Nifty Thrifty: Jell-o Molds ===> Easy Wall Decor

I struck thrift store gold last week. I found some choice additions to my wardrobe, some cool stickers for my son, but I truly enjoyed rifling through the kitchen section because by the looks of it, someone had cleared out her bakeware collection and donated piles of cake pans. There were sheet pans in the shape of Big Bird, cats, Christmas trees, Barney the dinosaur and tucked away were three old Jell-o molds — the kind your grandma would have used to make savory aspics or Jell-o salad.

I needed these molds, but I’m not one for Jell-o. It occurred to me they would look pretty great hanging on the wall like glimmering metal flowers.

Vintage Jell-o Molds ===> Simple wall decor

I just used nails for the two hollow molds and a springy plate display hook for the smaller one. I think they look pretty neat! I wasn’t sure if I should leave them in their original state or paint them fun colors. What do you think? Leave a comment below!

Vintage Jell-o Molds ===> Simple wall decor

Quick craft: Soda Bottle Kitty Planters

This was a perfect crafting weekend. Between family dinners and birthday parties my friend Kelly and I had just enough time for small crafts.

I’ve been hauling around some two liter soda bottles in my car for several weeks with the intention of creating kitty planters I saw on Recycleart.org (original post from Brudiy.com).

It took no time at all to cut the bottle to shape, paint it and plant some lovely soleirolia in it. Here’s our version.

Quick craft: Recycled soda bottle kitty planters. Irresistibly cute from Alaska Knit Nat

Materials:

one, two-liter soda bottle

scissors

permanent marker

acrylic paints in black, white and pink

paintbrushes

glossy finish spray (optional)

small plant

extra soil for planting

Quick craft: Recycled soda bottle kitty planters. Irresistibly cute from Alaska Knit Nat

Directions:

With sharp-tipped scissors, cut the top off of your bottle. Also poke some drainage holes in the bottom if you think of it. Clean and rinse the bottle. Note how deep your potted plant is to determine how tall your bottle planter should be. Also note where the “paws” are to determine where to place the ears. I didn’t think to do this so the black cat looks like his head is turned to the side, which is OK with me. With a Sharpie, draw the cat’s ears on the bottle. Cut around the ears and the back of the bottle. It should now look like a clear cat shape.

Paint two coats of desired base color on the outside of the bottle. Place your fist inside the bottle to make it easier to paint all around. Hold it up to the light to see if you missed any spots. I used a sponge brush and dabbed all over to give it more texture and eliminate any brush strokes. Let fully dry.

Paint on the ears and nose in pink. Paint the eyes and whiskers. Let fully dry.

Spray on an even coat of glossy finishing spray. I only did this because I was afraid watering the plant might cause the paint to chip over time. It’s probably not necessary. Let gloss dry.

Quick craft: Recycled soda bottle kitty planters. Irresistibly cute from Alaska Knit Nat

Place a plant of your choice in your kitty and enjoy how irresistibly cute it is.

Quick craft: Recycled soda bottle kitty planters. Irresistibly cute from Alaska Knit Nat

Homemade ABC Book — Free Tutorial

My son is starting to pick up on the alphabet and lately he’s been into ABC books. I was browsing Pinterest and came across a great idea. A homemade ABC book using personal photos.

With some basic Photoshop skills and a trip to Walgreens and Michael’s Crafts I was able to make a fantastic photo book for only $5.50.

Homemade ABC Book -- Free Tutorial

You can use phone, Instagram or digital camera photos as long as you size them well. I’m a self-taught Photoshop gal. Here’s a step-by-step guide to how I made my book, but I’m sure my techniques are not exactly textbook methods — but they work!

Homemade ABC Book -- Free Tutorial

Step 1: Open your image in Photoshop. I encourage you to make all your photos the same resolution — one of a printable quality — so that they all look more uniform. My personal photos come in several different sizes and resolutions depending on what camera I used. I made them all the same so the font size would be the same on each photo. A 140 pt. font on a 180 dpi resolution will look a different size from 140 pt. on 300 dpi.

Homemade ABC Book -- Free Tutorial

Step 2: Go to Image<Image size and take a look at the size of your photo. If the dpi is 180 or more, you’re good to go. Most of my Instagram and iPhone photos are really low resolution, such as 72 dpi, but really large in dimension, such as 45 inches wide. If you were to just resize the photo and leave a low resolution they wouldn’t print well.

Homemade ABC Book -- Free Tutorial

Step 3: Click the crop tool and enter the dimension and resolution you want for the photo. I selected 12×8 with 300 dpi to maintain as much data in the photo as possible (it will print better this way). Crop the photo the way you would like it.

Homemade ABC Book -- Free Tutorial

Step 4: Make sure your background layer is unlocked (double click the little lock next to the layer name). Create a new layer. Choose the font you’d like. I selected Helvetica bold. Type in your letter. I used 140 pt. font. Add a new layer. Type the word you want. I used 90 pt. font. With the selection tool, position the letter and word where you’d like them. If your photo is dark consider making the letters white. Leave enough space between the edge of the photo and the words in case the printers cut the photo funny.

Homemade ABC Book -- Free Tutorial

Step 5: Save your photo as a .jpg and make 25 more!

Step 6: Upload your photos to a photo printing site such as Walgreens and print 26, 4×6 prints. Search for online coupons. I saved $1.50!

Step 7: Purchase a “brag book” at a craft store. It’s just a floppy plastic photo album that holds up to 36, 4×6 photos. I had a coupon for Michael’s so I saved $1!

I don’t think I need to explain the rest. But you’ll end up with a personal ABC book that hopefully your child will love. Our child already recognized several familiar people and objects in his book.

Homemade ABC Book -- Free Tutorial


How to Make Marinara in Bulk

I never thought I’d be a label reader. But then I had a child and started feeding him. I quickly realized there’s a lot of extra stuff in store-bought food. I could be making a lot of that food myself and it would probably be cheaper.

Then again I am pretty lazy. I’ll make homemade marinara every once in a while, but when I’m in a pinch, I just go buy the jarred stuff. If I want the good jarred stuff it usually costs about $4.

Here is where I take a lesson from good ol’ dad. My entire life he has cooked sauce in bulk and freezes jars of it for later. I’ve been saving quite a few pickle and sauce jars so why not give it a try?

How to Make Marinara Sauce in Bulk

It was easy and in the end cost less than half as much as store bought; and it’s probably twice as good.

Here’s what you’ll need:

2 GIANT 106-oz. cans of crushed tomatoes – $2.99 apiece at Costco

25 cloves of garlic, smashed

about 1/3 cup good olive oil

1/4 cup dried basil

2 Tbs. dried oregano

2 Tbs. sugar

8 dried red chilis

salt and pepper to taste

6-7 large 40-oz. jars with lids


Directions:

Heat the olive oil in an extra large stock pot over medium-high. When oil is heated, toss in the garlic and turn heat to medium. Stir frequently and sauté till garlic is golden, about five minutes. Add all the other ingredients and turn heat to high. Cover and bring to a simmer. Turn heat to med-low and simmer for about two hours, stirring every once in a while so sauce doesn’t burn.

Let cool and spoon into jars. Do not fill right to the top because the sauce will expand in the freezer and then you’d have a sauce bomb to clean up later. If sauce is still hot enough, the jars might self seal as once they cool on the counter. Freeze up to six months.

To thaw: Defrost in microwave according to your microwave settings or leave out on the counter during the day. Once it’s slightly thawed and can be loosened into a sauce pot, thaw the rest of the way over medium-low flame.

How to Make Marinara Sauce in Bulk

Quick Vegetable Soup

I’m home sick today. During my two-hour pity party in bed this morning, I lamented over the fact that no one can bring me soup and my cabinets were bereft of Campbell’s Chicken Noodle.

It is a scientific fact that chicken soup is good for colds; but I’m not well enough to drive to the store and buy some, so I rolled my sick self out of bed, I took what I had on hand and made some delicious vegetable bean soup with a chicken broth base. Way better than store bought. And guess what? I’m feeling slightly better. Up from 61% to 68%. Not bad!

Quick Homemade Vegetable Soup | Alaska Knit Nat

Cast of Characters:

Quick Homemade Vegetable Soup | Alaska Knit Nat

1 Tbs. olive oil

3 Tbs. finely chopped onion

1 carrot, chopped

1/2 celery stalk, chopped

3 crimini mushrooms (or one giant baby portobello mushroom) sliced

1 sprig fresh thyme

4 cups chicken stock

1 can white beans, drained

salt and pepper to taste

Serves 2

Directions:

Heat olive oil in a small saucepan over medium-high heat. Add the onion, carrot, celery, mushroom, salt and pepper and sauté until most of the liquid evaporates, about five minutes. Add the thyme and stock and bring to a boil. Turn heat to low and simmer for 10 minutes, until carrots are tender. Add the beans and bring back to a simmer. Simmer another five minutes or so until beans are heated through.

The fresh veggies add more depth to the chicken stock so it doesn’t taste bland. The mushrooms create a wonderful richness and depth to the broth.

Enjoy!

Quick Homemade Vegetable Soup | Alaska Knit Nat

Simple Striped Baby Blanket — Free Pattern

Knitting a blanket isn’t difficult. It can be a bit monotonous and seemingly endless. I much prefer knitting hats where there’s a definite start and end and it can be completed in an afternoon.

That being said, there is something special about giving someone a hand-knitted blanket. It shows you care enough for the person to spend a lot of time and sometimes money on a thing she will hopefully cherish for years and years.

Simple striped baby blanket --Free Pattern

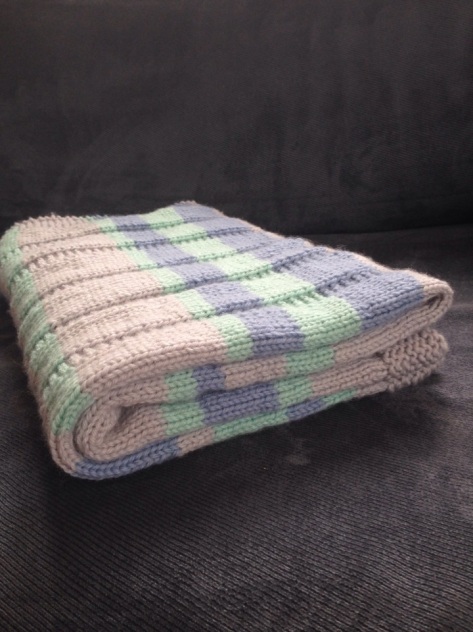
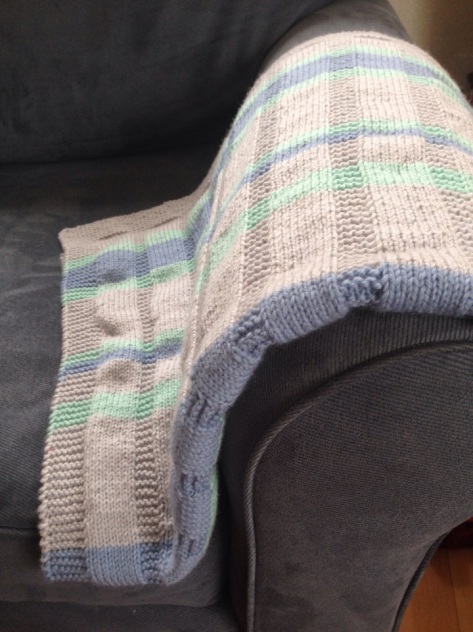
Here’s a pattern for a lovely baby blanket that measures approximately 29″ x 32″. I recommend it to knitters of all levels. I used a worsted superwash wool so no matter what temperature the gift recipient washes it in, it will not shrink.

Simple striped baby blanket --Free Pattern

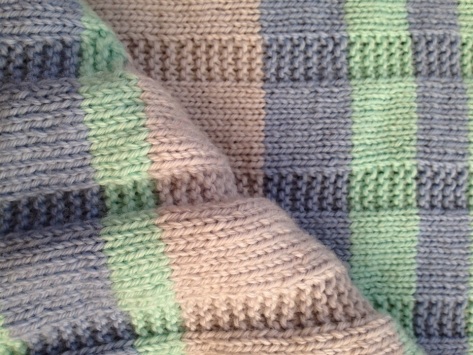
I based my pattern on two different designs from Altadena’s Baby Designs and the TLC Channel’s website (who knew they had knitting patterns?) You can make this pattern on whatever needle size you like and make it as long as you like. I randomly selected the color pattern and width of the stripes, but what follows is the exact rows and combinations for this particular blanket. Make the stripes the way you want. This is more of a guide.

Simple striped baby blanket --Free Pattern

If you’re wanting to knit this pattern with a different needle size and different weight yarn, I am unable to adjust the pattern for you. This pattern is written for a specific needle size and yarn weight.

Materials:

Long size 8 circular needle (mine is about 38 inches)

2-3 balls Ella Rae worsted superwash wool in light grey (I used exactly two balls, so you may want three just in case)

1 ball Ella Rae worsted superwash in limestone green

1 ball Ella Rae worsted superwash in moody blue

darning needle

Directions:

Except when you’re bringing in new color, slip the first stitch of every row.

Cast on 144 stitches. Knit in garter stitch for 16 rows.

Row 1: Knit across

Row 2: K8, P8, *K4, P8*, repeat * until 8 stitches remain. Knit 8.

Repeat rows 1 and 2 while following this stripe pattern:

14 rows grey, 6 rows limestone, 12 rows blue, 6 rows limestone, 26 rows grey, 4 rows limestone, 4 rows blue, 10 rows grey, 8 rows limestone, 30 rows grey, 12 rows blue, 10 rows limestone, 8 rows blue, 4 rows limestone, 20 rows grey, 6 rows limestone, 6 rows grey, 14 rows blue, 6 rows grey, 12 rows limestone, 6 rows blue, 6 rows limestone, 14 rows grey.

Knit 15 rows in garter stitch and bind off using the stretchy method.

Simple striped baby blanket --Free Pattern

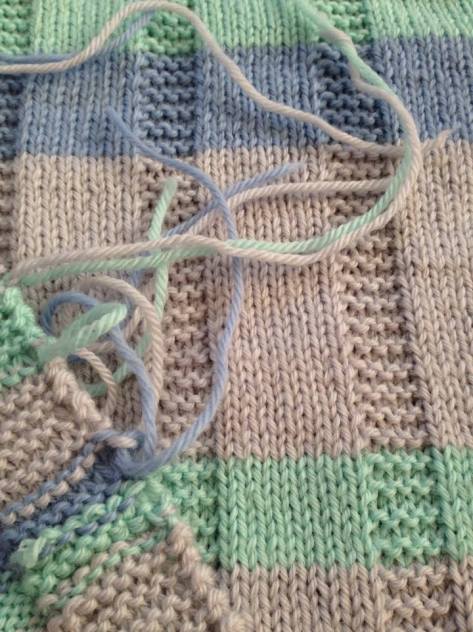
Now the fun part! Weave in all ends. This is the downside to stripes. A whole lot of ends. I don’t have any scientific method of weaving in ends, so do what works for you.

Simple striped baby blanket --Free Pattern

You could also block your blanket, but I figured this one won’t be shrinking much so I didn’t bother. If you have a good reason why I should block it, please leave me a comment. 🙂

Simple striped baby blanket --Free Pattern

Hope you find this pattern helpful and good luck knitting a blanket. You’ll feel a great sense of accomplishment and relief when you’ve finished.

-Natasha

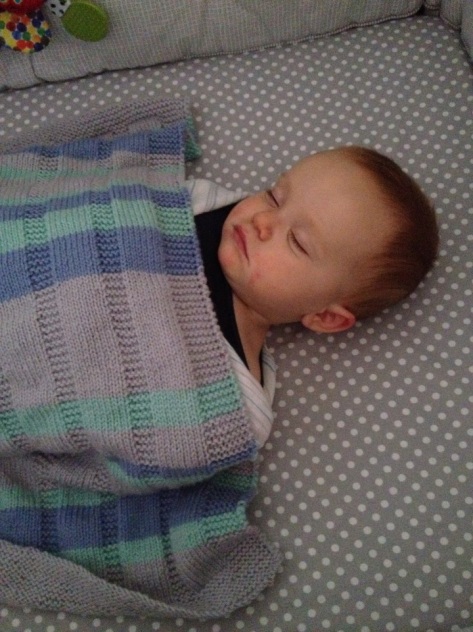
Here’s baby George all bundled up and cozy with his new blanket:

Simple striped baby blanket --Free Pattern

Quick Craft — Lace Curtains to Pillowcases

Our living room throw pillows needed an upgrade. At $20-30 a pop, I wasn’t about to buy two new ones, so I dug through my fabric stash and found an old lace curtain panel. Two cuts and four seams later I had a couple of gorgeous throw pillows. This was a great way to liven up my living room without breaking the bank. I just used the pillows we already had!

Quick Craft -- Lace Curtains to Pillowcase

Here’s how.

Materials:

1 lace curtain panel

2 square pillow forms

straight pins

sewing machine

Quick Craft -- Lace Curtains to Pillowcase

Directions:

Lay out your curtain panel on the floor and place your pillow on top of it to measure how much fabric to cut. If you have a removable slip cover on the pillow already, then remove it and use the cover as a guide. Cut the curtain widthwise, leaving a half an inch of seam allowance on the top and bottom edge.

Quick Craft -- Lace Curtains to Pillowcase

I made an envelope slip cover, but instead of the envelope being on the back side, like most throw pillows, it is on the front because the lace trim is already a finished edge and it looks so pretty overlapped.

Quick Craft -- Lace Curtains to Pillowcase

Lay your pillow on the long width of fabric and figure out how you want it to overlap. Fold one edge over the pillow and the other edge over. Mark where you folded and remove the pillow. Refold the lace and pin the raw edges in place.

Sew across both edges. Turn right side out and stuff your pillow inside. That’s it! Repeat with second pillow.

Quick Craft -- Lace Curtains to Pillowcase Quick Craft -- Lace Curtains to Pillowcase Quick Craft -- Lace Curtains to Pillowcase

Questions? Leave me a comment!

Quick Craft — DIY Teabags

My cupboards are packed with high quality, loose-leaf teas that I rarely drink because I’m too lazy to fill up a tea strainer. I also don’t have a tea strainer at work so I’m unable to use up the tea when I’m not at home.

Why not make my own tea bags so I’ll actually start enjoying my nice tea? Ok, it’s simple!

DIY Tea Bags | Alaska Knit Nat

Just grab a few coffee filters and plug in your sewing machine. I already had half the work done because my machine was plugged in and ready to go.

Fold your filter in half and sew seams across it so it’s divided into thirds. Make sure to make double seams so you can cut between them. Place a heaping teaspoon in one pouch and sew it shut. Do the same with the other two pouches. Then cut up your tea bags. I love 2-minute crafts!

DIY Tea Bags | Alaska Knit Nat DIY Tea Bags | Alaska Knit Nat DIY Tea Bags | Alaska Knit Nat


DIY Tea Bags | Alaska Knit Nat

Creamy Crock Pot Chicken

My son and I both had the day off (thanks Abe and George!) and by 1:30 p.m. I realized I hadn’t taken any meat out of the freezer for dinner.

I’ve seen slow cooker recipes where you put frozen chicken right in with a bunch of other “cream of” somethings and cook the hell out of it and get some sort of slop. Yes, I wanted to make that, mainly because I didn’t plan anything for dinner and I was way too lazy and tired to go to the store.

What I ended up with was just what most people describe on their “crock pot chicken” Pinterest posts — easy, creamy and delicious!

The secret to my dinner’s success was the homemade condensed cream of mushroom soup that I concocted because I didn’t have a can of it in my pantry. I followed this basic recipe from Pinch Of Yum, but sautéed 2 cups of sliced baby portobello mushrooms and 1/2 an onion, finely chopped, with half a stick of butter before adding the stock and milk. I also added smoked paprika, thyme and oregano to the recipe. It yielded quite a bit of thick soup and was perfect for my crock pot concoction, which was loosely based on this recipe from Coersfamily.com.

Creamy Crock Pot Chicken | Alaska Knit Nat

Creamy Crock Pot Chicken

Serves about 4

What you’ll need:

2-4 pieces frozen chicken (I used skinless thighs)

1.5 cups condensed cream of mushroom soup (or one can of the store bought stuff)

1 brick of cream cheese (I used neufchâtel)

1 bay leaf

1-2 potatoes, quartered

2 carrots, cut into large chunks

1 celery rib, chopped

1 cup frozen peas

1 cup dry egg noodles

1/2 cup chicken stock

Directions:

Place your frozen chicken pieces in the slow cooker and surround it with the carrots, potatoes, celery and bay leaf. Pour over the cream of mushroom soup. Break up the cream cheese and add it to the slow cooker. Cover and cook on low for 4-6 hours. After a few hours, stir it and break up the chicken if you can.

Forty-five minutes before serving stir in the peas and egg noodles, making sure to coat them thoroughly. If it’s already looking a bit thick, add 1/2 cup chicken stock. Cover and cook on high.

Remove bay leaf and roughly cut up carrots and potatoes before serving.

Savor the fact that your entire family should adore this meal that took little effort and zero defrosting.

Free knitting patterns, DIY crafts, easy recipes and more!