I’ve said it before – I’m a short-attention-span crafter. If I can’t finish something in a few hours, I probably never will unless I’m really determined.
When my friend Kasandra had her first son, she asked me to knit him a blanket. It took me months to make and although it’s been much loved I vowed I would never knit another blanket. It’s just too monotonous.
So when Kasandra told me no one had yet made her second boy, Oliver, a special blanket, I decided to keep my vow and crochet him a blanket.
This pattern was simple and quick. I made the whole thing in a couple of weeks. The vertical stripes are unusual and the gaps between the crocheted spaces aren’t too big so it’s a nice piece of fabric.
It’s week two of our Halloween Blog Party and the theme is “Woodland Creatures.” So far we’ve had fairy flower crown and forest garland tutorials, a woodland fairytale mix by DJ Spencer Lee and today I’ve got a super quick baby costume that requires minimal crafty skills and a shoestring budget.
This was my son’s first Halloween costume and I love it so.
“Step off. Don’t make me sick my Jeremy Fisher on you.”A while back AK Shopgirl was inspired by our little gnome. She decided to dress up her twin baby boys as more traditional David the Gnome.
Here’s all you need to achieve a gnome-tastic baby outfit:
*If you aren’t a knitter, I suggest making a gnome hat the way AK Shopgirl did using a sheet of red craft foam fashioned into a cone, adhered with a hot glue gun. Ohhappyday.com has a free template here, if you want to get technical.
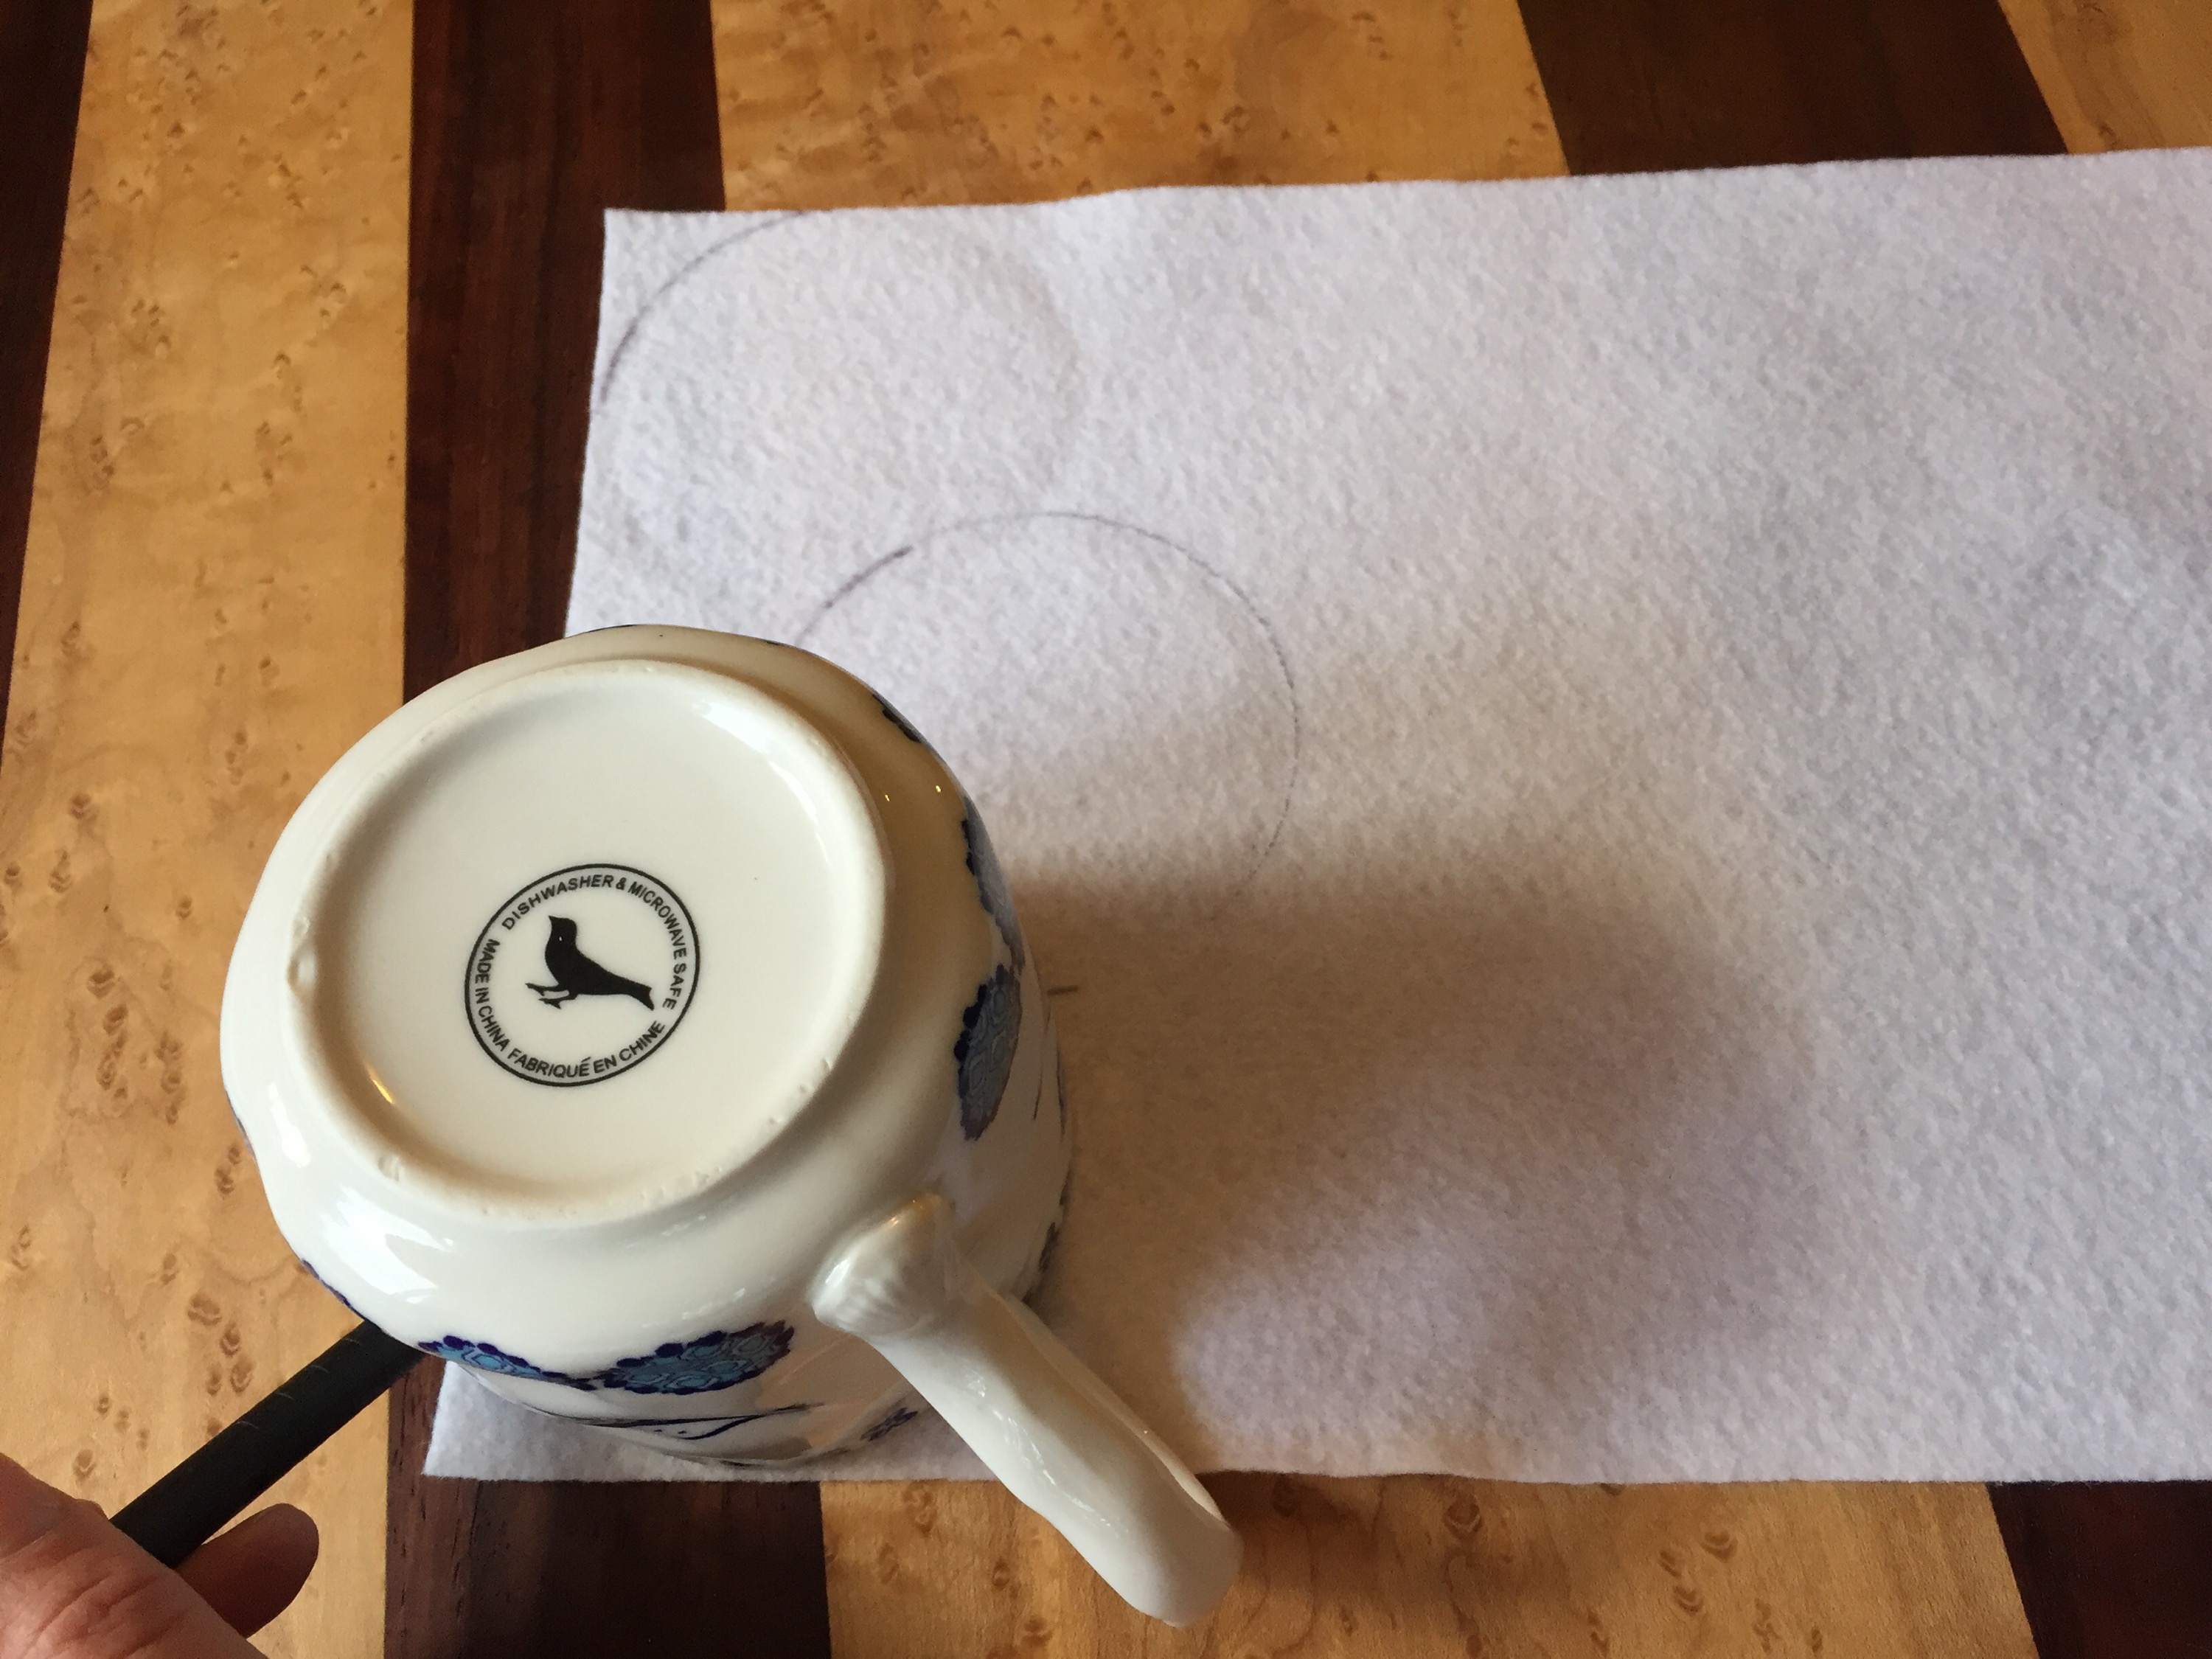
How to make the beard
Place the mug upside down in the middle of the white felt, 1.5 inches down from the top edge. Trace a circle for the neck hole.
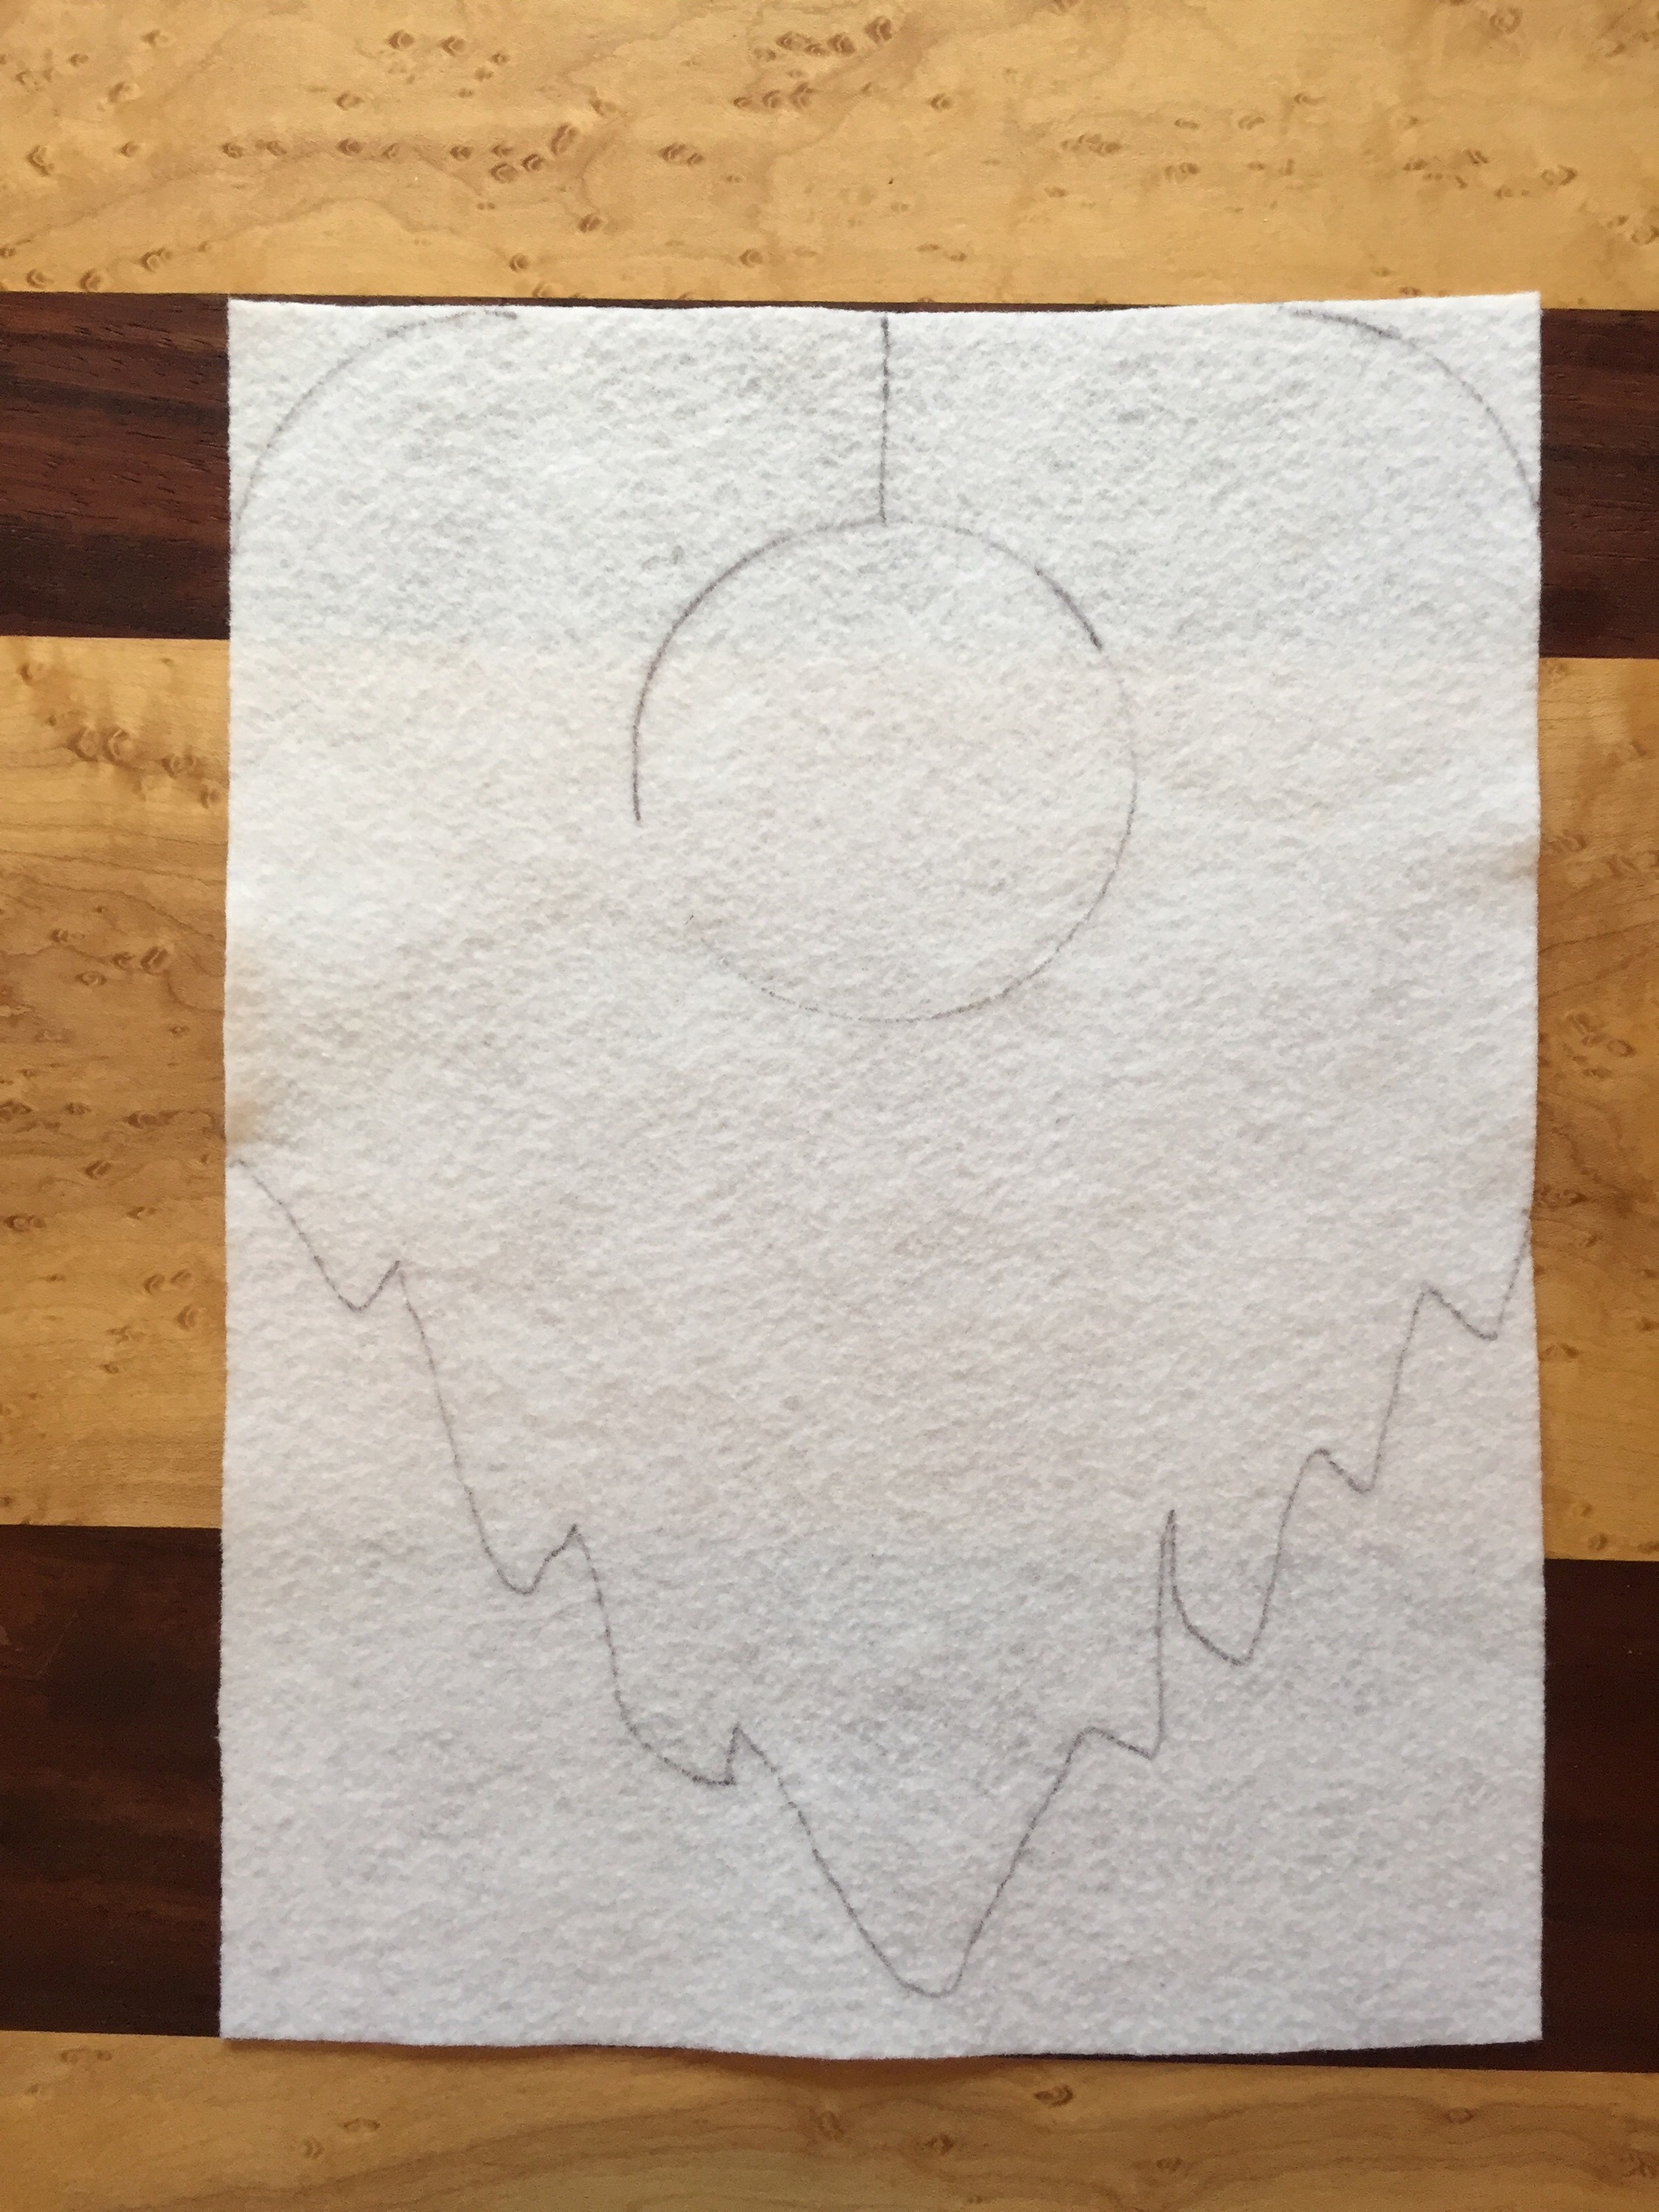
Use the mug to shape the corners of the beard bib.
Draw a line at the top of the neck hole to the top edge of the felt. This will be the opening of the beard bib. I just love saying “beard bib.”
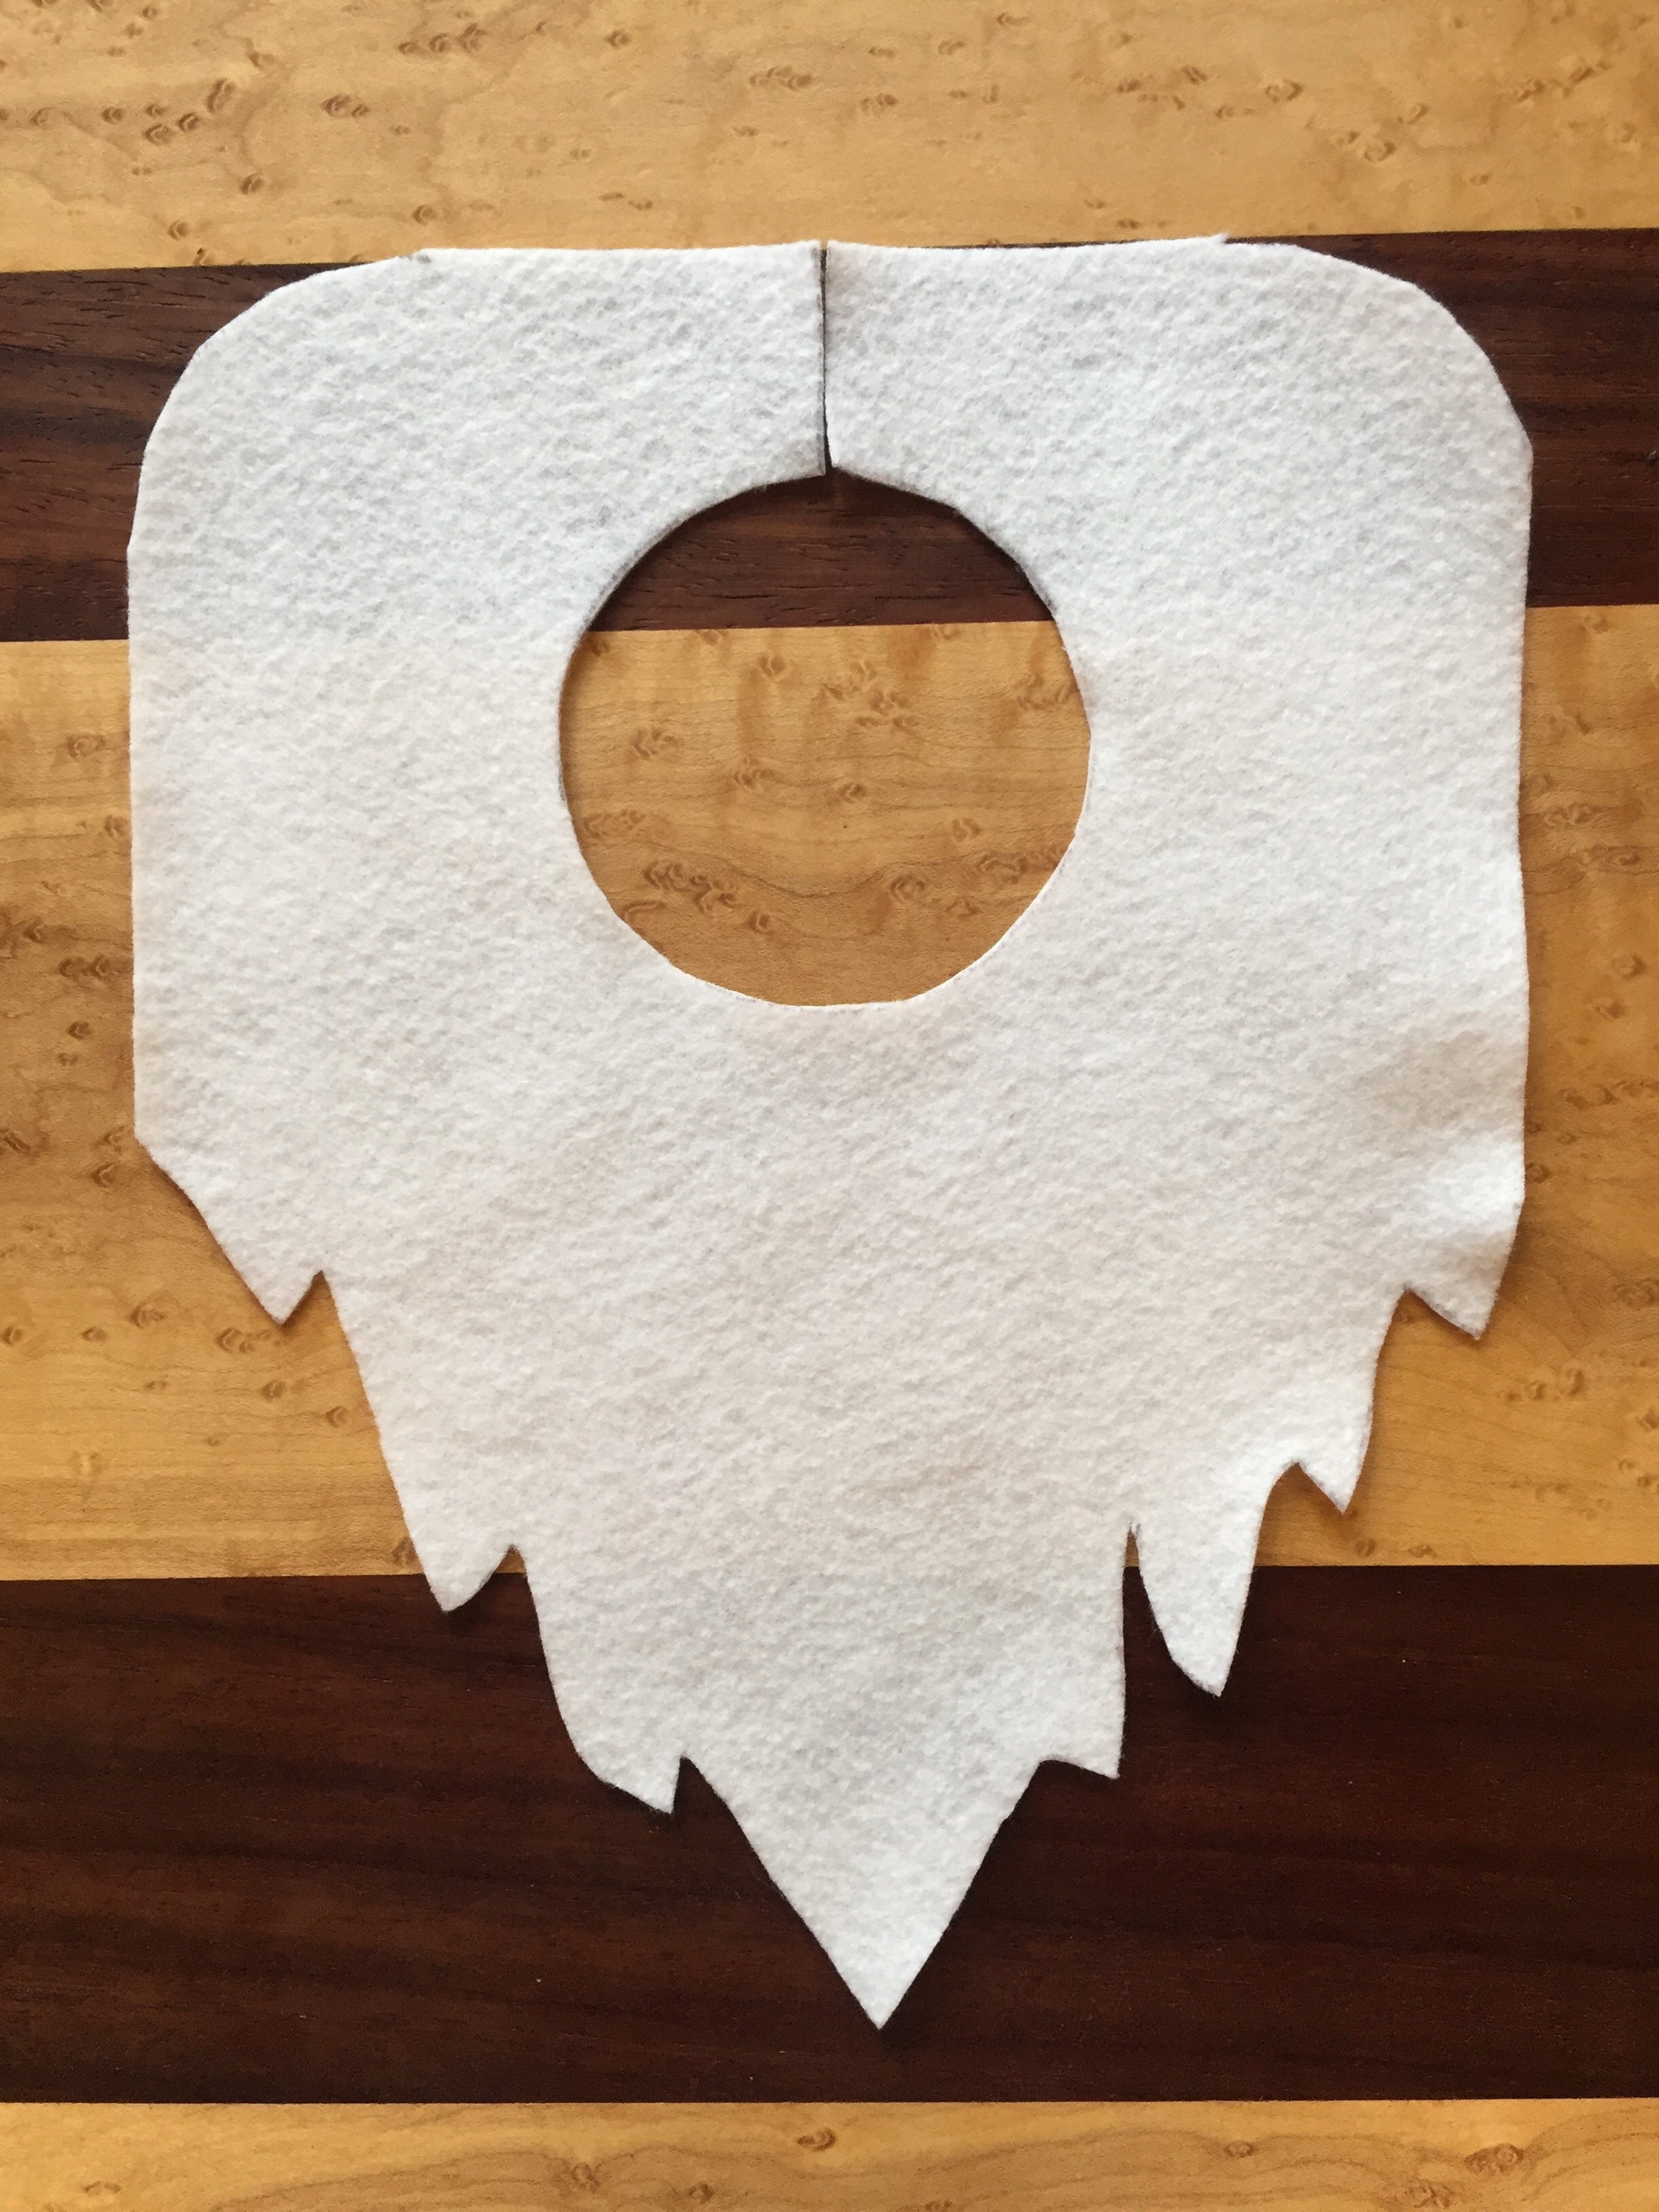
Freehand the shape of the beard. Cut out your beard bib.
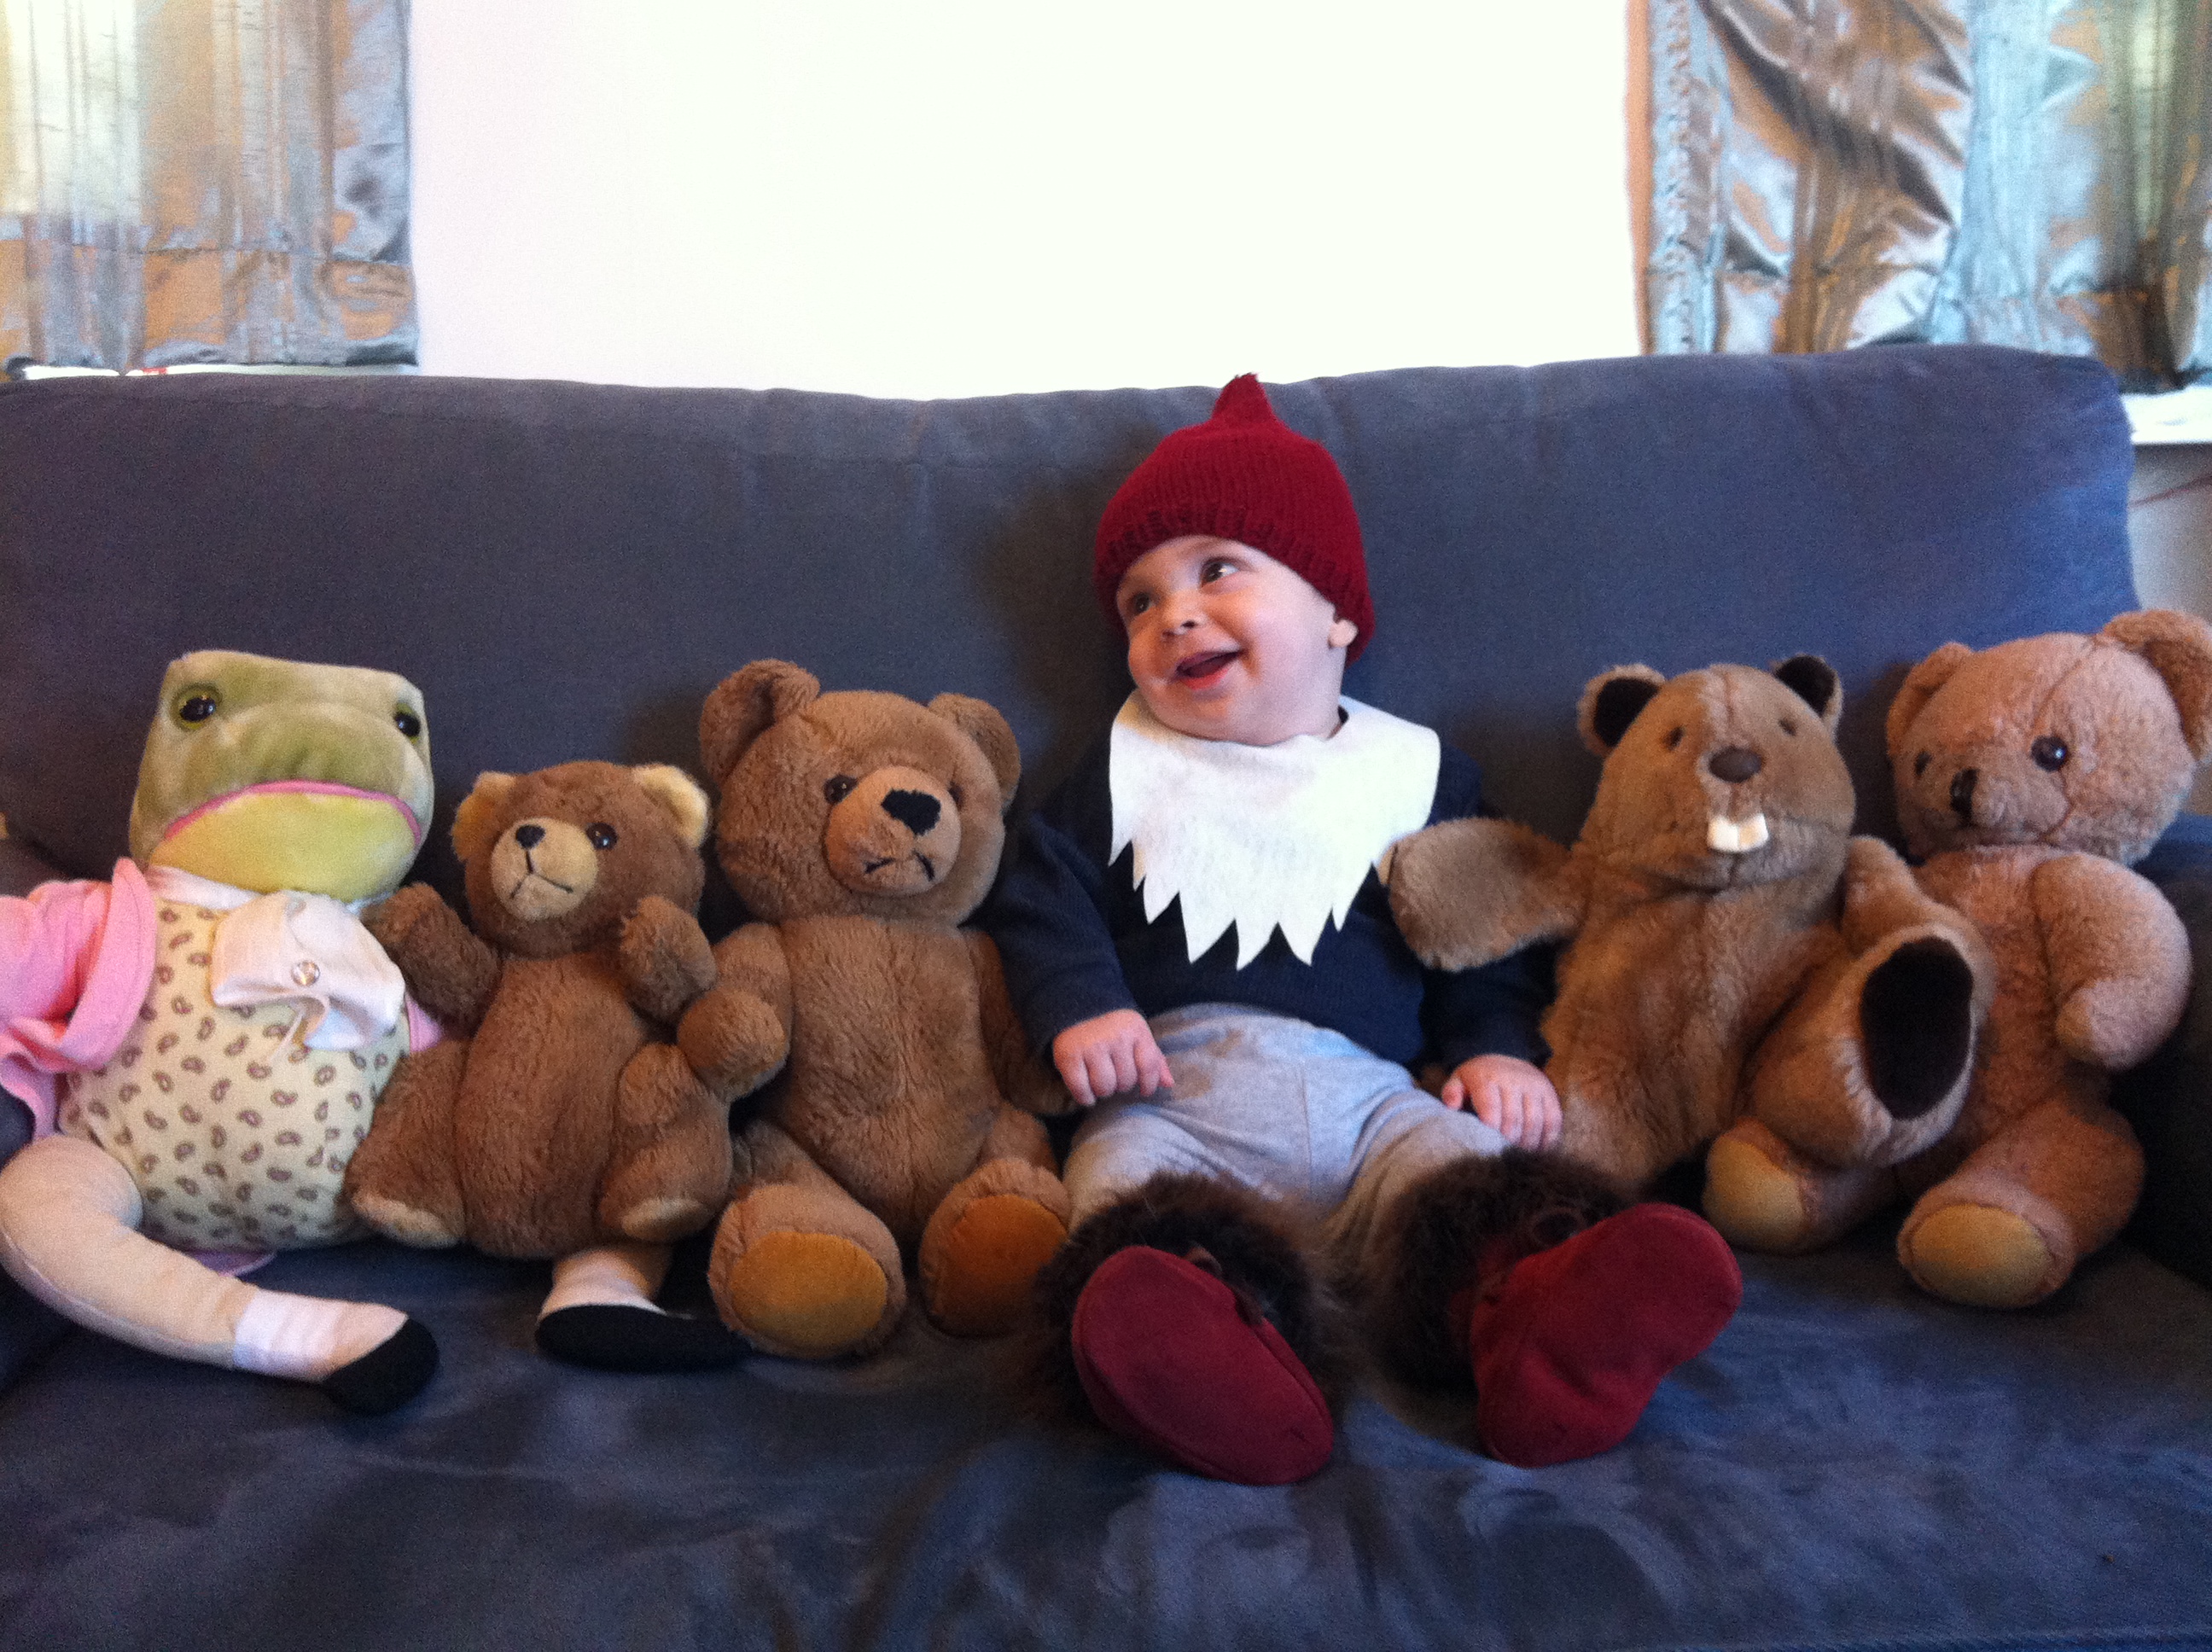
Dress up baby of choice in the onesie, pants and booties. Use a safety pin to connect the back edges of the beard bib. Place pointy hat atop baby.
Today I have the honor of hosting a pattern by the ever-so-lovely Annie Ciszak Pazar, owner of Anchorage’s Bella Boutique and author of the crafty blog Annie’s Arts and Follies.
I’ve always admired this lady for her unique jewelry and undying motivation for knitting big ol’ scarves and cowls.
Recently a mutual friend of ours had a baby — today actually! I felt like there was no better day to showcase the stunning blanket Annie made for her new little girl. So I’ll hand it over to Annie:
I have a blanket on my bed which I affectionately call Lovey. Lovey was a gift from my grandmother at my mother’s baby shower for me, 30-some years ago. Lovey is still around. And on my bed. Needless to say I have a very tolerant husband and perhaps some slight attachment issues. So when it comes time to make special soft and cuddly things for my friend’s little ones, I choose the Lovey pattern – also known as Fan and Feather for those in the biz.
The first blanket I made was for my friend Jeni when she was expecting her second little one, Robert, as she and I have known each other for 97% of our lives – so it was only fitting she have a Lovey too.
(Left: my Lovey in 2011. Right: Robert’s Lovey)
Using a US6 (4mm) needle cast on a multiple of 18 stitches + whatever you want for a border, but at least 1 stitch on either end (I add 10 – 5 on each side).
Knit 10 rows
Assuming 5 stitches at each end, work the following 4 rows until you reach desired length:
Row 1: knit
Row 2: purl
Row 3: k5, * k2 tog 3 times, (k1, yo) 6 times, k2 tog 3 times * repeat from * to * until last stitch, k5
Row 4: knit
When you have reached desired length, knit 10 rows to finish border. Weave in ends.
This latest blanket is for a local fab lady who keeps me in popsicles all summer on her funky custom PopCycle bike complete with cooler sidecar. I worked on this one from Alaska to New York and back again, and find it only appropriate that it already be travelling as the parents to be met while exploring the world in another country.
This is a super easy and rather fast pattern which looks more complicated than it is. In a bout of bravery I entered one in the Alaska State Fair 2 years ago and brought home a green ribbon and honorable mention in the baby blanket category. But what it really comes down to, is my hope that the kiddos for whom I make these little Lovey’s, love them as much as I love mine (or maybe a little less – there’s that attachment thing…).
Want to see more of Annie’s work? Check out her Etsy store!
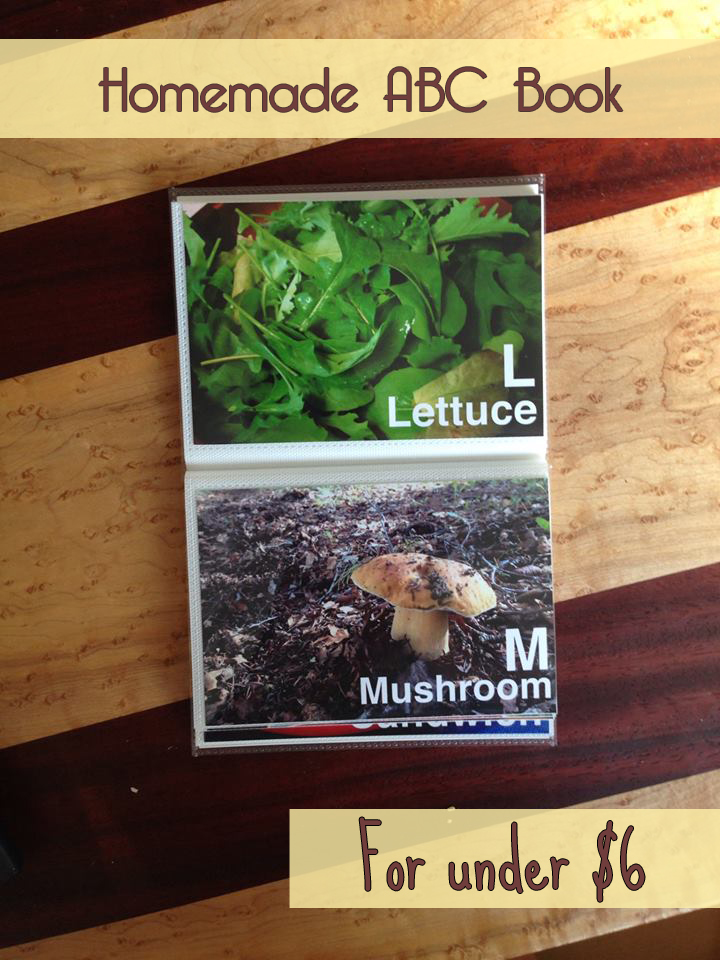
My son is starting to pick up on the alphabet and lately he’s been into ABC books. I was browsing Pinterest and came across a great idea. A homemade ABC book using personal photos.
With some basic Photoshop skills and a trip to Walgreens and Michael’s Crafts I was able to make a fantastic photo book for only $5.50.
You can use phone, Instagram or digital camera photos as long as you size them well. I’m a self-taught Photoshop gal. Here’s a step-by-step guide to how I made my book, but I’m sure my techniques are not exactly textbook methods — but they work!
Step 1: Open your image in Photoshop. I encourage you to make all your photos the same resolution — one of a printable quality — so that they all look more uniform. My personal photos come in several different sizes and resolutions depending on what camera I used. I made them all the same so the font size would be the same on each photo. A 140 pt. font on a 180 dpi resolution will look a different size from 140 pt. on 300 dpi.
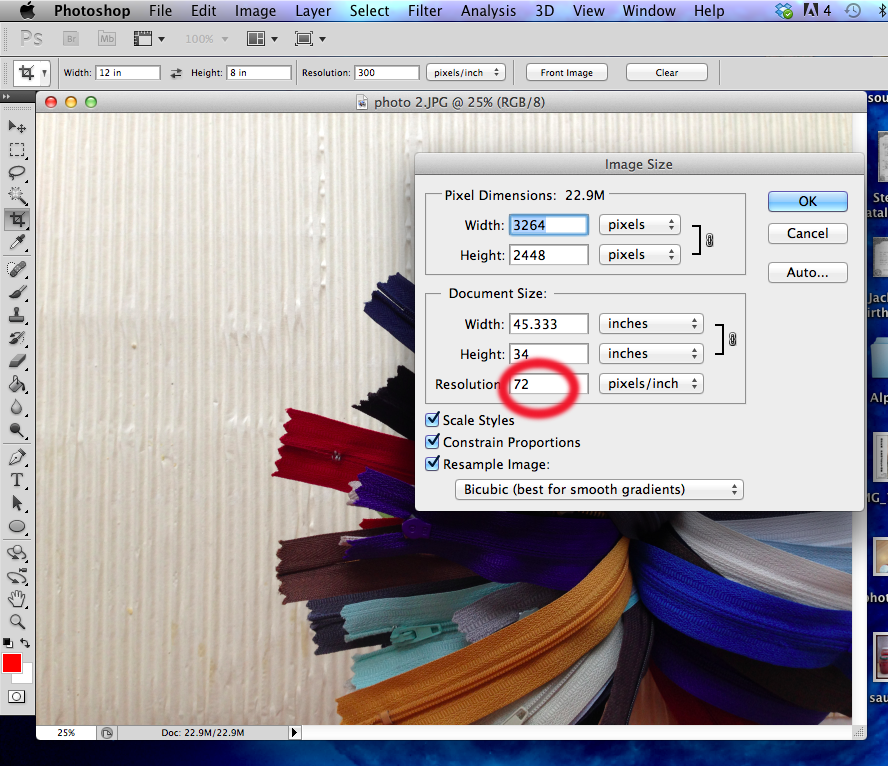
Step 2: Go to Image<Image size and take a look at the size of your photo. If the dpi is 180 or more, you’re good to go. Most of my Instagram and iPhone photos are really low resolution, such as 72 dpi, but really large in dimension, such as 45 inches wide. If you were to just resize the photo and leave a low resolution they wouldn’t print well.
Step 3: Click the crop tool and enter the dimension and resolution you want for the photo. I selected 12×8 with 300 dpi to maintain as much data in the photo as possible (it will print better this way). Crop the photo the way you would like it.
Step 4: Make sure your background layer is unlocked (double click the little lock next to the layer name). Create a new layer. Choose the font you’d like. I selected Helvetica bold. Type in your letter. I used 140 pt. font. Add a new layer. Type the word you want. I used 90 pt. font. With the selection tool, position the letter and word where you’d like them. If your photo is dark consider making the letters white. Leave enough space between the edge of the photo and the words in case the printers cut the photo funny.
Step 5: Save your photo as a .jpg and make 25 more!
Step 6: Upload your photos to a photo printing site such as Walgreens and print 26, 4×6 prints. Search for online coupons. I saved $1.50!
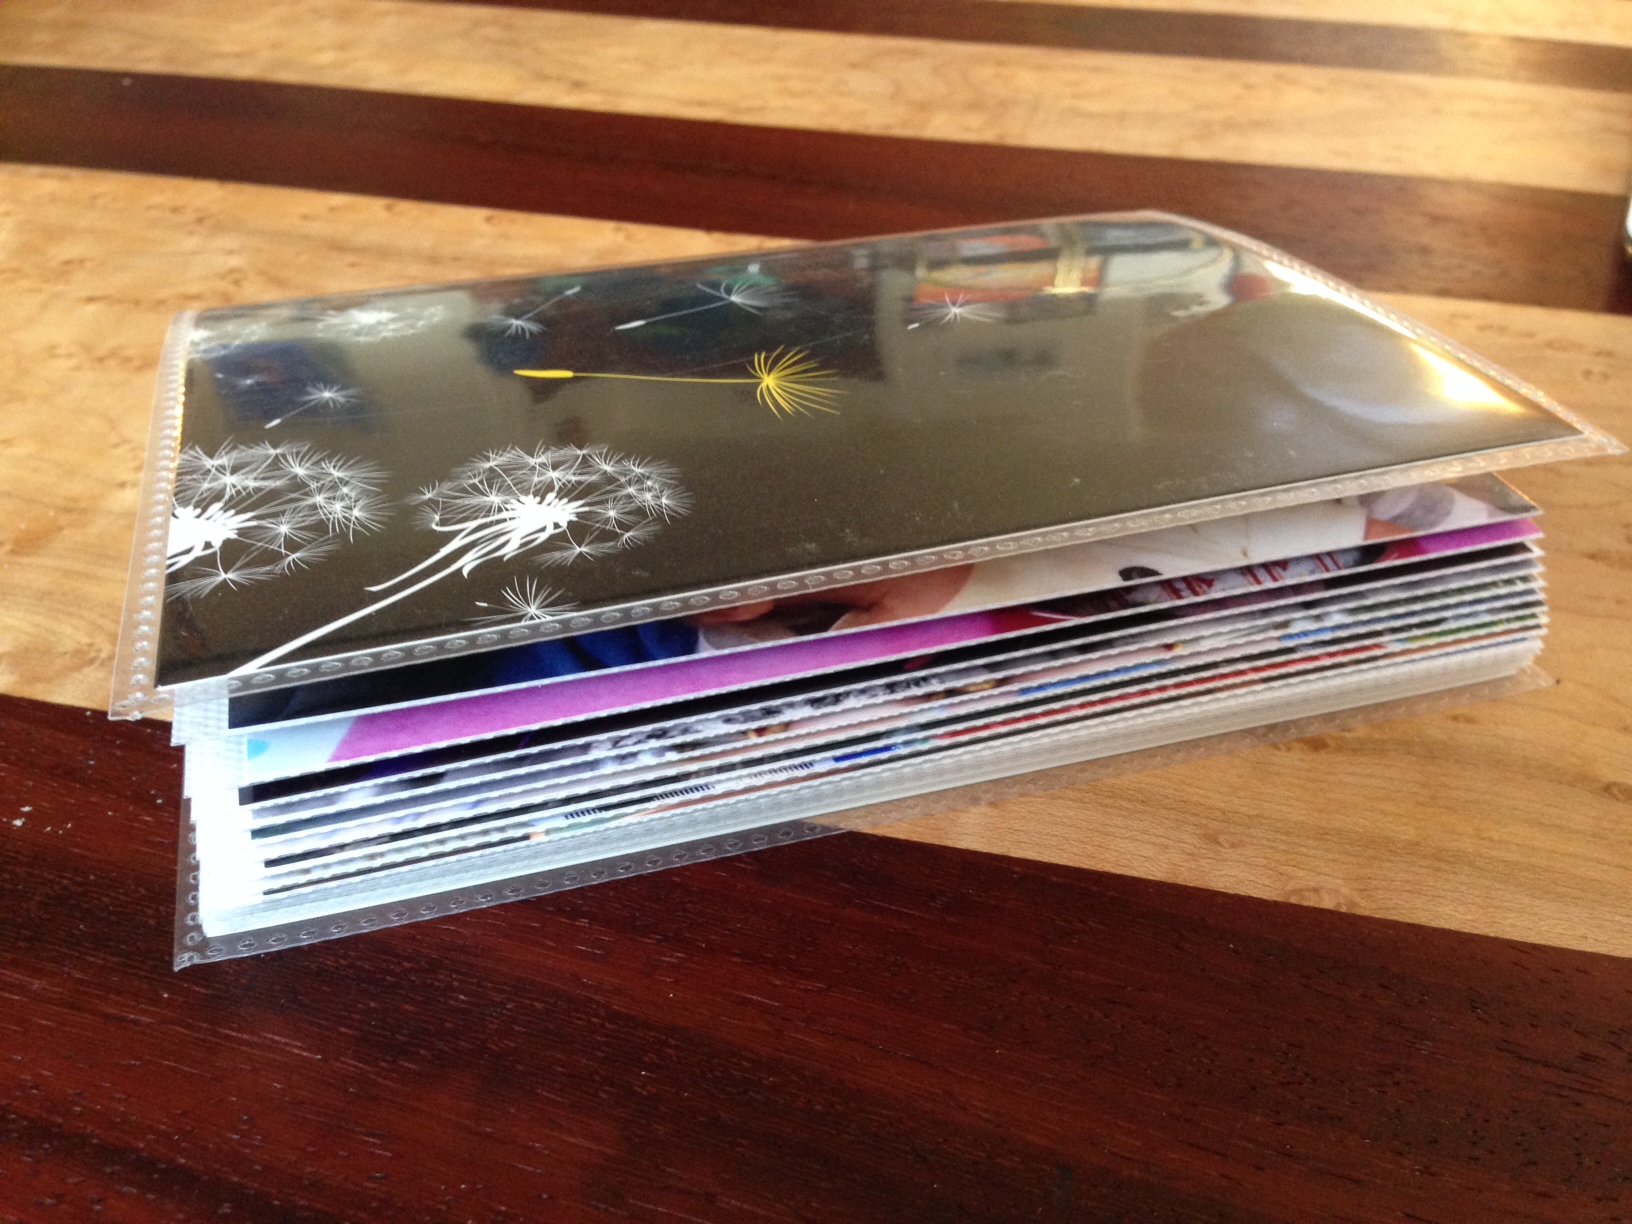
Step 7: Purchase a “brag book” at a craft store. It’s just a floppy plastic photo album that holds up to 36, 4×6 photos. I had a coupon for Michael’s so I saved $1!
I don’t think I need to explain the rest. But you’ll end up with a personal ABC book that hopefully your child will love. Our child already recognized several familiar people and objects in his book.
Knitting a blanket isn’t difficult. It can be a bit monotonous and seemingly endless. I much prefer knitting hats where there’s a definite start and end and it can be completed in an afternoon.
That being said, there is something special about giving someone a hand-knitted blanket. It shows you care enough for the person to spend a lot of time and sometimes money on a thing she will hopefully cherish for years and years.
Here’s a pattern for a lovely baby blanket that measures approximately 29″ x 32″. I recommend it to knitters of all levels. I used a worsted superwash wool so no matter what temperature the gift recipient washes it in, it will not shrink.
I based my pattern on two different designs from Altadena’s Baby Designs and the TLC Channel’s website (who knew they had knitting patterns?) You can make this pattern on whatever needle size you like and make it as long as you like. I randomly selected the color pattern and width of the stripes, but what follows is the exact rows and combinations for this particular blanket. Make the stripes the way you want. This is more of a guide.
If you’re wanting to knit this pattern with a different needle size and different weight yarn, I am unable to adjust the pattern for you. This pattern is written for a specific needle size and yarn weight.
Materials:
Long size 8 circular needle (mine is about 38 inches)
2-3 balls Ella Rae worsted superwash wool in light grey (I used exactly two balls, so you may want three just in case)
1 ball Ella Rae worsted superwash in limestone green
1 ball Ella Rae worsted superwash in moody blue
darning needle
Directions:
Except when you’re bringing in new color, slip the first stitch of every row.
Cast on 144 stitches. Knit in garter stitch for 16 rows.
Knit 15 rows in garter stitch and bind off using the stretchy method.
Now the fun part! Weave in all ends. This is the downside to stripes. A whole lot of ends. I don’t have any scientific method of weaving in ends, so do what works for you.
You could also block your blanket, but I figured this one won’t be shrinking much so I didn’t bother. If you have a good reason why I should block it, please leave me a comment. 🙂
Hope you find this pattern helpful and good luck knitting a blanket. You’ll feel a great sense of accomplishment and relief when you’ve finished.
-Natasha
Here’s baby George all bundled up and cozy with his new blanket:
My friend Laura asked me to make her new little one a tiny football hat. I was definitely up to the challenge. I was surprised how few knitted patterns there were floating around Pinterest. Most of the patterns are crochet, which can be made very quickly, but for a football hat I think knit has more room for detail.
This hat is so cute and teeny! It’s based on a tiny Steelers hat I made Laura’s second child a couple of years ago.
With your double pointed needles, cast on 56 stitches (14 stitches per needle) in brown. Join your work, being sure the stitches aren’t twisted and k1, p1 rib for three rounds.
Knit two rounds regularly and switch to the white. No need to cut the brown yarn. Knit two rounds in white and cut leaving an 8-inch tail. Bring up the brown and knit 15 rounds. Knit two rounds white without cutting the brown. Cut the white leaving an 8-inch tail and knit one round in brown. Decrease as follows:
*k2tog, k6* Repeat * till end of round
K one round
*K2tog, k5*, repeat * till end of round
K one round
*K2tog, k4*, repeat * till end of round
K one round
*K2tog, k 3*, repeat * till end of round
K one round
*K2tog, k 2*, repeat * till end of round
K one round
*K2tog, k1*, repeat * till end of round
*K2tog*, repeat * till end of round.
Cut yarn leaving an 8-inch tail. Using a darning needle, weave in all ends.
For the football stitches, thread a darning needle with a 24-inch length of white yarn. On the front of the hat, whipstitch the vertical line using short diagonal stitches stacked on top of one another. Then run three wide stitches perpendicular to the vertical line. Tie off the yarn and weave in the end.
To make this hat for a newborn-3 month size, cast on 64 stitches and follow the same pattern.
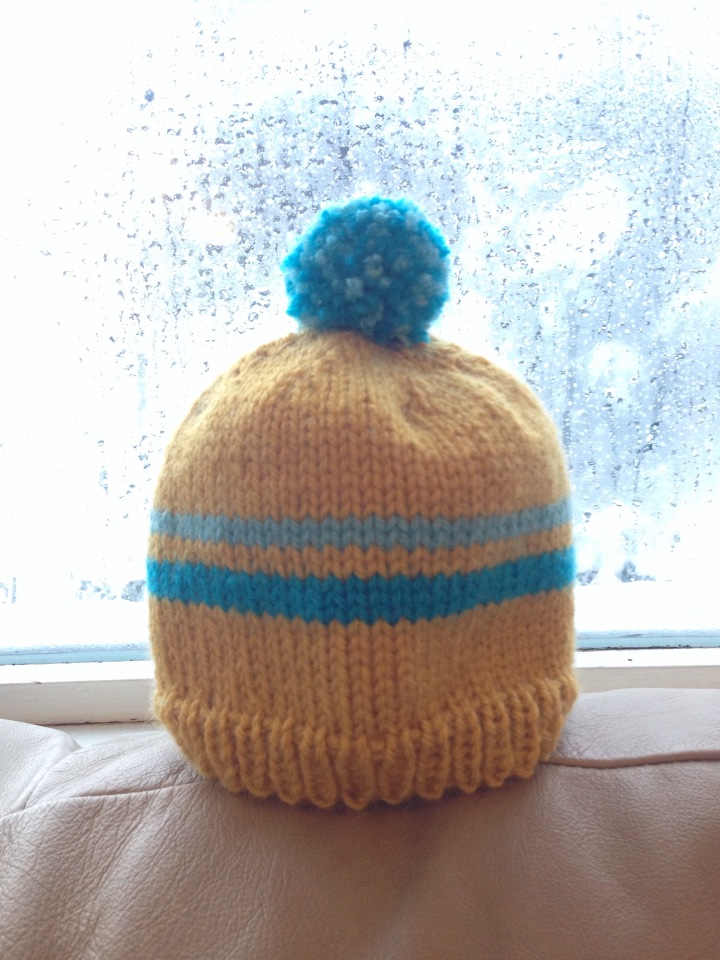
I’m getting down to the knitty gritty here for Christmas presents. I just had one more hat on my list and that was for my best friend’s new baby.
I knit this up in just a couple of hours — and you can too with this simple pattern.
Retro Baby Ski Hat — for a 3-6 mo. baby
If you’re wanting to knit this pattern with a different needle size and different weight yarn, I am unable to adjust the pattern for you. This pattern is written for a specific needle size and yarn weight.
Materials:
Vanna’s Choice worsted weight yarn — mustard, teal and light blue
Size 9 circular needles
size 9 double pointed needles
darning needle
large fork or pom pom maker
Abbreviations:
k1, p1 = knit 1, purl 1 ribbing
k2tog = knit two stitches together
Directions:
With your circular, cast on 64 stitches with mustard color and knit last stitch to first stitch without twisting the stitches. K1, P1 for six rounds. Knit 8 rounds in stockinette stitch.
Switch to teal and knit three rounds. Do not cut mustard yarn.
Cut teal yarn with an 8-inch tail. Switch to mustard yarn and knit two rounds.
Switch to light blue and knit two rounds. Do not cut mustard yarn.
Cut light blue yarn with an 8-inch tail and knit 10 rounds with mustard.
Begin decrease as follows:
Place a marker if you need to, but I can tell where the beginning of the round is based on the stripes.
K2tog, K6, repeat till end of round
Knit one round
K2tog, K5, repeat till end of round
K one round
K2tog, K4, repeat till end
K one round while transferring to double pointed needles. Or knit the round and transfer stitches — whatever’s easier for you.
K2tog, K3, repeat till end
Knit one round
K2tog, K2, repeat till end
Knit one round
K2tog, K1, repeat till end
K2tog, repeat till end.
Cut yarn leaving a long tail. With darning needle, draw up remaining stitches and weave in all ends.
For the pom pom:
Take both the teal and light blue yarn and wrap them around a large serving fork till it’s pom pom sized. With a doubled piece of yarn about one foot long, tie the yarn around the middle tine and remove from the fork. Cut the loops and trim pom pom to your liking. Using a darning needle, attach to top of hat. To better secure pom pom, run the yarn back up through the pom pom and back down into the inside of the hat.
This pattern is for a 3-6 month head. It’s also a great introduction to knitting stripes.
Ho ho hope you enjoy it!
If you’re wanting to knit this pattern with a different needle size and different weight yarn, I am unable to adjust the pattern for you. This pattern is written for a specific needle size and yarn weight.
Baby Candy Cane Stocking Cap
Materials:
One skein of red worsted weight yarn
One skein of cream worsted weight yarn (I used Red Heart soft)
With the red yarn cast on 64 stitches on your circular needle. Join with first stitch being careful not to twist the stitches. Begin ribbing in k1, p1 for six rounds.
Switch to white yarn and knit 2 rounds. There is no need to cut the red yarn as the rows are so narrow you can easily bring up the other yarn when you need it.
Continue knitting in stockinette stitch for 25 more rounds changing colors every 2 rounds. Transfer stitches to double pointed needles and begin decreasing as follows (while continuing to switch colors every 2 rounds):
*K2tog, k6, repeat * till end of round
knit 3 rounds
*K2tog, k5, repeat * till end of round
knit 4 rounds
*K2tog, k4, repeat * till end of round
knit 6 rounds
*K2tog, k3, repeat * till end of round
knit 15 rounds
*K2tog, k2, repeat * till end of round
knit 16 rounds
*K2tog, k1, repeat * till end of round
knit 5 rounds
*K2tog, repeat * till end of round
k 4 rounds. Cut yarn leaving a 12-inch tail. Using a darning needle, draw up remaining stitches and weave in all ends.
Seven months have passed since I published “17 Most Essential Infant Items.” A lot has changed since then. For instance, my son is now nine months old and he doesn’t use many of the things on that list anymore. I figured I might as well update my list, thus furthering my contribution to the Internet baby advice world.
These are things I find myself using every day. I’d say they are essential for us, but they may not be for you. Also, keep in mind I’m not including the obvious essentials such as a crib, car seat or high chair.
1. Breast Pump
Most of the items on this list are not in order of importance, but I put a breast pump on the top of the list because it is really one of the most important things I use every single day. I’m a working mom. My son goes to day care. He is still breastfed and in order to keep nourishing him with my milk, I gotta pump. I recommend getting an electric pump if you’re serious about collecting your milk. My husband brought home a hand pump back in the beginning and it was laughable. The Medela Pump in Style works great. It is the dorkiest thing you will ever attach to your body but I’m able to pump once at work to provide my son with milk for the following day. Yes, these pumps are really pricey, but the good news is they are always for sale on Craigslist and it’s really OK to buy a used one. The tubing and parts can be sanitized with Madela’s microwave sanitizing bags or if you’re really creeped about by it, you can buy all new parts. With its über sleek design you’ll be the most fashionable mom at work! (That was rife with sarcasm, by the way).
2. Jumperoo
Now that my boy is mobile, I’m starting to phase out the Jumparoo, but it was crucial for about seven months. As soon as your baby has good neck and core strength, these bouncing harness toys are the perfect place to set him while you make breakfast, take a shower or just take a load off for a little while. They light up, play music and have enough toys to entertain your little one and you know he’s in a safe place. These can also be easily found in the Craigslist and garage sale zone. Don’t bother paying full price for one. Since my son is no longer interested in being stationary, I’m thinking of taking the bouncer to a kiddie consignment shop and trading it for a baby walker.
3. Hydrogen Peroxide
Before I get too carried away with my thrift store mantra (really, you’ll save thousands by buying things used) I might as well tell you how to best clean all the used baby items you acquire. I used to clean toys with a weak bleach solution, but thanks to Pinterest I’ve discovered that hydrogen peroxide is super for cleaning all the surfaces your baby’s mouth will come in contact with (i.e. everything). I just took a sprayer from a spray bottle and screwed it on to a bottle of hydrogen peroxide. I spray his high chair tray and all his toys with it, let them sit for a couple of minutes and wipe them down with a sponge.
4. Softee Blanket
We live in Alaska where blankets are of the essence. This item may not apply to those living in hotter climates, but we use a super fuzzy — some call it minky — blanket every night at bedtime. Someone bought us a really fancy one, but really, you could just buy a $10 fuzzy throw at the store, cut it in half and hem it. I’m in the process of crafting a back-up for our vacation. Yes, most of the time I find my son’s face buried in his blanket come morning but it’s starting to grow on him and the fuzziness soothes him at night (and isn’t self-soothing the ultimate goal here?)
5. Humidifier
We live in a semi-arid part of the world and a humidifier comes in handy up here especially during cold season. When my son’s nose is all stuffed up, this helps make the air in his room less harsh.
6. Cloth Wipes
One of the few items that carried over from the previous list, the cloth wipe is definitely essential in our household. I still use the wipes I made out of old receiving blankets. I stuff them in an empty wet wipes container, about 24, and wet them with water during diaper changes. Then I toss them into a regular wash. I know wet wipes are pretty cheap, but this is waaaaaay cheaper and I’m saving my baby’s bottom from harsh detergents and chemicals or something. Ok, ok, I’m doing it more for the saving money thing and less for the environment thing. But check out my neato tutorial here.
7. Homemade laundry detergent
Thanks again to Pinterest for showing me the light on homemade laundry detergent. I mix equal parts Oxy Clean, Borax and washing soda and just use a tablespoon per cycle. This is a huge money saver. This is a recipe for cloth diapers, since soap isn’t recommended for them. But you can incorporate Fels Naptha and make a general detergent and you’d still be saving a bundle.
8. Dimmer Switch
I am forever thankful we installed a dimmer light switch in our baby’s room. I should have included this on the first list. We use dimmers to wind things down in the evenings, for middle-of-the-night wake ups and as a general nightlight. No one is chipper in the morning when the light is suddenly turned on. This is an inexpensive and easy fix-up.
9. Internet Radio
Music is great for people of all ages and babies are no exception. I love Internet radio sites such as Pandora or Spotify. I’m really digging Songza because they help you choose the music you feel like listening to at that moment. Babies don’t need to listen to strictly baby music. My favorite Songza playlist is “Songs to Raise Your Kids To,” which is a mixture of all my favorite old tunes. I’ll put on music while getting breakfast ready, in the car and during playtime. Our son is getting into clapping and nothing beats sweatin’ to the oldies.
10. Pack ‘n’ Play
This is a recently acquired item in our house, but I’m happy we have it. This is a portable play pen/crib that folds up really easily. It’s perfect for your more mobile baby when you need to get some housework done because it keeps him in a safe place so you don’t have to worry about his exploring and a chair falling on him (that happened this morning as I was making breakfast). I also use it for nights at Grammy and Grandpa’s house. These run about $30-70 on Craigslist, so definitely buy a used one.
11. Zipper Jammies
If you think your baby is cute, he will be ten times cuter in footie pajamas. Our son practically lives in zip-up jammies. They are super convenient to get on and off, you don’t need to worry about socks and they usually have grips on the bottom of the feet so he can climb around without falling (as much).
12. Coconut Oil
This is the ultimate multi-purpose goop. Coconut oil comes in Crisco-like form and can be found at health food stores and even Costco. Not only is it nice for cooking as a replacement for saturated fats it can also be used for dozens of topical reasons. It’s great for dry skin and cures diaper rash. Check out this list for tons of other uses.
A sample of some of our thrift store toys and books.
13. Used Toys and Books
You could easily spend a fortune on stuff for your child. Do yourself a favor and get used toys and books. See if your town has a Freecycle Web site. Go to garage sales and thrift shops and keep an eye out for sturdy toys in good working condition. The thrift shop is a gold mine for used books, usually just a few cents each. We have fully furnished our son’s nursery with second-hand toys and I’m happy to say none of them makes electronic noise and our son still loves them. There’s still a lot of love left in his toys for them to be passed on when he grows out of them. Pay it forward!
This is Jack’s first Halloween. I’m not much of a Halloween person. I’m over it. I don’t need to dress like a sexy fill-in-the-blank. I’m not out to impress anyone. I was going to put forth some sort of effort with Jack since I have to address every single milestone in his tiny little life.
I dressed him up as a garden gnome, with a bib fashioned out of white felt to look like a beard and a pointy red hat. Here’s a poor-quality iPhone photo:
The hat is just too cute. I discovered after dressing him in green footie pyjamas that he also looks like an elf (no photo, unfortunately). This means the hat can double up for the holidays while I parade Jack around like the little elf child that he is.
The hat is pretty simple if you know how to knit hats. Here’s how I made it.
If you’re wanting to knit this pattern with a different needle size and different weight yarn, I am unable to adjust the pattern for you. This pattern is written for a specific needle size and yarn weight.
Materials:
1 skein worsted weight yarn
size 9 circular and double pointed needles
darning needle
Abbreviations:
CO = cast on
k1,p1 = knit 1, purl 1 ribbing
k2tog = knit two stitches together
Directions:
With your ciruclar needle, CO 64 stitches. Knit the last stitch to the first stitch making sure the stitches aren’t twisted on the needles. K1,P1 in the round for 6 rounds.
Knit regularly for 27 more rounds. Place marker at beginning of round. Decrease as follows:
k2tog, K6, repeat till end of round
k 1 round regularly
K2tog, K5, repeat till end of round
k 2 rounds regularly
K2tog, k4, repeat till end of round. Transfer stitches to double points
K 3 rounds regularly
K2tog, k3, repeat till end of round
K 3 rounds regularly
K2tog, k2, repeat till end of round
K 3 rounds regularly
K2tog, k1, repeat till end of round
K2tog, repeat till end of round
Cut yarn leaving an 8-inch tail. With a darning needle, weave in all ends. You can alter the pointyness of the hat by knitting more or fewer rounds between the decrease rounds. I like the cupie-doll look.