Category Archives: Crafts

DIY Waxed Cloth Food Wrap

I’m all for convenience, but after two years of making school lunches I’m realizing that I create a lot of plastic wrap trash. The other day I saw an ad for beeswax coated fabric that could be used in replacement of plastic wrap. You use the heat of your hands to seal the fabric to itself. You can reuse the fabric several times by just rinsing it in cool, soapy water.

DIY waxed cloth food wrap | A tutorial from AlaskaKnitNat.com

I have an apiarist friend who keeps beeswax as a byproduct. I asked if he could spare a few ounces so I could experiment with this fabric food wrap idea. If you don’t know a beekeeper, you can easily order beeswax online.

This was a super fun crafty activity that required no sewing. Give it a try!

Continue reading DIY Waxed Cloth Food Wrap

Quick craft: easy and cheap bookmarks

My son recently celebrated his fifth birthday with a “Trolls”-themed party. We tend to be low-key with birthday parties.  Usually a handful of kids come over and we eat snacks, play games, color and do a craft.

Now that we’re reading chapter books, bookmarks are a necessity. Here’s a creative way to make inexpensive bookmarks. Next time you head to the hardware store pick up a few paint chips and you’re almost done. This is a great craft for little ones since it involves no cutting.

Paint chip bookmarks | All you need is stickers, yarn and free paint chips. A great craft for toddlers!

Paint chip bookmarks

Materials:

  • Paint chips (look for ones with a hole punched in the corner)
  • Stickers
  • Yarn
  • Hole punch (if necessary)

Paint chip bookmarks | All you need is stickers, yarn and free paint chips. A great craft for toddlers!

Directions:

Cut two pieces of yarn about 8 inches long. Fold them in half and loop them through the hole in the corner of the paint chip (or use a hole punch).

Have your child apply stickers to his heart’s content to the paint chip.

Presto! Bookmark!

Paint chip bookmarks | All you need is stickers, yarn and free paint chips. A great craft for toddlers!

DIY Hoop Wreath | a simple tutorial

This time of year isn’t the prettiest in Alaska. Snow is waiting to melt, everything is brown and dusty, and there’s a certain stale odor in the air. But there is LIGHT – so much daylight.

Erin of Blomma Designs, photographer Anne Marie Moran and I decided to take advantage of our ever-increasing sunlight last weekend.I brought my sister, Farra, along too. We all met at Erin’s studio to create modern floral wreaths. It was the perfect respite from Alaska breakup season.

Make your own asymmetrical wreath with this simple tutorial by Blomma Designs and Natasha Price of Alaskaknitnat.com | Photos by Anne Marie Moran Photography

I thought we should share this crafting experience with a step-by-step tutorial. The luscious photos are by the talented and delightful Anne Marie of Anne Marie Moran Photography.

Continue reading DIY Hoop Wreath | a simple tutorial

Sherbet Triangle Scarf

I’m not a big fan of knitting scarves. They take too long and I usually lose interest. But there’s one style I don’t mind knitting. It’s a giant triangle and the pattern is crazy easy.

Sherbet Triangle Scarf | a simple knitting pattern from Alaskaknitnat.com

Two days ago my little sister texted and said she lost her favorite scarf and asked if I’d make her a new one. Here’s her cute little self:

Sherbet Triangle Scarf | A super simple pattern from Alaskaknitnat.com

Two binge-watching nights later and the scarf was finished. This is a perfect mindless project since it’s knit in garter stitch and you only have to remember to increase one stitch at the beginning of each row. The mohair adds a beautiful fluff to the scarf so it feels like a cloud when you’ve finished. By combining fuschia and peach yarns the outcome sort of reminds me of sherbet ice cream.

Sherbet Triangle Scarf | a simple knitting pattern from Alaskaknitnat.com

Here’s how to make it:

Super Simple Triangle Scarf Pattern

Materials:

img_6155

  • 224 yards aran weight yarn in peach (I used 2 skeins of Sirdar Snuggly SK shade 0451)
  • 224 yards (2 skeins) Rowan Mohair Haze in Caress (00525)
  • Size US 15 circular needles (straight would work too)
  • Darning needle

Sherbet Triangle Scarf | a simple knitting pattern from Alaskaknitnat.com

Abbreviations:

KFB = Knit in the front and then in the back of one stitch, thus increasing work by 1

M1 = make 1 stitch from front to back in the horizontal strand between stitches

Gauge: doesn’t matter

Directions:

You’ll be knitting both aran and mohair yarns at the same time as though they are one strand.

  1. Cast on 4 stitches.
  2. Row 1: K1, KFB, knit to end of row
  3. Repeat row 1 until you have 108 stitches or until triangle is about 20 inches from tip to needles. Bring in new skeins of yarn when necessary.
  4. Next row: K1, KFB, *K3, M1. Repeat * till there are two stitches remaining. K2.
  5. Next row: Cast off using the stretchy method.
  6. Cut yarn, leaving an 8-inch tail. With a darning needle, weave in all ends.

Sherbet Triangle Scarf | a simple knitting pattern from Alaskaknitnat.com

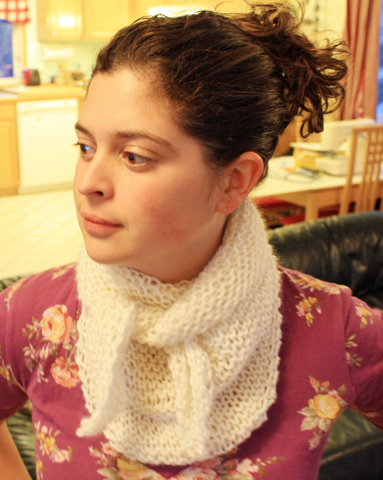
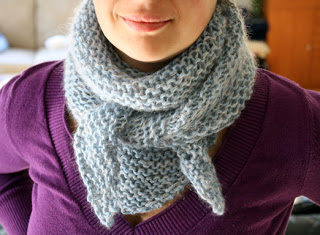
Here are a couple of examples of my past triangle scarves in different colors:

Snow Angel Scarf

Orange Sherbet Scarf

scarf2

bluesky2

Alaska Knit Nat’s top 6 posts

Today my Facebook page reached 1,000 likes!

Alaska Knit Nat turns 6 | My top 6 blog posts

As Alaska Knit Nat enters its seventh year, I thought it would be fun to dig into the archives and pull up some of my favorite posts from years past.

I started Knit Nat AK in November 2010 with the intention of cataloging my craftiness.

“It’s mainly for my own benefit,” I wrote in my first-ever post. “I make so much stuff I can’t keep track of it all. In addition to knitting (hence the Knit Nat title), I cook, sew and repurpose things. This blog is a catalog of all things Craft.”

So here’s my top 6 posts since 2010. Enjoy!

Continue reading Alaska Knit Nat’s top 6 posts

Alaska Flag Hat revisited

Last summer a friend commissioned me to knit her a slouchy Alaska Flag Hat. It turned out to be a hit and I knit more than 30 of them for various Alaskans. Several asked for a kids or non-slouchy version as we can’t all look as spectacular as Fernanda in a slouchy hat.

I’ve been meaning to rewrite the pattern for months but have been overwhelmed by my floral business. But when a friend of mine texted me her family photo this year, I knew it was time.

Alaska flag hat - a free pattern for children and adults from Alaskaknitnat.com
Photo by Jennifer Hughes Photography

I mean, how adorable is this family?

Continue reading Alaska Flag Hat revisited

Furniture facelift – how to refinish a thrift store table

The other day as I was making my thrift store rounds I saw an old table sitting outside of Bishop’s Attic. It had lots of stains on it as though someone was raised in a non-coaster family (oh, the shame!)

Furniture Facelift | How to refinish a thrift store table from alaskaknitnat.com

It was only $5 so what was there to lose by buying it?

Furniture Facelift | How to refinish a thrift store table from alaskaknitnat.com

I could tell it was a solid construction made with nice wood. Maybe teak, cherry and walnut in there? I’m not sure. But when I asked my husband if he’d help me refinish it I was surprised to find how easy it was. All we did was refinish the top of the table as the legs were still in good shape. We now have a gorgeous wooden table and all we really paid for was the wood finish.

Furniture Facelift | How to refinish a thrift store table from alaskaknitnat.com

Here’s what you’ll need:

Directions:

  1. Remove the top from the legs. Using 80 grade sandpaper sand down the tabletop with the orbital sander. Use circular motions and sand the top evenly all over. Sand the sides of the tabletop too, if you’re able to.
  2. Repeat this step with the next finest grade of sandpaper until you’ve reached 220.Furniture Facelift | How to refinish a thrift store table from alaskaknitnat.com
  3. Hand sand any bits or corners you weren’t able to get with the orbital sander. I just eyeballed it.
  4. Use a piece of tack cloth to remove all sawdust from the tabletop.Furniture Facelift | How to refinish a thrift store table from alaskaknitnat.com
  5. Pour a big glug of wood finish onto the tabletop and spread out evenly with a shop paper towel. Get all over and around the sides. Get it underneath the edge of the table. No need to finish the whole bottom part, but get some around the underneath edge. It should instantly look amazing.Furniture Facelift | How to refinish a thrift store table from alaskaknitnat.com
  6. Make sure the finish is evenly distributed and not applied so heavily that it drips or gloops.
  7. After 3 minutes use a dry paper towel to wipe the table with the grain to remove any excess oil. If you go against the grain it might look streaky.
  8. Wait four hours and repeat steps 5-7.
  9. You could stop here or apply another coat if you’d like. I only did two coats.
  10. Screw the top back onto the legs and presto! New table!

Furniture Facelift | How to refinish a thrift store table from alaskaknitnat.com

Furniture Facelift | How to refinish a thrift store table from alaskaknitnat.com

Guest post: Feather & Fan Scarflette

My friend Annie is an avid knitter. She’s more of a knitting ninja – she wears her needles down to near stubs because of her always-popular Harry Potter scarves.

In the past few years it seems all of her friends are procreating because she makes a baby blanket nearly every month. I shared her adorable feather and fan lovey a couple of years back and when she posted a scarf with a similar pattern on her Etsy shop yesterday I asked if I could share the pattern.

Continue reading Guest post: Feather & Fan Scarflette

Grinch-themed birthday party

Our son, Jack, turns 4 this week. Since his second birthday we’ve let him choose his party theme. At 2 it was Pingu (please, have a look at this adorable Swedish claymation penguin show), last year it was the Lorax and when I asked him this year what he wanted, he chose the Grinch.

A Grinch-themed birthday party | Minimal organization and lots of running around is all you need for a fun kids birthday party. A photo gallery from alaskaknitnat.com
Pin the heart on the Grinch. It’s more of a tradition on my part to get me into the spirit of party planning. The kids play with it for about 5 minutes.

During the holidays we took Jack to a local restaurant to see the outrageous film based on the Dr. Seuss character. It was his first big screen experience so it must have left an impression on him.

Continue reading Grinch-themed birthday party

Reversible chevron scarf

A couple of weeks ago I was packing for a two-week vacation in Mexico. Our family trips consist of sleeping, eating and lying around, so I have a lot of time to knit. I wanted to work on a pattern that was easy and quick to finish.

I’m not usually a fan of knitting scarves as they go on forever and ever, but I realized I don’t have many scarves and the cowls I’ve made muss my hair when I take them off.

I don’t do lacework and cable scarves have a wrong side, which I find unattractive. That’s when I found a free downloadable pattern from Ravelry called the Reversible Chevron Scarf designed by Debbie Seton of The Crimson Rabbit.

Click here for the free pattern.

Reversible chevron scarf in fuchsia | A free pattern by Debbie Seton and featured on Alaskaknitnat.com

Reversible chevron scarf in fuchsia | A free pattern by Debbie Seton and featured on Alaskaknitnat.com

This scarf has a beautiful texture and the design, which is made up of just knits and purls, looks the same on both sides. Just what I wanted!

Continue reading Reversible chevron scarf