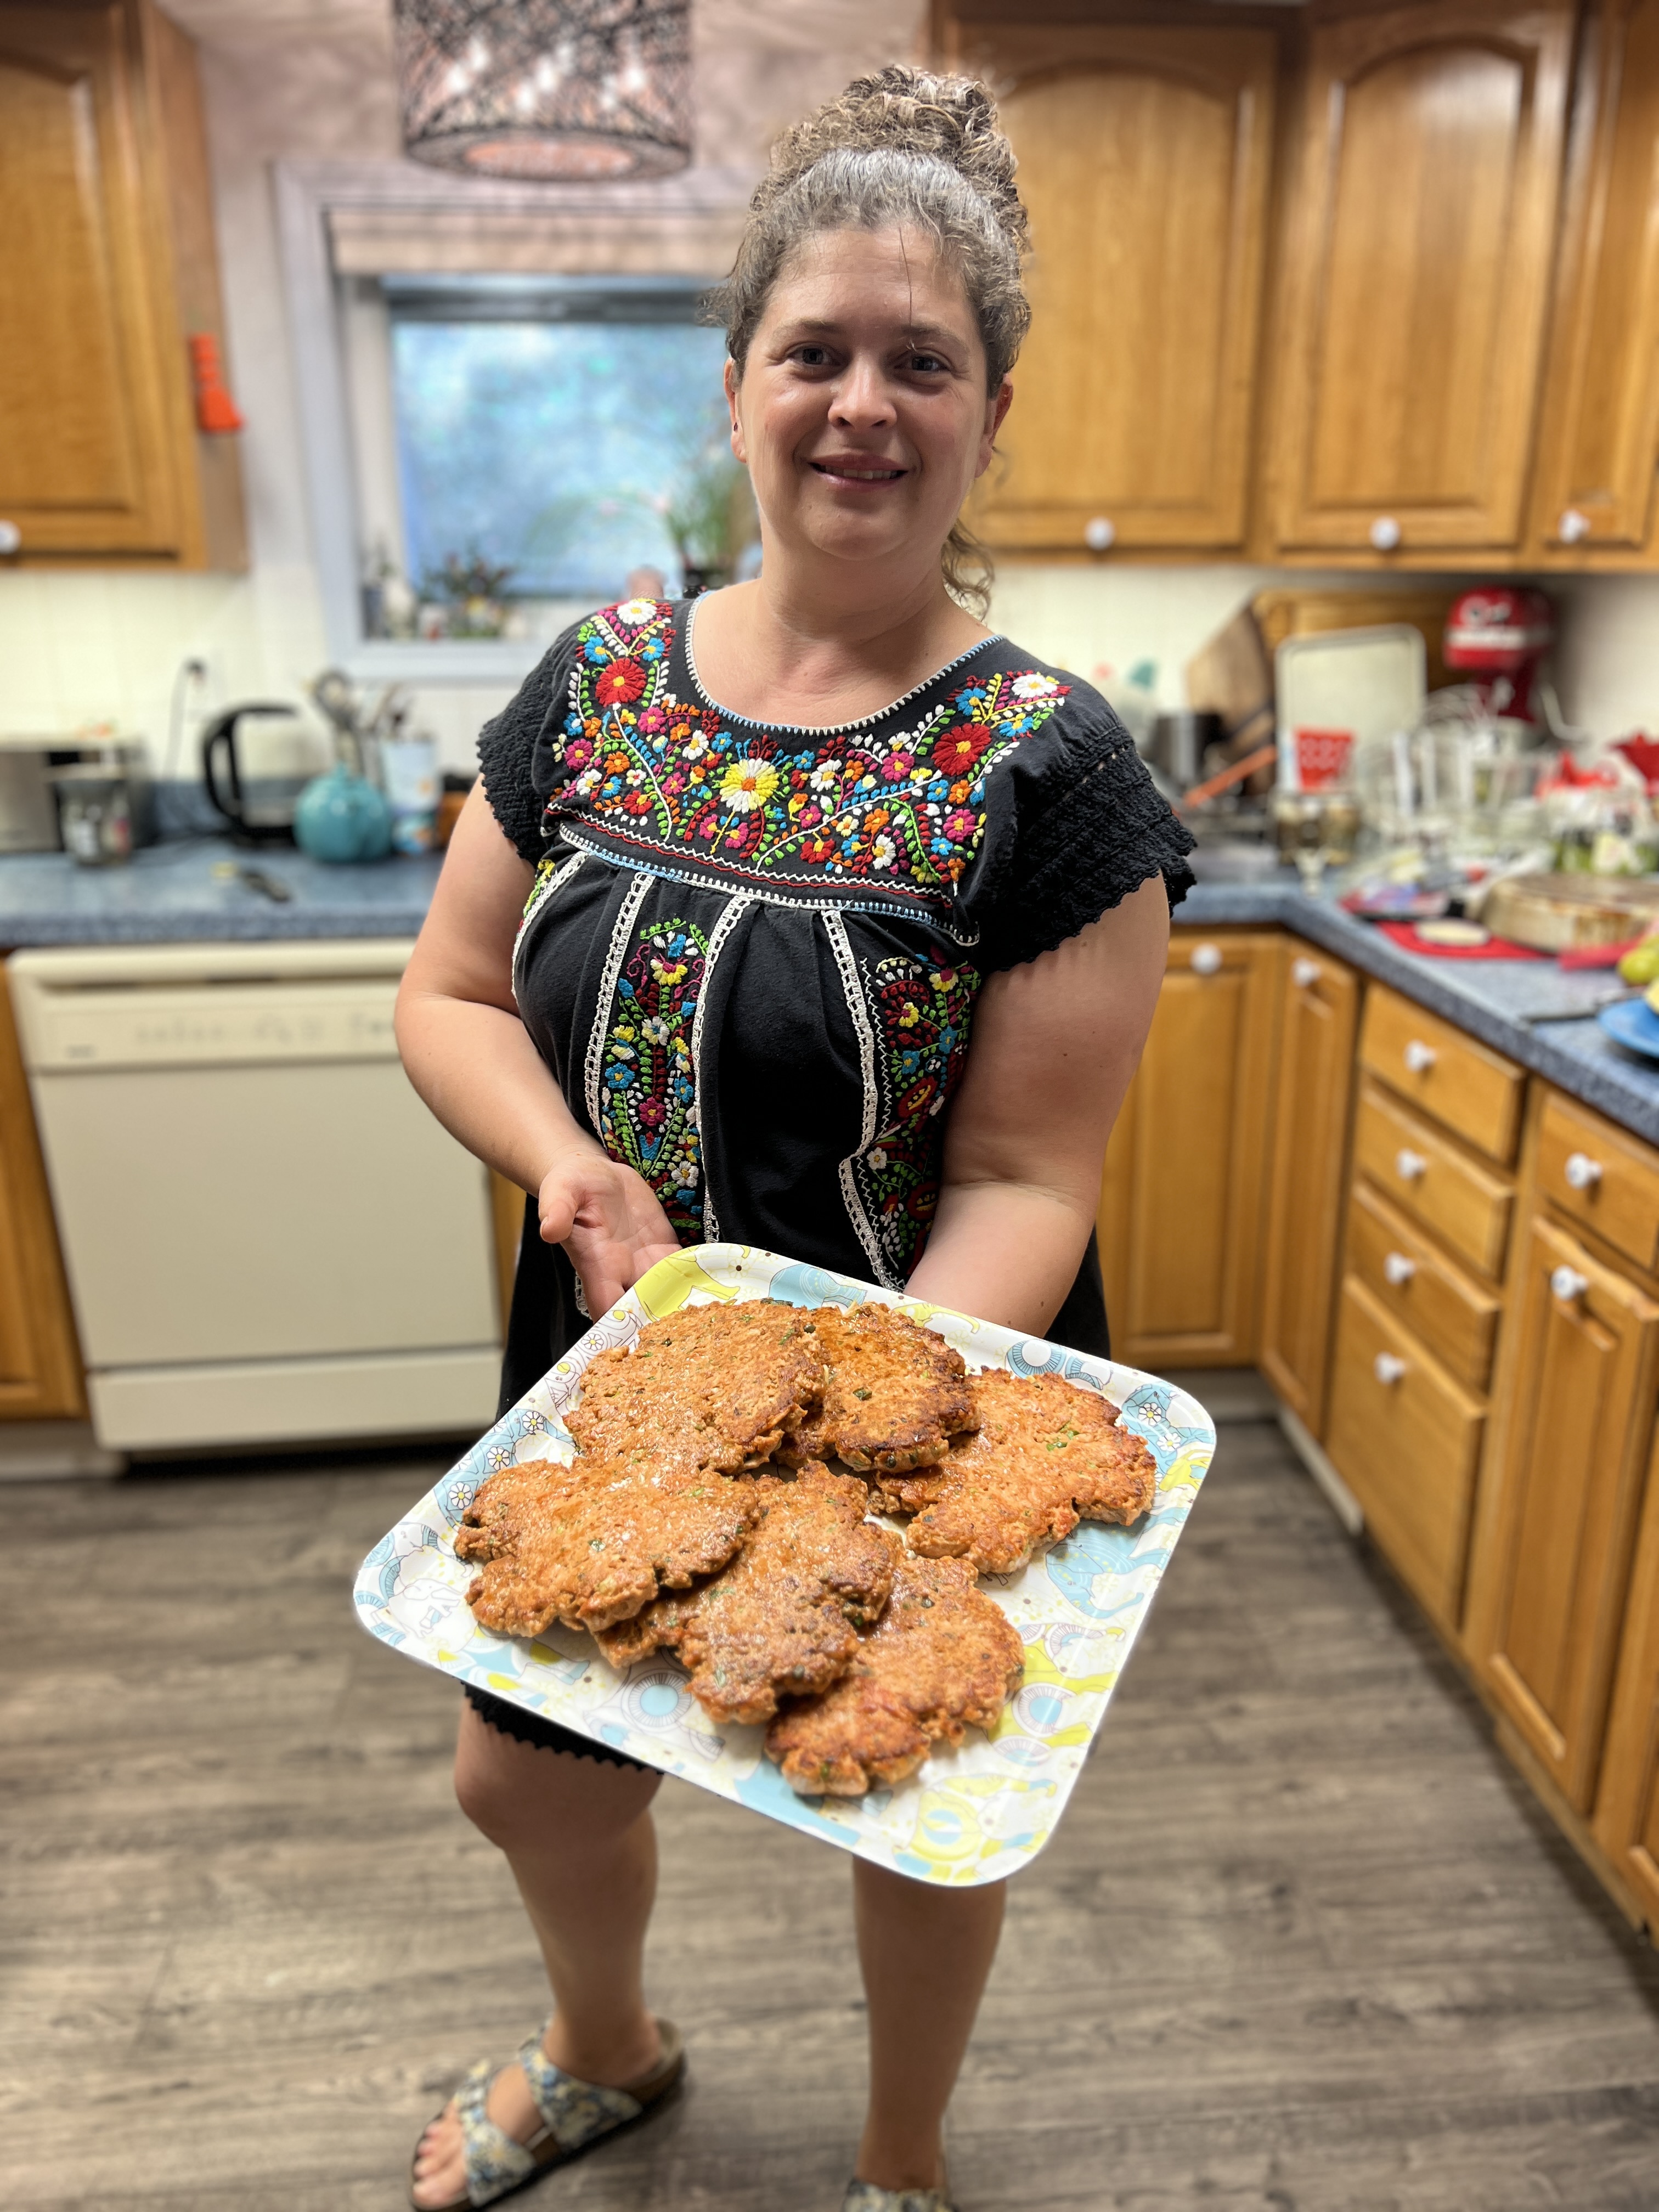
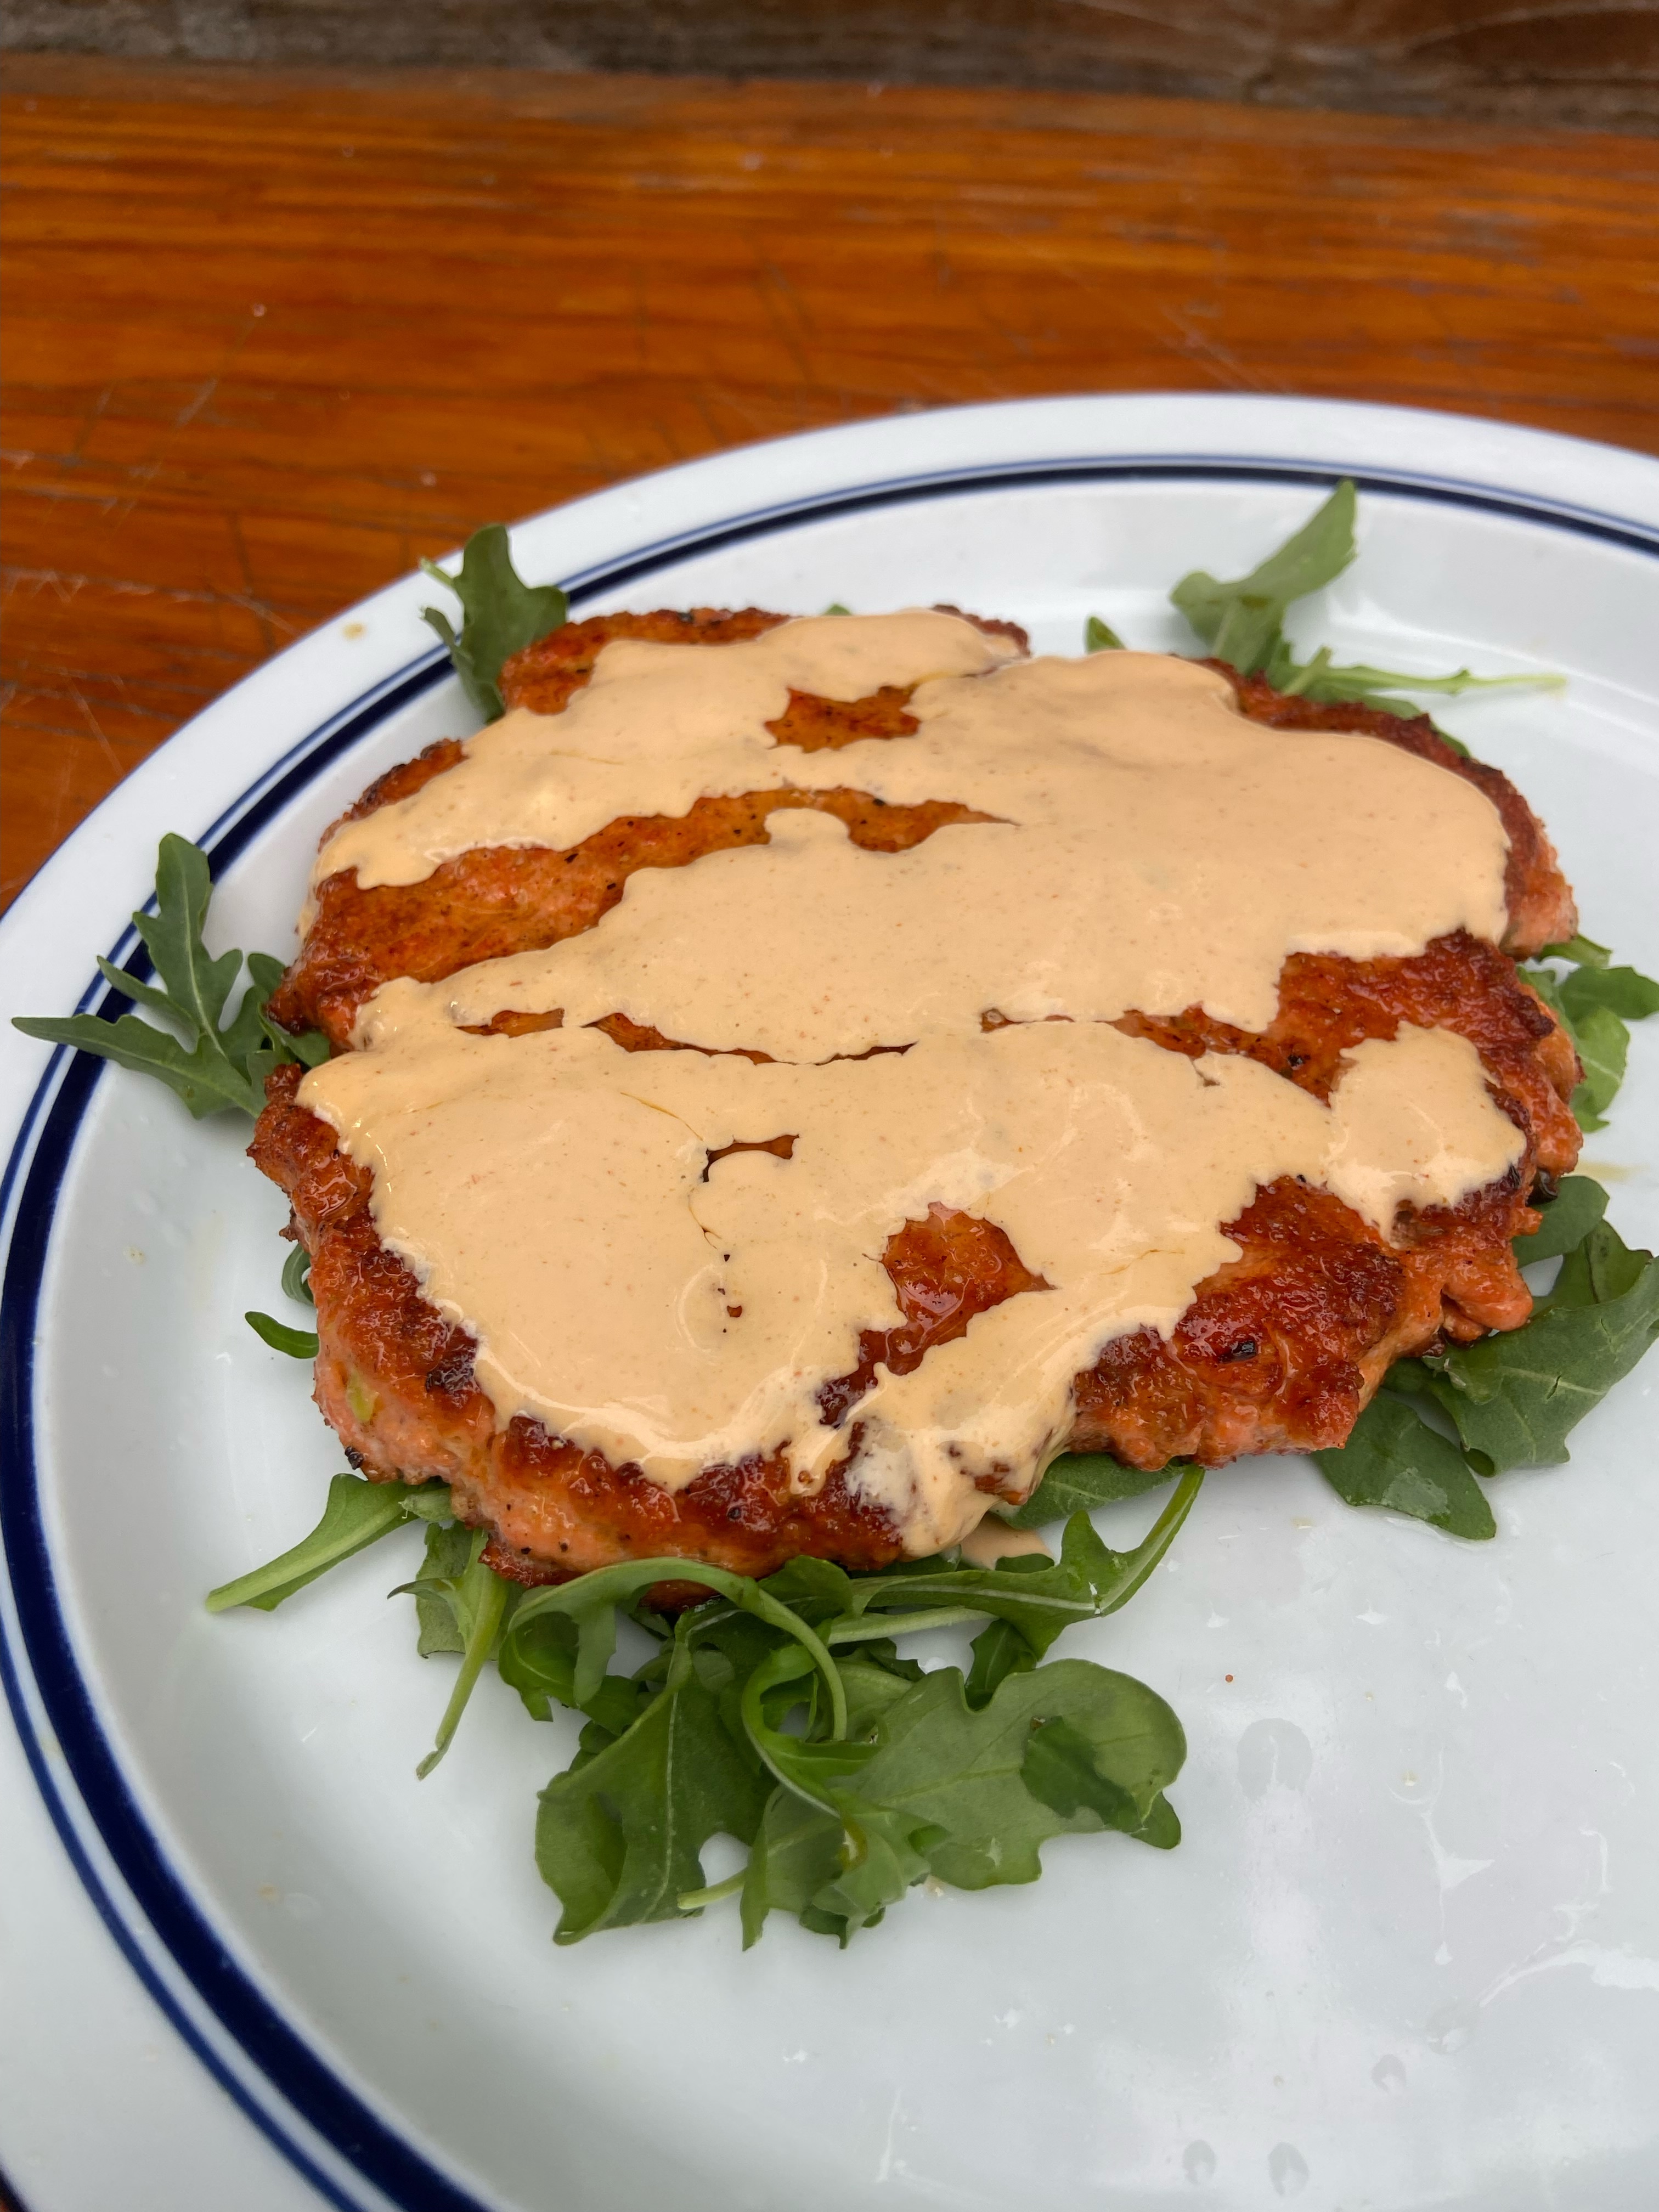
Tag Archives: cooking

Alaska Knit Nat’s top 6 posts

Today my Facebook page reached 1,000 likes!

Alaska Knit Nat turns 6 | My top 6 blog posts

As Alaska Knit Nat enters its seventh year, I thought it would be fun to dig into the archives and pull up some of my favorite posts from years past.

I started Knit Nat AK in November 2010 with the intention of cataloging my craftiness.

“It’s mainly for my own benefit,” I wrote in my first-ever post. “I make so much stuff I can’t keep track of it all. In addition to knitting (hence the Knit Nat title), I cook, sew and repurpose things. This blog is a catalog of all things Craft.”

So here’s my top 6 posts since 2010. Enjoy!

Continue reading Alaska Knit Nat’s top 6 posts

The secret to perfect hard-boiled eggs

There’s no other time that I feel as though I’ve failed at life as when I hard boil eggs. It seems like a simple endeavor: boil eggs, cool them, peel them. But usually my eggs are impossible to peel.

When I asked my friends on social media why I can’t seem to successfully peel an egg, I got all sorts of egg-cellent suggestions from running them under water as I peeled them, to shaking them vigorously in a jar of water (totally didn’t work). The most frequent response I got was I was using too-fresh eggs.

I dutifully tried every suggestion but got no closer to a peelable egg. Finally, I heard a new one: steam the eggs.

I tried it. It worked. Here’s how to make the perfect hard-cooked egg. *note: after trying this method three times, the only successful batch was when I steamed 4 eggs. When I tried to steam 12 they didn’t get cooked through enough — but they were incredibly easy to peel!

The best way to hard boil an egg is not to boil it, but to steam it! | Life hack from alaskaknitnat.com

What you’ll need:

Some eggs

A pot

A steamer basket

Directions:

Fill your pot with about an inch of water and bring it to a boil. Place your eggs in a steamer basket and lower them into the pot. Cover, turn the heat to medium and steam for 13 minutes.

A couple of minutes before the eggs are done, fill a bowl with ice and cold water. Transfer the eggs to the bowl and let them cool for 15 minutes.

They peeled perfectly!

Yay for life hacks.

Looking for a good egg salad recipe? Try my chicken salad but substitute eggs!

Chicken Sandwich

Sausage 101 — a photo & video tutorial

The kitchen is the heart of our family. My dad would spend the weekends making vats of marinara sauce and in the late summer my mom would be canning blueberry jam. Back when apples were cheap we’d make gallons of applesauce with the food mill and mix in low-bush cranberries for color. Most of my childhood memories are centered around cooking.

One staple in our family is sausage. I remember waking up early on Saturday morning to the loud humming of my dad’s homemade motorized sausage grinder. I was thrilled to stuff  hog intestines with meat — I was the best sausage stuffer in the family thanks to my deft, friendship bracelet-making hands.

Sausage-making 101 | a photo tutorial from alaskaknitnat.com. Learn how to make your own Italian sausage with this step-by-step guide.
Me, age 9, stuffing sausage with some old family friends.

My dad owns one of the most popular sausage-making sites on the Internet, sausagemania.com (yes, that is really the name). People from all over the world come to his site for his detailed recipes and tutorials.

When we decided to make 100 pounds of Italian and breakfast sausage this morning at 7:30 I thought it would be the perfect time to make my own tutorial for my little DIY audience.

Continue reading Sausage 101 — a photo & video tutorial

An East Coast Halloween: 3 tricks and treats

Soon after becoming friends with Kasandra in college I discovered we had one big difference: she celebrated holidays.

An East Coast Halloween | 3 tricks and treats that are affordable and easy from Alaskaknitnat.com

Kasandra is from Connecticut where they have four seasons, a long history, darkness in the summer and tolerable cold in the winter. These reasons are why East Coasters celebrate holidays differently from Alaskans.

“I love that the East Coast celebrates every holiday to the fullest,” Kasandra said. “It makes me look forward to the seasons.”

I visited Kasandra and her husband, Gary, in their hometown seven years ago in May. As she was giving us a driving tour of a road used to deliver mail during the Revolution, I was seeing house after house ridiculously adorned with flags and patriotic banners. I asked, “What the hell is going on here?” and she said “It’s Memorial Day weekend.”

Feel free to contradict me, but Alaskans just don’t celebrate this way. Sure, I’ll carve a pumpkin in October and string up some lights at Christmas, but there isn’t a single house on my block right now with Halloween decorations outside.

So today I wanted to show off a little of what Kasandra has going on in her neck of the woods to hopefully inspire Alaskans this Halloween.

An East Coast Halloween | 3 tricks and treats that are affordable and easy from Alaskaknitnat.com

Kasandra maintains that frugal collegiate spirit but includes East Coast charm and sophistication. All of her crafts are easy, quick and affordable. Here are three that she shared with me.

1. Bedazzled Pumpkin

An East Coast Halloween | 3 tricks and treats that are affordable and easy from Alaskaknitnat.com

Paint a pumpkin. Stick craft store jewels all over it. No glue necessary if the paint is still wet.

2. Mummy cookies

An East Coast Halloween | 3 tricks and treats that are affordable and easy from Alaskaknitnat.com

Melt some white chocolate. Dip Milano cookies halfway into chocolate. Drizzle chocolate over the cookie to make it look like a mummy. Stick on sugar eyes.

3. Monster mouth snacks

An East Coast Halloween | 3 tricks and treats that are affordable and easy from Alaskaknitnat.com

Peel some apples and slice them into wedges. Spread peanut butter on one wedge. Add some yogurt-covered raisins to look like teeth. Top with another apple.

So, get out there, Alaskans, and show some last-minute Halloween spirit!


Chicken & Vegetable Stew

I came home from work today and didn’t want to think much about making dinner. What with eight wedding floral gigs this summer, parenting, plus my near full-time job, I have a lot of other things on my mind.

Enter condensed cream of chicken soup. I tend to avoid recipes that call for this salty, globby ingredient but sometimes I’ll make an exception.

Chicken, veggies, herbs and soup over rice or noodles is always a crowd pleaser. Comfort food at its finest.

This was simple to assemble and although it’s not quick, it requires very little effort or thought, which is perfect for today.

Chicken & Vegetable Stew | An easy recipe from Alaskaknitnat.com

Chicken & Vegetable Stew-like Casserole Dinner

Serves 4

Ingredients:

  • 2 tbs. butter
  • olive oil
  • 3-4 skinless chicken thighs (breast works too)
  • 1/2 cup flour
  • 3 celery stalks, chopped
  • 1/2 onion, chopped (about 1 cup)
  • 3 carrots, chopped
  • 1 bay leaf
  • 2 Tbs. chopped fresh parsley
  • 1 can cream of chicken soup
  • 6 oz. cream cheese
  • chicken stock
  • 1/2 cup frozen peas
  • 1/2 cup frozen green beans
  • 1/2 cup frozen peas
  • salt and pepper

Directions:

Preheat oven to 350 degrees F. Heat butter and 2 Tbs. olive oil in a dutch oven oven. Place flour in a pie pan. Dredge chicken thighs in flour and shake off any excess. Place thighs in dutch oven and brown on both sides, about 5 minutes total. Set thighs aside and pour out excess oil.

Chicken & Vegetable Stew | An easy recipe from Alaskaknitnat.com

Add another tablespoon of oil and toss in the celery, onion and carrot. Cook until onions are soft, about 5 minutes. Add the parsley, bay leaf and cream of chicken soup. Fill the empty can with chicken stock and pour that too. Break up the cream cheese with your fingers and add to the pot. Add salt and pepper to taste.

Nestle the thighs into the sauce and place into the oven. Take out and stir the pot every 20 minutes or so to prevent any burning.

Chicken & Vegetable Stew | An easy recipe from Alaskaknitnat.com


After 45 minutes in the oven, stir in the frozen veggies and break up the thighs with a fork. Place back in the oven and bake another 30 minutes.

Remove from oven and break up any other chicken pieces. Remove bay leaf and serve over egg noodles or brown rice.

Chicken & Vegetable Stew | An easy recipe from Alaskaknitnat.com

Harvesting Anchorage: Devil’s Club Pesto

As Part Two of my summertime Alaska blog series, I tried to harvest a few things such as fiddlehead ferns and fireweed shoots, but I only successfully cooked something using devil’s club.

You’ve probably encountered devil’s club in any Alaska forest. It’s pretty much the last plant you want to encounter because it’s covered top to bottom in sharp thorns that can easily embed themselves in your skin; but in the spring the plants produce short buds covered in premature, soft thorns. This part of the plant is edible. Is it good? That’s what I aimed to find out.

I embarked on my devil’s club hunt on a sunny spring day after the birch trees had started budding. I had no trouble finding a thicket of devil’s club up on the hillside. They all had 1-to-3-inch buds emerging from the dry, wheat-colored stalks. I used a gardening glove to pluck them and collected them in a bucket.

Harvesting Anchorage: Devil's Club Pesto | A free recipe from AlaskaKnitNat.com
This one isn’t quite ready yet. There should be an inch or two of green coming out of the brown sheath.
Harvesting Anchorage: Devil's Club Pesto | A free recipe from AlaskaKnitNat.com
This one is ripe for the plucking!

After getting stuck with thorns a few times I felt as though I had enough to work with. On the drive home my car started smelling like an Alaska forest. The devil’s club buds had a spicy, celery-like scent.

Continue reading Harvesting Anchorage: Devil’s Club Pesto

Harvesting Anchorage: Birch Tree Tapping

This summer my goal is to gather or harvest at least one plant a month. Usually I gather fiddlehead ferns and fireweed shoots in May, pick wild strawberries in June (I can’t disclose my secret spot!), hunt for boletes in the mid/late summer and harvest berries in the fall.

When UAF Cooperative Extension Service tweeted about birch tree tapping in mid-April, I knew I had to start my harvesting season early. I texted my good friend Ivan, knower of all things apian, and he told me I could find spiles, or birch tree taps, at Alaska Mill & Feed. I have several big birches in my yard, so it was worth a try!

With just a little hardware and a whole lot of stove time, you can have your own homemade birch syrup (I still haven’t reached syrup state, but you’ll see what I came up with in the meantime if you read below). I didn’t take step-by-step photos only because they would be pretty boring. It’s a lot of boiling. Follow this handy guide for a complete explanation.

Please keep in mind that I’ve never done this before, so I have no idea whether I’m doing it incorrectly. The instructions below is what worked for us. Let me know if you use a different/better technique!

Birch tree tapping | Make your own birch syrup | Alaskaknitnat.com

Birch Tree Tapping in Anchorage

Materials:

  • 2 or more 7/16″ birch tree spiles ($5.99 each at Alaska Mill & Feed)
  • 7/16″ drill bit
  • Power drill
  • Rubber mallet
  • 2 or more 2-gallon buckets
  • 3 or more 5-gallon buckets
  • Tall kitchen bags
  • Pushpins
  • Wire sieve
  • Two large soup pots
  • Small saucepan
  • Cheesecloth
  • Lots of freezer space
  • Candy thermometer

Continue reading Harvesting Anchorage: Birch Tree Tapping

How to Cook Perfect Beans

Taco night is always a big hit in our family and one of the most requested ingredients from our son is beans. Sure, canned beans are convenient and inexpensive, but there’s often a bit of sodium in them and when you reheat them, they can easily be overcooked.

Many are hesitant to cook dry beans due to lack of experience and convenience, but with a little planning and minimal effort, you can easily cook creamy, flavorful beans to accompany many food genres. And they are much cheaper than canned beans!

How to cook perfect beans | Alaska Knit Nat

Perfect Beans

Makes about 3 cups

Ingredients:

One cup of dried beans such as pinto, great northern or black

1 Tbs. salt

water

How to cook perfect beans | Alaska Knit Nat

Directions:

The morning you want to have beans for dinner, toss your dry beans into a mesh strainer and rinse with cold water. Add beans and salt to a medium saucepan. Fill with water so pan is about 2/3 full. Cover and let sit all day, about 7-9 hours.

Put pan on stove, still covered, and bring to a boil. Reduce heat and gently simmer beans for 1.5-2 hours. Be sure it’s not at a full rolling boil as the beans can get torn up if overly disturbed. Drain and serve.

*Beany tidbit: If your beans appear shriveled after soaking them it means they are past their prime. They will still taste all right but you may want to buy new beans next time.

How to cook perfect beans | Alaska Knit Nat

Chicken-stuffed Eggplant

Eggplant is a foreign food to me. I’ve only cooked with it once before when I made eggplant parmesan a long time back. They looked so irresistible today at Costco — so purple and shiny without a single flaw. I added a $5 rotisserie chicken, mini heirloom tomatoes and mini bell peppers to my cart and knew I’d be able to throw something together.

I made stuffed eggplant almost like a meatball recipe. They turned out flavorful and not too soggy, thanks to a quick technique inspired by America’s Test Kitchen.

Chicken-stuffed Eggplant | Alaska Knit Nat

Chicken Stuffed Eggplant

Serves 2-3

Ingrdients:

2 medium eggplants, sliced down the middle

2 Tbs. olive oil

1/2 onion, chopped fine

3 mini orange and yellow bell peppers, chopped fine

1/2 stalk celery, chopped fine

1/4 cup diced tomatoes

3 cloves garlic, minced

2 tsp. dried basil

1 tsp. dried oregano

1/2 tin of anchovies, minced (about 3 filets)

1 egg

1/2 cup cooked chicken, diced

2 Tbs. fresh parsley, chopped

3 Tbs. Italian breadcrumbs

1/2 cup parmesan cheese, grated

salt and pepper to taste

Chicken-stuffed Eggplant | Alaska Knit Nat

Directions:

Carefully scoop out the flesh of your eggplants without breaking the skin. Chop the flesh into small pieces. Lightly salt the flesh and hollowed out eggplants. Place eggplant shells in a foil-lined casserole dish and set aside.

In a saute pan, heat the olive oil over medium-high flame. Add the onion, peppers, celery and tomatoes and cook till onions are soft, about five minutes. Add the garlic, basil and oregano and cook another two minutes.

In a mixing bowl, combine the egg, chicken, anchovies, parsley, breadcrumbs and sautéed vegetables. Place the eggplant flesh in a microwave safe bowl and microwave for 30 seconds. Pat dry with a paper towel. This removes excess liquid from the eggplant and makes the filling less soggy. Add the eggplant to the mix and salt and pepper to taste. Add 3 Tbs. of parmesan cheese, mix well and add filling to the eggplant shells. Lightly press the filling and create small mounds in the shells if needs be.

Sprinkle liberally with parmesan cheese and bake for 45 minutes or until browned.

Serve with brown rice.

Chicken-stuffed Eggplant | Alaska Knit Nat

Creamy Potato Salad

We’ve been having an unusually sunny and warm May, which means it’s time for BBQ food. No BBQ is complete without creamy potato salad. This recipe was inspired by one from Cook’s Country Magazine where they incorporate an egg yolk into the dressing. I’m not usually a fan of hard-boiled eggs mingling with my potato salad, but this time it turned out surprisingly well.

I know everyone has a “method” to cooking perfect hard-boiled eggs. My method is to cover the eggs with cold water and pour in a couple of teaspoons of baking soda. Cover and bring to a boil. Uncover and boil for 11 minutes. Then immediately drain and cover with icy cold water. Not only are the yolks perfectly cooked, but the eggs peel easily too.

Creamy Potato Salad | Alaska Knit Nat

Creamy Potato Salad

Serves 4

3 medium yukon gold potatoes, cut into 1-inch cubes

2 hard-boiled eggs, one yolk reserved

2 Tbs. apple cider vinegar

2 tsp. agave nectar or honey

1/2 a celery rib, minced

2 green onions, minced

2 pickles, diced

1/4 cup greek yogurt

2 Tbs. mayonnaise

salt and pepper to taste


Directions:

Toss your diced potatoes into a large pot and cover with water. Add a couple of pinches of salt, cover and bring to a boil. Turn down the heat and simmer till potatoes are just tender — about 8 minutes.

Meanwhile, whisk together the vinegar, agave nectar, and the yolk from one egg. Drain the potatoes and transfer to a bowl. Pour over half the dressing and gently toss to coat. Refrigerate for 30 minutes.

Add the remaining eggs to the remaining dressing and thoroughly mash till the egg whites are small chunks. Add the celery, green onions, pickles, yogurt and mayo. Once the potatoes are cooled, add the remaining dressing. Add salt and pepper to taste. If you prefer your salad even creamier, add a little more mayo.

If you’re looking for a healthier potato salad, why not try this tasty recipe I made with red potatoes? Click on the photo for the recipe:

img_11231