I knit a lot of gifts this last holiday season. With the completion of a belated scarf last week, I’m just about knitted out. I needed a new project that would satisfy my short attention span and was something different.
I found a simple crochet hat pattern on TangledHappy.com that used the herringbone half double crochet stitch. I’d never heard of it, but after a couple of video tutorials, it looked easy enough.
I didn’t have the hook size the pattern called for, but I had something close, so I used what I think was an N size hook (it’s unmarked for some ridiculous reason). This made the gauge off for the original pattern so I had to wing it, which is why I’m posting a pattern on my blog. I also added contrasting trim and pompom.
These are incredibly quick to complete. I made two yesterday and one this morning. They are a great way to use up excess yarn, especially if you double up worsted weight and crochet two strands at once, which I did with the blue hat shown in this pattern.
Quick, Chunky Crochet Hat with Pompom — A Free Pattern from Alaska Knit Nat
Materials:
1 skein of chunky yarn such as Lopi or Lion Brand Thick and Quick OR two strands of heavy worsted yarn crocheted together as one strand.
Now that the holidays are over and my handmade gifts have been delivered I can start posting some more patterns.
Earlier this winter I became mildly obsessed with the brioche stitch. I found this lovely tutorial and pattern for a cowl and I came up with a simple headband/turban using the same stitch.
I took it one step further with this fluffy, scrumptious stitch and decided to make an oversized cowl using larger needles and a wider width. Not only is it super cozy, but you can stretch part of it over your head for a makeshift hood. You can wear it looped around your neck twice or have it hang loosely. It’s a versatile piece that happens to be trendy.
Big Fluffy Brioche Cowl
Materials:
250 grams of heavy worsted yarn such as Lamb’s Pride (I used 2.5 skeins of Loops & Threads Wool to Wash)
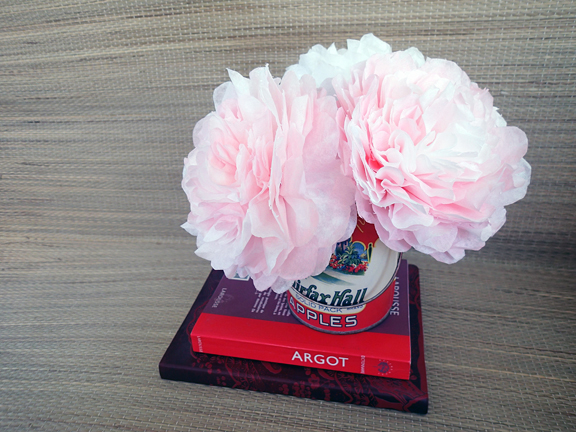
I stayed home sick today and I hate wasting my time in bed, so I decided to mildly craft out. I really love tissue paper flowers but I don’t like spending a ton of time cutting out paper. I found this neat tutorial last year for making coffee filter flowers and I thought I’d take it a step further. I dyed the coffee filters with food coloring and water, let them air dry, and then made them with pipe cleaners as the stem. By using coffee filters I didn’t have to cut the paper to shape. I just shaped the petals, which is far quicker. They really turned out splendidly, don’t you think?
Materials:
White coffee filters
Red food coloring
Liquid medicine syringe or eye dropper
Scissors
Pipe cleaners
Floral tape
Floral wire
Directions:
You’ll be using 12 filters per flower. Fill a small cup with water and about 7 drops of food coloring. Place a few filters at a time onto a plate. With the syringe or eye dropper randomly drop the water all over the filters. Flip them over and do the other side. It’s up to you how much white you want to leave. Hang dry them. Or I guess you could use a hair dryer, but I don’t own one.
When filters are dry, take six at a time and fold them in half three times and cut out a heart shape to make the petals. I cut more off of one set of six. These will be the inside petals.
Rough up the edges of the petals with your scissors. Cut a teeny tiny bit off the point of the filters to create a small hole in each filter.
Inner petals (left) and outer petals
Repeat with second set of six filters, but don’t cut off as much. These will be your outer petals.
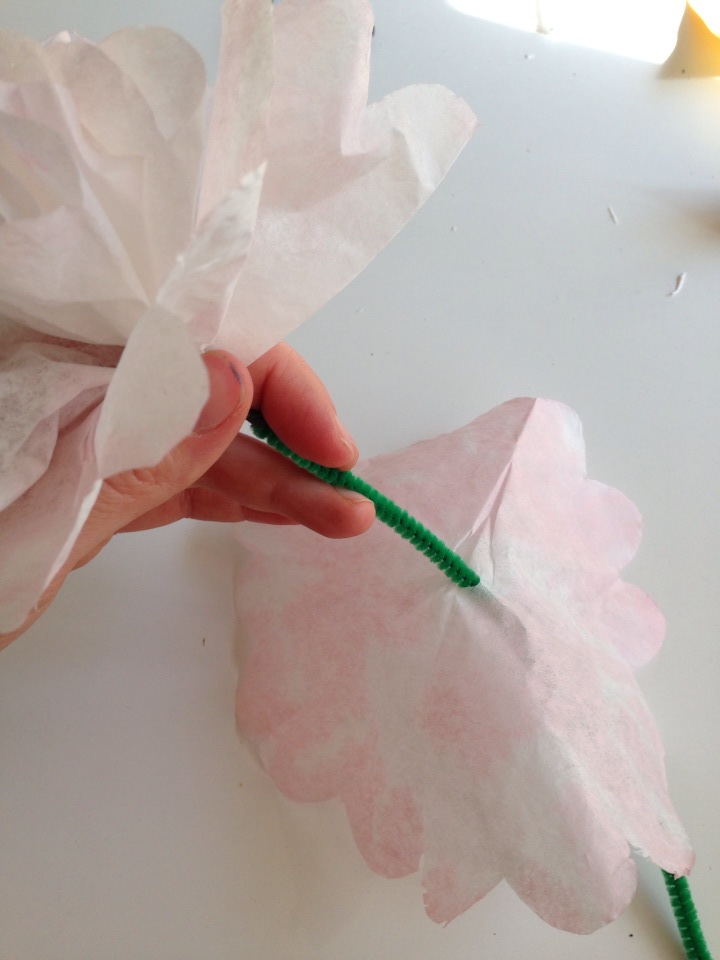
Take your pipe cleaner and create a little nub at one end. Take one sheet of your smaller filter and thread it up to the nub. Wrap the bottom of the filter all around the nub to cover it and secure with floral tape. This way you won’t be able to see the center of the flower.
Thread the next filter onto the pipe cleaner and scrunch it around the nub. Repeat with one filter at a time till you’ve put on all the small filters.
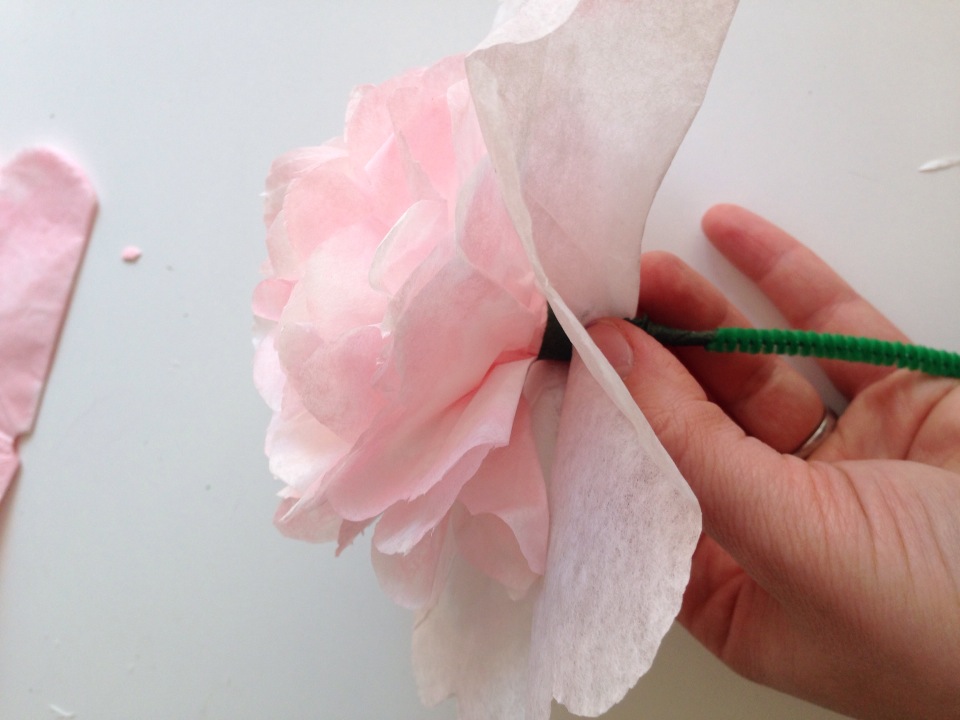
Scrunch around the base of the flower and wrap with floral tape. You’ll now have a small flower and you could call it a day, but I want a huge peony.
Take one larger filter and thread it on the pipe cleaner, but don’t shove it all the way up. Give it a little space so the outer petals are just a little longer than the inner petals. Repeat with the remaining filters. Scrunch up around the base of the flower and secure with floral tape.
Cut a 6-inch piece of floral wire and fold it in half, or just use another pipe cleaner. Stick it to the main stem and continue wrapping with floral tape. This stabilizes the stem. Keep wrapping all the way to the bottom.
Break tape and wrap the bottom of the stem. Ta-da!
These flowers look cheery on a window sill year-round. Peony season is on the way, but I just couldn’t wait. These will definitely do in the meantime.
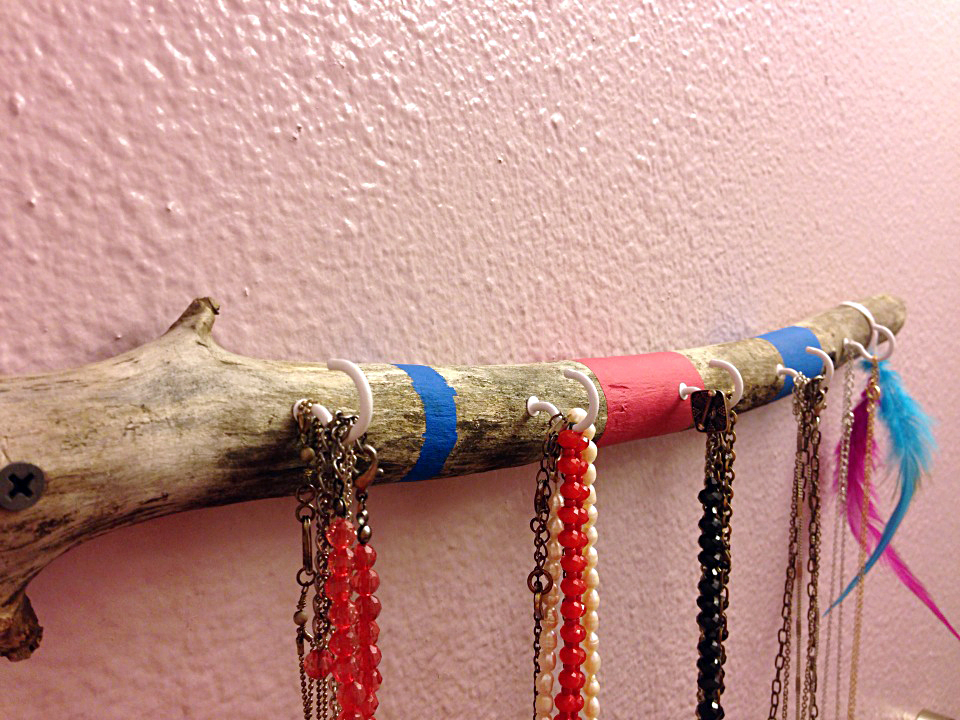
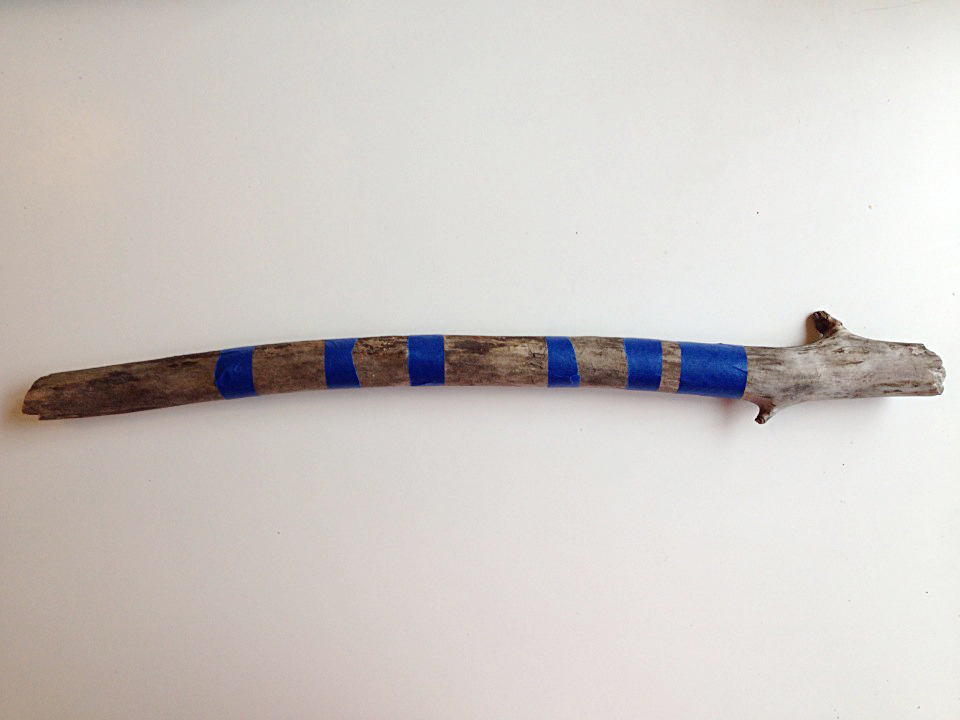
This morning my husband was cleaning up the yard. Amid the brush and rubble I found a lovely stick that would be just perfect for a necklace holder. It looked like this:
So I turned it into this:
Here’s how.
Materials:
One stick, 12-18 inches long, about 2 inches thick
Acrylic paints
Painters or masking tape
Small paint brush
Power drill
4-7 Screw-in cup hooks (found at the hardware store)
Two long wood screws
Feathers and embroidery thread (optional)
Directions:
Clean off any dirt from your stick. Mark the stick with painters tape to set up your stripe pattern.
Paint the stick to your liking. Let dry about 15 minutes and peel away the tape. Let stick dry completely.
Determine where you’d like to drill through your stick on either end. I held up the stick against the wall to find the places that were most flush against the wall, about two inches in from either end. Drill holes the same size as the wood screws through either end of the stick. This is where I let my husband help me because I’m really terrible at power tools.
Determine where you’d like your hooks to go. I used a 12-inch ruler as my guide and pressed the end of a hook into the wood every three inches. You could eyeball it. Hand-screw each hook into the stick.
If you’d like, tie some embroidery thread around a couple of feathers, leaving a foot-long tail of thread. Wrap around one end of the stick for decoration.
Figure out the placement of your necklace holder and drill the wood screws into the previously drilled holes. Tighten screws and make sure it’s secure. Hang necklaces on your new, awesome hippy craft.
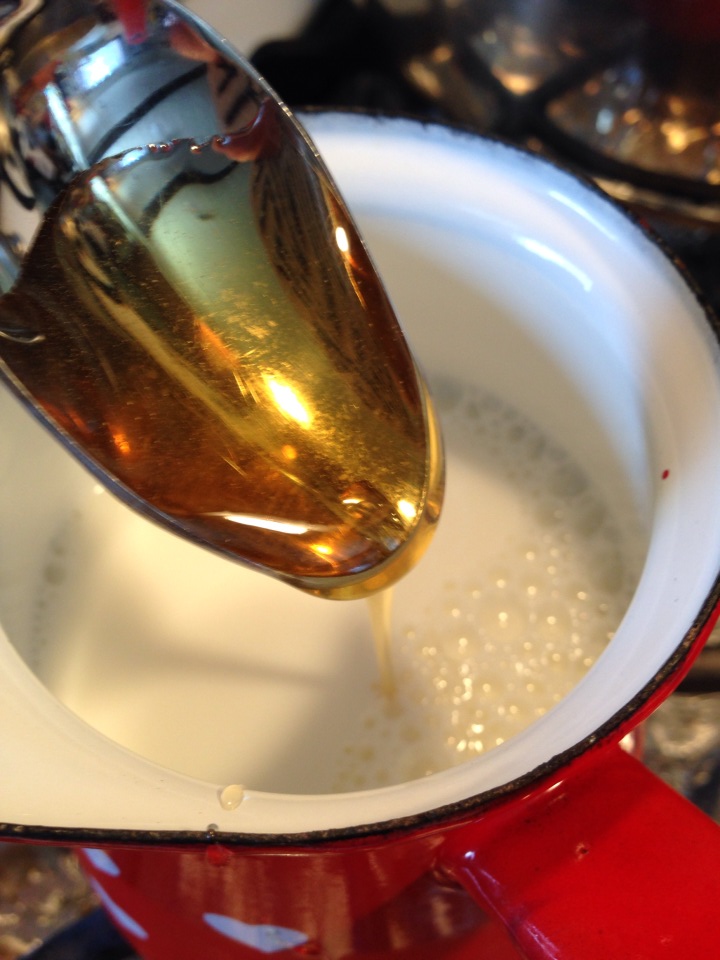
One of my son’s favorite winter treats is hot cocoa. He learned the words when he was about 18 months old. I prefer hot cocoa made with milk but there’s so much sugar and other junk in store bought cocoa, plus usually you are supposed to use water.
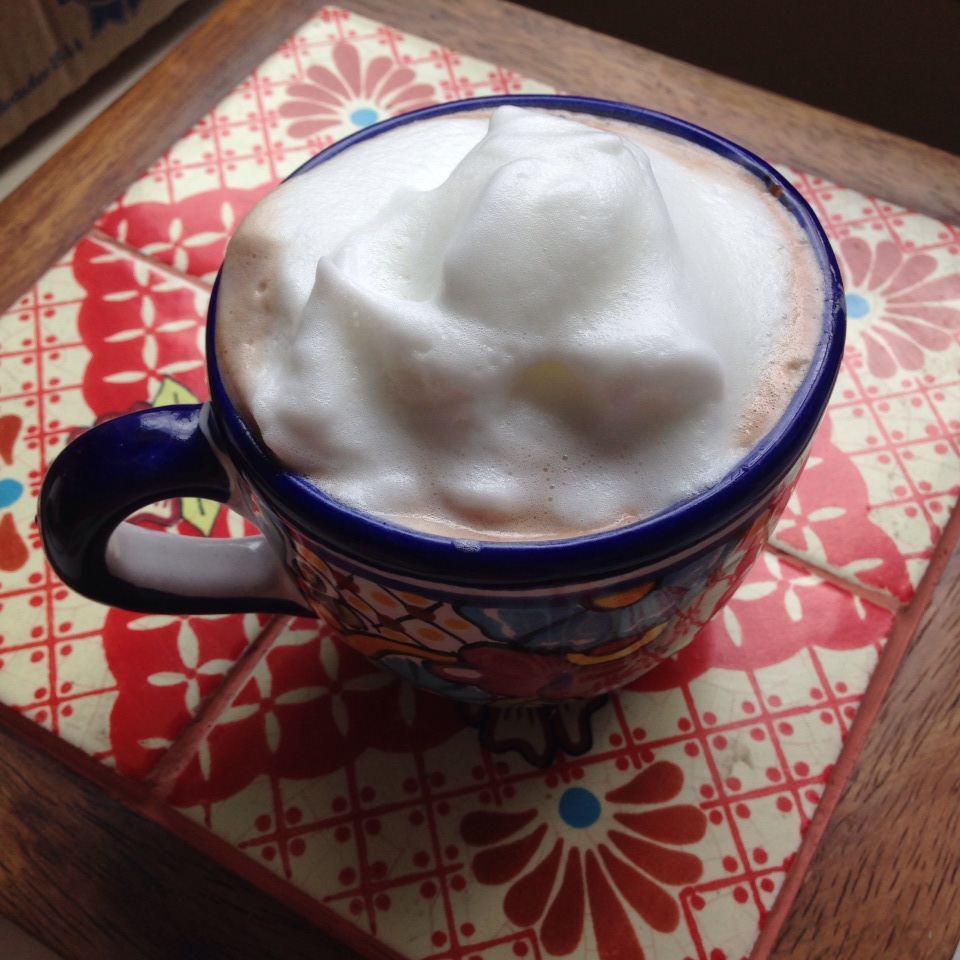
So I made my own. And it’s super good! I also never have whipping cream so to make it extra special I use my Nescafe milk frother to top off the cocoa with a thick layer of foam. It makes me feel like I’m in a fancy cafe.
Ingredients:
1 cup milk
1 tsp. honey or agave nectar
2 tsp. unsweetened cocoa powder
Directions:
In a small saucepan whisk together the milk, honey and cocoa. Heat to desired temperature. Top with whipped cream or milk foam.
I struck thrift store gold last week. I found some choice additions to my wardrobe, some cool stickers for my son, but I truly enjoyed rifling through the kitchen section because by the looks of it, someone had cleared out her bakeware collection and donated piles of cake pans. There were sheet pans in the shape of Big Bird, cats, Christmas trees, Barney the dinosaur and tucked away were three old Jell-o molds — the kind your grandma would have used to make savory aspics or Jell-o salad.
I needed these molds, but I’m not one for Jell-o. It occurred to me they would look pretty great hanging on the wall like glimmering metal flowers.
I just used nails for the two hollow molds and a springy plate display hook for the smaller one. I think they look pretty neat! I wasn’t sure if I should leave them in their original state or paint them fun colors. What do you think? Leave a comment below!