Tag Archives: recipe

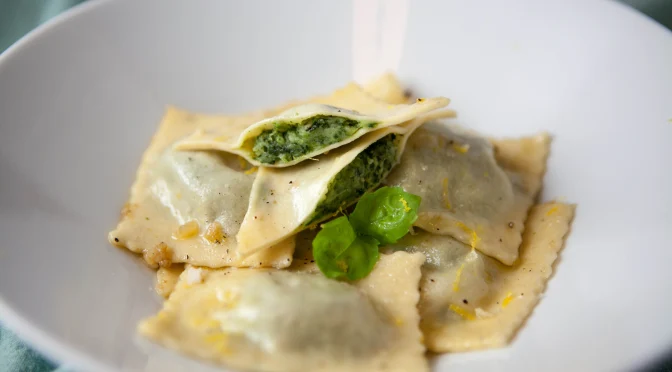
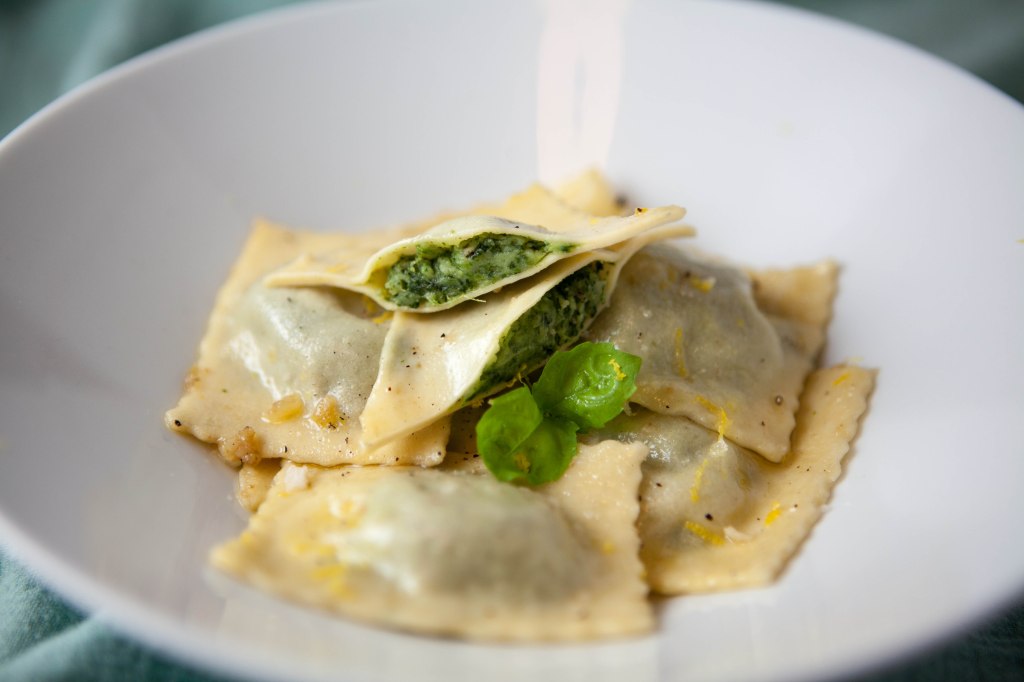
Colcannon Ravioli

It’s St. Patrick’s Day and although I don’t really have much of a connection to this day, I thought it would be fun to serve something festive for dinner.

I’ve made colcannon in the past, which is a traditional Irish potato dish with cabbage, and as I was leafing through an Alice Waters cookbook I saw a recipe for potato and spinach ravioli and I thought it would be the perfect dish for St. Patrick’s Day. I didn’t follow her recipe, but made up my own and after boiling the ravioli I sautéd them like pierogis.

Spinach and Potato ravioli in a garlicky cream sauce

Serves 4

Ingredients

For the pasta dough:

  • 225 grams 00 flour
  • 75 grams fine semolina flour
  • 3 eggs
  • 1 teaspoon olive oil

For the filling:

  • 1 pound potatoes, any variety (I used a combination of russet, new potatoes and fingerling)
  • 8 ounces frozen spinach, thawed and squeezed dry
  • 1/3 cup grated Parmesan cheese
  • 1 tablespoon butter
  • 1/4 cup cream, divided
  • salt and pepper, to taste

For the sauce:

  • 1 tablespoon olive oil
  • 1 tablespoon butter
  • 2 cloves garlic, minced
  • 1/4 cup cream
  • salt and pepper, to taste
  • zest of 1 lemon

Special supplies:

  • Small food processor or immersion blender
  • Potato ricer (you could use a potato masher but it won’t be as smooth)
  • KitchenAid pasta roller adapter (or a hand cranked version would work too)
  • Ravioli cutter (or a pizza cutter would work)
  • Shot glass
  • Large spider strainer (a slotted spoon would work)

Directions:

1. In a large bowl or on a clean, dry countertop, combine the flours. Make a well in the center and add the eggs and olive oil. Whisk the eggs and oil till scrambled, slowly incorporating the flour. Mix into a rough ball and knead for 10 minutes. Wrap in plastic wrap and set aside for at least 30 minutes.

2. Meanwhile, peel the potatoes and cut them into roughly the same sized pieces. Boil in salted water until tender, about 10-15 minutes. Place the squeezed spinach and 2 tablespoons of cream in a food processor and run it till the spinach is puréed. You may need to add a little more cream to get it going. When the potatoes are done, drain them and press through a potato ricer into a medium mixing bowl. Add the spinach, Parmesan, butter, remaining cream and salt and pepper. This should be a relatively homogenous consistency. Add more cream if necessary to make it smooth. Place mixture in a gallon zip top bag and refrigerate until cool.

3. Time to assemble the ravioli. Tear a small handful of dough away from your pasta ball and flatten it with your hand. Set the pasta roller on the largest setting and run the dough through. It’s ok if it tears apart a little. Roughly fold the dough into thirds and run it through again on the same setting. Repeat this three or four times until your dough is smooth.

4. Adjust the roller to the next thinnest setting and run the dough through once. Repeat this step making the roller thinner each time until you’ve run it through the thinnest setting.

5. Place the sheet of dough on a clean counter top. With a ravioli or pizza cutter, cut the sheet in half, across the width, not the length.

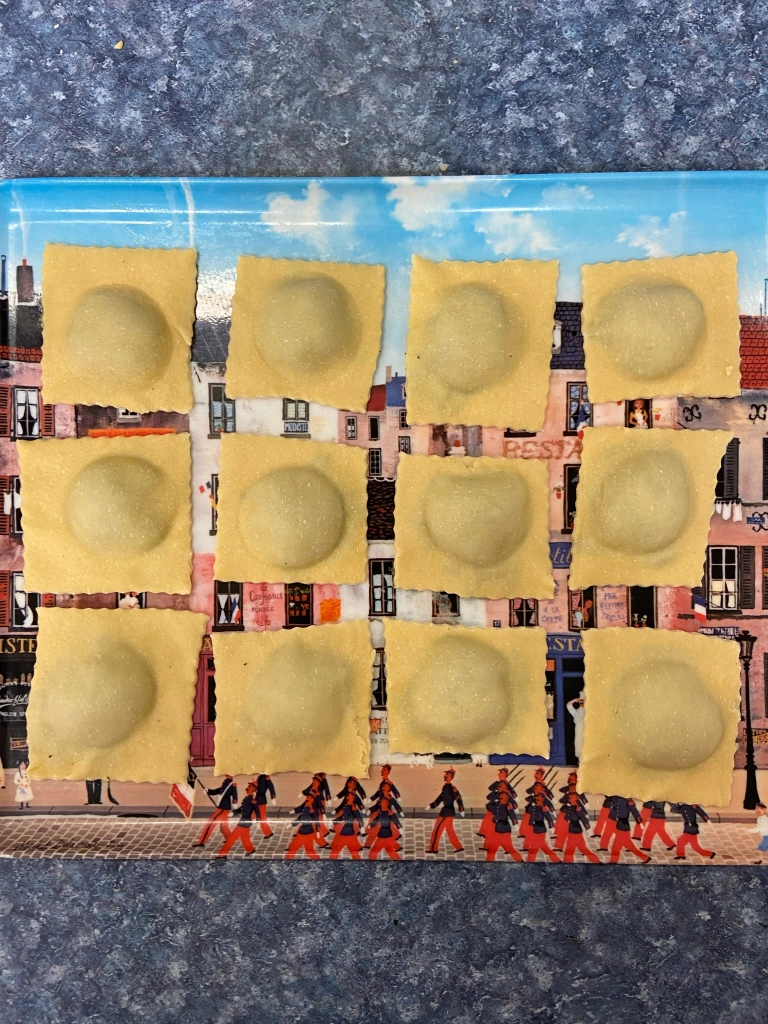
6. Cut a hole in the corner of the bag containing the filling and place about 1 teaspoon of filling on one half of the pasta sheet. Repeat so you have them evenly spaced on the dough, about 6-8 on the sheet. Place the other half of the dough on top and gently press the air out between the sheets without smashing down the filling. Use a shot glass to center the filling and lightly press down (don’t cut through the dough with the shot glass). This makes the ravioli look more uniform.

7. Use your ravioli cutter to cut out 6-8 ravioli. Pick up each ravioli and make sure the edges are sealed. Pinch any areas that look separated. Place on a semolina lined tray. Cover with foil.

8. Repeat steps 3-7 with the remaining dough and filling.

9. Bring a large pot of well-salted water to a boil. Just before the water is boiling, place a large sauté pan over medium-high heat and add the olive oil and butter. Add the garlic and cook till fragrant, turning down the heat to prevent the garlic from burning, about 1 minute. Add the cream, stir, and turn off the heat while you cook the ravioli.

10. Add the ravioli to the boiling water, gently stirring with a spider strainer. Boil the ravioli for 3-5 minutes, until al dente. Remove one ravioli and cut off a corner to see if the dough is cooked to your liking.

11. Heat the sauté pan again over medium-low heat. Remove the ravioli from the water using the spider strainer, give it a good shake to remove excess water, and place into the sauté pan. Gently toss the ravioli till they are all coated with the sauce. Add salt, pepper and lemon zest to taste. You could either serve right away or continue cooking the ravioli until they ever so lightly brown, like pierogis.

12. Serve the ravioli with a drizzle of cream and a grind of pepper.

Cold Sesame Ginger Noodle Salad

Last Saturday my husband and I decided to spend date night shopping around Costco, which was surprisingly mellow at 6 p.m. I came across a package of millet and brown rice ramen noodles that looked like it might fulfill my never-ending craving for pasta while not being totally unhealthy.

I came up with this cold noodle salad that is perfect for a weekday lunch.

Cold Asian Noodle Salad | A simple weekday lunch from Alaskaknitnat.com

Cold Asian Noodle Salad

Ingredients:

  • 2 bricks of millet and brown rice ramen (or regular cheap ramen would do fine, just toss out the spice packet)
  • 6 mini bell peppers, julienned
  • 3 green onions, chopped fine
  • 3 tablespoons chopped cilantro
  • 1/2 cup diced English cucumber

For the dressing:

  • 1/3 cup rice wine vinegar
  • 1/4 cup soy sauce
  • 1 tablespoon toasted sesame oil
  • 1 teaspoon grated ginger
  • 1 garlic clove, minced
  • freshly ground pepper to taste

Directions:

Boil the noodles according the package directions. In the meantime, whisk together the dressing ingredients in a small bowl or jar.

Drain the noodles and rinse with cold water to stop them from cooking. Toss noodles, bell peppers, green onion, cilantro and cucumber in a mixing bowl. Pour dressing over the noodles and toss well. Serve right away or refrigerate until lunch time.

Cold Asian Noodle Salad | A simple weekday lunch from Alaskaknitnat.com

Sparkling sake cupcakes

Lately my four-year-old son has been interested in science experiments, which consist of his mixing random kitchen ingredients together into a nasty gloop and watching what happens.

Not that I disapprove of his experimenting but I would rather he make a kitchen mess if we were actually preparing something edible.

I suggested cupcakes but we were running low on milk, so I harkened back to my one-and-only successful baking recipe: pink champagne cake. I didn’t have any champagne but I had a delightful little bottle of sparkling sake my husband had bought for me.

Instead of a whole cake I halved the recipe and we made lovely pink cupcakes. You can too! By using effervescent booze the cupcakes turn out airy and not overly sweet.

Sparkling sake cupcakes | delightfully airy and semisweet | recipe from Alaskaknitnat.com

Pink sparkling sake cupcakes

Makes about 12 cupcakes

Sparkling sake cupcakes | delightfully airy and semisweet | recipe from Alaskaknitnat.com

Ingredients:

  • 1.5 cups all-purpose flour
  • 1.5 teaspoons baking powder
  • 1/4 teaspoon salt
  • 1 stick of butter, softened
  • 1 cup sugar
  • 1/2 teaspoon vanilla extract
  • 3 egg whites
  • 3 drops red food coloring
  • 1 cup sparkling sake or champagne

Directions:

Preheat oven to 350 degrees F. Mix together the flour, baking powder and salt in a medium bowl. Set aside. With a Kitchen Aid mixer, beat the butter and sugar for several minutes till fluffy. Mix in the vanilla. Add the egg whites one at a time then mix in the food coloring. Beat for a couple of minutes. Incorporate the flour and sake in alternating batches of three, starting and ending with the flour. This way the champagne won’t curdle (but it’s ok if it does).

Add cupcake liners to a cupcake pan. Pour batter into pan and bake for about 20 minutes or until a toothpick comes out clean.

Let cool completely before adding icing. If you’re at a loss for icing, here’s my recipe:

  • 4 oz. cream cheese, softened
  • 1/4 cup sugar
  • 1 cup of heavy whipping cream

Whip together the sugar and cream cheese. When fully combined, add the whipping cream and beat till you get stiff peaks. Slice up fresh strawberries for garnish.

Sparkling sake cupcakes | delightfully airy and semisweet | recipe from Alaskaknitnat.com

Smoky tuna dip – a healthy snack

In Alaska we are pretty seafood-centric. Although we have more than 47,000 miles of shoreline my husband doesn’t like seafood so I rarely cook with it.

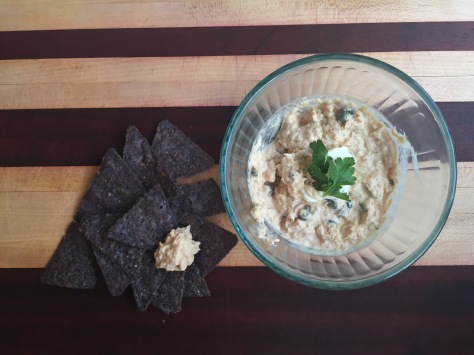
I have access to Alaska halibut and salmon, but sometimes I just want a good old-fashioned can of tuna. Recently I was in Mexico and a friend served up a dip made with smoked mackerel. I don’t have any smoked fish lying around my freezer so I tried my own tuna dip. With a tiny amount of liquid smoke and just a few other ingredients I came up with a smoky, delicious tuna salad that’s perfect for a mid-afternoon snack — and it’s healthy too!

Smoky tuna dip | A healthy snack from Alaskaknitnat.com

I love tuna packed in oil, but that can run pretty expensive at our local fancy grocery store. The big grocery store carries the next best thing for about $2.50 a can.

Smoky tuna dip | A healthy snack from Alaskaknitnat.com

You can use any can of tuna you’d like.

Smoky tuna dip

Ingredients:

  • 1 can of tuna
  • 1 teaspoon of chile in adobo sauce
  • 1.5 teaspoons lime juice
  • 1 tablespoon mayonnaise
  • 1 tablespoon plain, Greek yogurt
  • 1/8 teaspoon liquid smoke
  • 2 teaspoons capers
  • salt and pepper to taste

Drain the tuna and place in a small mixing bowl. Combine all the other ingredients. Serve with corn chips or crackers.

Smoky tuna dip | A healthy snack from Alaskaknitnat.com

Harvesting Anchorage: Mama’s Blueberry Jam

Having been raised harvesting Alaska wildberries you’d think I would be a pro at making jams and jellies. Truth is, I really stink at it. It always comes out syrupy. It’s like you have to have some sort of instinctual jam-making knowledge passed down through the generations.

But in reality all it takes is a lot of stirring. My mom has been making jam since she moved here in 1982. I turned to her for this segment of “Harvesting Anchorage.”

It was a bluebird day in Anchorage as we made our way to our super-secret blueberry spot. The only downside of picking berries on a sunny day is they are harder to see — but I’m not complaining!

Harvesting Anchorage: Mama's Blueberry Jam | A recipe from alaskaknitnat.com Harvesting Anchorage: Mama's Blueberry Jam | A recipe from alaskaknitnat.com

Mama’s Blueberry Jam — a free recipe

Cooking time: about 30 minutes

Ingredients:

  • 8 cups blueberries
  • 4 cups white sugar
  • zest and juice of 1 lemon (optional)

Continue reading Harvesting Anchorage: Mama’s Blueberry Jam

Pizza on the Grill

My old college friends are here for a visit this week and of course they arrive on the first cloudy day in two weeks. This morning we had planned on making my creamy tomato tortellini soup, but by mid-afternoon the sun finally came out and it was evident that soup was inappropriate. We decided on pizza on the grill.

This is a dish my mom is an expert at preparing. She makes the dough from scratch, but we didn’t have the time. I discovered that my grocery store sells balls of pizza dough in the bakery section for just $3. This makes pizza a quick, easy dish.

Good pizza tends to be cooked in a really hot oven and my oven just doesn’t get hot enough. My gas grill, though, can heat up pretty well. Pizza on the grill is easy and the crust comes out wonderfully crispy. The secret is to use a pizza grate, which looks a bit like a fan filter and only costs a few bucks at a restaurant supply store. The other secret is to grill the rolled out dough on one side before adding the toppings.

Pizza on the grill | A simple recipe from Alaskaknitnat.com

Pizza on the grill

Ingredients:

  • 2 balls of pre-made pizza dough
  • shredded mozzarella cheese
  • simple tomato sauce
  • toppings of choice such as Italian sausage, mushrooms and Kalamata olives.
  • Pizza grate (can be purchased at restaurant kitchen supply stores)

Pizza on the grill | A simple recipe from Alaskaknitnat.com

Directions:

Let the dough sit at room temperature for 30 minutes. Heat gas grill to hot for 15 minutes. Turn down burners to medium-hot.

opizza2

Flour and roll out the dough till it’s pizza size and place on pizza grate. Place on the grill and close the grill for about 3-5 minutes, until the side down is browned. Flip and remove from grill. Add tomato sauce, cheese and toppings and place back on the grill until cheese is melted and bubbly, about 5 minutes and bottom of the pizza is browned.

Pizza on the grill | A simple recipe from Alaskaknitnat.com

Slice and serve with a simple garden salad.

Pizza on the grill | A simple recipe from Alaskaknitnat.com

Harvesting Anchorage: Rose and rhubarb cookies (and a Rose Collins)

As part of my personal challenge to forage at least one edible plant a month this summer in Anchorage, I decided to revisit wild rose petals. Several years back I collected these perfectly pink petals and made a just-OK jelly out of them. Thing is, I don’t eat jelly. I’m not a toast and jam kind of gal, I guess.

This time I opted to make rose petal syrup. It was easy to prepare and resulted in a gorgeous pink concoction that tasted as good as roses smell.

Harvesting Anchorage: Wild Rose and Rhubarb Cookies | A recipe from Alaskaknitnat.com
You can find wild roses just about everywhere in Anchorage in June. This bush is on the on-ramp to the Seward Highway.

Harvesting Anchorage: Wild Rose and Rhubarb Cookies | A recipe from Alaskaknitnat.com

The wild roses are in full bloom here in Anchorage and it’s hard not to find them. I picked petals on the side of the highway, on my street and in my back yard. They have been in bloom since the first week of June and will probably be around for another week before they fade, fall and begin to turn into rose hips (and that’s another foraging adventure!)

Rose Petal Syrup 

Harvesting Anchorage: Wild Rose and Rhubarb Cookies | A recipe from Alaskaknitnat.com

To make one bottle of syrup I collected about 2 gently packed cups of petals. Be ready to encounter some caterpillars, bugs and spiders (I lost about a cup of petals when I spotted an arachnid creeping around my collecting jar).

Harvesting Anchorage: Wild Rose and Rhubarb Cookies | A recipe from Alaskaknitnat.com

I followed this recipe from Nitha Kitchen to make the syrup.

*2023 update* – I realized I didn’t have a written recipe for the syrup. Here it is!
Ingredients:

6 cups fresh wild rose petals
5 cups sugar
1 quart plus 1 cup of water
2 teaspoons salt
2 tablespoons lemon juice

Fill the sink with cold water and pour in the petals. Stir them around and let the bugs and debris settle. Spin the petals dry in a salad spinner and place in a medium mixing bowl. Add 3/4 cup of sugar and muddle the petals with a potato masher.

Place the pulpy petals in a sealable container in the fridge overnight. Before cleaning the mixing bowl, scoop out remaining sugar gloop and exfoliate your hands. It’s lovely.

The next day, bring the water to a boil. Add the remaining sugar till dissolved. Toss in the petals and any pulp, lemon juice and salt and simmer on low until the color has been extracted from the petals. There’s no science to this. I think I simmered mine for 30 minutes. The liquid should be bright pink.

Turn off the heat and let the syrup cool. Using a mesh strainer lined with a clean linen dishcloth, ladle the syrup into a pitcher, pressing on the petals and tossing them as you go.

Pour into sanitized jars or bottles. Keep refrigerated. Keeps for several months.

Continue reading Harvesting Anchorage: Rose and rhubarb cookies (and a Rose Collins)

Chicken & Vegetable Stew

I came home from work today and didn’t want to think much about making dinner. What with eight wedding floral gigs this summer, parenting, plus my near full-time job, I have a lot of other things on my mind.

Enter condensed cream of chicken soup. I tend to avoid recipes that call for this salty, globby ingredient but sometimes I’ll make an exception.

Chicken, veggies, herbs and soup over rice or noodles is always a crowd pleaser. Comfort food at its finest.

This was simple to assemble and although it’s not quick, it requires very little effort or thought, which is perfect for today.

Chicken & Vegetable Stew | An easy recipe from Alaskaknitnat.com

Chicken & Vegetable Stew-like Casserole Dinner

Serves 4

Ingredients:

  • 2 tbs. butter
  • olive oil
  • 3-4 skinless chicken thighs (breast works too)
  • 1/2 cup flour
  • 3 celery stalks, chopped
  • 1/2 onion, chopped (about 1 cup)
  • 3 carrots, chopped
  • 1 bay leaf
  • 2 Tbs. chopped fresh parsley
  • 1 can cream of chicken soup
  • 6 oz. cream cheese
  • chicken stock
  • 1/2 cup frozen peas
  • 1/2 cup frozen green beans
  • 1/2 cup frozen peas
  • salt and pepper

Directions:

Preheat oven to 350 degrees F. Heat butter and 2 Tbs. olive oil in a dutch oven oven. Place flour in a pie pan. Dredge chicken thighs in flour and shake off any excess. Place thighs in dutch oven and brown on both sides, about 5 minutes total. Set thighs aside and pour out excess oil.

Chicken & Vegetable Stew | An easy recipe from Alaskaknitnat.com

Add another tablespoon of oil and toss in the celery, onion and carrot. Cook until onions are soft, about 5 minutes. Add the parsley, bay leaf and cream of chicken soup. Fill the empty can with chicken stock and pour that too. Break up the cream cheese with your fingers and add to the pot. Add salt and pepper to taste.

Nestle the thighs into the sauce and place into the oven. Take out and stir the pot every 20 minutes or so to prevent any burning.

Chicken & Vegetable Stew | An easy recipe from Alaskaknitnat.com


After 45 minutes in the oven, stir in the frozen veggies and break up the thighs with a fork. Place back in the oven and bake another 30 minutes.

Remove from oven and break up any other chicken pieces. Remove bay leaf and serve over egg noodles or brown rice.

Chicken & Vegetable Stew | An easy recipe from Alaskaknitnat.com

Harvesting Anchorage: Spruce tips

After my less-than-stellar morel hunt last weekend I needed to forage something more gratifying. It’s the perfect time for spruce tips. Pretty much all the spruce trees in town are boasting bright green tips with brown papery casings. I ventured as far as my yard to collect a pound of them. They required very little processing; just remove the papery casings and you’re good to go.

Harvesting Anchorage: Spruce tips | Alaskaknitnat.com

Harvesting Anchorage: Spruce tips | Alaskaknitnat.com

I’ve never been quite sure what to make with these edibles. I’m not much for tea or jelly. I wanted something savory.

Harvesting Anchorage: Spruce tips | Alaskaknitnat.com

I first referenced the Goddess of Alaska Forests, Laurie Constantino, and made a delectable dip with mayo, Greek yogurt, lemon juice and minced spruce tips. It was perfect for the garlic bread crusts I had leftover on my dinner plate last night.

Harvesting Anchorage: Spruce tips | Alaskaknitnat.com

Recently a friend of mine told me about a Juneau-based blog that’s all about foraging Alaska edibles. There was an intriguing recipe for spruce tip gnocchi. I had to try it.

Harvesting Anchorage: Spruce tips | Alaskaknitnat.com

Continue reading Harvesting Anchorage: Spruce tips

Lazy Lasagna

My family requested lasagna for dinner yesterday, but I didn’t get home till 5 p.m. so it would have been a mad dash to get lasagna on the table by 6:30.

Here’s what I made instead. Although it’s about the same ingredients as lasagna I didn’t have to take the time to layer everything out. I just threw it all together, topped it with cheese and stuck it in the oven. Easy peasy.

Lazy Lasagna | A delicious and simple recipe from Alaskaknitnat.com

Lazy Lasagna

Serves 6-8

Ingredients:

  • 12 oz. lasagna noodles
  • 2 Tbs. olive oil
  • 8 oz. crimini mushrooms, sliced
  • 1 lb. loose Italian sausage
  • One bunch of fresh spinach, roughly chopped
  • 1 large jar of spaghetti sauce
  • 1 cup shredded mozzarella cheese
  • 1 cup freshly grated parmesan cheese

Directions:

Preheat oven to 375 degrees F. Bring a large pot of salted water to a boil. When the water boils break up the lasagna noodles into irregular pieces and add to the pot. Cook according to box instructions, about 12 minutes.

In the meantime, heat oil in a large, ovenproof skillet. Add the mushrooms and sauté until some of the liquid has evaporated, about 5 minutes. Add the spinach and a pinch of salt. Sauté until spinach is wilted, another minute. Set mushrooms and spinach aside.

Without cleaning the pan, add the sausage and brown. Add the sauce, mushrooms and spinach. Combine well. Drain the noodles and add to the skillet. Add half the cheeses and mix well. Top with the remaining cheese, cover and bake for 35 minutes. Uncover and bake another 10 minutes. Remove from oven and let cool 10 minutes.


Lazy Lasagna | A delicious and simple recipe from Alaskaknitnat.com