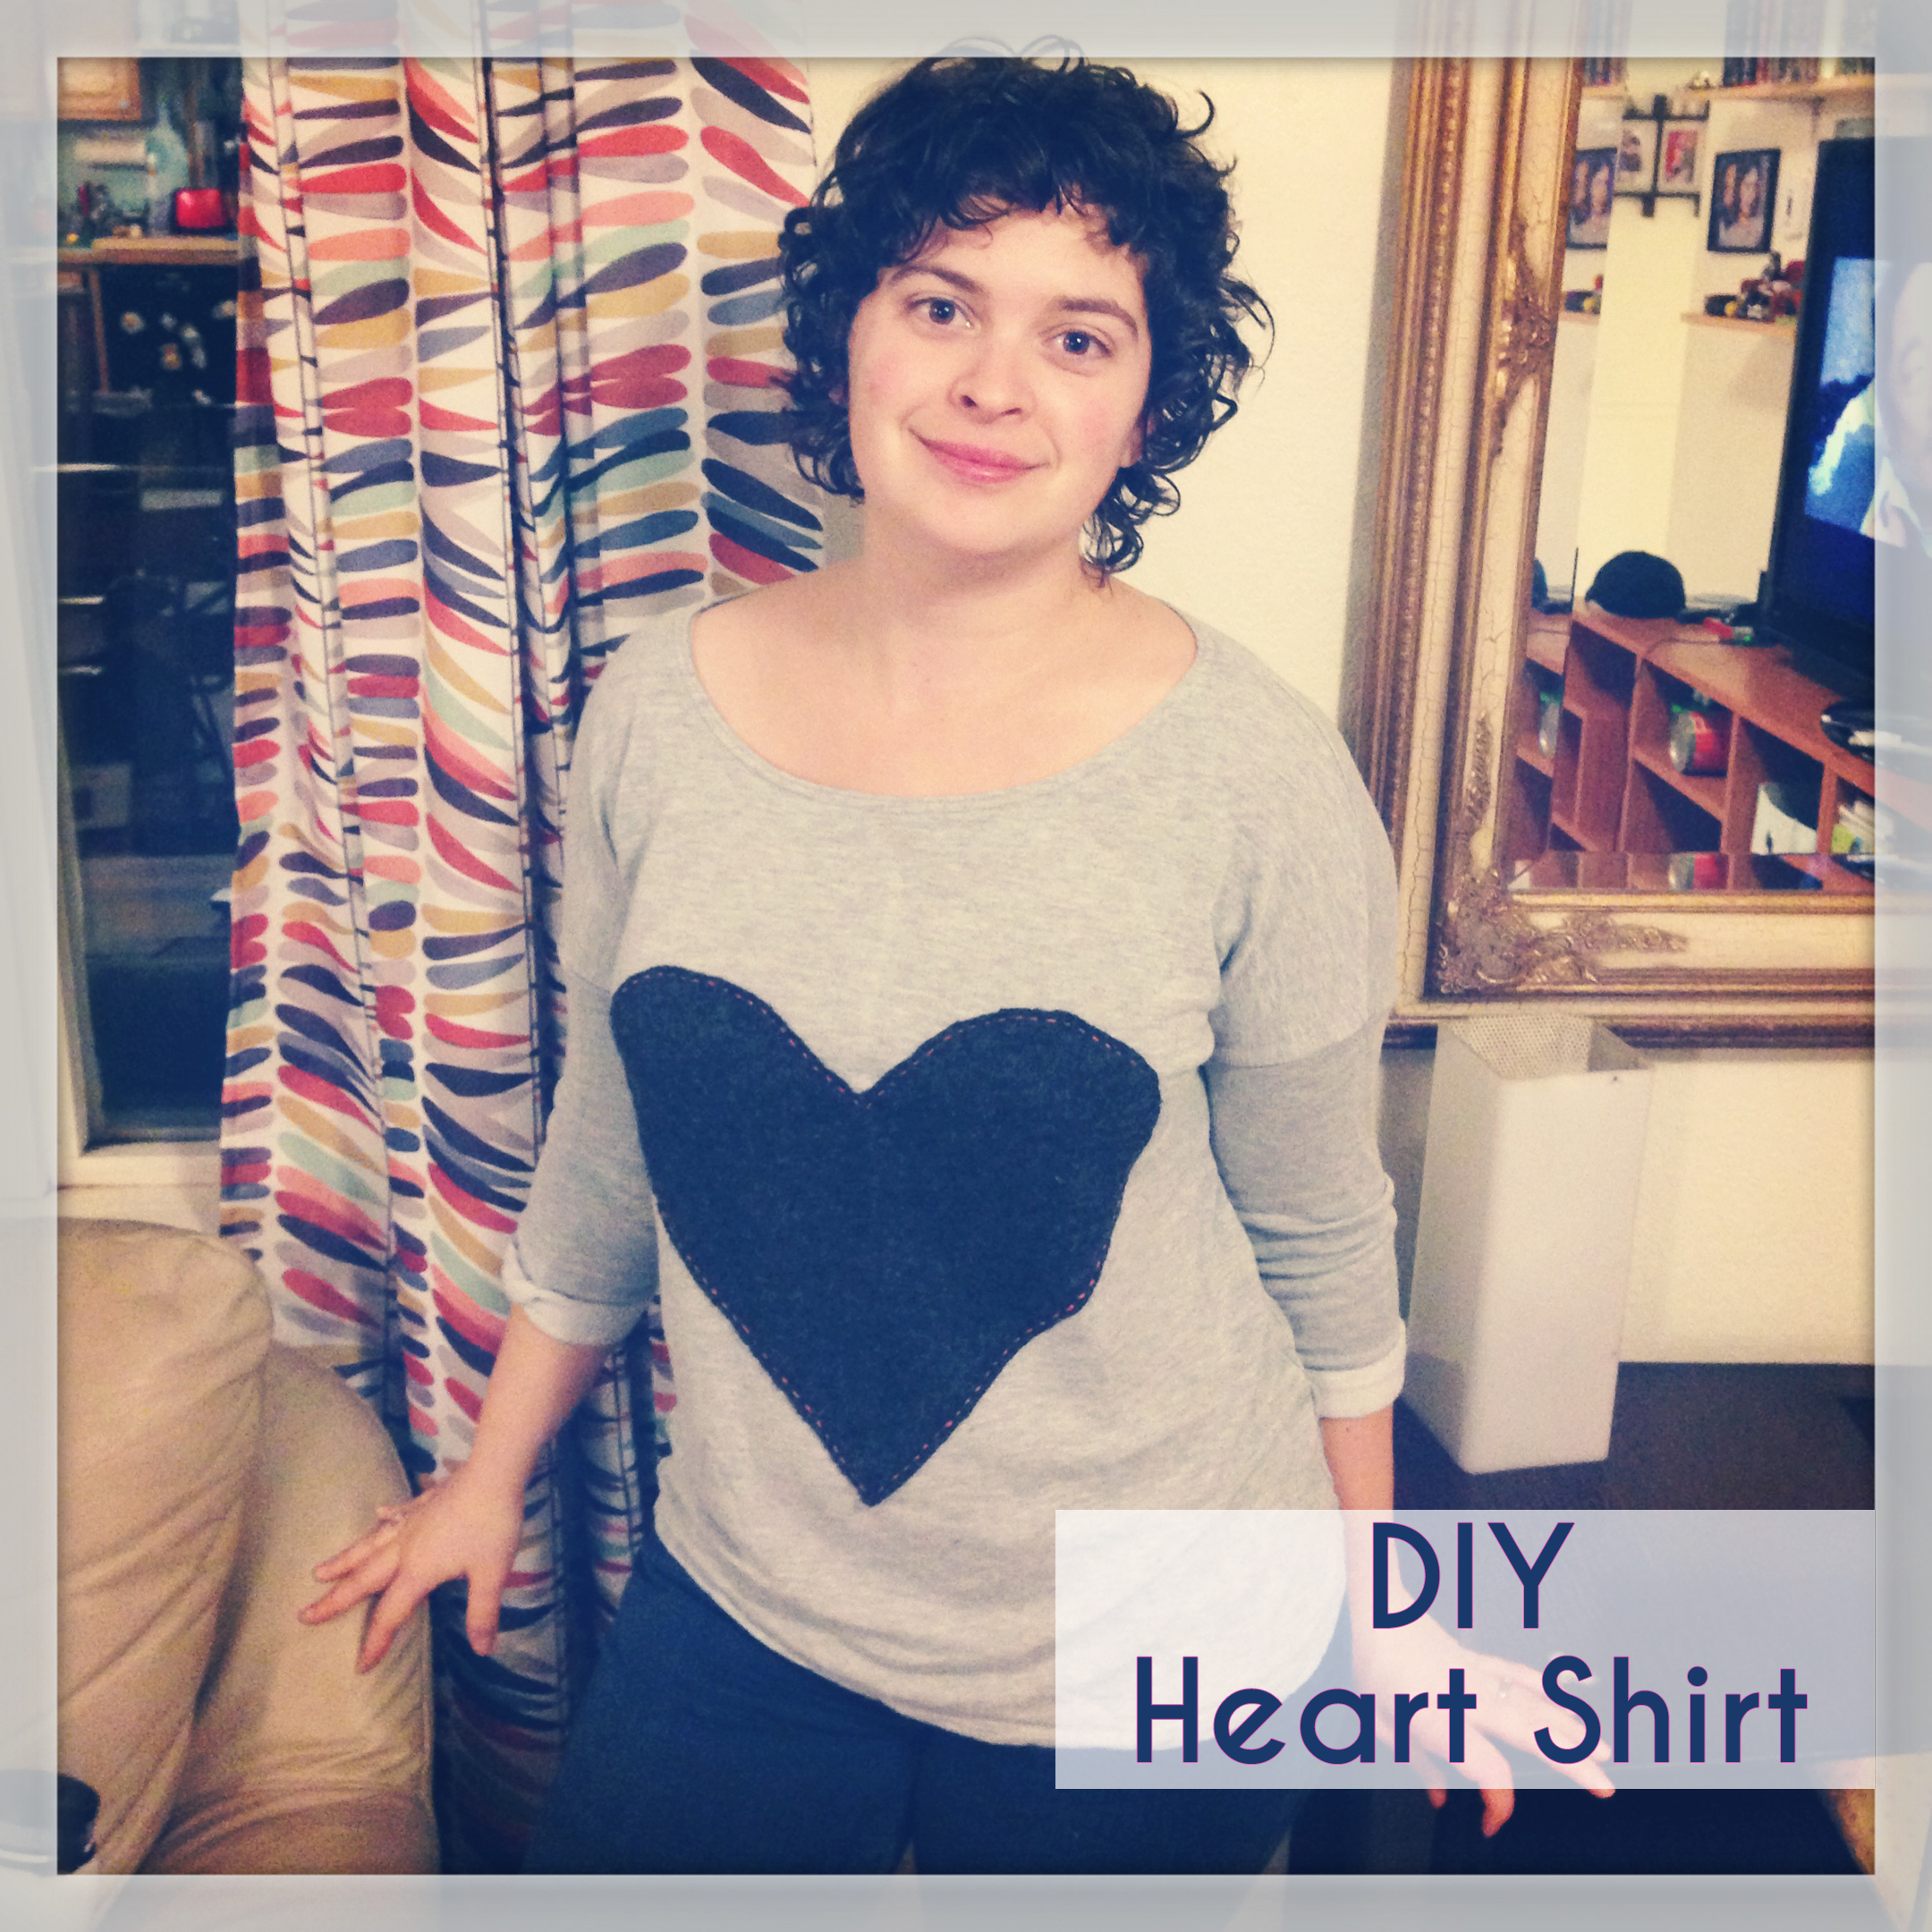
Each year I try to give my two sisters equally awesome handmade gifts that follow a similar theme. I usually make something for myself so we can all dorkily match. Last year was a winner: shirts with giant cashmere hearts.
This is a low-skill craft. It requires hand sewing, but nothing complicated. I turn to my local thrift shops for blank sweatshirts and cashmere sweaters. Any tight-knit sweater will work if you aren’t able to find cashmere. Mohair or angora might be fun. Be sure to wash and dry your sweater on the hot setting a couple of times to ensure it is completely done shrinking. If you sew on a fresh sweater when you wash the final product the heart will shrink and cause the shirt to tear and bunch up where you sewed it on (I know from disappointing experience).
Our front door is a sad, sad sight. It’s what I imagine the Crooked Man of nursery rhyme’s front door would look like. At Halloween, it must look so haunted because not once in the five years we’ve lived here has a single child trick-or-treated.
It’s beyond improvement, which is why I never bother to add holiday decorations; but when we were at Lowe’s yesterday picking up a Christmas tree, this hastily scrawled sign caught my attention:
More specifically, “FREE” caught my attention. Now, what could I use pine boughs for? I’d already utilized them for our Thanksgiving table décor, so I thought why not shoddily assemble a front door wreath-type thingie?
It cost me zero dollars and took five minutes to make. It took me 15 minutes to affix to our front door because I couldn’t find a single nail in our garage, but I worked it out. I don’t anticipate it lasting through Christmas, but it certainly adds cheer to our depressing entryway.
DIY Festive Door Decoration: No. 3 on Alaska Knit Nat’s DIY Holiday Craft Guide
What you’ll need:
2-4 pine boughs
Twist ties (I used the long ones that held together our Christmas lights)
Pretty ribbon
A small nail
Hammer
Directions:
1. Trim off any excess or dead branches at the base of each pine bough.
2. Arrange the boughs like a big fan.
3. Tie the boughs together using a couple of twist ties.
4. Cover up the twist ties by tying ribbon around them. Form a large bow out of the ribbon.
I’m not good at fair isle knitting. Usually everything comes out three sizes too small. I pull the yarn too tightly. Or I follow a pattern that slowly incorporates a new color and I’m left with long strands of yarn on the wrong side.
Today I decided to try fair isle again by designing something simple — zig zags. I’ve included the chart and the row-by-row instructions. I recommend knitting the patterned portion in a place with little distraction and possibly without other people. I end up counting out loud “knit one, knit two, knit three, knit two,” etc. so I don’t get lost in the pattern. It’s not difficult, but requires a fair amount of focus.
The advantage to fair isle knitting is you create a thick wrong side to your fabric, which means a warmer hat. Below is a photo of the inside of the hat.
Zig Zag Hat
Materials:
size US 8 circular needle
size US 9 circular and double pointed needles
Loops & Threads Wool to Wash, one skein of neon orange (color A) and one electric blue (color B) Any heavy worsted weight wool yarn would work.
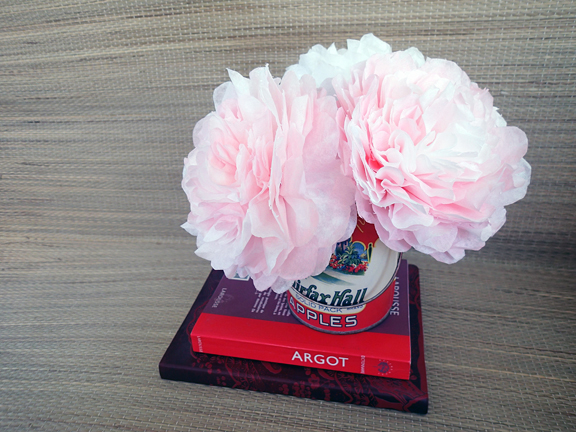
I stayed home sick today and I hate wasting my time in bed, so I decided to mildly craft out. I really love tissue paper flowers but I don’t like spending a ton of time cutting out paper. I found this neat tutorial last year for making coffee filter flowers and I thought I’d take it a step further. I dyed the coffee filters with food coloring and water, let them air dry, and then made them with pipe cleaners as the stem. By using coffee filters I didn’t have to cut the paper to shape. I just shaped the petals, which is far quicker. They really turned out splendidly, don’t you think?
Materials:
White coffee filters
Red food coloring
Liquid medicine syringe or eye dropper
Scissors
Pipe cleaners
Floral tape
Floral wire
Directions:
You’ll be using 12 filters per flower. Fill a small cup with water and about 7 drops of food coloring. Place a few filters at a time onto a plate. With the syringe or eye dropper randomly drop the water all over the filters. Flip them over and do the other side. It’s up to you how much white you want to leave. Hang dry them. Or I guess you could use a hair dryer, but I don’t own one.
When filters are dry, take six at a time and fold them in half three times and cut out a heart shape to make the petals. I cut more off of one set of six. These will be the inside petals.
Rough up the edges of the petals with your scissors. Cut a teeny tiny bit off the point of the filters to create a small hole in each filter.
Inner petals (left) and outer petals
Repeat with second set of six filters, but don’t cut off as much. These will be your outer petals.
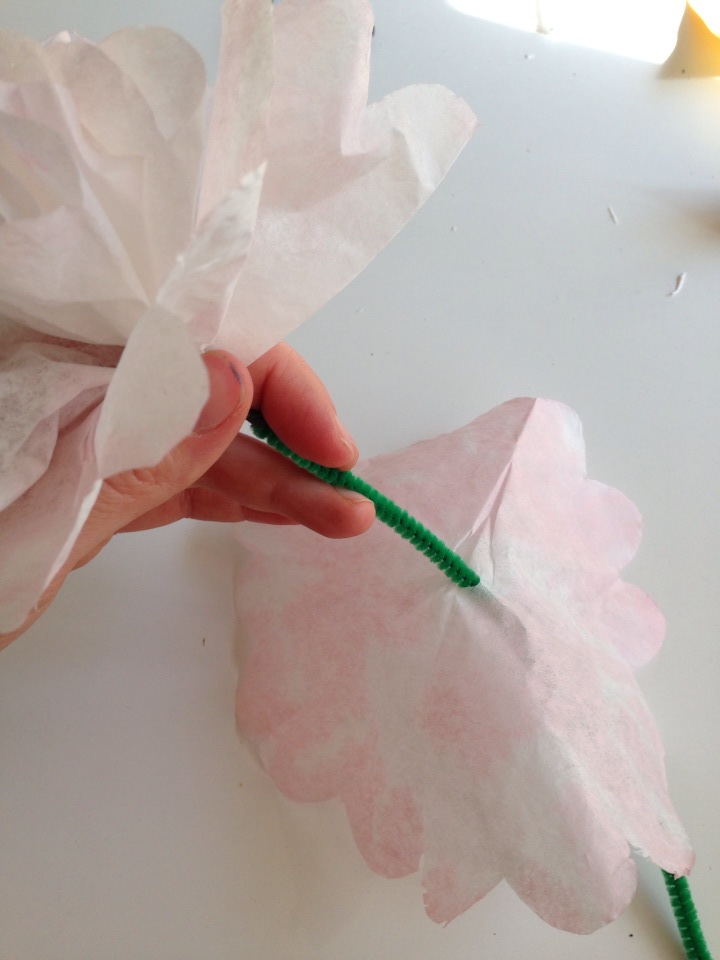
Take your pipe cleaner and create a little nub at one end. Take one sheet of your smaller filter and thread it up to the nub. Wrap the bottom of the filter all around the nub to cover it and secure with floral tape. This way you won’t be able to see the center of the flower.
Thread the next filter onto the pipe cleaner and scrunch it around the nub. Repeat with one filter at a time till you’ve put on all the small filters.
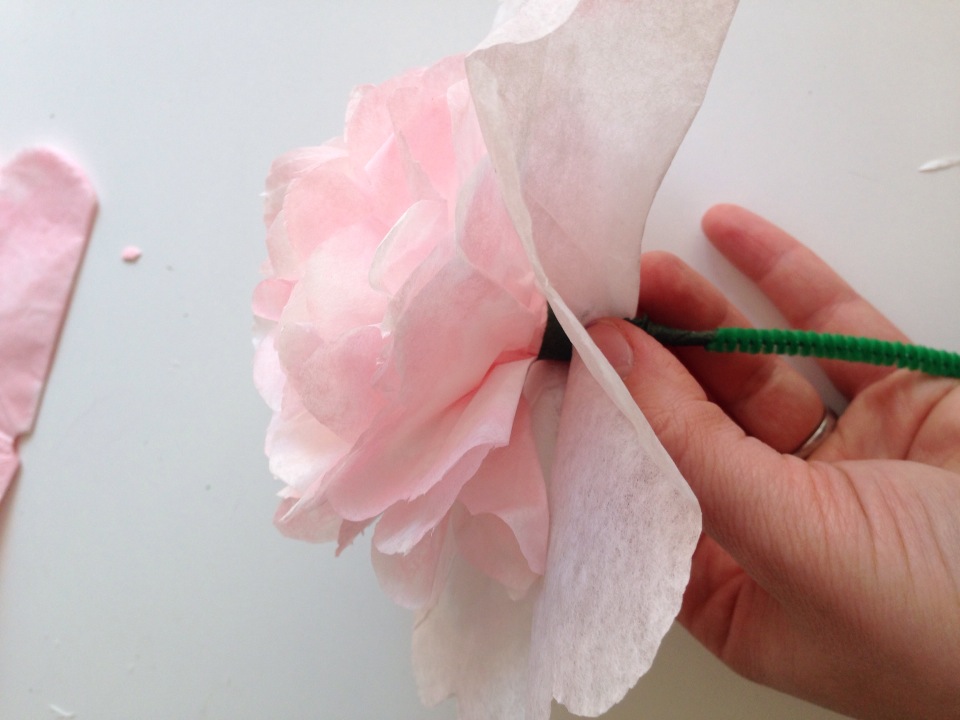
Scrunch around the base of the flower and wrap with floral tape. You’ll now have a small flower and you could call it a day, but I want a huge peony.
Take one larger filter and thread it on the pipe cleaner, but don’t shove it all the way up. Give it a little space so the outer petals are just a little longer than the inner petals. Repeat with the remaining filters. Scrunch up around the base of the flower and secure with floral tape.
Cut a 6-inch piece of floral wire and fold it in half, or just use another pipe cleaner. Stick it to the main stem and continue wrapping with floral tape. This stabilizes the stem. Keep wrapping all the way to the bottom.
Break tape and wrap the bottom of the stem. Ta-da!
These flowers look cheery on a window sill year-round. Peony season is on the way, but I just couldn’t wait. These will definitely do in the meantime.
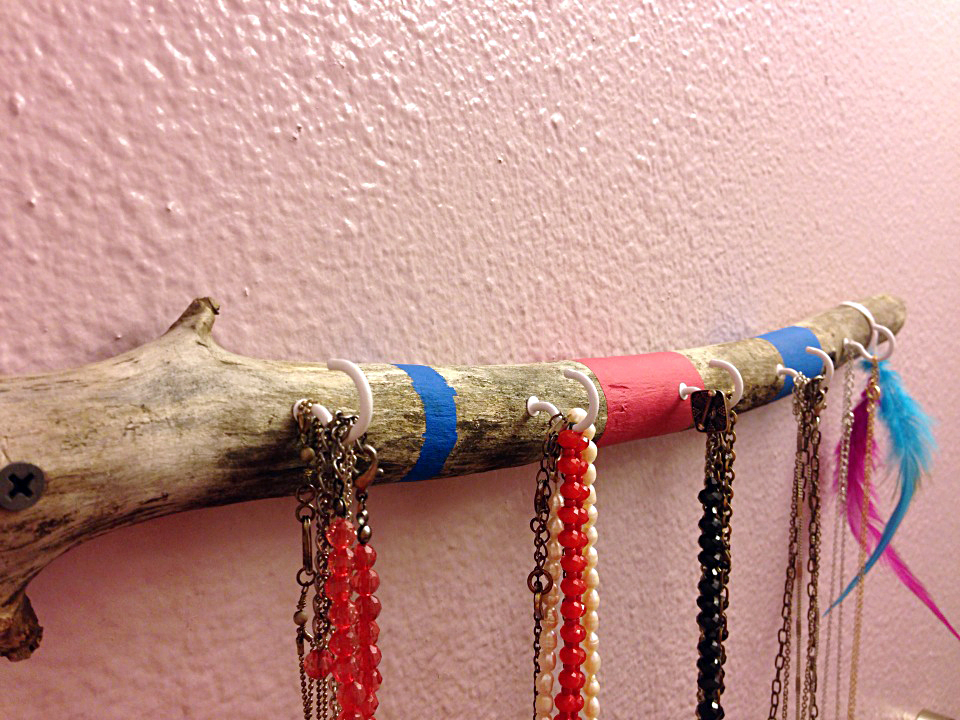
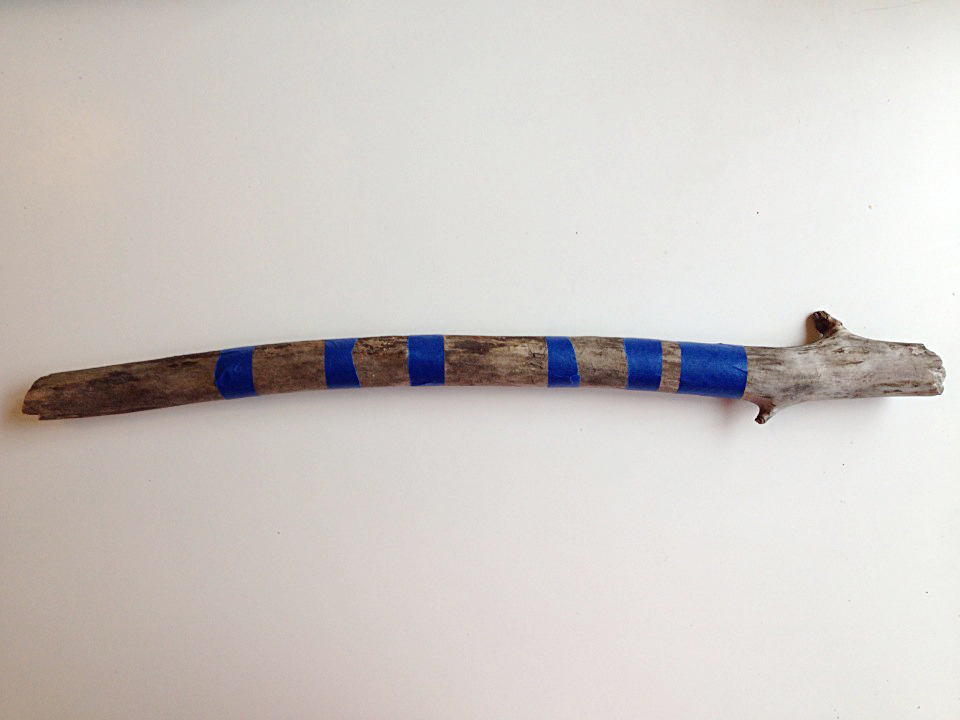
This morning my husband was cleaning up the yard. Amid the brush and rubble I found a lovely stick that would be just perfect for a necklace holder. It looked like this:
So I turned it into this:
Here’s how.
Materials:
One stick, 12-18 inches long, about 2 inches thick
Acrylic paints
Painters or masking tape
Small paint brush
Power drill
4-7 Screw-in cup hooks (found at the hardware store)
Two long wood screws
Feathers and embroidery thread (optional)
Directions:
Clean off any dirt from your stick. Mark the stick with painters tape to set up your stripe pattern.
Paint the stick to your liking. Let dry about 15 minutes and peel away the tape. Let stick dry completely.
Determine where you’d like to drill through your stick on either end. I held up the stick against the wall to find the places that were most flush against the wall, about two inches in from either end. Drill holes the same size as the wood screws through either end of the stick. This is where I let my husband help me because I’m really terrible at power tools.
Determine where you’d like your hooks to go. I used a 12-inch ruler as my guide and pressed the end of a hook into the wood every three inches. You could eyeball it. Hand-screw each hook into the stick.
If you’d like, tie some embroidery thread around a couple of feathers, leaving a foot-long tail of thread. Wrap around one end of the stick for decoration.
Figure out the placement of your necklace holder and drill the wood screws into the previously drilled holes. Tighten screws and make sure it’s secure. Hang necklaces on your new, awesome hippy craft.
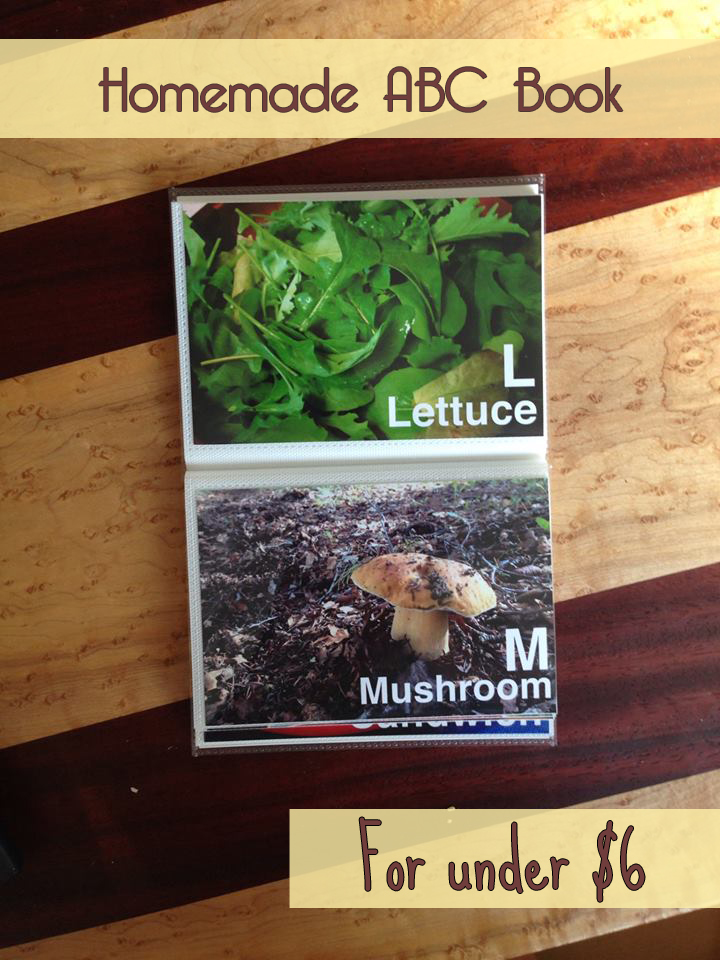
My son is starting to pick up on the alphabet and lately he’s been into ABC books. I was browsing Pinterest and came across a great idea. A homemade ABC book using personal photos.
With some basic Photoshop skills and a trip to Walgreens and Michael’s Crafts I was able to make a fantastic photo book for only $5.50.
You can use phone, Instagram or digital camera photos as long as you size them well. I’m a self-taught Photoshop gal. Here’s a step-by-step guide to how I made my book, but I’m sure my techniques are not exactly textbook methods — but they work!
Step 1: Open your image in Photoshop. I encourage you to make all your photos the same resolution — one of a printable quality — so that they all look more uniform. My personal photos come in several different sizes and resolutions depending on what camera I used. I made them all the same so the font size would be the same on each photo. A 140 pt. font on a 180 dpi resolution will look a different size from 140 pt. on 300 dpi.
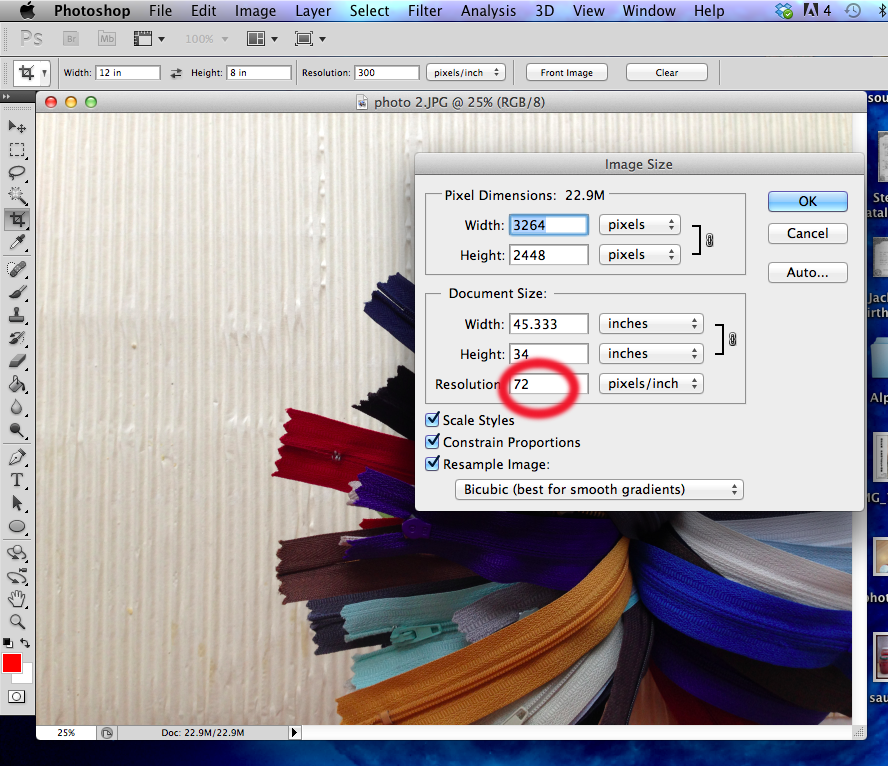
Step 2: Go to Image<Image size and take a look at the size of your photo. If the dpi is 180 or more, you’re good to go. Most of my Instagram and iPhone photos are really low resolution, such as 72 dpi, but really large in dimension, such as 45 inches wide. If you were to just resize the photo and leave a low resolution they wouldn’t print well.
Step 3: Click the crop tool and enter the dimension and resolution you want for the photo. I selected 12×8 with 300 dpi to maintain as much data in the photo as possible (it will print better this way). Crop the photo the way you would like it.
Step 4: Make sure your background layer is unlocked (double click the little lock next to the layer name). Create a new layer. Choose the font you’d like. I selected Helvetica bold. Type in your letter. I used 140 pt. font. Add a new layer. Type the word you want. I used 90 pt. font. With the selection tool, position the letter and word where you’d like them. If your photo is dark consider making the letters white. Leave enough space between the edge of the photo and the words in case the printers cut the photo funny.
Step 5: Save your photo as a .jpg and make 25 more!
Step 6: Upload your photos to a photo printing site such as Walgreens and print 26, 4×6 prints. Search for online coupons. I saved $1.50!
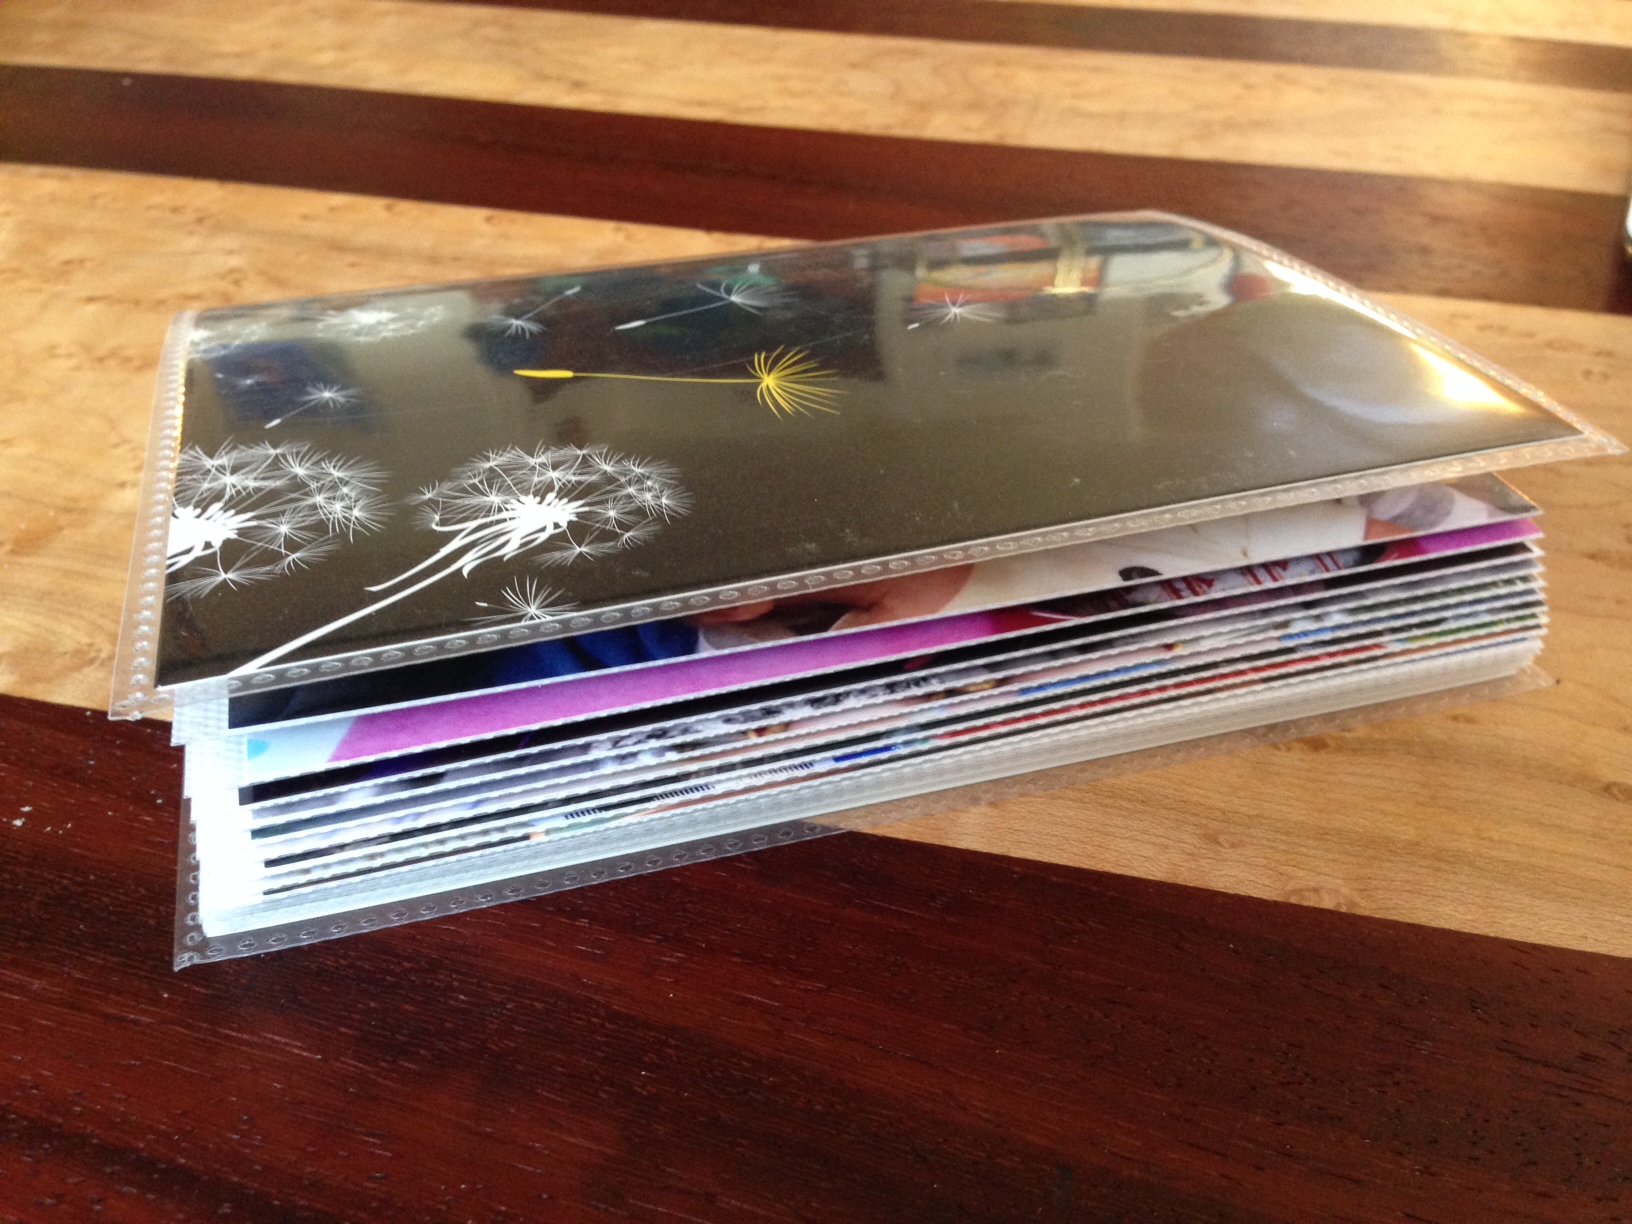
Step 7: Purchase a “brag book” at a craft store. It’s just a floppy plastic photo album that holds up to 36, 4×6 photos. I had a coupon for Michael’s so I saved $1!
I don’t think I need to explain the rest. But you’ll end up with a personal ABC book that hopefully your child will love. Our child already recognized several familiar people and objects in his book.