In Alaska, winter solstice is kind of a big deal. It’s the shortest day of the year. In Anchorage we had a little under five and a half hours. It becomes part of the daily winter grind. The sun doesn’t rise until well after you arrive at work and it’s already set when you drive home for the day.
After December 21 we will gradually gain more daylight. It’s a celebratory time for Alaskans.
Recently a friend of mine got married and decided to have her reception around solstice time. When I was hired to make some centerpieces for her I was thrilled to create more wintery pieces.
Purple and lavender carnations, white chrysanthemums, eucalyptus and spruce sprigs were all I needed to bring some winter cheer to her reception.
The couple loves Italy so it was fitting that many of the bud vases were little limoncello glasses.
I worked in retail for six years and by this time during the holiday season our gift wrapping supplies were usually low. Only birthday paper and giant boxes left. When I had a customer wanting a small item wrapped, I came up with this simple hack to make a small box out of the lid of a bigger box.
I know it’s a superb fall when I close my eyes at night and all I see behind my eyelids are lowbush cranberries.
Blood-red jewels hug the mossy ground in my secret south Anchorage picking spot. It must have been the warm May weather that caused patches of usually dormant cranberry bushes to produce large, pea-sized berries.
What my family calls lowbush cranberries are, in fact, lingonberries. These short plants can be found in most Anchorage forests. They have round, shiny leaves and if there’s enough sunlight during the summer they bear tart, red berries.
I prefer these to highbush cranberries, which are more watery and have a big, oblong seed in each berry. Lowbush cranberries are opaque and have no seeds. They are also firmer than the highbush variety.
Cranberries are my favorite wild berry to pick because they are durable, highly nutritious and they freeze well. They can also be substituted for any recipe that calls for commercial cranberries.
I once again refer to my mama for this segment of “Harvesting Anchorage.” She’s a pro when it comes to cranberry marmalade. The cranberries have so much natural pectin there is no need to add any of the store-bought kind. This simple marmalade is a perfect addition to any breakfast table.
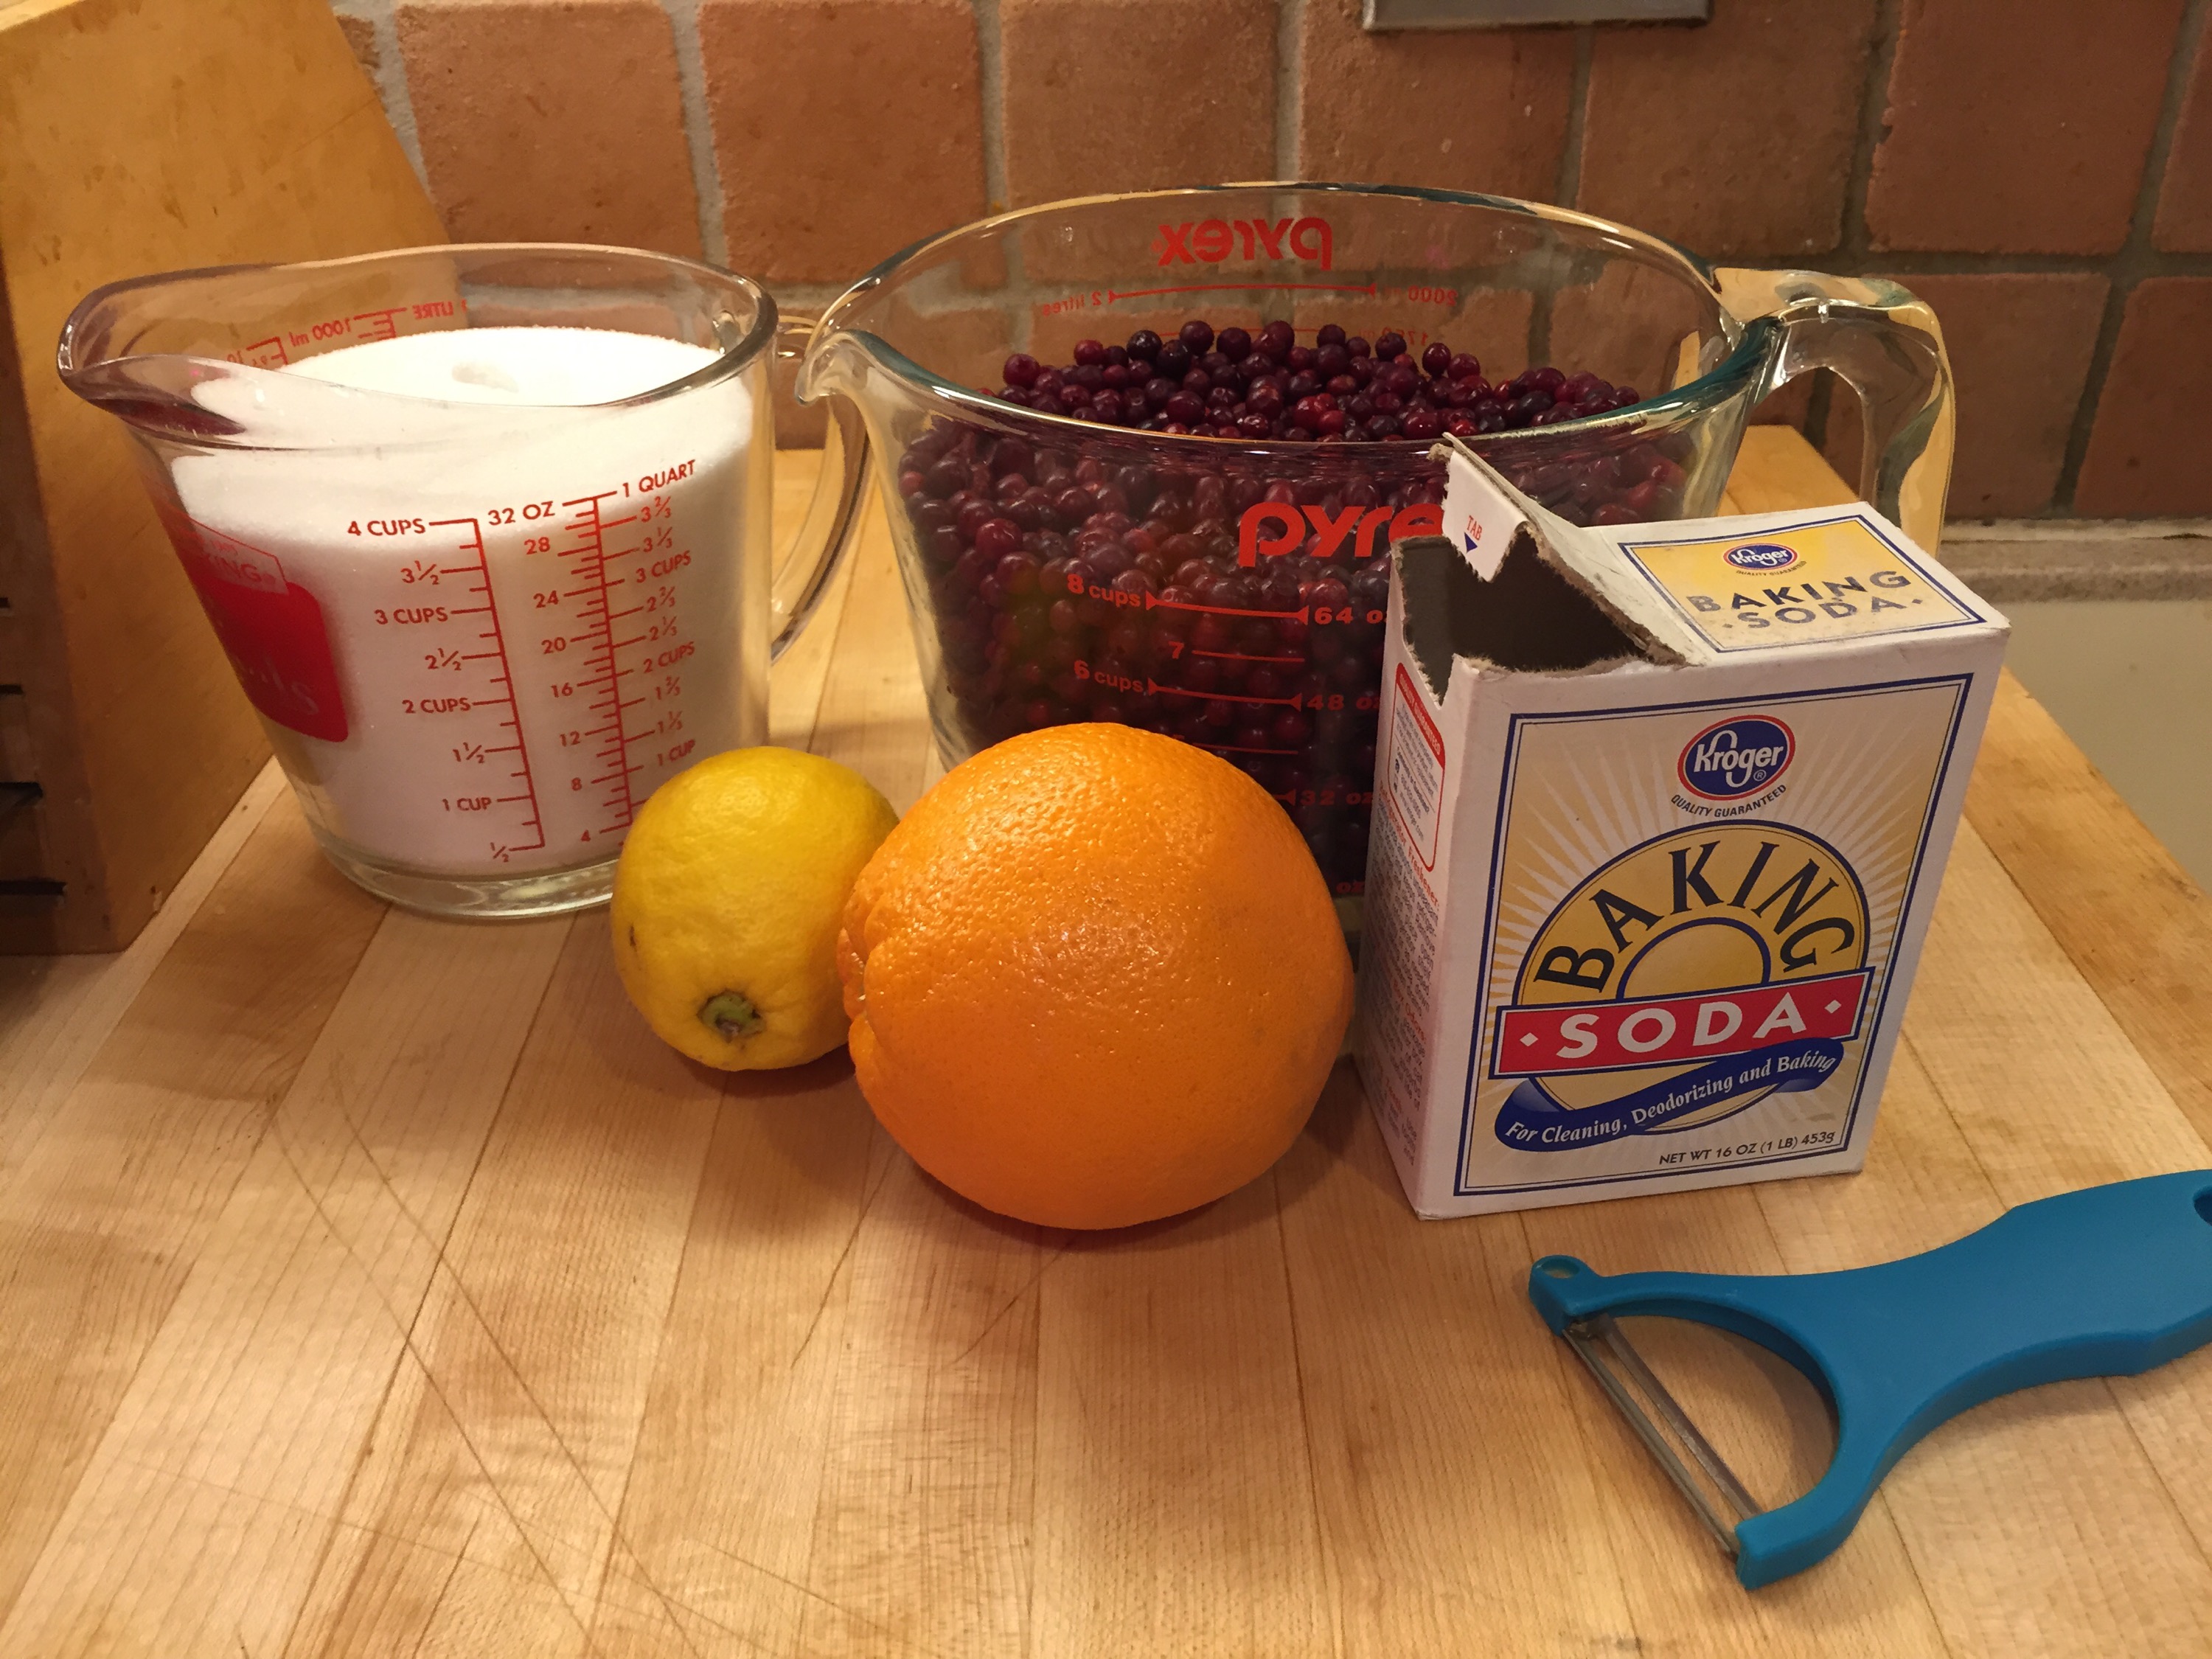
Cranberry Orange Marmalade
Ingredients:
3 oranges (or 2 oranges and 1 lemon)
Water
1/4 tsp. baking soda
8 cups wild lowbush cranberries
4 cups sugar
Directions:
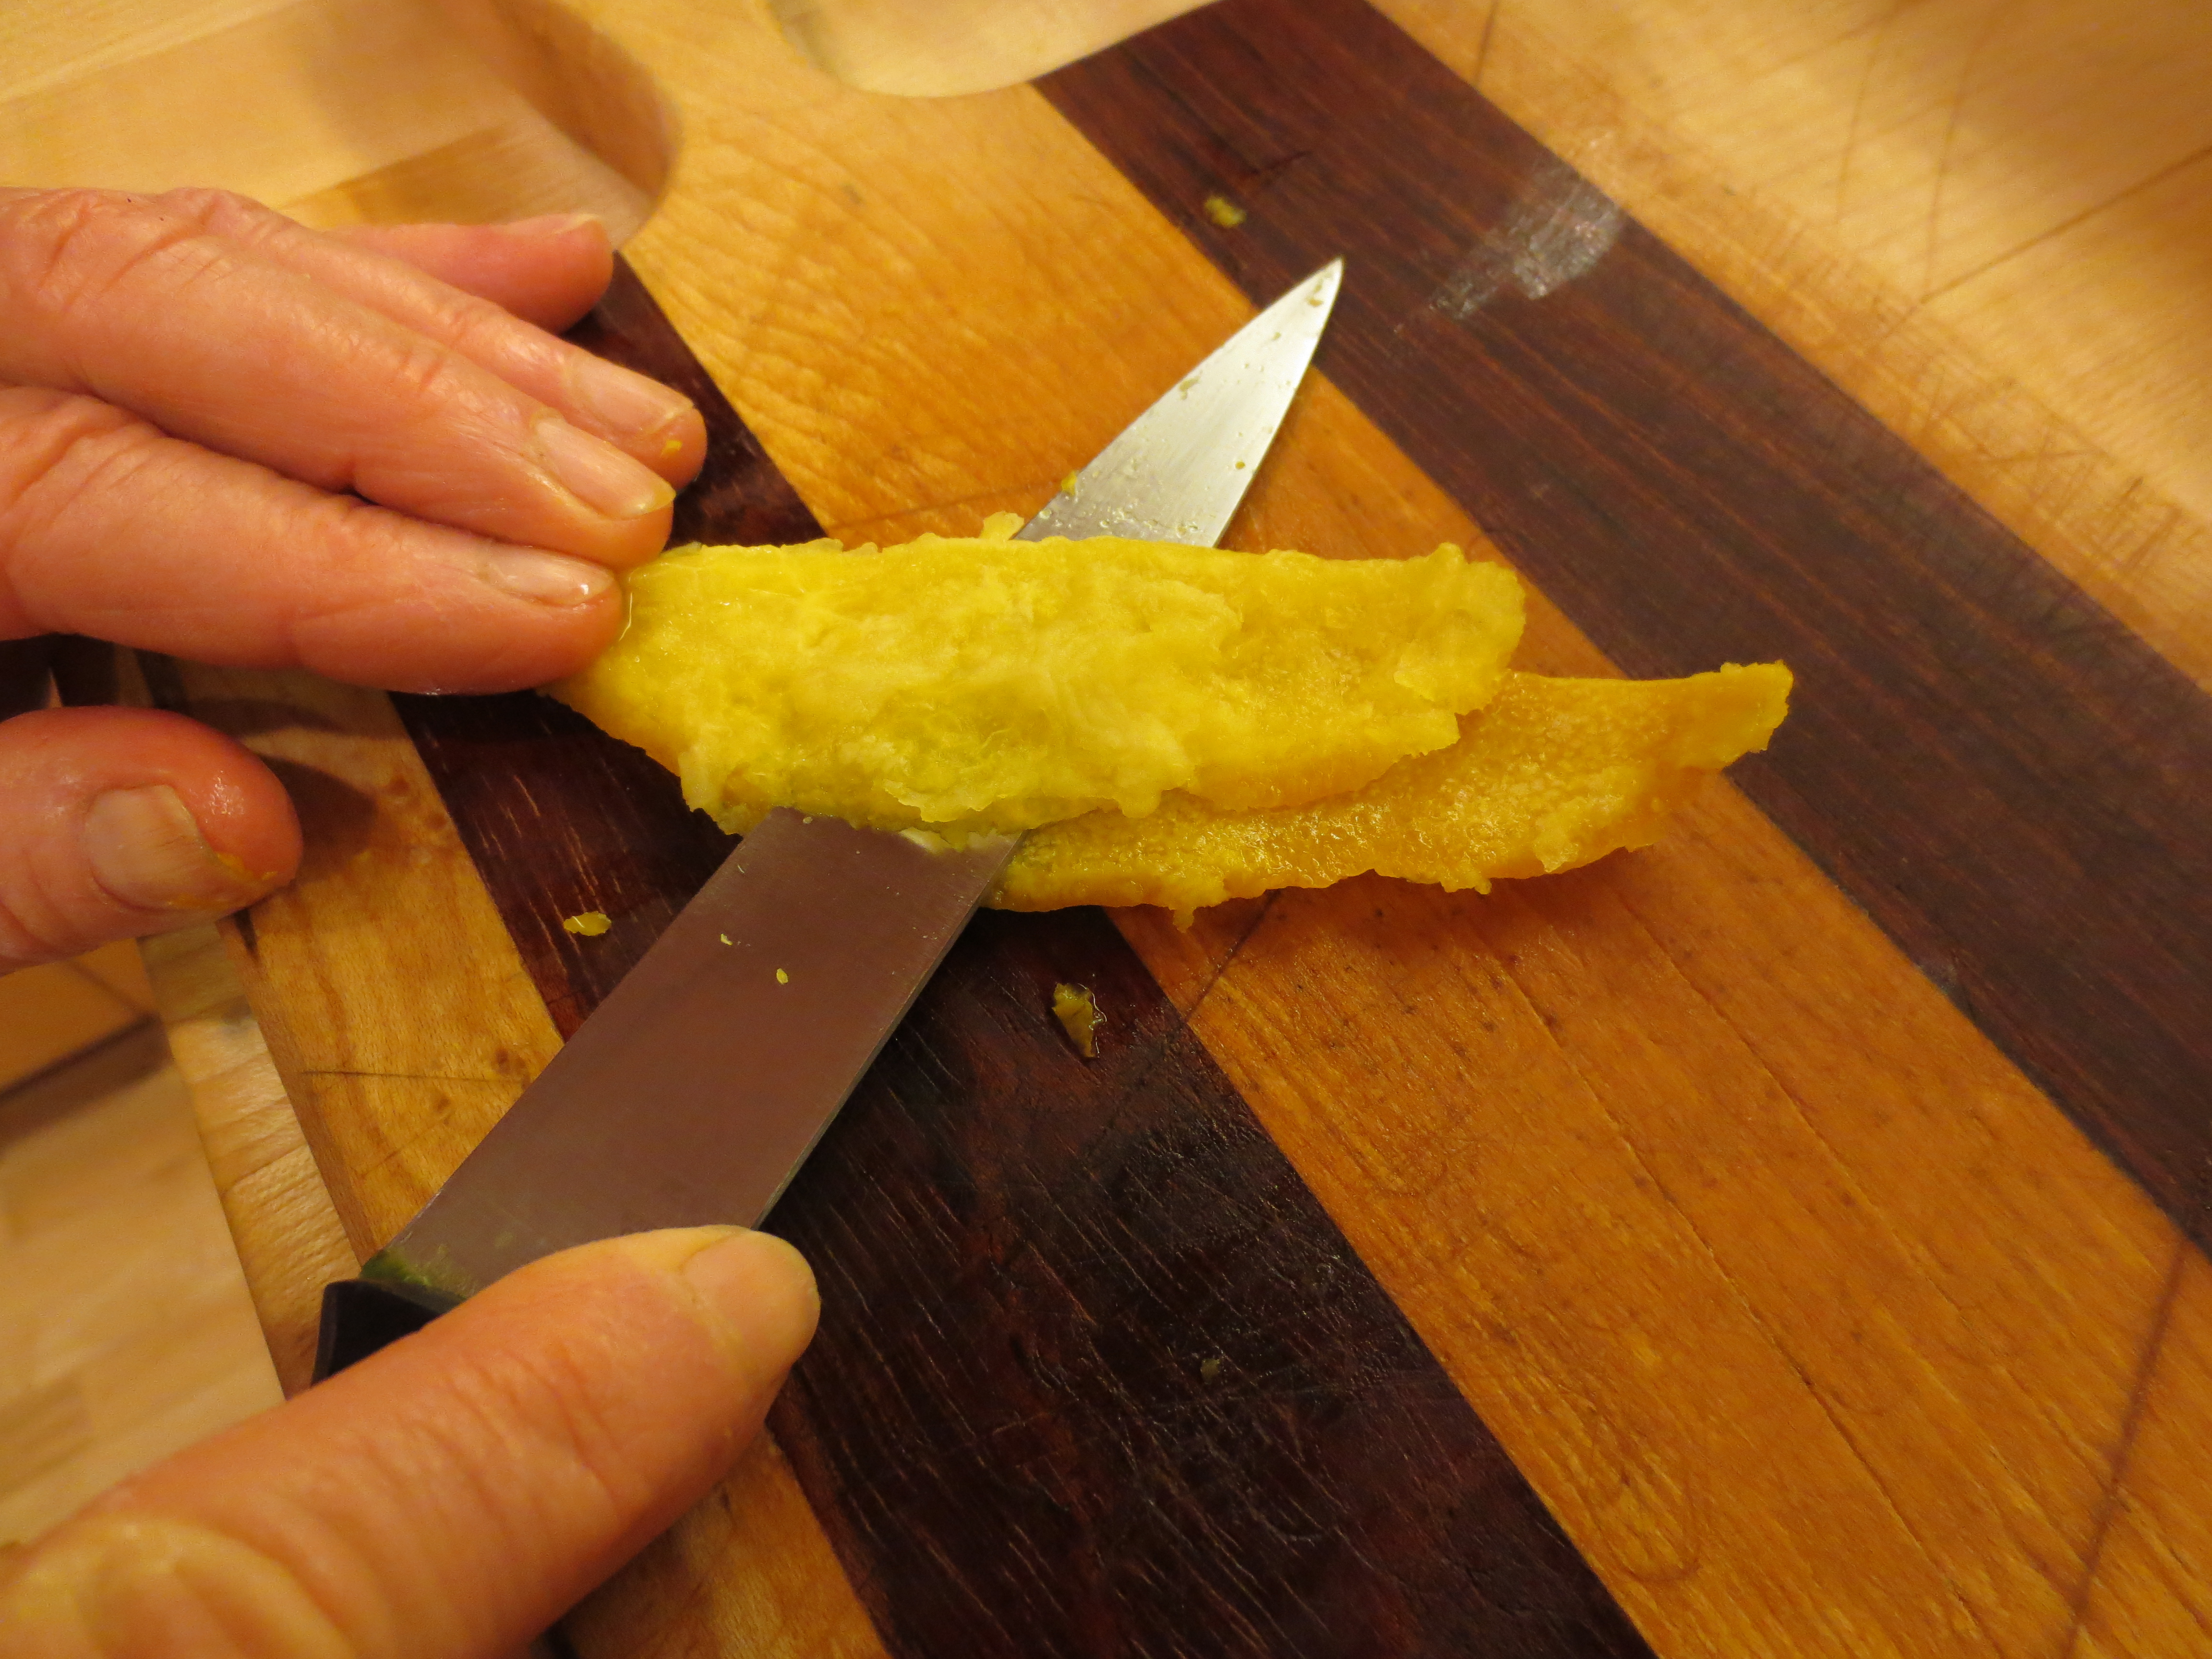
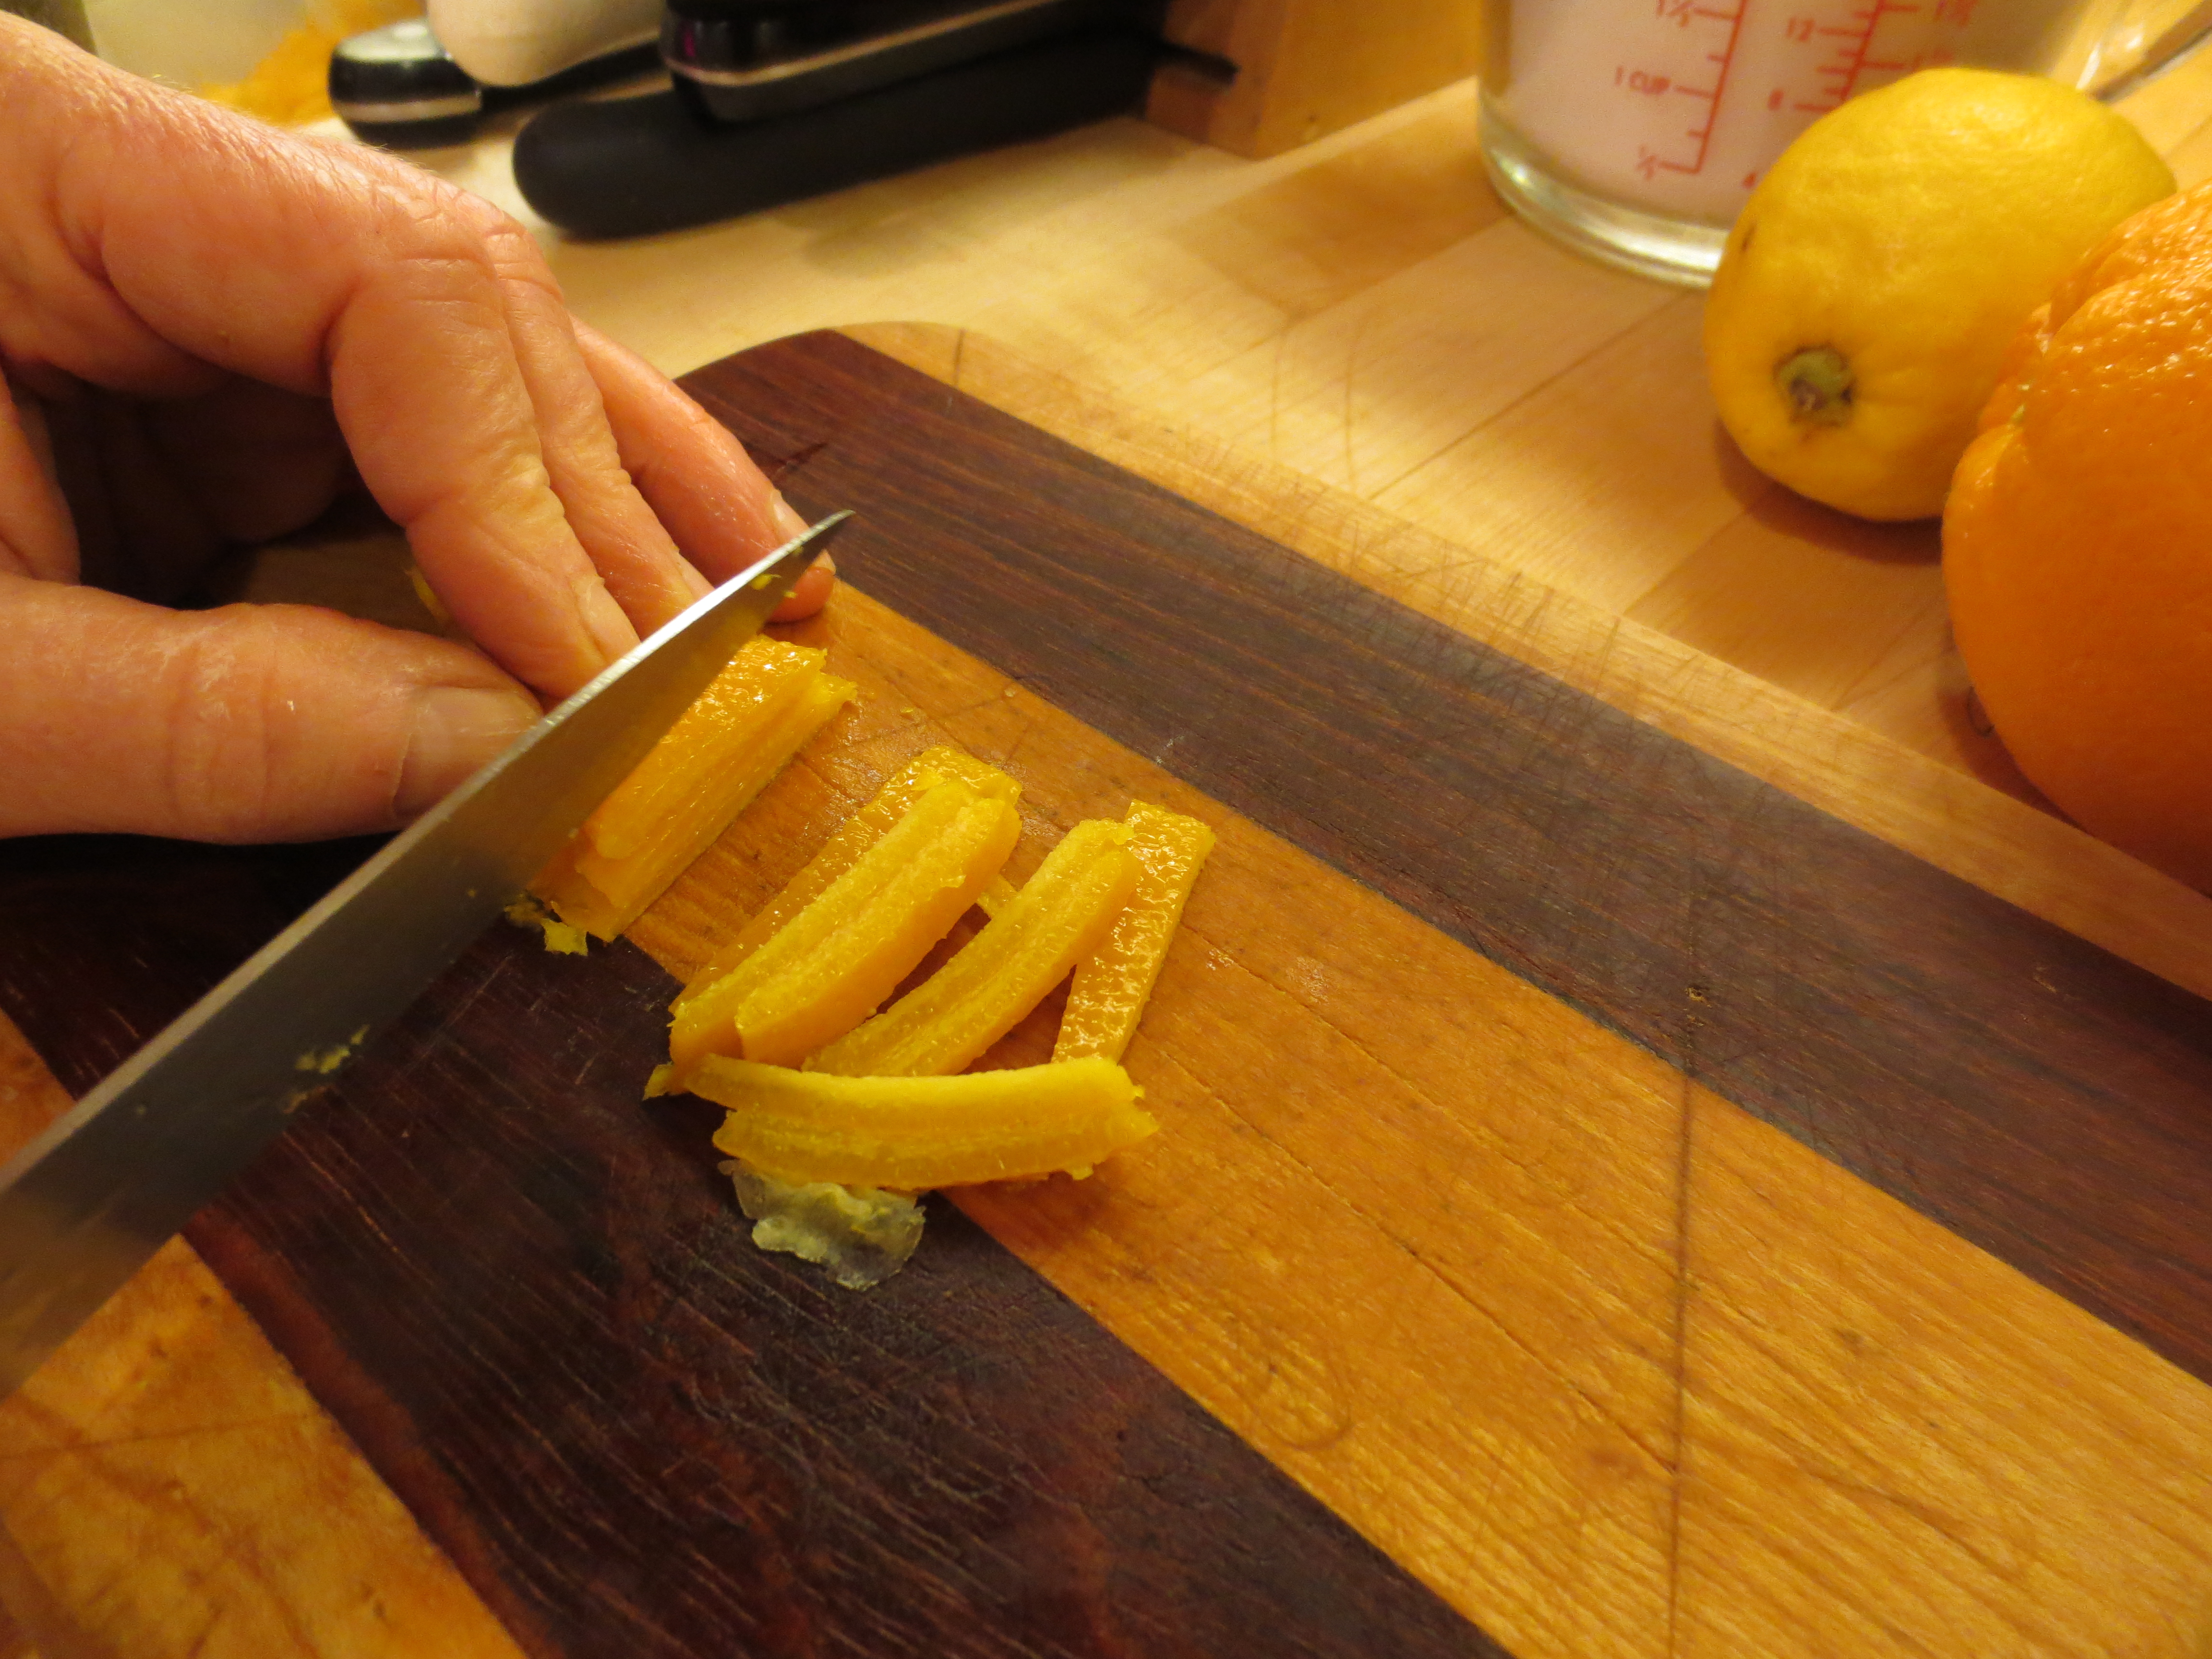
Remove the skins of the oranges in quarters. Cover rinds with water and boil with baking soda for 15 minutes. Shave off as much of the white pith as you can from the rind and slice rind very thin.
An alternative method is to use a vegetable peeler to peel off the rind and slice it. If you choose this method you won’t need to boil the rinds since they are so thin.
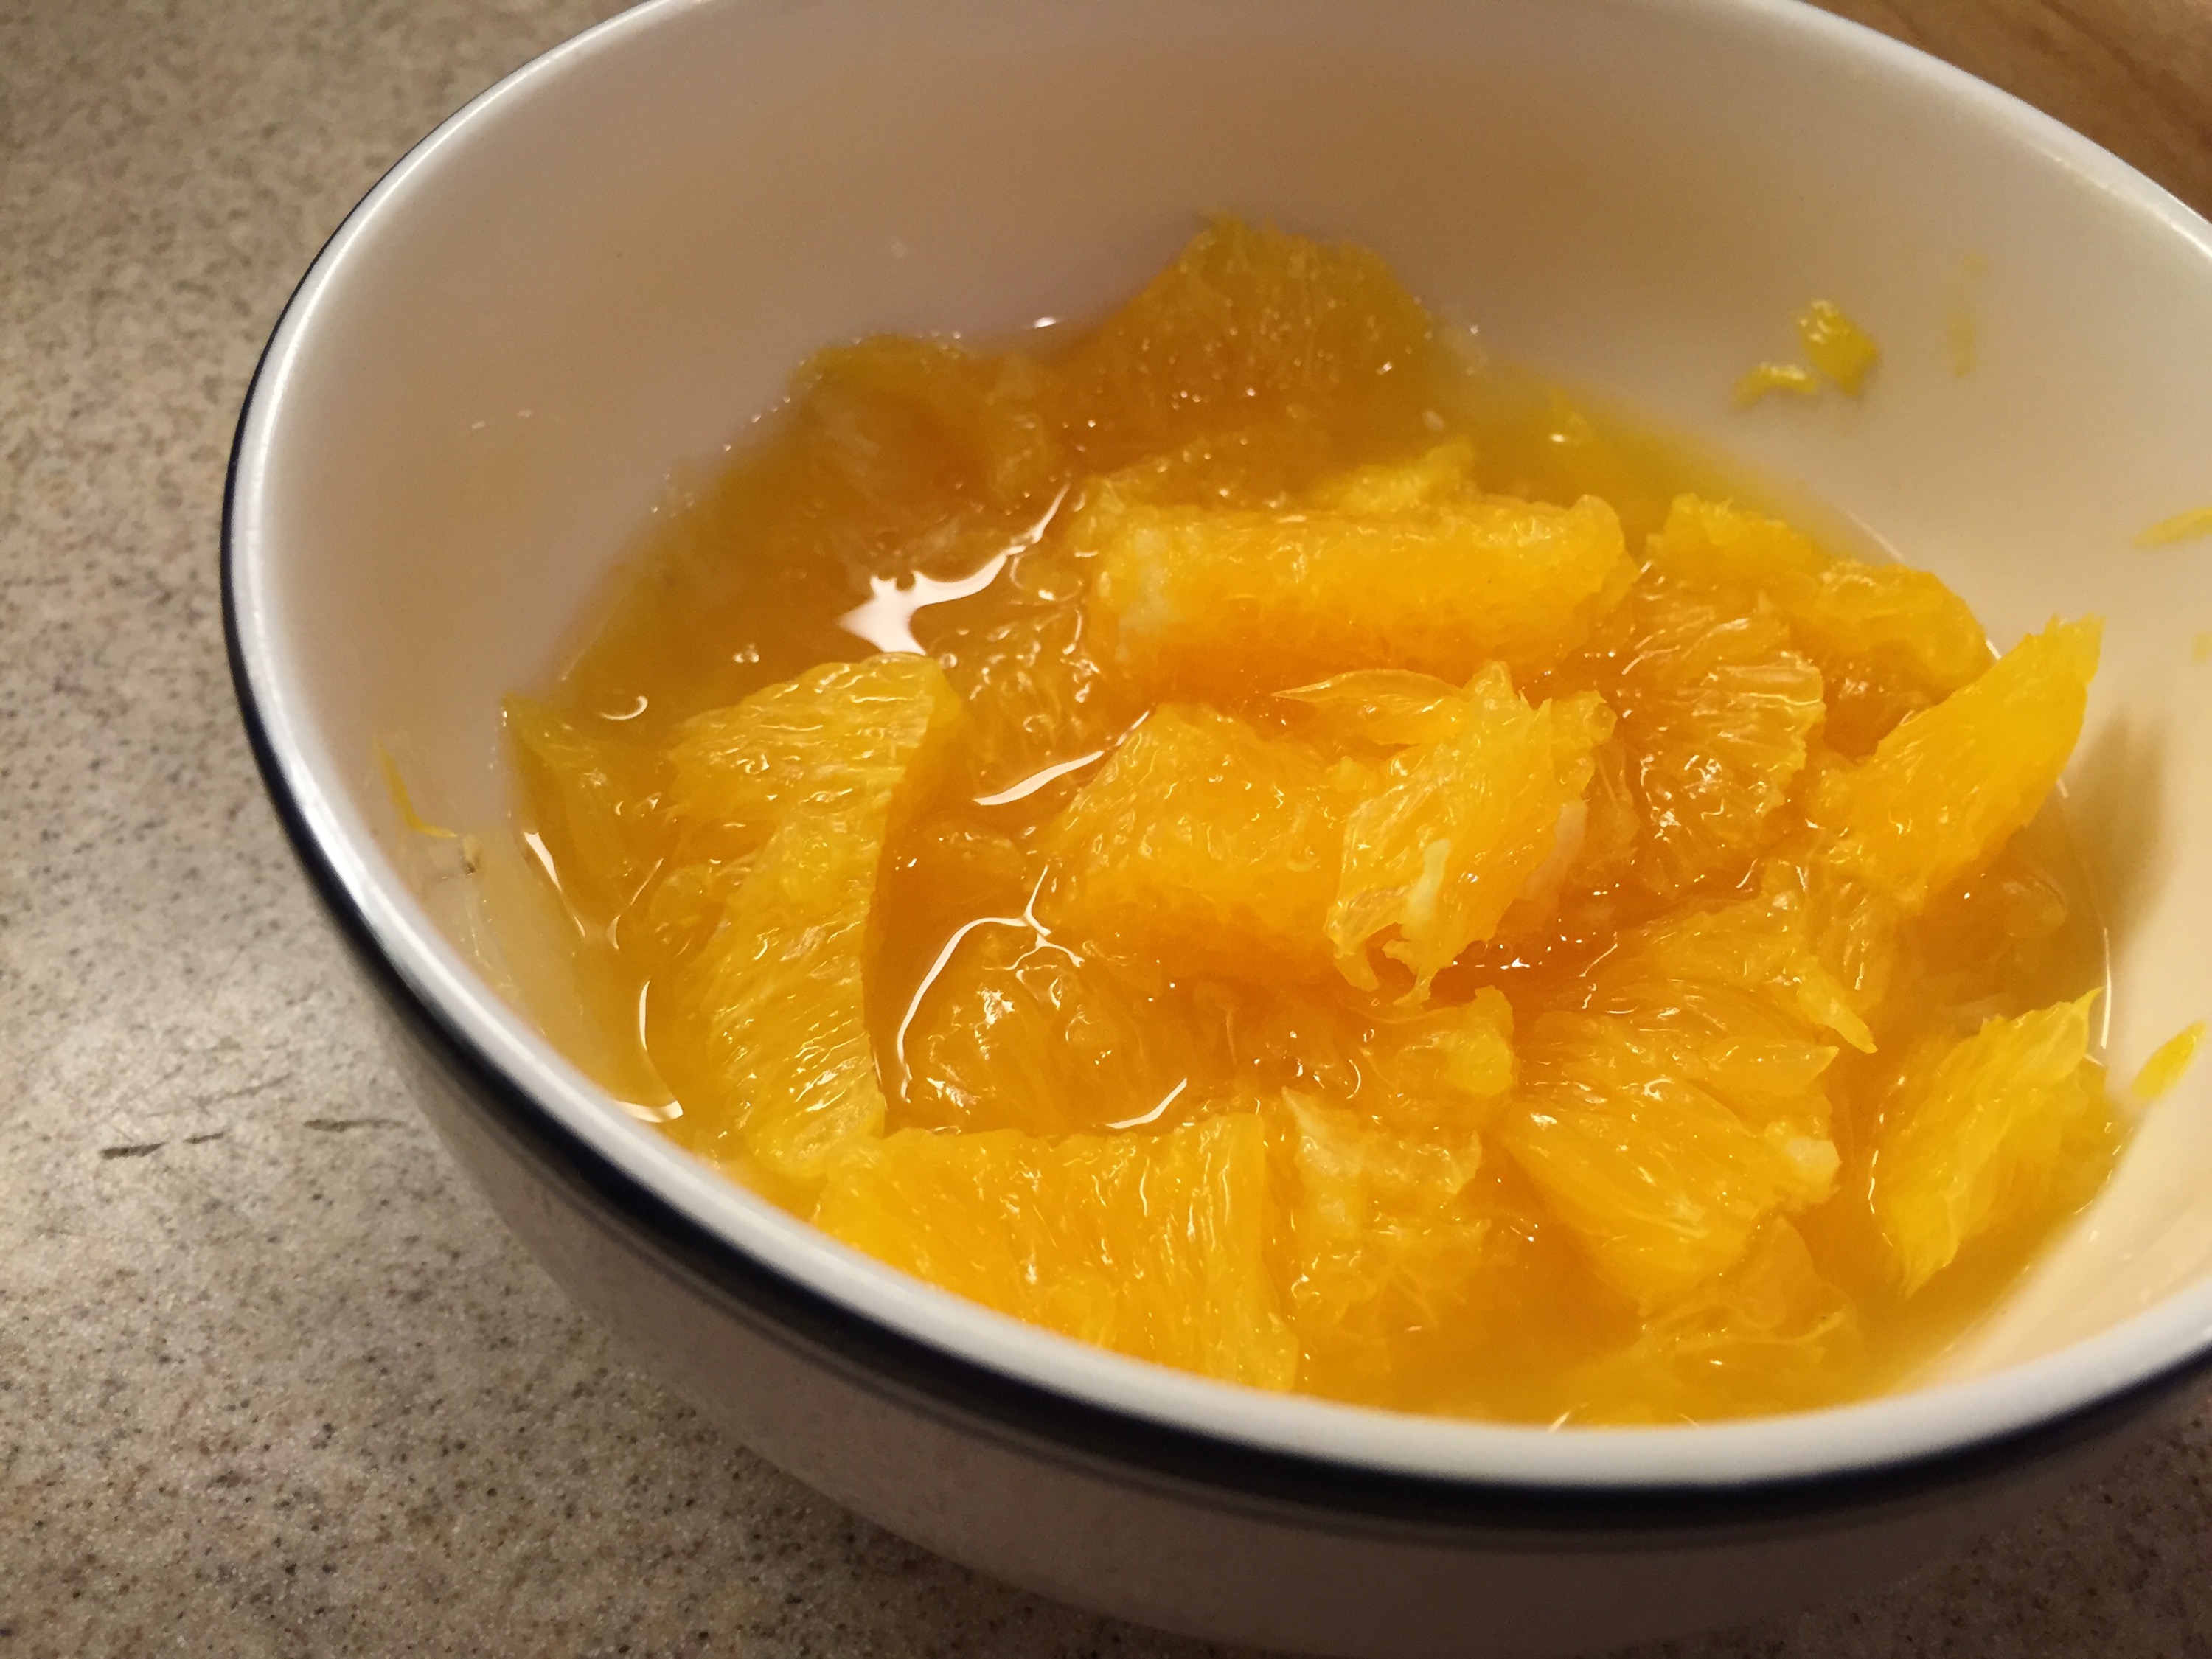
Meanwhile remove the membrane from each orange segment and reserve the pulp in a bowl. Take the membranes in your hands and squeeze the remaining pulp and juice into the bowl. Discard the membranes. If you’re really lazy you could probably use a couple of cans of mandarins, drained and rinsed. I’ve never tried it, but it could work.
Combine pulp, rinds with their water, cranberries and sugar in a saucepan. Boil, stirring often, skimming off any foam.
Let the mixture boil down and thicken, about 15-18 minutes. Take a spoonful of the mixture and pour it back into the pot. If there are lots of frequent droplets, the mixture isn’t ready yet. If the drips are slow and turn into one big droplet, then it’s ready (that’s called “sheeting”). Turn off the heat and place a tablespoon of liquid in a bowl and place it in the freezer for about 3 minutes.
Remove sample from freezer and tip it slightly. The sample should stay put. If the jam slides around the bowl it means it’s not ready yet. Bring the jam back to a boil and continue stirring constantly for another 5 minutes.
Ladle jam into sterilized canning jars with brand-new lids. Fill leaving about 1/4 inch of space at the top. Add the lids and let cool. When you hear little pops that means the lids have sealed. If you’d like more details about canning I recommend this thorough tutorial from The Alaska Urban Soil Project.
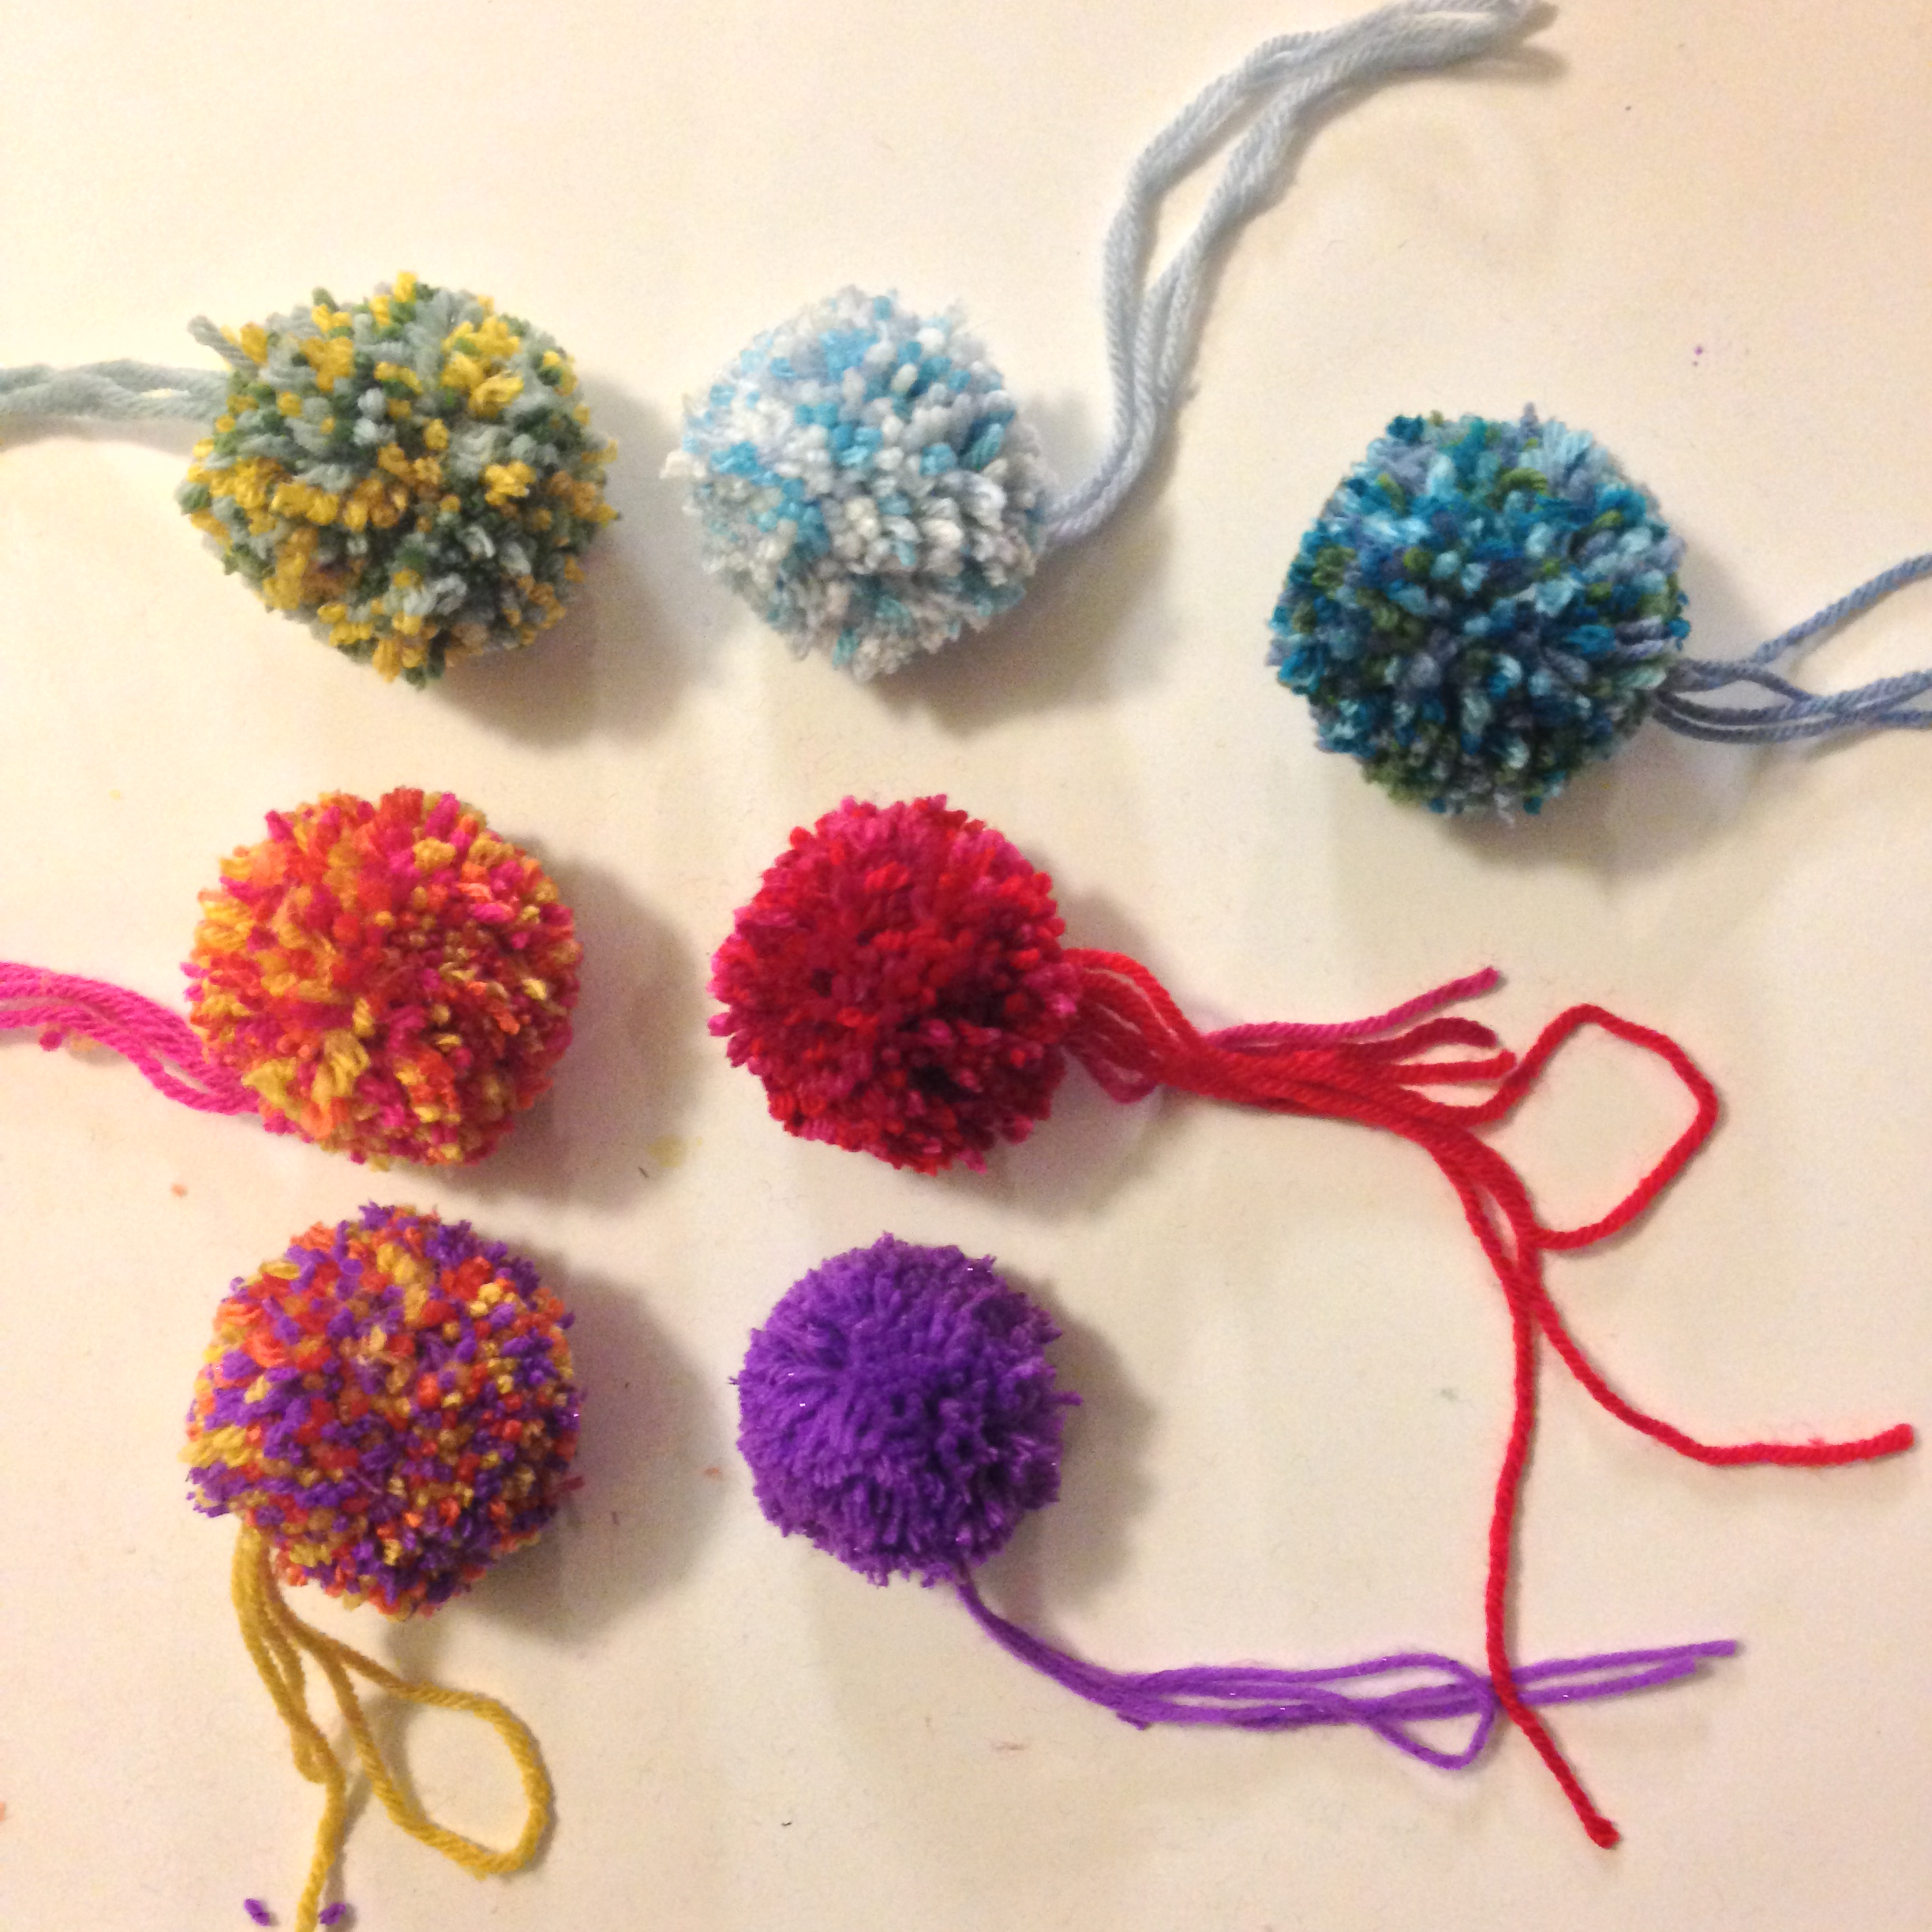
I recently assessed my yarn stash and quickly came to the conclusion that I have way too much. I’m running out of time to knit and crochet presents for my loved ones and I need to taper down my yarn inventory. Enter the pompom. This perky accessory harkens to my younger years when my clothes were adorned with rick rack and I coveted Tinkerbell peel-off nail polish.
Pompoms are making a comeback in a big way. Plus, they eat through yarn stashes quickly. This was a great way to decorate my tree and it requires barely any skills. I highly recommend using fabric scissors for this project; otherwise you might find yourself getting callouses in the crotch of your thumbs.
You’ll love the trick to making these ornaments. Look no further than your kitchen utensil drawer.
Cut a piece of yarn about 16 inches long and fold it in half. Run it in between the middle prong of the fork and hold it securely against the handle. Take up to four strands of yarn at a time and loosely start wrapping around the fork. Do this till you’ve got a whole lotta yarn on there. The more strands you use at a time the faster this will go. Cut the yarn when you think it’s enough. This may take some tinkering.
Use the yarn you originally placed between the prongs to tie around all the wrapped yarn. Another person’s finger comes in handy, but it’s possible to do this alone. Tie a double knot and slip your uncut pompom off the fork.
Cut apart all of the loops, being sure not to cut the original strand of yarn as this will be what you’ll hang the ornament from.
Trim your pompom as you deem fit. Repeat till you’ve run out of yarn or have worked up an appetite for some microwave nachos.
The older I get the less I despise big box hardware stores. Every time I get dragged into one by my husband I treat it as a mission to think of cool ways to reuse hardware supplies. This craft is perfect for the holidays, and free too.
Paint chip gift tags — No. 9 on Alaska Knit Nat’s DIY Holiday Craft Guide
What you’ll need:
Paint samples from the hardware store (you can usually get about 3 tags per paint chip)
Cut out the paint samples in the shape of gift tags. Poke a hole in one end and run a six-inch piece of string through the hole. Tie the ends of the string together. Elaborately wrap a gift and add the tag as a finishing touch.
Each year I try to give my two sisters equally awesome handmade gifts that follow a similar theme. I usually make something for myself so we can all dorkily match. Last year was a winner: shirts with giant cashmere hearts.
This is a low-skill craft. It requires hand sewing, but nothing complicated. I turn to my local thrift shops for blank sweatshirts and cashmere sweaters. Any tight-knit sweater will work if you aren’t able to find cashmere. Mohair or angora might be fun. Be sure to wash and dry your sweater on the hot setting a couple of times to ensure it is completely done shrinking. If you sew on a fresh sweater when you wash the final product the heart will shrink and cause the shirt to tear and bunch up where you sewed it on (I know from disappointing experience).
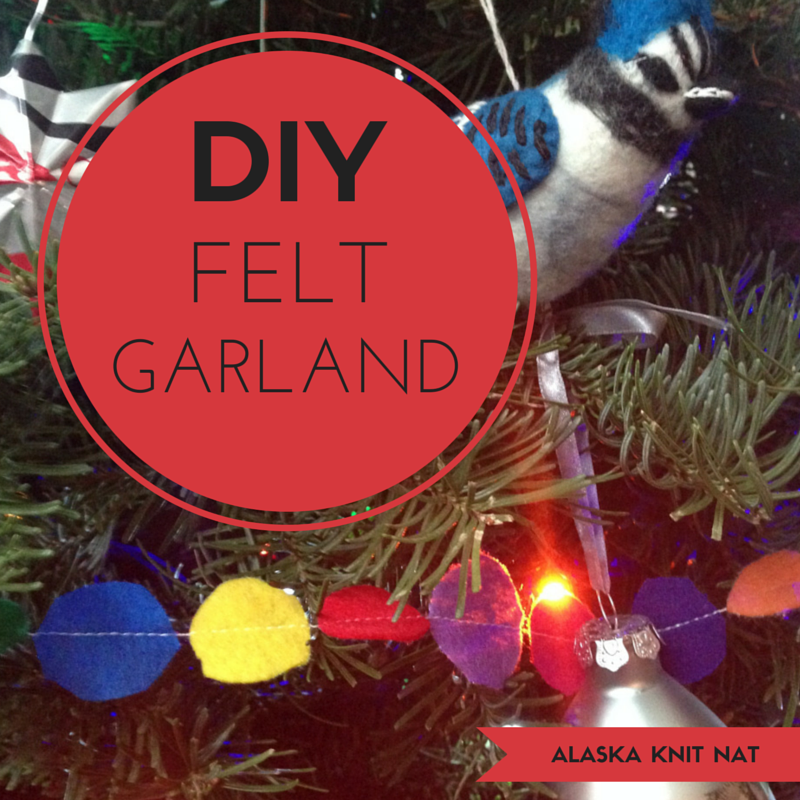
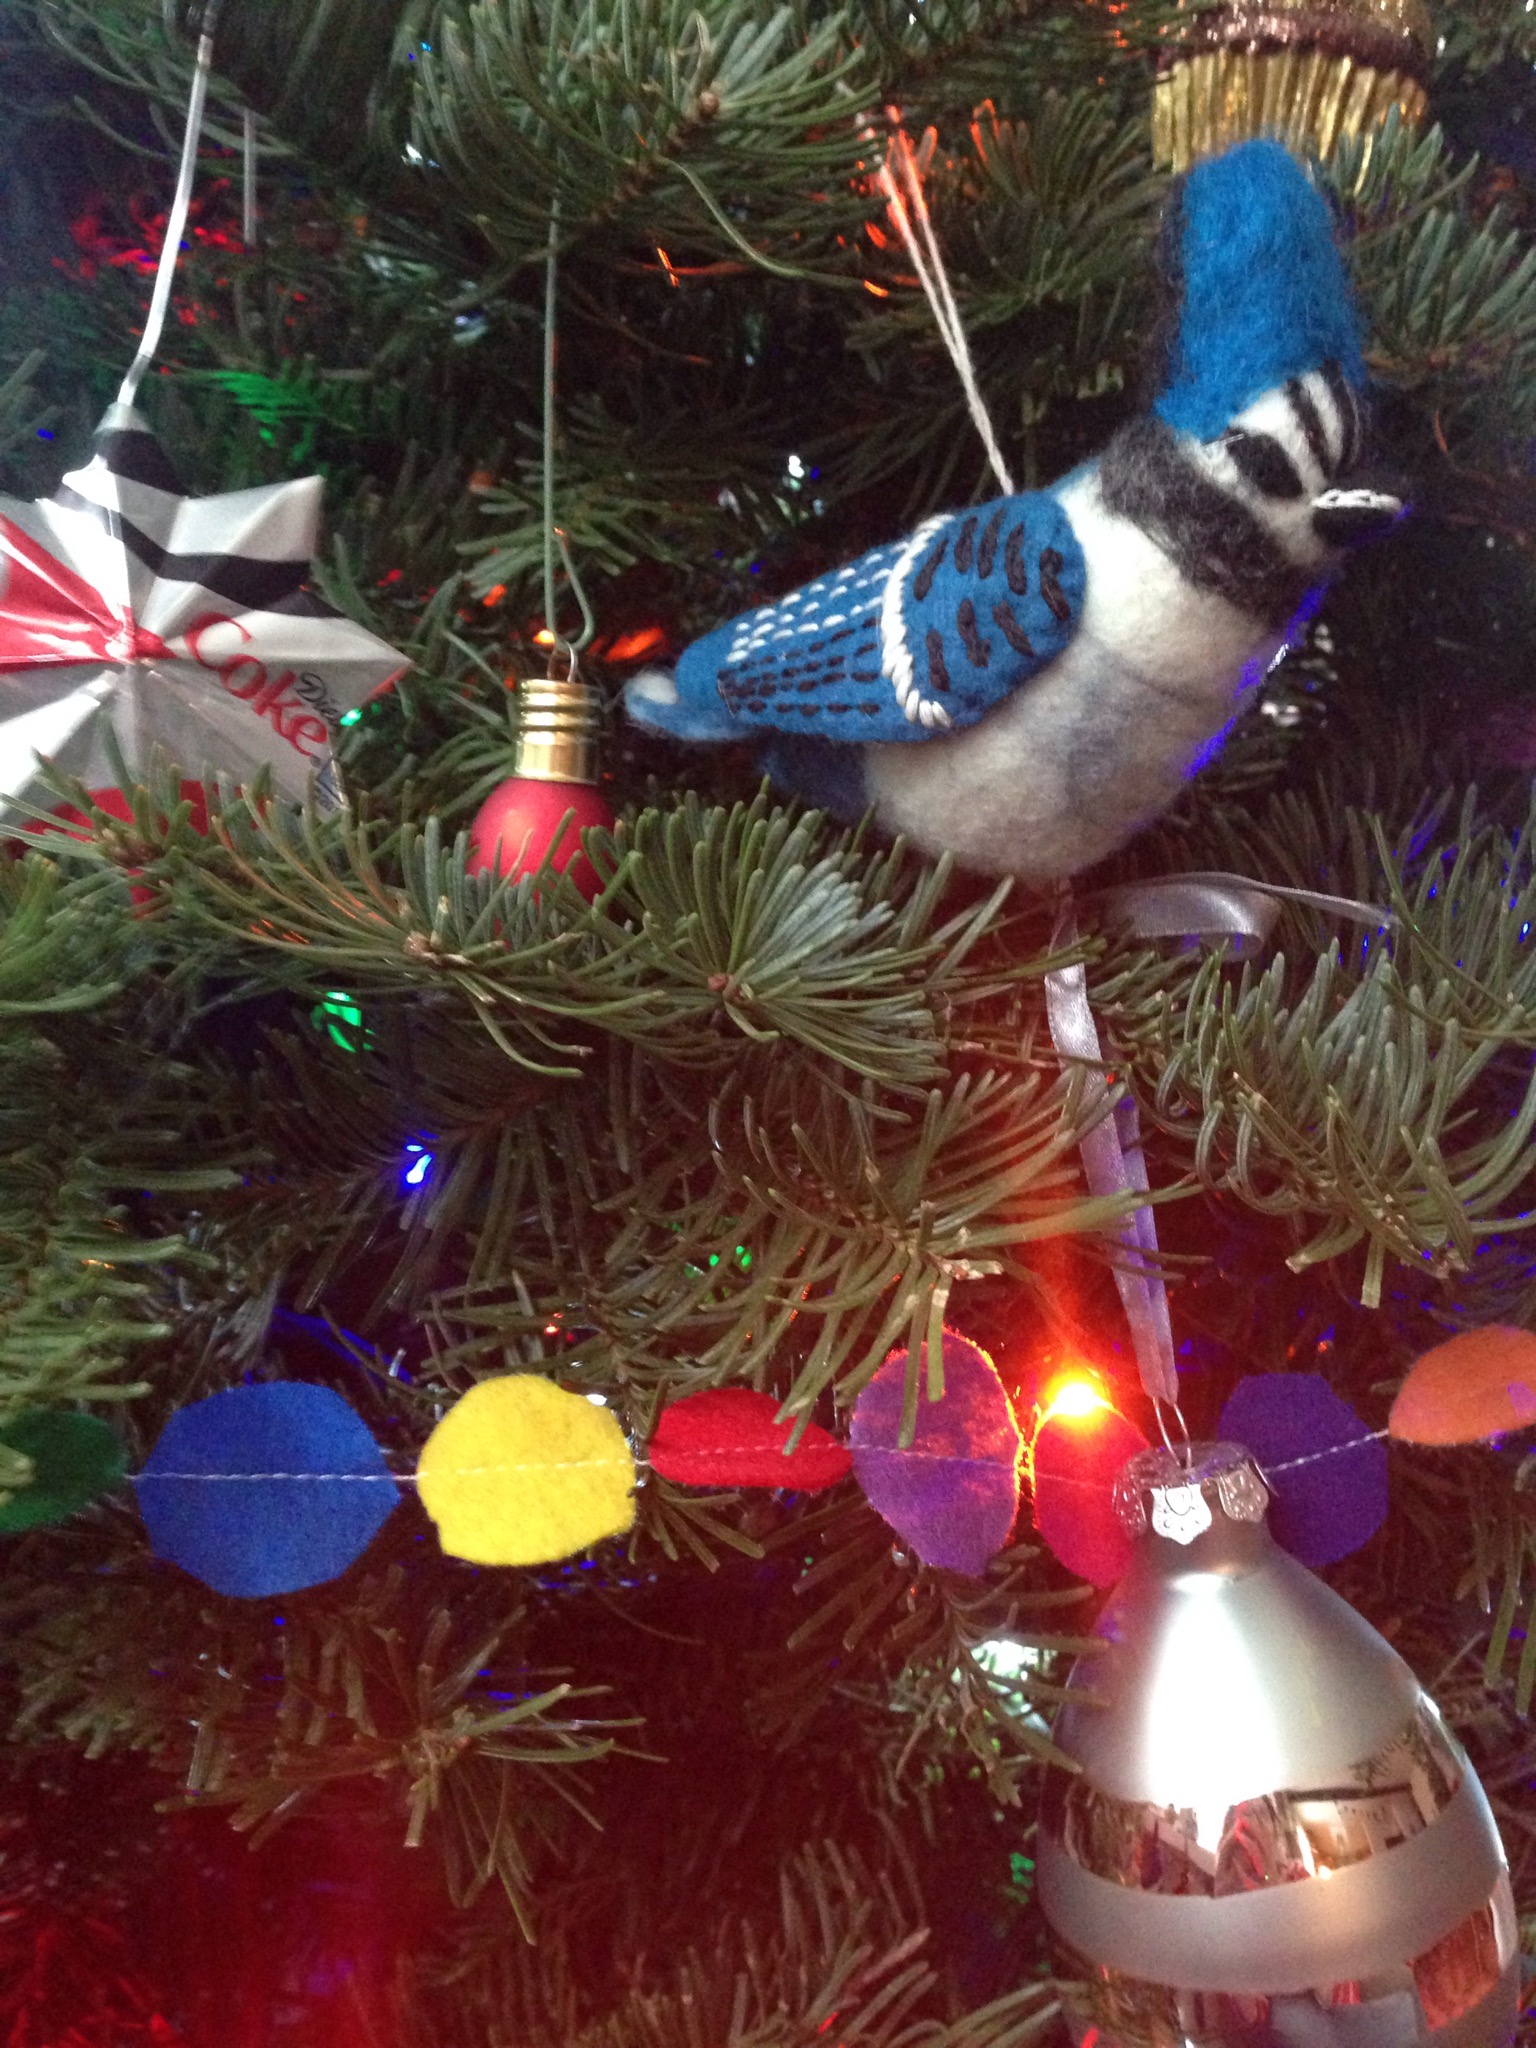
There are vastly different ways to trim a Christmas tree. Some prefer the all-white glitter tree, while I love bright colors and a homey hodgepodge of ornaments and garlands.
As I was preparing to trim our tree last week I opened our ornament box and was delighted to find a felt garland I’d constructed last year. I had forgotten about it and it kind of made my day to place it on our tree this year. I love popcorn garlands, but they get pretty messy and i have a toddler who is fascinated with the tree and eating things, so I imagine it wouldn’t last long.
This craft is cheery, colorful and easy. It does require the use of a sewing machine and some monotonous cutting. I recommend putting on “A Christmas Story” or some other holiday film you have memorized and cut out your felt while watching it. Mulled wine could be included, if desired.
Easy felt tree garland: No. 6 on Alaska Knit Nat’s DIY Holiday Craft Guide
Craft felt in many different colors (about $5 at Walmart)
Fabric scissors (optional but extremely helpful)
Sewing machine
Directions:
Fold a piece of felt in fourths and cut out 1-inch circle-ish shapes. Repeat with other felt colors until you have about 300 hundred (I really didn’t count. I just cut out circles until I was sick of it.)
Place all your circles in a bowl and set next to your sewing machine. Start sewing across the diameter of a circle with a straight stitch. When you get to the end of the circle, start sewing through another circle. Repeat this until you’ve run out of circles. You’re basically just lining up the circles side by side and sewing a seam through them to keep them together. I didn’t follow a color pattern, I just sewed them randomly. It doesn’t matter what thread color you use, but I imagine gold thread would look neat. I used white. It’s ok if there are gaps between the circles. If you run out of thread mid-garland, just rethread your machine and sew across the most recently sewn circle.
Wrap your garland around your tree. If it’s too short, make more circles and take your garland back to your sewing machine.
All right, now it’s time to start making some crafty gifts that hopefully don’t suck. I’m so over homemade bath salts, soup in a jar and t-shirt pillows. Let’s shake it up a bit and give the gift of creative recycling.
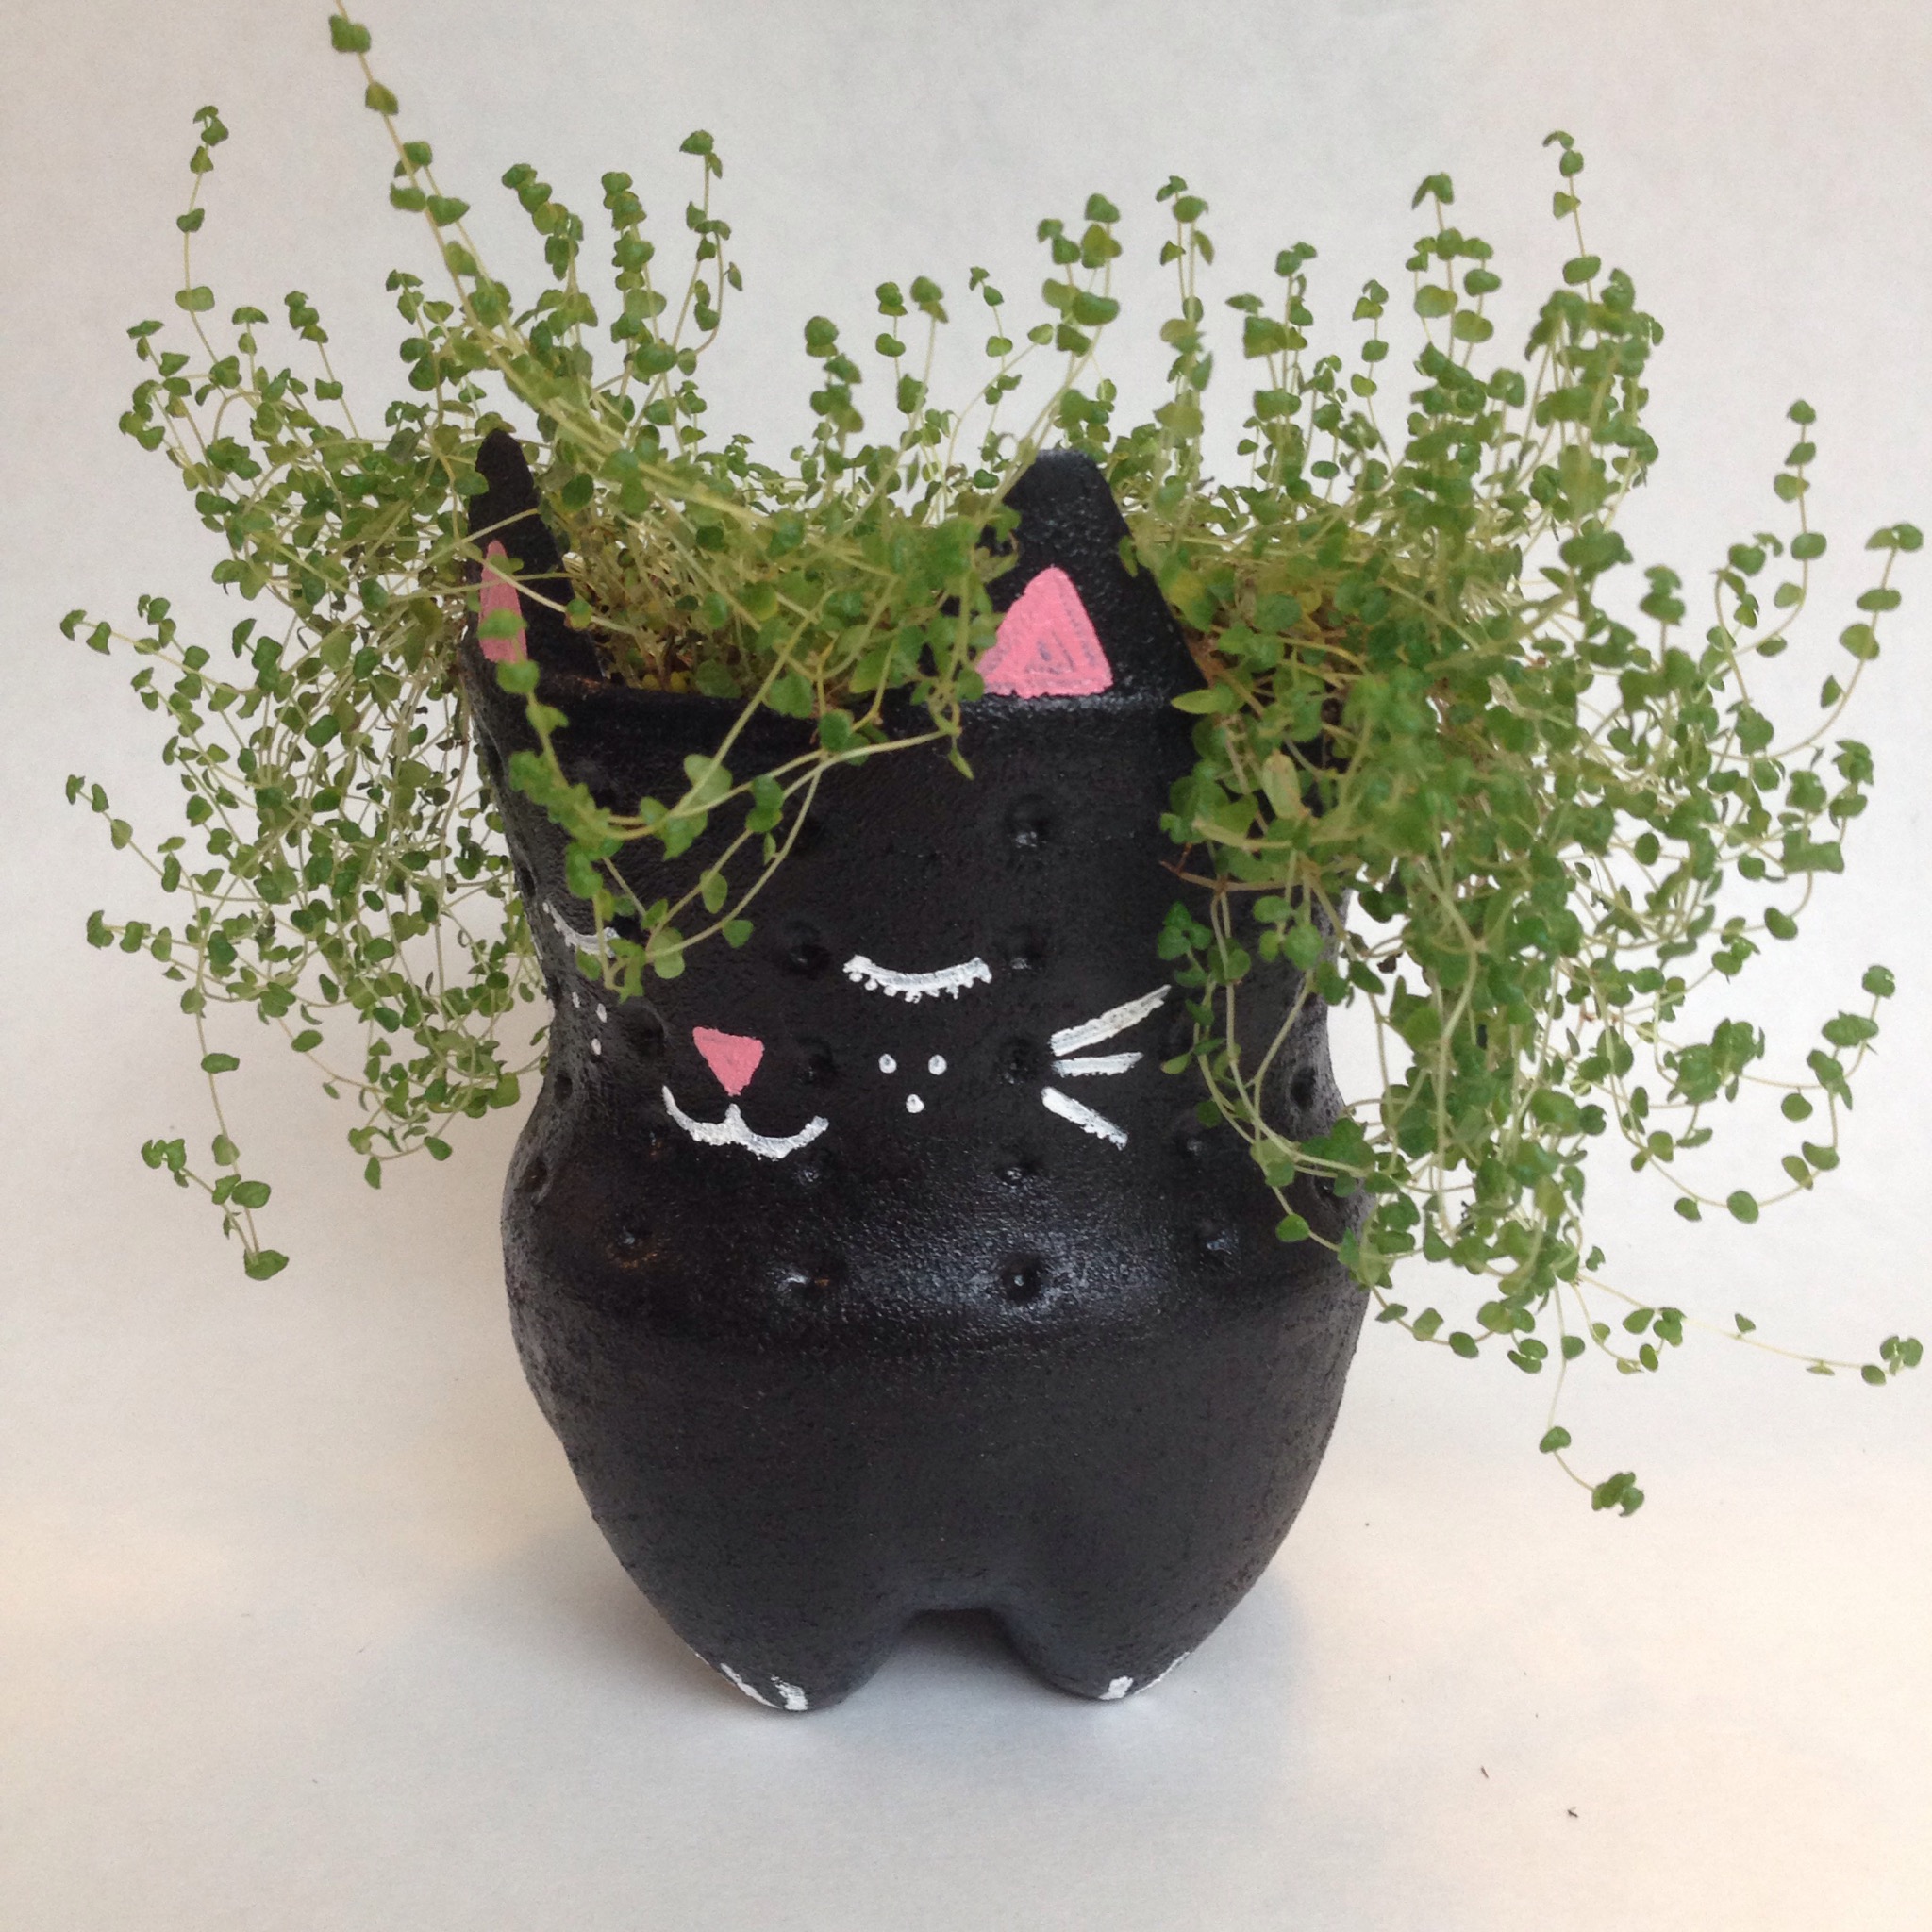
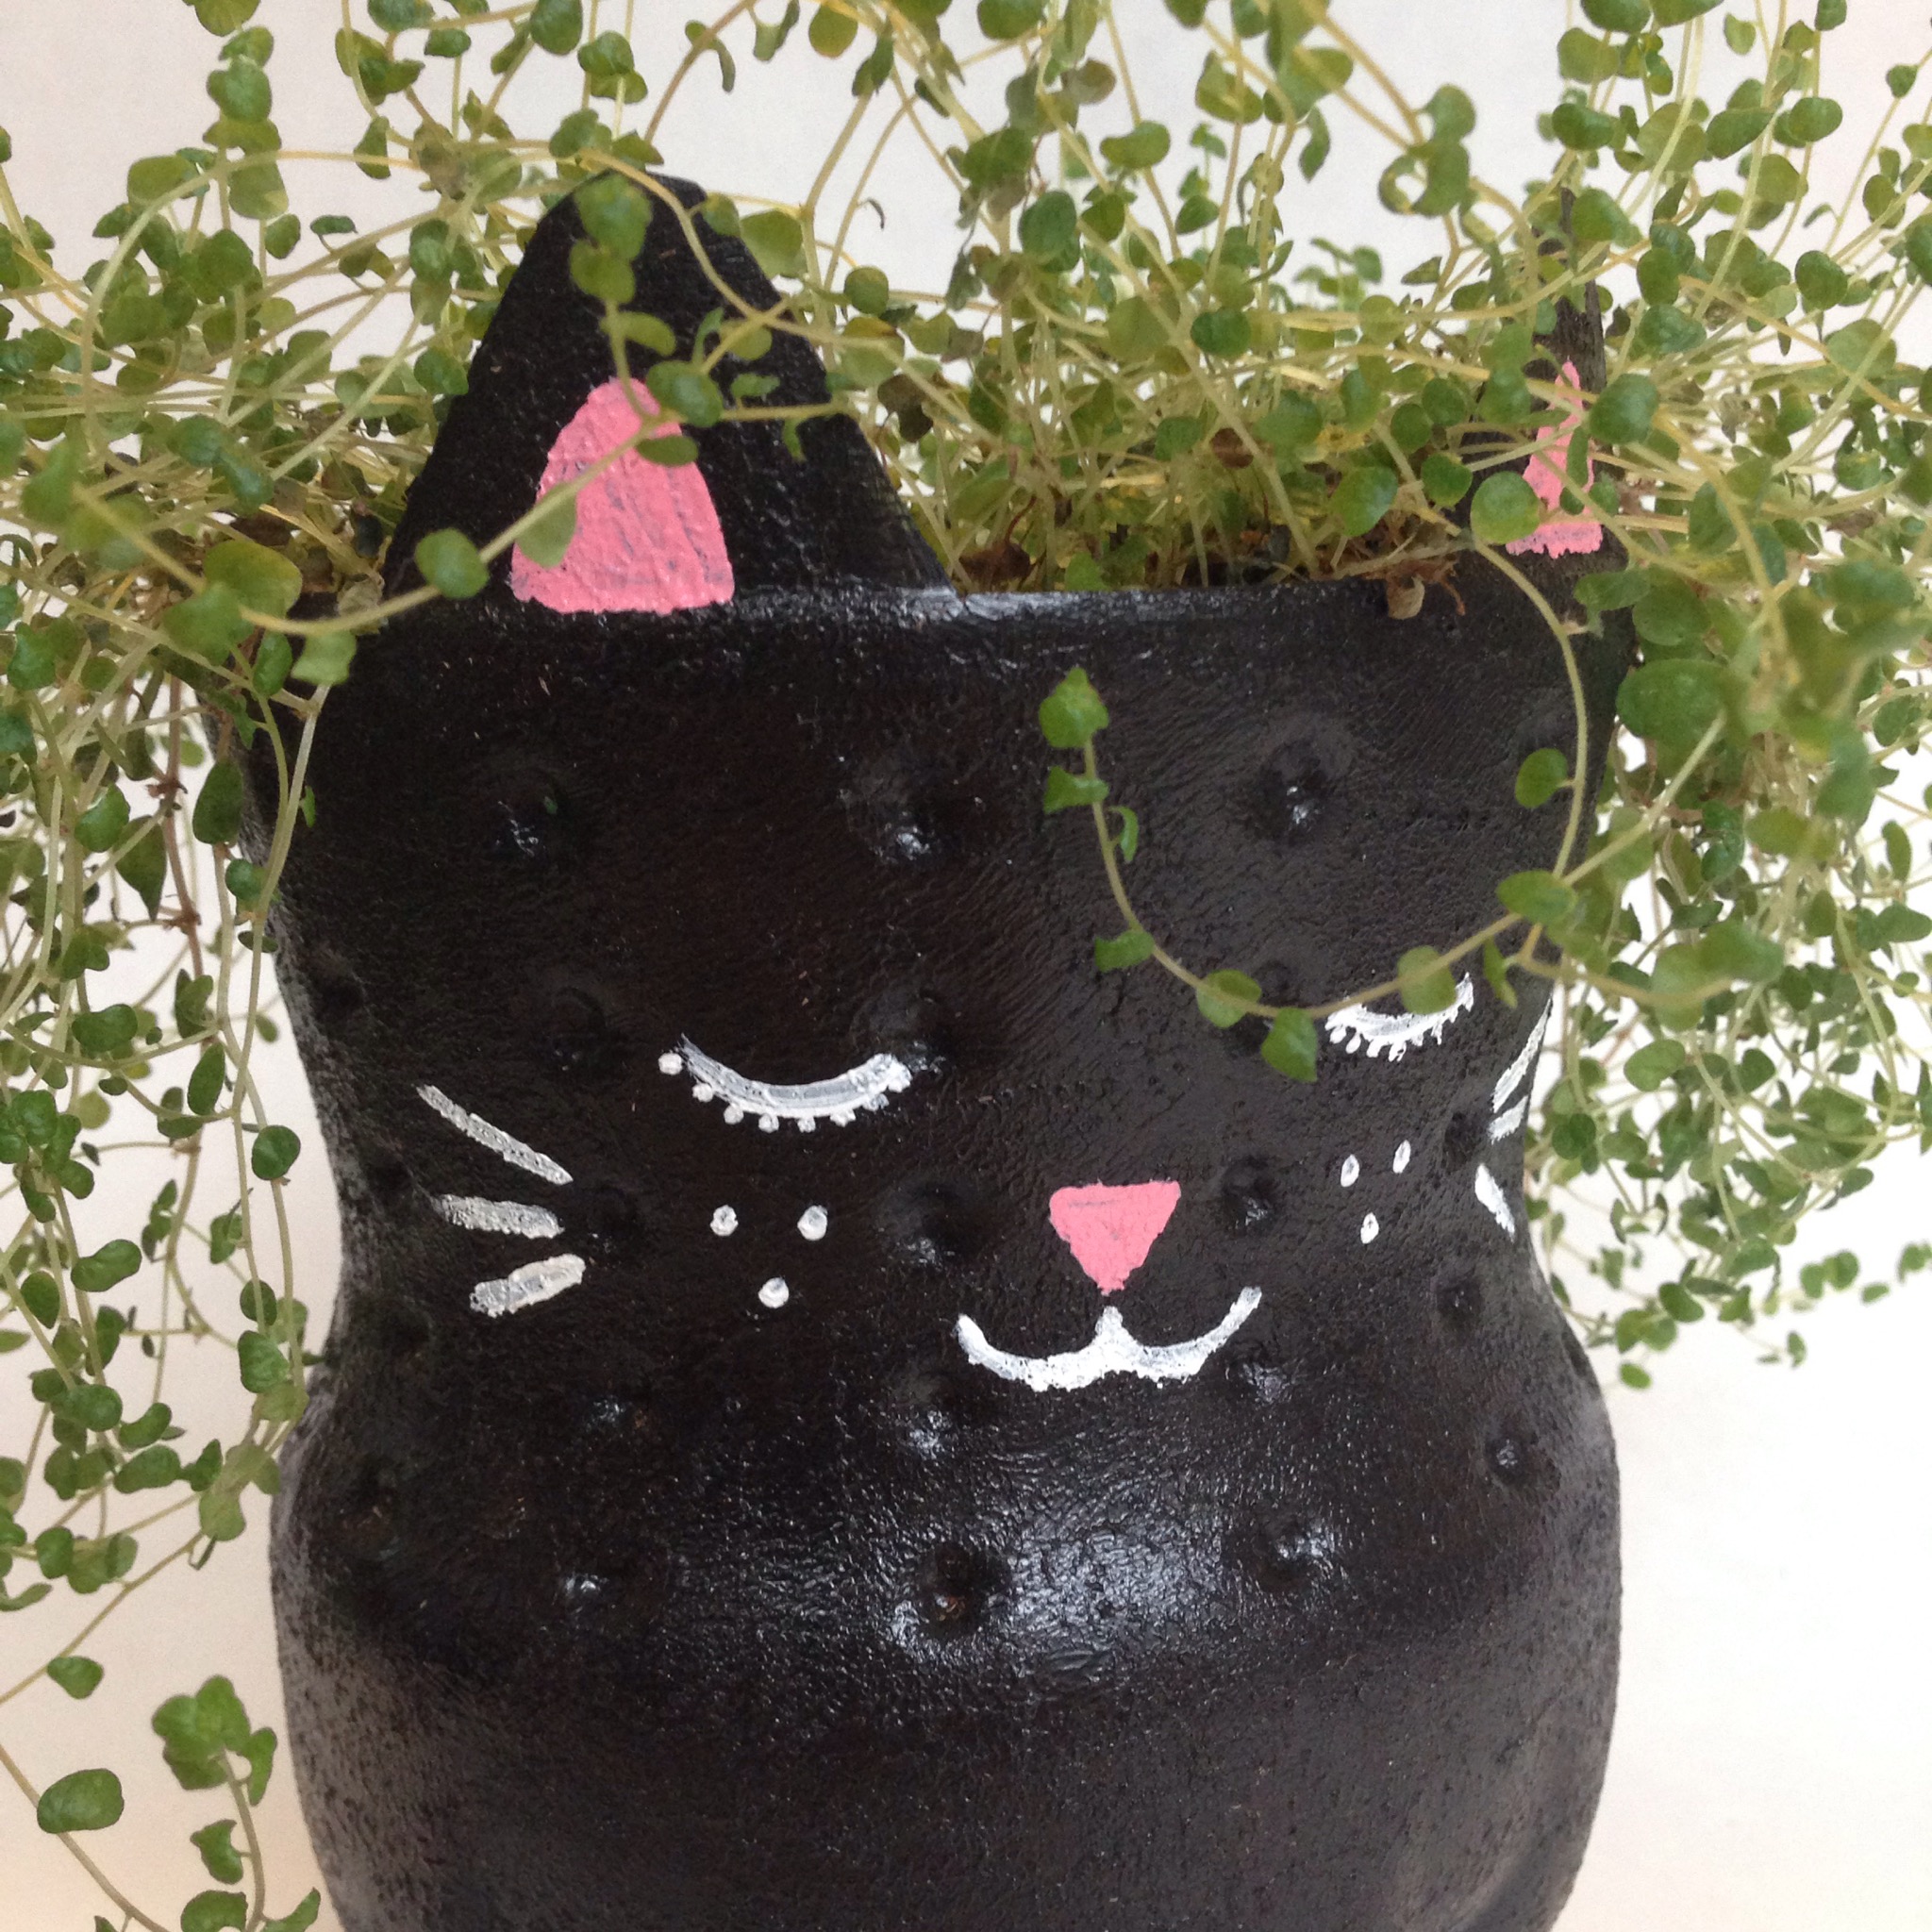
My best friend Kelly and I made kitty planters last spring out of 2-liter plastic soda bottles. Somehow, despite my brown thumb, I’ve managed to keep it alive. This craft is easy, not too time consuming and cute as hell. It requires minimal artistic ability, which is a big plus for me.
DIY Soda bottle kitty planters: No. 4 on Alaska Knit Nat’s DIY Holiday Craft Guide
Isn’t she lovely? I call her Beatrice. I have a friend whose dog is called Jack (same name as my son), so I figured I should name my fake pet after her daughter.
Our front door is a sad, sad sight. It’s what I imagine the Crooked Man of nursery rhyme’s front door would look like. At Halloween, it must look so haunted because not once in the five years we’ve lived here has a single child trick-or-treated.
It’s beyond improvement, which is why I never bother to add holiday decorations; but when we were at Lowe’s yesterday picking up a Christmas tree, this hastily scrawled sign caught my attention:
More specifically, “FREE” caught my attention. Now, what could I use pine boughs for? I’d already utilized them for our Thanksgiving table décor, so I thought why not shoddily assemble a front door wreath-type thingie?
It cost me zero dollars and took five minutes to make. It took me 15 minutes to affix to our front door because I couldn’t find a single nail in our garage, but I worked it out. I don’t anticipate it lasting through Christmas, but it certainly adds cheer to our depressing entryway.
DIY Festive Door Decoration: No. 3 on Alaska Knit Nat’s DIY Holiday Craft Guide
What you’ll need:
2-4 pine boughs
Twist ties (I used the long ones that held together our Christmas lights)
Pretty ribbon
A small nail
Hammer
Directions:
1. Trim off any excess or dead branches at the base of each pine bough.
2. Arrange the boughs like a big fan.
3. Tie the boughs together using a couple of twist ties.
4. Cover up the twist ties by tying ribbon around them. Form a large bow out of the ribbon.
It’s that time of year again where I scramble to find affordable and meaningful gifts for my family and friends. I wouldn’t go so far as to say I’m cheap, but I definitely don’t have the means to purchase nose-hair trimmers willy nilly.
I turn to my thrifting and crafting skills during the holidays. I thought this year I’d share a couple of my moneysaving ideas each week until it’s crunch time and you’re desperate for ideas on how to glue random trash and recyclables together in your house and stick a bow on it — we’ll get there together.
So here we go.
Alaska Knit Nat’s DIY Holiday Guide 2014
#1: Make your own photo cards
I always have those friends who mail out holiday cards with professional family photos arranged on glossy photo paper with a side banner that reads in hipster calligraphy, “May your days be merry and bright.” Yes, I’m jealous of them. Yes, I want to copy them but without spending a lot of money. Yes, I want to mail mine out perfectly on time too.
Here’s how you can create your own family photo card with an awesome font on the side for a fraction of the cost.
What you’ll need:
Digital photos of your family. Instagram and phone photos would work too.
You don’t have to be a graphic designer to make your own photo cards. Just visit canva.com. It’s like graphic design for dummies. Create an account for free and you have access to tons of banners, frames, fonts and digital doodads that are predesigned and ready for you to arrange into myriad media. Just today Canva added a Christmas Card category where you select the template you like and upload your photos. You can get a little more technical and design your own. Most of the graphics are free.
I spent about an hour tinkering around with a design and finally settled on this one:
Next, save your design as a PDF. Then upload your photo collage to any online drugstore photo processor. I prefer Walgreens because not only is it a block away from my house, but there is always a coupon code floating around the internet that works. *Note: I did have to change the PDF file to a JPG in order to upload it to Walgreens’ site. If you originally save it from Canva as a JPG it may not be high quality enough to print since it’s saved much smaller than a PDF.
Print one tester photo and see how it turns out. If it’s to your liking, print the number you need.
Then, glue your photo to the front of your blank card.