Tag Archives: crochet

Oliver baby blanket

I’ve said it before – I’m a short-attention-span crafter. If I can’t finish something in a few hours, I probably never will unless I’m really determined.

When my friend Kasandra had her first son, she asked me to knit him a blanket. It took me months to make and although it’s been much loved I vowed I would never knit another blanket. It’s just too monotonous.

So when Kasandra told me no one had yet made her second boy, Oliver, a special blanket, I decided to keep my vow and crochet him a blanket.

The Oliver Blanket | an easy crocheted baby blanket with vertical stripes | free crochet pattern from Alaskaknitnat.com

This pattern was simple and quick. I made the whole thing in a couple of weeks. The vertical stripes are unusual and the gaps between the crocheted spaces aren’t too big so it’s a nice piece of fabric.

Continue reading Oliver baby blanket

Northern Lights Memory Blanket — A free crochet pattern

Hello Pinterest and AllFreeCrochet.com fans!

Thanks for checking out my Northern Lights Memory Blanket pattern. I have a little note for you. I wrote this pattern when I was a much less experienced crocheter. I don’t have a lot of experience writing crochet patterns and I have had a few people contact me about how the set-up rows are written in a confusing manner.

Unfortunately, as I’m a full-time working mom I don’t have the ability to recreate this pattern to check for errors. I based this pattern on the Granny Stripe Scarf from PurlSoho.com, so if you have difficulty following my pattern I recommend you read their instructions. Once the first few rows are set up it crochets very easily – just like a granny square. Instead of working in the round, though, you crochet back and forth.

Back to my original post:

A few weeks ago I tidied up my yarn collection and realized I have a whole lotta yarn. Too much yarn. I have a loose rule that I can’t buy more yarn until I use the last yarn I purchased. That doesn’t always work out, apparently.

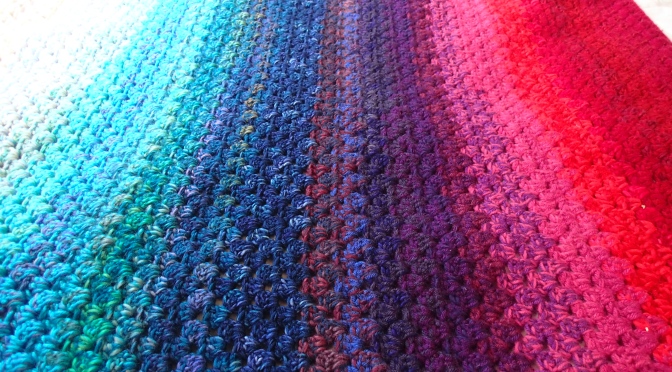
I decided to work on a lap blanket to curl up on the couch with. I knew crochet was the way to go. It not only goes by more quickly than knitting but it also uses up yarn faster, which is just what I wanted. Instead of following a striped pattern, I opted to go with the flow. I started with some tripled up DK weight red wool I had used to knit a teeny tiny baby sweater. As soon as I reached the end of a skein I brought in a different skein.

As I crocheted along I was reminded of each project I had bought the yarn for. It was becoming a memory blanket. After I got through purple, the blanket was starting to remind me of the Aurora Borealis. I’ve not had the opportunity to see more than green and white with my own eyes, but the northern lights can be all colors of the spectrum.

Use your yarn stash to create a northern light memory blanket | A free pattern from Alaska Knit Nat

Use your yarn stash to create a northern light memory blanket | A free pattern from Alaska Knit Nat

Use your yarn stash to create a northern light memory blanket | A free pattern from Alaska Knit Nat

I’m overjoyed with the end product. It’s every color I love and perfectly cozy.

Continue reading Northern Lights Memory Blanket — A free crochet pattern

Tapered Flower Headband — A Free Crochet Pattern

I’ve been trying to polish up my site and I realized one of my most popular patterns was full of dead photo links. I also realized it wasn’t even a pattern but just some nice photos of my wearing a bunch of my headbands — pretty much useless to all of you! Instead of just updating the post, which was from three years ago, I figured I’d just start anew and reintroduce it.

This simple crocheted headband is my best-selling product. I sell out of it at Bella Boutique every holiday season. You can’t go wrong — it’s colorful and has a huge flower on it. I also love embellishing the back of the headband with a vintage button.

The pattern is inspired by Knitty.com’s Calorimetry Headband, which I like, but is really too wide for my head. I also get bored by the ribbing pattern. I wanted something that I could create quickly for my short attention span. I relied on this pattern for the base and then added a simple trim and my own flower pattern, instructions for which can be found here.

Many thanks to my old friend Laura for taking (and recovering) these shots. She was just starting out her photography business when these were taken and they are lovely!

Tapered flower headband | A free crochet pattern from Alaska Knit Nat
© Laura Stennett Photography

I originally made two versions of this pattern, one with worsted yarn and the other while crocheting two strands of worsted at the same time. I prefer the double stranded version because it’s fuller looking. You can do a single strand but you may have to extend the ends by a couple of rows.

Continue reading Tapered Flower Headband — A Free Crochet Pattern

Quick, Chunky Crochet Hat — A Free Pattern

I knit a lot of gifts this last holiday season. With the completion of a belated scarf last week, I’m just about knitted out. I needed a new project that would satisfy my short attention span and was something different.

I found a simple crochet hat pattern on TangledHappy.com that used the herringbone half double crochet stitch. I’d never heard of it, but after a couple of video tutorials, it looked easy enough.

I didn’t have the hook size the pattern called for, but I had something close, so I used what I think was an N size hook (it’s unmarked for some ridiculous reason). This made the gauge off for the original pattern so I had to wing it, which is why I’m posting a pattern on my blog. I also added contrasting trim and pompom.

These are incredibly quick to complete. I made two yesterday and one this morning. They are a great way to use up excess yarn, especially if you double up worsted weight and crochet two strands at once, which I did with the blue hat shown in this pattern.

Quick Chunky Crochet Hat | A Free Pattern from Alaska Knit Nat

Quick, Chunky Crochet Hat with Pompom — A Free Pattern from Alaska Knit Nat

Materials:

1 skein of chunky yarn such as Lopi or Lion Brand Thick and Quick OR two strands of heavy worsted yarn crocheted together as one strand.

1 skein of contrasting yarn, weight can vary

Size N crochet hook

Darning needle

Two toilet paper tubes (opional)

Sharp scissors

Removable stitch marker

Continue reading Quick, Chunky Crochet Hat — A Free Pattern

Retro Crochet Chevron Skirt

Recently a friend gave me a stack of old needlecraft magazines from the ’70s and ’80s. Most of the patterns are hilariously hideous, but there are a few that are pretty classic.

I’m more of a hat, scarf and mittens type of crocheter, but I was intrigued by a crochet chevron skirt from a 1981 magazine. This pattern I haven’t yet attempted, but I think it’s the only crochet clothing I’d be willing to wear (and not just on Halloween).

I’ve transcribed the pattern with the hopes that someday I will reference this post and actually make it. But if any of my readers attempt it before I do, please email me a photo of the finished product!

Retro Crochet Chevron Skirt | Free Pattern from Alaska Knit Nat

Retro Crochet Chevron Skirt

Sizes:

To fit 36-38 [40-42]-inch hips.

Length when hanging 26.75 inches

Materials:

Total of 16 [22] oz. (450 [600] grams) of worsted yarn (about 6 oz. each for colors A,B,C,D)

Size F crochet hook

1-inch wide elastic

7-inch zipper

needle and thread

Gauge:

15dc and 7.5 rows to 4 inches in plain dc; 17dc to 4 inches in chevron

Retro Crochet Chevron Skirt | Free Pattern from Alaska Knit Nat

Back and front (make 2)

Using A, make 148[172] ch.

Base Row: 1 dc into 4th ch from hook, 1dc into each of next 10ch, work 3dc tog. Over next 3ch, 1 dc into each of next 10ch, 3dc into next ch, repeat from * to end, but finish last repeat 2dc into last ch instead of 3dc. Turn. 145 [169] dc.

Next Row: 3ch to count as 1dc, 1dc into first dc, *1dc into each of next 10dc, work 3dc together, 1 dc into each of next 10dc, 3dc into next dc, repeat from * to end, but finish last repeat 2dc into turning ch of previous row and join B on last dc. Turn.

Repeat the last row, working 2 rows each in B, C, D, A, B, C and D and join A on last dc – so completing 16 rows from the beginning.

1st decrease row: Using A, work 3ch, skip first dc, 1dc into each of next 10dc, * work 3dc together, 1dc into each of next 21dc, repeat from * to end, but finish last repeat 1dc into each of last 1dc. Turn.

Next row: 3ch, 1dc into first dc, * 1dc into each of next 9dc, work 3dc together, 1dc into each of next 9dc, 3dc into next dc, repeat from * to end, but finish last repeat 2dc into last dc, and joint B on last dc. Turn. Using B, repeat the last row twice more, joining C on last dc of second row.

2nd decrease row: Using C, work 3ch 1 dc into each of next 9dc, * work 3dc together, 2dc into each of next 19dc, repeat from * to end, but finish last repeat 1dc into each of last 10dc. Turn.

Next row: 3ch, 1dc into first dc, *1dc into each of next 8dc, work 3dc together, 1dc into each of next 8dc, 3dc into next dc, repeat from * to end, but finish last repeat 2dc into last dc, and join D on last dc. Turn. Using D, repeat the last row twice more, joining A on last dc of second row.

3rd decrease row: Using A, work 3ch, skip first dc, 1dc into each of next 8dc, * work 3dc together, 1dc into each of next 17dc, repeat from * to end, but finish last repeat 1dc into each of last 9dc. Turn.

Next row: 3ch, 1dc into first dc, *1dc into each of next 7dc, work 3dc together, 1dc into each of next 7dc, 3dc into next dc, repeat from * to end, but finish last repeat 2dc into last dc, and join B on last dc. Turn.

Continue in this way, working in stripe sequence and patters as now set, decreasing on every 4th row, as before until 61 [71] dc remain.

Work 7 rows, so ending 2 rows in D, joining A on last dc of 3rd row.

Next row: Using A, work 1 ch, skip first dc, *sc into next dc, 1hdc into each of next 2dc, 1dc into each of next 3dc, 1hdc into each of next 2dc, 1sc into next dc, repeat from * to end, finishing 1sc into last dc. Turn.

Work 4 rows in sc. Fasten off.

To Finish:

Do not block. Using a backstitch seam, join side seams leaving 7 inches from top edge open. Sew in the zipper. Work catch stitch casing over elastic on wrong side at waist. Press seams lightly according to type of yarn used.


Crochet Candyland Cowl

Chunky cowls are in. Crochet is in. Color is in. Let’s do this!

I tinkered with a couple of large crochet hooks this weekend and decided to use up some of my yarn stash by making a cozy, some might say yummy, cowl. This only took a couple of hours to make and only uses one type of crochet stitch, so it’s perfect for a beginner or a sourdough who just wants to race through her bits of yarn.

You’ll be crocheting two strands of yarn at once to make it chunky so you’ll have to make separate balls out of your already existing skeins. What’s really handy is if you are able to find both ends of one skein because then you could crochet with them at the same time without having to make an extra ball.

The other great thing about this pattern is that it doesn’t have to be exact. If you end up with more stitches than you’re supposed to you won’t be able to notice. Just wing it! It’s also up to you how you want to change colors as you go. I did it one time where I brought in the new color as I went and another time I finished each row, drew up the end through the last loop and then brought up the new color on the next round. Whatever makes more sense to you is what I would do.

Crochet Candyland Cowl -- Free Pattern

Materials:

Various colors of worsted yarn.

Size P crochet hook

Darning needle

Directions:

Crocheting with two strands at the same time, chain 52 stitches. I like to do the foundation-free method, which can be found here. This way I don’t have one row that’s wider than all the rest. Slip stitch into the first stitch, creating a big loop.

1. Bring in your next color by chaining 2 stitches. DC into each stitch all the way around, making 2 DC in the last stitch. Slip stitch to the top of the first DC.

2. Bring in the new color and Ch 2. DC all the way around and slip stitch into the top of the first DC.

Repeat steps 1 and 2 until you have 58 stitches or 13 rows, whichever comes first.

Cut yarn and draw up through the last loop. Weave in all the ends. I weave them in as I go, but you could also tie the bits of yarn to one another and clip them short.

Crochet Candyland Cowl

Crochet a Flower Headband

At long last I have finally caved into mainstream fashion and I’ve gone and made a flowered headband. You know the ones — tapered with a big flower on the side? They are cute, don’t get me wrong, but I was never into knitting them and then I realized the other day — I was never into KNITTING them. But what about crochet?

I actually admire Knitty.com’s Calorimetry Headband. I’ve made it before, although slightly altered because I feel as though it’s too wide for my head.

But honestly, I hate purling. All you do is knit 2, purl 2 for the whole pattern and it’s enough for me to stay away.

Last weekend I set out looking on Ravelry for a simple crochet headband pattern. I ended up finding a crocheted version of the Calorimetry Headband. As a knitter by nature, I needed a crochet pattern I could understand. This one was simple and best of all, much quicker than knitting.

I decided to take this basic pattern and embellish it with a border and a flower. Pizzazz!

Tapered flower headband | A Free Crochet Pattern from Alaska Knit Nat
© Laura Stennett Photography


But I didn’t stop there. In case you don’t know me very well, when I get on a new kick I don’t stop. So I made five more. Then I decided to double the yarn and WOWEE it made it really pop. So I made four more.

Tapered flower headband | A Free Crochet Pattern from Alaska Knit Nat
© Laura Stennett Photography
Tapered flower headband | A Free Crochet Pattern from Alaska Knit Nat
© Laura Stennett Photography


And choosing the button in the back is half the fun!

© Laura Stennett Photography

So how are these pretty headbands made? LET ME TELL YOU!

First, I followed the instructions here but I used a J hook instead. I also think doubling up the yarn is much nicer, but that’s up to you. If you only have one ball just make another ball from it or use the end from the inside at the same time as the outside, if that makes sense.

Once you’ve completed the basic headband, with your contrast color start making single chains all around the outside of the headband. I didn’t put the hook into individual stitches, but instead I stuck the hook in the ch2 gaps at each end. When you’ve gone all the way around, slip stitch into the first SC and weave in all the ends.

View my previous blog post on how to crochet a flower. Then stitch the flower with a darning needle to wherever you’d like the flower to be. Pretty simple!

Tapered flower headband | A Free Crochet Pattern from Alaska Knit Nat
© Laura Stennett Photography
Tapered flower headband | A Free Crochet Pattern from Alaska Knit Nat
© Laura Stennett Photography