Welcome to Alaska Knit Nat! I was born and raised in Anchorage and have always had a passion for making useful things, whether they are eaten, knit, crocheted, sewn or randomly glued and assembled. I received my bachelor’s degree in French and journalism from the University of Alaska Anchorage and work almost full time at a nonprofit and way over time as a mom.
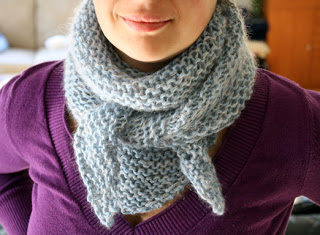
I’m not a big fan of knitting scarves. They take too long and I usually lose interest. But there’s one style I don’t mind knitting. It’s a giant triangle and the pattern is crazy easy.
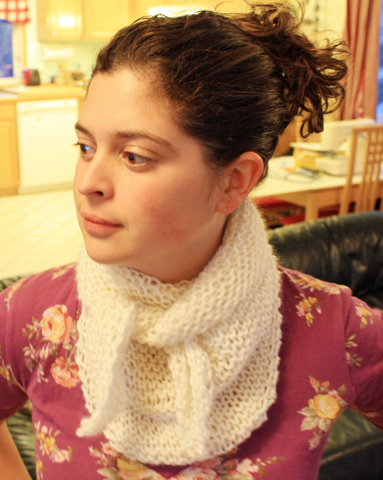
Two days ago my little sister texted and said she lost her favorite scarf and asked if I’d make her a new one. Here’s her cute little self:
Two binge-watching nights later and the scarf was finished. This is a perfect mindless project since it’s knit in garter stitch and you only have to remember to increase one stitch at the beginning of each row. The mohair adds a beautiful fluff to the scarf so it feels like a cloud when you’ve finished. By combining fuschia and peach yarns the outcome sort of reminds me of sherbet ice cream.
Here’s how to make it:
Super Simple Triangle Scarf Pattern
Materials:
224 yards aran weight yarn in peach (I used 2 skeins of Sirdar Snuggly SK shade 0451)
224 yards (2 skeins) Rowan Mohair Haze in Caress (00525)
Size US 15 circular needles (straight would work too)
Darning needle
Abbreviations:
KFB = Knit in the front and then in the back of one stitch, thus increasing work by 1
M1 = make 1 stitch from front to back in the horizontal strand between stitches
Gauge: doesn’t matter
Directions:
You’ll be knitting both aran and mohair yarns at the same time as though they are one strand.
Cast on 4 stitches.
Row 1: K1, KFB, knit to end of row
Repeat row 1 until you have 108 stitches or until triangle is about 20 inches from tip to needles. Bring in new skeins of yarn when necessary.
Next row: K1, KFB, *K3, M1. Repeat * till there are two stitches remaining. K2.
During inauguration time in January you had to have been living under a rock to not notice all the glorious pink pussy hats women (and men) were wearing all over the country.
I particularly took notice when a fellow knitter posted to her Facebook page a cabled version of the now-iconic cap. I’ll now turn over this post to Amanda who has knitted a nice stack of these adorable hats.
I love knitting hats. They’re quick, gauge isn’t really a huge issue, they don’t require a lot of yarn, and they can be knit on circular needles. And since winter has returned to Alaska again, we have lots of opportunity to wear them.
In December and January, pink hats starting popping up in my Instagram feed a lot. I saw so many posts of the original pussy hat being made and worn (if you don’t know the story behind these hats, well, first, where have you been? And second, find out more information at www.pussyhatproject.com). The project gained so much momentum there were actually pink yarn shortages in shops across the country. Pink yarn shortages! When has that ever happened? I was set to make a few, and then I ran across a photo of a cabled pussy hat that I just loved the style of. I haven’t been knitting for that long, and cables are something I’ve always wanted to try. I assumed they would be very difficult so I’d wait until I could take a class…but the pattern was free until the Women’s March, so I went ahead and downloaded it.
The pattern is so simple! Easy to follow instructions (there is also a chart for those of you that prefer to follow charts) and even photos illustrating exactly where to pick up and make those darn knits for the crown. Between the size 11 needles and the super bulky yarn, it knits up pretty quickly. Oh, and those cables? Way easier than I ever thought, and there are lots of helpful YouTube videos out there for the extra assist. I did buy a cable needle, which I highly suggest just to make life a little easier. I’ve made several now, and I must say this hat gets people talking! The Women’s March is over, but there are more events planned starting as soon as March 8th – so don’t let those cables hold you back! Solidarity, sister!
In December I had the opportunity to create wedding flowers at Our Lady of The Snows Chapel in Girdwood. I’ve seen many photos of this quaint cabin in the woods but there was something special about being there in person for the first time.
Olivia and Neil were looking for a wintery floral decor without too much of a Christmas look so I used flowers in deep magenta and scarlet.
A huge thanks to Grace Adams Photography for her breathtaking photos. She’s one of my favorite wedding photographers and I was thrilled to finally be able to work with her.
The bride’s bouquet was brimming with the most exquisite white waxflower. She had wanted anemones in her bouquet but they unfortunately weren’t available. I was so happy Olivia was open to my using burgundy gerber daisies instead. Their dark centers gave the look of anemones and are much more durable a flower.
The altar centerpiece was one of my pride and joys. Trailing amaranthus was spilling over the sides and with the eucalyptus, stock and waxflower filled in between the roses it smelled so good!
Lately my four-year-old son has been interested in science experiments, which consist of his mixing random kitchen ingredients together into a nasty gloop and watching what happens.
Not that I disapprove of his experimenting but I would rather he make a kitchen mess if we were actually preparing something edible.
I suggested cupcakes but we were running low on milk, so I harkened back to my one-and-only successful baking recipe: pink champagne cake. I didn’t have any champagne but I had a delightful little bottle of sparkling sake my husband had bought for me.
Instead of a whole cake I halved the recipe and we made lovely pink cupcakes. You can too! By using effervescent booze the cupcakes turn out airy and not overly sweet.
Pink sparkling sake cupcakes
Makes about 12 cupcakes
Ingredients:
1.5 cups all-purpose flour
1.5 teaspoons baking powder
1/4 teaspoon salt
1 stick of butter, softened
1 cup sugar
1/2 teaspoon vanilla extract
3 egg whites
3 drops red food coloring
1 cup sparkling sake or champagne
Directions:
Preheat oven to 350 degrees F. Mix together the flour, baking powder and salt in a medium bowl. Set aside. With a Kitchen Aid mixer, beat the butter and sugar for several minutes till fluffy. Mix in the vanilla. Add the egg whites one at a time then mix in the food coloring. Beat for a couple of minutes. Incorporate the flour and sake in alternating batches of three, starting and ending with the flour. This way the champagne won’t curdle (but it’s ok if it does).
Add cupcake liners to a cupcake pan. Pour batter into pan and bake for about 20 minutes or until a toothpick comes out clean.
Let cool completely before adding icing. If you’re at a loss for icing, here’s my recipe:
4 oz. cream cheese, softened
1/4 cup sugar
1 cup of heavy whipping cream
Whip together the sugar and cream cheese. When fully combined, add the whipping cream and beat till you get stiff peaks. Slice up fresh strawberries for garnish.
I don’t have the opportunity to do winter wedding flowers too often. Alaskans make the most of their summer and usually get married from June-August. When bride Caitlin hired me for her January wedding I was thrilled. She wanted all white and greenery.
Caitlin and Jason lucked out – the morning of their wedding it was like a magical snowy fairy land. Anchorage has been severely lacking in snow for the past four winters and this year hasn’t disappointed. We got about 18 inches on their wedding day.
Caitlin had me wrap her bouquet in blush silk ribbon. I was overjoyed to finally have the opportunity to use this. It was a dream to wrap and tie! She had me add a little “something blue” at the last minute.
Preheat oven to 375 degrees F. Remove the stems from the mushrooms. Chop stems finely and mix with the onions. Heat 1 tablespoon butter and 1 tablespoon oil in a sauté pan over medium-high heat. Add mushrooms and onions until the liquid has been drawn out of the mushrooms and the onions are soft, about 7 minutes. Set aside to cool in a mixing bowl.
In the same pan, add another tablespoon of butter and stir in the panko flakes. Sauté until the flakes are lightly browned, about two minutes. Place flakes in the mixing bowl with mushrooms and onions.
In the same pan add the loose sausage (remove from casings if necessary). Cook until meat is browned, about 7 minutes. Place the meat on a cutting board and chop finely. Add to the mixing bowl.
Toss in the Parmesan, parsley and cream cheese and mix thoroughly (hands are best). Add salt and pepper.
Stuff each mushroom with a heaping amount of filling and place on a baking sheet. Top with more grated Parmesan.
Bake for about 30 minutes or until lightly browned. Serve immediately.
If you’re a mom in her 30s then you’ve probably encountered the direct sales brand, LuLaRoe. Recently my Facebook feed has been overloaded with pop-up shops and online shopping parties for a women’s clothing brand that touts fun prints and comfortable fit.
I finally went to a LuLaRoe party at a friend’s house. It was sort of like Avon – my girlfriend hosted a shopping party and a sales rep was on-hand to talk up the brand and get you excited about buying things. If you bring a friend, you save 10 percent!
Although I found some cute styles and they were pretty comfortable, it was the price that I wasn’t impressed with. Thirty-five dollars seems like a good price for a skirt, but when I saw the fabric quality and the way they were constructed I concluded it was probably about $1.50 worth of materials and a whole lot of upselling on the part of the sales rep.
One of my coworkers has been sporting LuLaRoe’s Cassie skirt and it looks fabulous on her. It’s essentially a tube of jersey fabric with a wide waistband.
And it was pretty dang easy to make! This project took me about 45 minutes from start to finish and it cost me less than $5.
It’s 1 degree out!
Copycat Lularoe Cassie Skirt
What you’ll need:
1 yard of jersey (stretchy) fabric. I’d suggest a non-directional pattern to make it easier
Straight pins
Sewing machine
Fabric scissors
Step 1: Determine the stretch of your material. My material was stretchy in both directions but one way was definitely more stretchy. You’ll want the stretchy direction to go side-to-side, around your hips (instead of up and down stretch).
Step 2: Take the fabric and stretch it around your waist. This is how I determined how wide to make my skirt. I marked from the edge of the fabric to where it met when wrapped around my waist once. For me it was 30 inches.
Step 3: Cut a piece from your fabric that’s the measurement you came up with plus 2 inches – for me that was 32 inches. Remember the stretch should be horizontal.
Step 4: Fold down the top edge by 7 inches and cut across for the waistband. My waistband measured 32 inches long and 14 inches tall (you’ll be folding it in half later). Set this aside.
Step 5: Pin your two side edges, right sides together, from top to bottom. Using a zig-zag stitch, sew with a 5/8″ seam allowance thus creating a tube. It should essentially be a pencil skirt with raw edges on top and bottom. Trim the seam edges. Try on your tube to figure out if you want to trim the bottom. My skirt hit just above my knees, which is what I wanted.
Bottom edge of skirt, pinned with 1/2-inch hem.
Step 6: Determine the bottom of your skirt and inside out, pin up a 1/2-inch hem. Sew around starting at the side seam with a straight stitch using a 3/8″ seam allowance. Turn right-side out.
Waistband sewn together at the side.
Step 7: Take your waistband and pin the side edges together, right sides together. Sew using a zig-zag stitch with a 5/8″ seam allowance. Trim seam edges.
Waistband is inside-out and placed over the top of the skirt, which is right-side out.
Step 8: Keep your waistband inside out and place it over the top of your skirt (which is right-side out). Pin the top edge of the waistband to the top edge of the skirt. Sew using a zig-zag stitch with a 5/8″ seam allowance.
Step 9: Flip the waistband up and fold in half so the raw edge is now inside the skirt. Turn inside out.
Step 10: Pin the raw edge of the waistband to the seam you just made. You’ll be pinning through three layers of fabric. Sew a zig-zag stitch just next to the stitch you made before. This will ensure the seam you’re currently making won’t show on the outside of the skirt.
This stitch is made adjacent to the first waistband seam. This ensures it doesn’t show on the outside of the skirt.
Step 11: Turn right-side out and you’re done! The waistband is extra tall, so either wear it that way or fold it down to create more tummy control.
Pesto. I love pesto. I’m a traditionalist and tend to prepare it in the classic Genovese way but recently a friend told me his method, with cream and white wine, and I thought I’d try it.
I loved it! Pesto can sometimes have an overpowering garlic taste (it does contain raw garlic) so this version provides the flavor of pesto but is a little smoother.
If you use the Costco basil pesto then it’s a super quick meal, just perfect for a weeknight.
Weeknight meal: creamy pesto with chicken
Ingredients:
1 lb. spaghettini
4 tablespoons butter
3/4 cup heavy cream
3/4 cup white wine
2/3 cup pesto
3/4 pound leftover rotisserie chicken, torn into bite-sized pieces
salt and pepper to taste
lemon (optional)
Directions:
Bring a large pot of salted water to a boil. While pasta is cooking, melt the butter in a large sauté pan over medium-high flame. Add the cream and bring to a simmer. Turn down the heat. Add the wine and let simmer for about 3 minutes.
Turn off the heat and add the pesto and chicken.
Drain the pasta. Add to the sauté pan and toss till evenly coated with sauce. Add salt and pepper. Squeeze a lemon over the top. Serve with a side salad.
Since starting a full-time job a year ago, I’ve had to get creative with dinners. I have a limited amount of time before I put my son down for bed.
This evening I came home from work with absolutely no plan and a near-empty fridge. My freezer, however, was chock full of random Costco impulse buys: tamales, gyoza, hash brown patties, broccoli.
I contemplated the frozen broccoli. Why, why did I buy this? It’s never as good as fresh broccoli. It’s sort of chewy and crumbly. So I decided to get creative.
I fried up some hash brown patties, chopped up some thawed broccoli and came up with a seriously delicious side dish that’s sure to please the whole family. My husband ate five of them!
Preheat oven to 400 degrees F. Heat the butter in a sauté pan and cook the onions till soft and translucent, about 5 minutes. Add the garlic and sauté another 30 seconds.
Place onions and garlic in a mixing bowl to cool. Place hash brown patties in the pan and brown on both sides. Crumble up and add to the mixing bowl. Finely chop the broccoli and add to the mixing bowl.
Once all the ingredients have slightly cooled, add the egg, bread crumbs, cheeses, salt and pepper. Mix thoroughly.
Lightly grease a baking pan (I used a silpat mat instead). Form mixture into small patties. Bake 15 minutes, flip and bake another 15 minutes. Serve with sour cream.
Every once in a while I have the wherewithal to make lasagna with homemade noodles. This evening I decided to try something different. Instead of traditional red sauce and ricotta I made a creamy béchamel sauce and layered the spinach noodles with shredded chicken and marinated artichoke hearts. The marinade from the artichokes added a tangy flavor to the dish and the creamy sauce was pure deliciousness. You can of course use store-bought noodles, but there’s something fancy about fresh pasta.