Here is my DISCLAIMER: I’ve been foraging for mushrooms my whole life and I am positive that what I’m picking is edible. I am not a mushroom expert but I can give you great advice on how to discern boletus mushrooms from inedible ones. Pick at your own risk! Some people experience gastric upset after eating boletes even though they aren’t poisonous. Never eat a bolete unless it’s been thoroughly cooked. When in doubt, throw it out!
Feel free to contact me and e-mail me photos of your finds if you ever have any questions. There are quite a few edible mushrooms in Alaska, but I’m only knowledgable about boletus.
So here we go:
Alaska Guide to Boletus Mushrooms
There are several types of boletus mushrooms and you can find many of them in the Anchorage area. Most are edible and the ones that are poisonous will let you know by their scary color.
The U.S. Forest Service has a great Alaska mushroom guide. I highly recommend taking a look at it.
The only inedible boletes I’ve come across in Alaska are boletus luridiformis and boletus coniferarum. Luridiformis is red, which to me is a signal to not eat it. The coniferarum has yellow flesh that when bruised or cut will rapidly turn inky blue. Keep in mind that many edible types of boletus will oxidize, but not nearly as quickly as the coniferarum turns from yellow to blue. It looks pretty cool, but tastes extremely bitter (but will not kill you if eaten).
*Note: a mushroom enthusiast commented on my old blog that the mushroom in the photo below is edible. I would just avoid it if you find it.
 |
| Boletus luridiformis |
Ok, now that we have the inedibles out of the way, let’s start becoming mushroom detectives. Before you go out and pick these mushrooms, let me prepare you…
- You will probably encounter bugs
- You will probably encounter little maggots (baby bugs!)
- You will probably get dirty and wet
You’ve got to get over these factors if you’d like to carry on.
OK? ok….
First, all edible boletes have sponge under the caps instead of gills. Boletes are the only mushroom in Anchorage forests that have sponge instead of gills besides the hawks wing mushroom, which has hedgehog-like spines underneath (and it’s edible if you boil it, but I’ve never tried it). You can exclude any mushroom with gills because it will not be a bolete. This one fact makes bolete hunting reassuring because there is so much you can rule out. There are deceptive mushrooms that really look like bolete caps, but when you turn them over and see gills, just let them be. They tricked you!
Here are the common types of boletes you’ll come across in Anchorage forests:
Aspen Scaber-stalk — these are found in birch and spruce forests, typically around moss, low-bush cranberry and crow berry bushes. They have sienna-colored caps with dirty-looking stems (almost looks like the texture of a terry-cloth towel). The flesh also tends to oxidize and turn black when cut.
*Note: a person commented on my old blog post that the scaber-stalks can cause gastric upset. I have been picking and eating this mushroom most of my life and never experienced upset stomach, but I thought I should let it be known. I don’t care much for their flavor when fresh; I prefer to dehydrate them and add them to soups.
 |
| Aspen scaber-stalk |
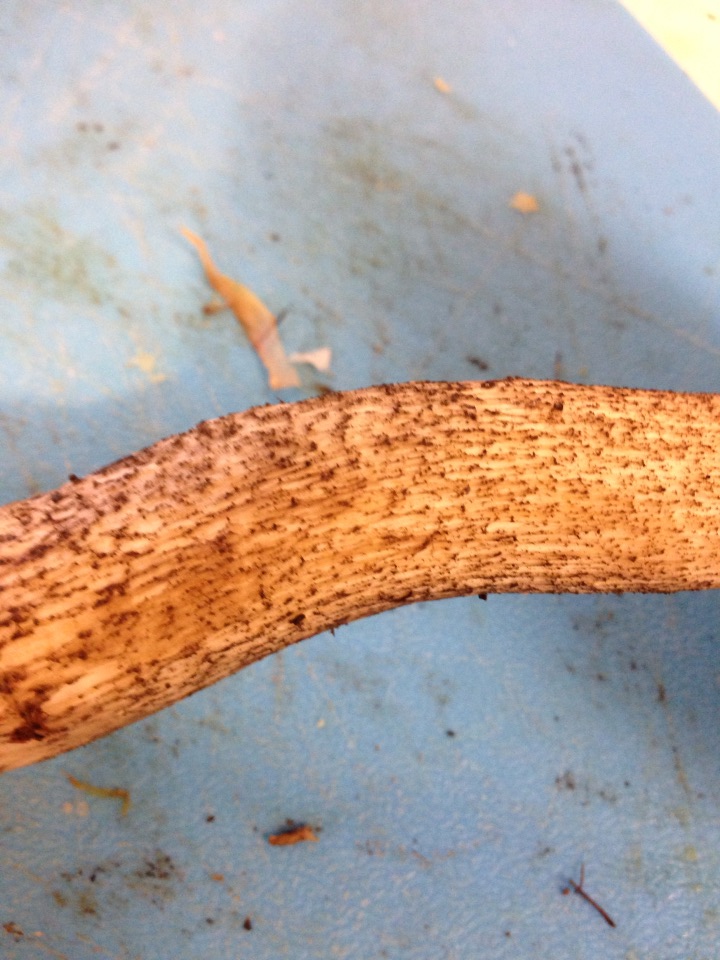 |
| Stem of most forest boletes |
Alaskan Scaber-stalk — these look a lot like the Aspen scaber-stalk but darker with a narrower stem. I don’t care much for these and when I find them, I let them be. They tend to get soggy, slimy and buggy really fast.
 |
| Alaskan scaber-stalk |
Boletus Mirabilis — I have never encountered this bolete, but thanks to the folks at the Girdwood Fungus Fair, they have provided me with a lovely photo. I’m so excited to try and find some!

King bolete — this is the purest, most prized bolete and is the equivalent of a wild porcino mushroom. These have light brown caps and white stems with no terry-cloth look to them. The sponge will turn yellow with age.
 |
| Freaky melded-cap king bolete. Still delicious |
 |
| King boletes |
In addition to the U.S. Forest Service, here is another great site about Alaska boletes.
All right, now let’s set out to find some mushrooms! But where, might you ask? Well, boletes like to grow near spruce roots, birches and in mossy areas. You can often find boletes growing in people’s yards. You usually won’t find them in areas with long grasses and ferns or anywhere with tall vegetation. The trail system in Anchorage is a great place to start. You could also try Thunderbird Falls, Bird Creek and Girdwood.
The best time to pick boletes is from late July to mid-September. Over the years I haven’t found a true rhyme or reason to how boletes grow. Sometimes you’ll have a summer with hundreds of pounds and others you won’t find any. Usually they grow during the rainy and damp times of Alaska summers.
Boletes can grow to be pretty huge, but it’s best to pick them when they are just a couple of days old because bugs love boletes as much as humans do. They will flock to them pretty much as soon as they surface. It’s rare to find a bolete that hasn’t been lived in by a beetle or some sort of fly eggs, but if you pick them early on it doesn’t affect the quality or taste of the mushroom. I’ll show some photos later.
 |
| This large bolete was literally teeming with insects and maggots. Didn’t take this one home! |
Fresh boletes should have firm stems and caps, but it’s ok if the cap is slightly soft. If you find a really squishy bolete, let it be because the bugs have laid claim to it. Sometimes you’ll find a bolete that’s firm on the cap, but when you look underneath it looks like bugs have taken it over. Not always true! Sometimes the bugs just get into the sponge part of the mushroom, which can be easily removed. Break the cap in half. If the flesh is white and has no holes in it, then keep it. Baby boletes are the best. Their cap and stem are both firm and delicious. They also look totally phallic. I just had to put that out there.
I recommend field dressing your mushrooms as you go. This means bringing a pocket knife along and whittling away the dirty root. I’m lazy and often don’t do this. It just means I’ll have more trash to throw out at home.
Boletes are sturdy so you can collect them in plastic grocery or garbage bags, five-gallon buckets, or if you’re feeling whimsical, in a lovely basket. It’s up to you. Most will say that mushrooms should never be stored in plastic bags (I can see Laurie Constantino shaking her head). I find it easier to tote large quantities of mushrooms around the forest in a plastic bag and it doesn’t seem to affect the quality of my mushrooms. Do not store your boletes in plastic bags for long periods of time. This will create too much moisture and cause them to rot.
When you find a good bolete, pick it by the base of the stem, not by the cap, as you will probably break off the cap and tear away the flesh by accident.
The great thing about picking mushrooms is they literally pop up overnight so many people could pick the same spot and still find a good share. You can usually tell if another bolete hunter has been in the area by the discarded caps and overturned trickster mushrooms. On a recent quest we covered the same ground as another hunter and still came out with nearly 40 pounds of mushrooms!
Once you’ve collected your mushrooms, you’ll have to process them. Here’s how it goes:
Start by whittling away the root of the mushroom to remove any soil. If you come across any bug-eaten mushrooms, either toss them or cut into the stem or cap to see if it’s salvageable. Sometimes the bugs will have only gotten to half the mushroom, so why waste the whole thing? Once you’ve removed the big pieces of dirt, you can run each mushroom under cold water and lightly scrub with a nail brush to remove excess dirt. Only rinse them if you plan to use them right away. Rinsing them and then storing them in the fridge may cause them to rot.
Now comes the part where you need to figure out what you’re doing with your mushrooms. They can be stored in the fridge for a couple of days, but you’ll want to prepare them as soon as you can. If you must store them, be sure to keep them in paper bags so they can breathe.
Boletes should not be eaten raw. They will probably give you an upset stomach. If I’m not cooking with them right away I either sauté the mushrooms in butter, vacuum pack and freeze them or put them in a food dehydrator for a couple of days, bag them up or grind them into porcini powder.
Either way, you’ll need to slice them up. This is where you do most of the work. You might find that lots of your mushrooms are bug eaten. I tend to toss caps that are eaten even in the slightest, but really it’s not gonna kill you so this is a matter of personal preference. You’ll be able to tell if the mushroom is too rotten to eat cause it will look totally gross. But as I said before, you can always try and cut away the nasty bits and keep the good bits. I mentioned before that you can remove the sponge. I do this with most mature boletes because the sponge ends up becoming slimy when cooking. With really new boletes, the sponge is firm and doesn’t need to be removed. It’s a bit like getting to an artichoke heart — the sponge will peel off easily and you’ll be left with the yummy cap.
 |
| This king bolete stem has been eaten by bugs. Not salvageable |
 |
| This aspen cap is nasty. Didn’t keep any of it. |
 |
| This Alaskan stem was soft and dark as soon as I cut into it. It was not good. |
 |
| This stem was deceiving because it felt great from the outside, but was eaten up on the inside. |
 |
| This cap had maggots in the sponge, but the actual flesh was just fine. |
 |
| See? Looks great! Peel off the sponge and you’ll be fine. |
 |
| This is the inside of a good king bolete. Some parts have been eaten by a bug, but I wasn’t horrified by it so I kept it. |
 |
| This Alaskan bolete has oxidized. It’s fine to eat! |
 |
| This is a fresh king cap. The sponge is thin and firm. It doesn’t need to be peeled off. |
Once your boletes have been processed the world is your mushroom! Boletes are great in soups and sauces, but your best bet is to do a Google search for recipes for porcini. If you’ve decided to dry your mushrooms, they will need to be reconstituted when you’re ready to use them. Boil a couple of cups of water or chicken broth and pour over the dried mushrooms in a bowl. Let sit for 20 minutes and reserve the steeped water for your soup. It’ll deepen the flavor even more.
So, that’s my guide to Alaska boletes. Please contact me if you have any questions, comments or even corrections.
And remember, if you’re not extremely positive about a mushroom, don’t eat it. Better safe than sorry!
For more Alaska mushroom information, check out this short film produced by the Alaska Teen Media Institute for the U.S. Forest Service and this terrific article by Laurie Constantino for Alaska Dispatch.