Category Archives: Holiday

Wes Anderson thrift store costumes

It’s T-minus 12 days till Halloween and if you haven’t pre-ordered your costume then that means you’re like me and you leave it to the last minute, thrift stores and luck.

In Anchorage, one of the best places to build your own costumes is the Bishop’s Attic on Gambell. This place is ’80s costume heaven (and keep it in mind for those ugly sweater parties during the holidays).

And this week’s theme is definitely thrift store appropriate. We’re dedicating the week to all things Wes Anderson.

So here are three Wes Anderson costumes that are easy to slap together with a visit or two to your local thrift shop and some rummaging through your closet.

1. Suzy from “Moonrise Kingdom”

DIY Wes Anderson Halloween Costumes | Simple outfits put together at the thrift store; presented by alaskaknitnat.com
Photo Credit: Josh Koonce via Compfight cc

From the thrift store:

  • Knee-length dress
  • White, long-sleeved dress shirt
  • Beret

DIY Wes Anderson Halloween Costumes | Simple outfits put together at the thrift store; presented by alaskaknitnat.com

This outfit was easy to find at the thrift store. I recommend washing the beret before wearing. And if you’re able to use your own pea coat you’ve just created a perfect Alaska-friendly costume (yay for staying warm!)

Accoutrements:

  • Binoculars
  • Retro suitcase
  • Pea coat
  • Knee-high socks
  • Saddle shoes

2. Dudley from “The Royal Tenenbaums”

DIY Wes Anderson Halloween Costumes | Simple outfits put together at the thrift store; presented by alaskaknitnat.com
Beautiful artist’s rendering photographed by Will Laren on flickr.

From the thrift store:

  • Retro t-shirt
  • Cargo shorts
  • Safari Hat
  • ’80s glasses

DIY Wes Anderson Halloween Costumes | Simple outfits put together at the thrift store; presented by alaskaknitnat.com

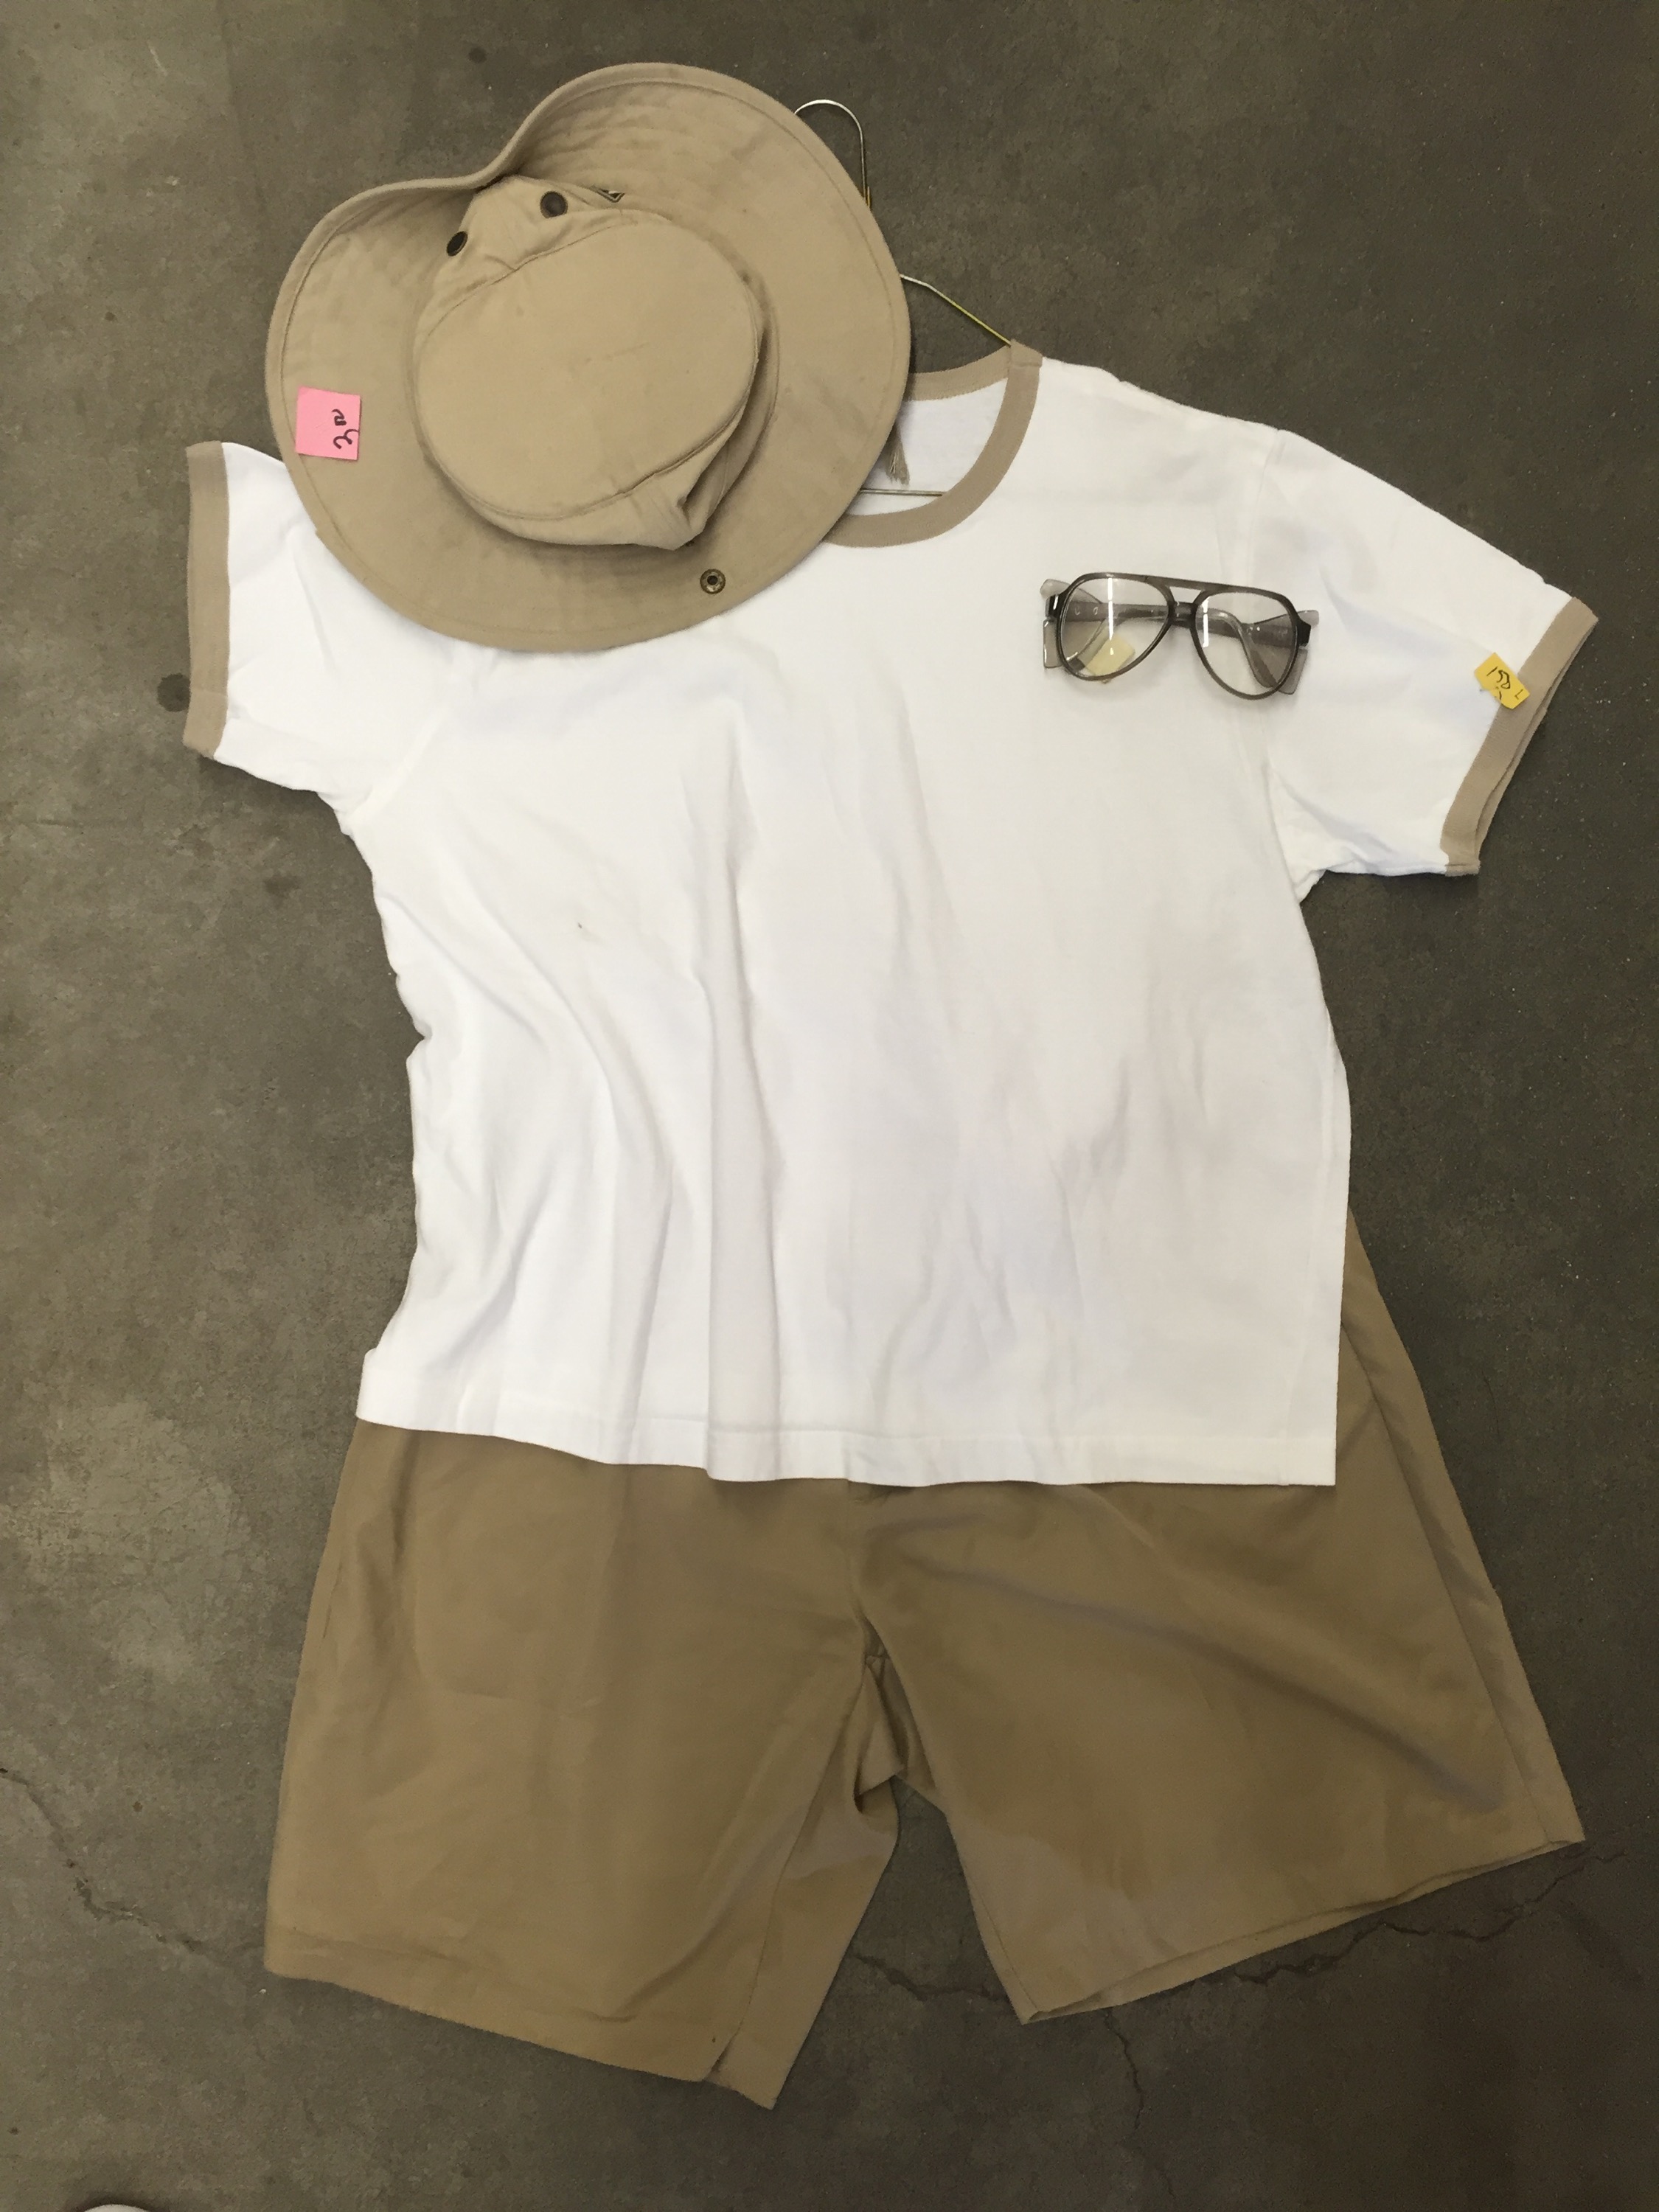
This costume needs no additional elements. It’s perfect. But some Croakies couldn’t do any harm.

3. Team Zissou from “The Life Aquatic”

DIY Wes Anderson Halloween Costumes | Simple outfits put together at the thrift store; presented by alaskaknitnat.com
By John Lester (Flickr: Zissou)

DIY Wes Anderson Halloween Costumes | Simple outfits put together at the thrift store; presented by alaskaknitnat.com

This is the simplest costume I was able to find at the thrift store. Just have a look in the uniforms section of the shop and grab some hospital scrubs. Top it off with a red hat and you’re solid. Go the extra mile and print off this free logo and tape it to the shirt.

If you have a spare few hours this week, knit yourself a Zissou cap using my free pattern.

Zissou Hat | A free knitting pattern from Alaska Knit Nat

And stay tuned for more Wes Anderson delights this week from me, akshopgirl and TessieStyle.

DIY Wes Anderson Halloween Costumes | Simple outfits put together at the thrift store; presented by alaskaknitnat.com

Super quick baby gnome costume

It’s week two of our Halloween Blog Party and the theme is “Woodland Creatures.” So far we’ve had fairy flower crown and forest garland tutorials, a woodland fairytale mix by DJ Spencer Lee and today I’ve got a super quick baby costume that requires minimal crafty skills and a shoestring budget.

This was my son’s first Halloween costume and I love it so.

Super quick baby gnome costume | a DIY Halloween craft from alaskaknitnat.com.
“Step off. Don’t make me sick my Jeremy Fisher on you.”
A while back AK Shopgirl was inspired by our little gnome. She decided to dress up her twin baby boys as more traditional David the Gnome.

Super quick baby gnome costume | a DIY Halloween craft from alaskaknitnat.com.

Here’s all you need to achieve a gnome-tastic baby outfit:

  • 1 piece of white felt (24 cents from Wal-Mart)
  • A large mug
  • pen
  • scissors
  • safety pin
  • a dark-colored onesie
  • pants
  • booties
  • gnome hat (knitting pattern here)*

*If you aren’t a knitter, I suggest making a gnome hat the way AK Shopgirl did using a sheet of red craft foam fashioned into a cone, adhered with a hot glue gun. Ohhappyday.com has a free template here, if you want to get technical.

How to make the beard

Super quick baby gnome costume | a DIY Halloween craft from alaskaknitnat.com.

Place the mug upside down in the middle of the white felt, 1.5 inches down from the top edge. Trace a circle for the neck hole.

Super quick baby gnome costume | a DIY Halloween craft from alaskaknitnat.com.

Use the mug to shape the corners of the beard bib.

Draw a line at the top of the neck hole to the top edge of the felt. This will be the opening of the beard bib. I just love saying “beard bib.”

Super quick baby gnome costume | a DIY Halloween craft from alaskaknitnat.com.

Freehand the shape of the beard. Cut out your beard bib.

Super quick baby gnome costume | a DIY Halloween craft from alaskaknitnat.com.

Dress up baby of choice in the onesie, pants and booties. Use a safety pin to connect the back edges of the beard bib. Place pointy hat atop baby.

Super quick baby gnome costume | a DIY Halloween craft from alaskaknitnat.com.

Presto. Baby gnome.

DIY Fresh Garland

It’s week two of the Halloween Blog Party with AK Shopgirl and Tessie Style Blog. This week’s theme is “Woodland Creatures.”  We’ll be featuring crafts, costumes, decorations, cocktails and music mixes that represent the fairies, flora and fauna of the forest.

Earlier this week I posted a video tutorial on how to make a fresh flower crown. I’m kicking it up a notch today with a fresh garland to decorate your woodland creatures party or to spruce up your mantle. No video for this tutorial, but I encourage you to watch the time-lapse flower crown tutorial as the technique is similar.

DIY Fresh Garland

DIY fresh garland | Follow this simple tutorial so you can decorate your home with fresh greens all year long. Alaskaknitnat.com

Here’s what you’ll need:

DIY fresh garland | Follow this simple tutorial so you can decorate your home with fresh greens all year long. Alaskaknitnat.com

  • About four feet of twine
  • floral wire (available at crafts stores)
  • Fresh greens such as salal, plumosa ferns and eucalyptus
  • Scissors
  • Wire cutters

Continue reading DIY Fresh Garland

Decorating Eggs with a Toddler – The Last-minute Way

Easter is an unfamiliar holiday for our family, but that doesn’t mean we can’t get creative with hard-boiled eggs.

Pinterest will show you endless egg possibilities but I’m frankly too lazy to attempt most of them. I also don’t have egg dye.

We decided to bust out our $2 water colors and paint our eggs. It turned out to be far less messy than egg dye and our 3-year-old had a great time coloring his eggs.

We baked the eggs to prevent cracking. Then we just set them out in a muffin tin with some water colors and markers and let our son go to town. Fun!

I’ll have a glue, glue Christmas — #10: Pompom ornaments

I recently assessed my yarn stash and quickly came to the conclusion that I have way too much. I’m running out of time to knit and crochet presents for my loved ones and I need to taper down my yarn inventory. Enter the pompom. This perky accessory harkens to my younger years when my clothes were adorned with rick rack and I coveted Tinkerbell peel-off nail polish. 

Pompoms are making a comeback in a big way. Plus, they eat through yarn stashes quickly. This was a great way to decorate my tree and it requires barely any skills. I highly recommend using fabric scissors for this project; otherwise you might find yourself getting callouses in the crotch of your thumbs.

You’ll love the trick to making these ornaments. Look no further than your kitchen utensil drawer.

Pompom ornaments | #10 on Alaska Knit Nat's DIY Holiday Craft Guide

Pompom ornaments — No. 10 in Alaska Knit Nat’s DIY Holiday Craft Guide

What you’ll need:

  • Yarn
  • Large serving fork
  • Sharp scissors

Directions:

Cut a piece of yarn about 16 inches long and fold it in half. Run it in between the middle prong of the fork and hold it securely against the handle. Take up to four strands of yarn at a time and loosely start wrapping around the fork. Do this till you’ve got a whole lotta yarn on there. The more strands you use at a time the faster this will go. Cut the yarn when you think it’s enough. This may take some tinkering.

IMG_1973

Use the yarn you originally placed between the prongs to tie around all the wrapped yarn. Another person’s finger comes in handy, but it’s possible to do this alone. Tie a double knot and slip your uncut pompom off the fork.

Pompom ornaments | #10 on Alaska Knit Nat's DIY Holiday Craft Guide

Pompom ornaments | #10 on Alaska Knit Nat's DIY Holiday Craft Guide

Cut apart all of the loops, being sure not to cut the original strand of yarn as this will be what you’ll hang the ornament from.

Pompom ornaments | #10 on Alaska Knit Nat's DIY Holiday Craft Guide

Trim your pompom as you deem fit. Repeat till you’ve run out of yarn or have worked up an appetite for some microwave nachos.

I’ll have a glue, glue Christmas — #9: Paint chip gift tags

The older I get the less I despise big box hardware stores. Every time I get dragged into one by my husband I treat it as a mission to think of cool ways to reuse hardware supplies. This craft is perfect for the holidays, and free too.

Paint chip gift tags | #9 on Alaska Knit Nat's DIY Holiday Craft Guide

Paint chip gift tags — No. 9 on Alaska Knit Nat’s DIY Holiday Craft Guide

What you’ll need:

  • Paint samples from the hardware store (you can usually get about 3 tags per paint chip)
  • Scissors or a gift tag-shaped paper punch
  • Tiny hole punch or large needle
  • String

Directions:

Cut out the paint samples in the shape of gift tags. Poke a hole in one end and run a six-inch piece of string through the hole. Tie the ends of the string together. Elaborately wrap a gift and add the tag as a finishing touch.

Paint chip gift tags | #9 on Alaska Knit Nat's DIY Holiday Craft Guide

I’ll have a glue, glue Christmas — #8: DIY Heart Shirt

Each year I try to give my two sisters equally awesome handmade gifts that follow a similar theme. I usually make something for myself so we can all dorkily match. Last year was a winner: shirts with giant cashmere hearts.

DIY Heart Shirt | #8 in Alaska Knit Nat's DIY Holiday Craft Guide

This is a low-skill craft. It requires hand sewing, but nothing complicated. I turn to my local thrift shops for blank sweatshirts and cashmere sweaters. Any tight-knit sweater will work if you aren’t able to find cashmere. Mohair or angora might be fun. Be sure to wash and dry your sweater on the hot setting a couple of times to ensure it is completely done shrinking. If you sew on a fresh sweater when you wash the final product the heart will shrink and cause the shirt to tear and bunch up where you sewed it on (I know from disappointing experience).

Quick Craft: DIY Heart Shirt | Alaksa Knit Nat

DIY heart shirt — No. 8 in Alaska Knit Nat’s DIY Holiday Craft Guide

What you’ll need:

  • A blank sweatshirt
  • A sweater you don’t mind massacring (cashmere recommended)
  • Embroidery thread of contrasting color
  • Embroidery needle
  • Double-sided fusible, lightweight interfacing or Stitch Witchery

For the full tutorial, click here.

I’ll have a glue, glue Christmas — #3: DIY Festive Door Decoration

Our front door is a sad, sad sight. It’s what I imagine the Crooked Man of nursery rhyme’s front door would look like. At Halloween, it must look so haunted because not once in the five years we’ve lived here has a single child trick-or-treated.

It’s beyond improvement, which is why I never bother to add holiday decorations; but when we were at Lowe’s yesterday picking up a Christmas tree, this hastily scrawled sign caught my attention:

DIY Festive Door Decoration | No. 3 on Alaska Knit Nat's DIY Holiday Craft Guide

More specifically, “FREE” caught my attention. Now, what could I use pine boughs for? I’d already utilized them for our Thanksgiving table décor, so I thought why not shoddily assemble a front door wreath-type thingie?

DIY Festive Door Decoration | No. 3 on Alaska Knit Nat's DIY Holiday Craft Guide

It cost me zero dollars and took five minutes to make. It took me 15 minutes to affix to our front door because I couldn’t find a single nail in our garage, but I worked it out. I don’t anticipate it lasting through Christmas, but it certainly adds cheer to our depressing entryway.

DIY Festive Door Decoration: No. 3 on Alaska Knit Nat’s DIY Holiday Craft Guide

What you’ll need:

  • 2-4 pine boughs
  • Twist ties (I used the long ones that held together our Christmas lights)
  • Pretty ribbon
  • A small nail
  • Hammer

Directions:

1. Trim off any excess or dead branches at the base of each pine bough.

2. Arrange the boughs like a big fan.

3. Tie the boughs together using a couple of twist ties.

DIY Festive Door Decoration from Alaska Knit Nat

4. Cover up the twist ties by tying ribbon around them. Form a large bow out of the ribbon.

5. Hang up on your front door.

DIY Festive Door Decoration | No. 3 on Alaska Knit Nat's DIY Holiday Craft Guide

DIY Festive Door Decoration | #3 on Alaska Knit Nat's DIY Holiday Craft Guide

I’ll have a glue, glue Christmas — #2: free wrapping paper

I just received a huge box from my mother-in-law and it included wrapped presents and several yards of crumpled up craft paper.

Free wrapping paper | DIY Crafty Holiday Guide from Alaska Knit Nat

No more packing peanuts, thank goodness! When I see all this paper, I instantly think, “What can I make out of this?” It seems a waste to toss it. So I flatten it out, roll it up and use it as wrapping paper. Yay, free!Free wrapping paper | DIY Crafty Holiday Guide from Alaska Knit Nat

Holiday DIY: Free gift wrap | Alaska Knit Nat