Yesterday I had the pleasure of guest posting on GretchenLovesAnchorage about thrift store fashion shopping in Anchorage. It was refreshing to post something a little different from what I normally write and it brought back memories of working as the features editor for The Northern Light.
In case you missed it, here’s my thrift store advice. And for those non-Anchorage residents, you still might learn a thing or two about how to dress to the nines without spending the tens — of thousands…ok, I am done trying to be clever. Enjoy! And if you have a chance, take a look around Gretchen’s blog. It’s happy, insightful and hopefully will make you want to come visit our fabulous city.

I have been thrift store shopping in Anchorage since I was 12 when I bought my very first Kurt Cobain-style flannel shirt at Value Village on Boniface (the Dimond location was Fabricland and Nerland’s furniture store). Since then I’ve furnished my dorm room, first apartment and current home in second-hand décor. I have also created a fun, colorful wardrobe that I can say I’m pretty proud of.
So let me delve into the Anchorage thrift store scene and give you some tips and tricks of the thrifty trade.
Recently my friend, Karen, asked me to be her “thrifty style adviser.” She wanted a little more pizzazz in her wardrobe without spending a lot of cash. I accepted the challenge, but gave her a few ground rules.
First, you have to be persistent and diligent. You can’t expect to waltz into a secondhand shop and immediately flick to the perfect, most amazing item you’ve ever seen in your life. You have to trudge through a whole lot of, well, crap. People often literally donate trash to thrift stores. I’ve spoken with former Salvation Army employees who have told me they toss a majority of donated items because they aren’t suitable to sell. Be prepared to visit thrift stores more than once and to dig, dig, dig to find the good stuff.
My other tip is to take fashion risks. Try on things you wouldn’t normally wear. You never know — that Las Vegas cat shirt might be the perfect level of ironic for you to pull it off.
Do some research. Analyze your closet inventory and figure out what articles of clothing you want or need. I always keep a mental list of items I’ve either worn out or really want. For instance, I NEEDED salmon-colored jeans and — ta-da! — I found some the other day for just $2. Also on my recent list was a pair of plain black heels. Mission accomplished when I found a brand-new pair of Sofft brand black patent leather pumps for $25 — a little pricey by my thrifty standards, but since they were originally $110 I felt it was worth it.
A great resource is Pinterest. I’ll often type in an article of clothing I already own and see what Polyvore experts have put together. From “black blazer” to “chevron maxi dress,” you can create a mental file of what to keep an eye out for.
My goal as a thrift store clothing shopper is to find good quality clothes that will complement my current wardrobe. Sometimes I go out on a limb and buy something wacky and wild just because I love the item. I don’t feel remorse when it doesn’t work out because I really didn’t spend much on it.
Now let’s get started. Anchorage thrift shops are not all alike. Some are great for furniture, others are better for clothing and some have really great dishes. Today I’ll discuss the good clothing stores in town.
Salvation Army — Northern Lights Blvd.
Anchorage has three Salvation Army thrift stores – on Dimond, Mountain View and the oldest location on Northern Lights Boulevard next to Crossbar. My mom used to take me to this store when I was just four years old (thrifting runs in the family).
This Salvation Army is great for most clothes. Target donates unsold items to the city’s Salvation Armies, so if you like Merona, Converse and Mossimo brands you can often find them here for $4-6 with the tags still attached. They are usually stored on their own racks.

Karen was looking for colorful tops and cute mini skirts so we split up and started flipping through the racks. The shick, shick, shick of hangers quickly passing by can be exhausting, but I made a game of it by holding up the most horrifying of frocks and joking that “this Victoria’s Secret top is so old it’s actually fashionable again.”
I found Karen a few pretty shirts, a lovely blue dress with pockets, and she came up with a floral skirt and some indigo straight-legged jeans. It’s off to the fitting room. Keep in mind that not all thrift stores offer such a luxury. Employees have told me it has to do with homeless people using them as public toilets. The Mountain View Salvation Army only has a full-length mirror, so be sure to wear a camisole and leggings if you want to see how things look on you.
I stood outside the fitting room as Karen broke a mild sweat.
“Nobody said you didn’t have to work for it,” she said as she tried on several unexpectedly frumpy shirts. True that, Karen; true that.
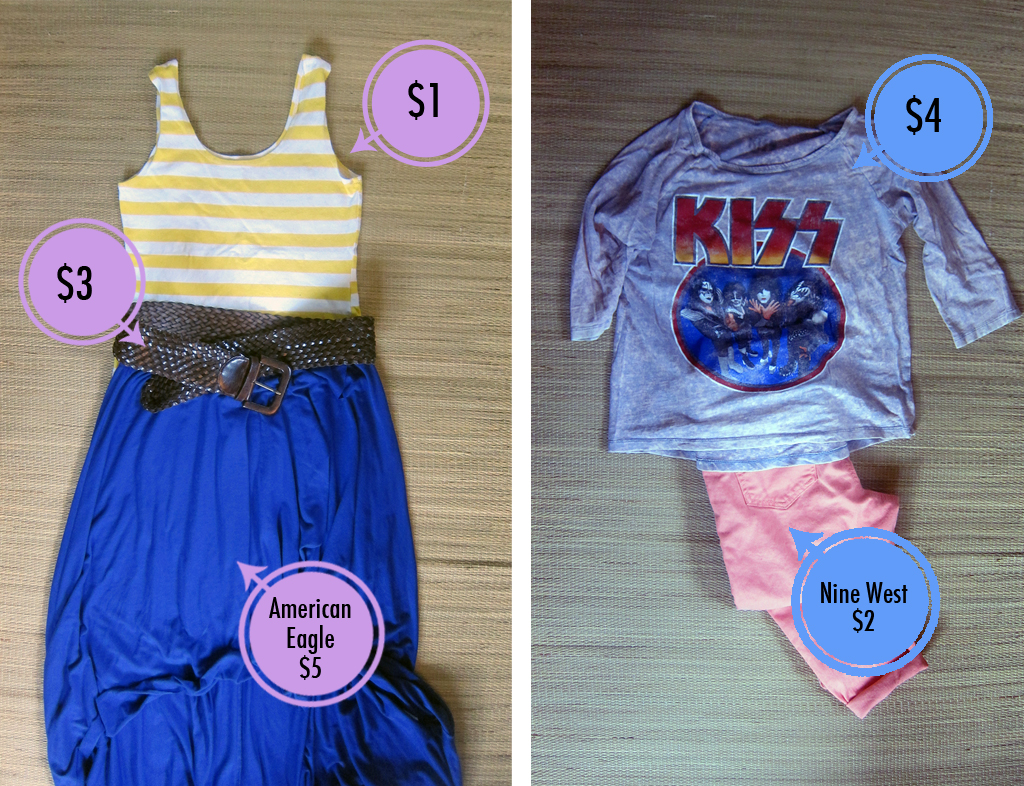
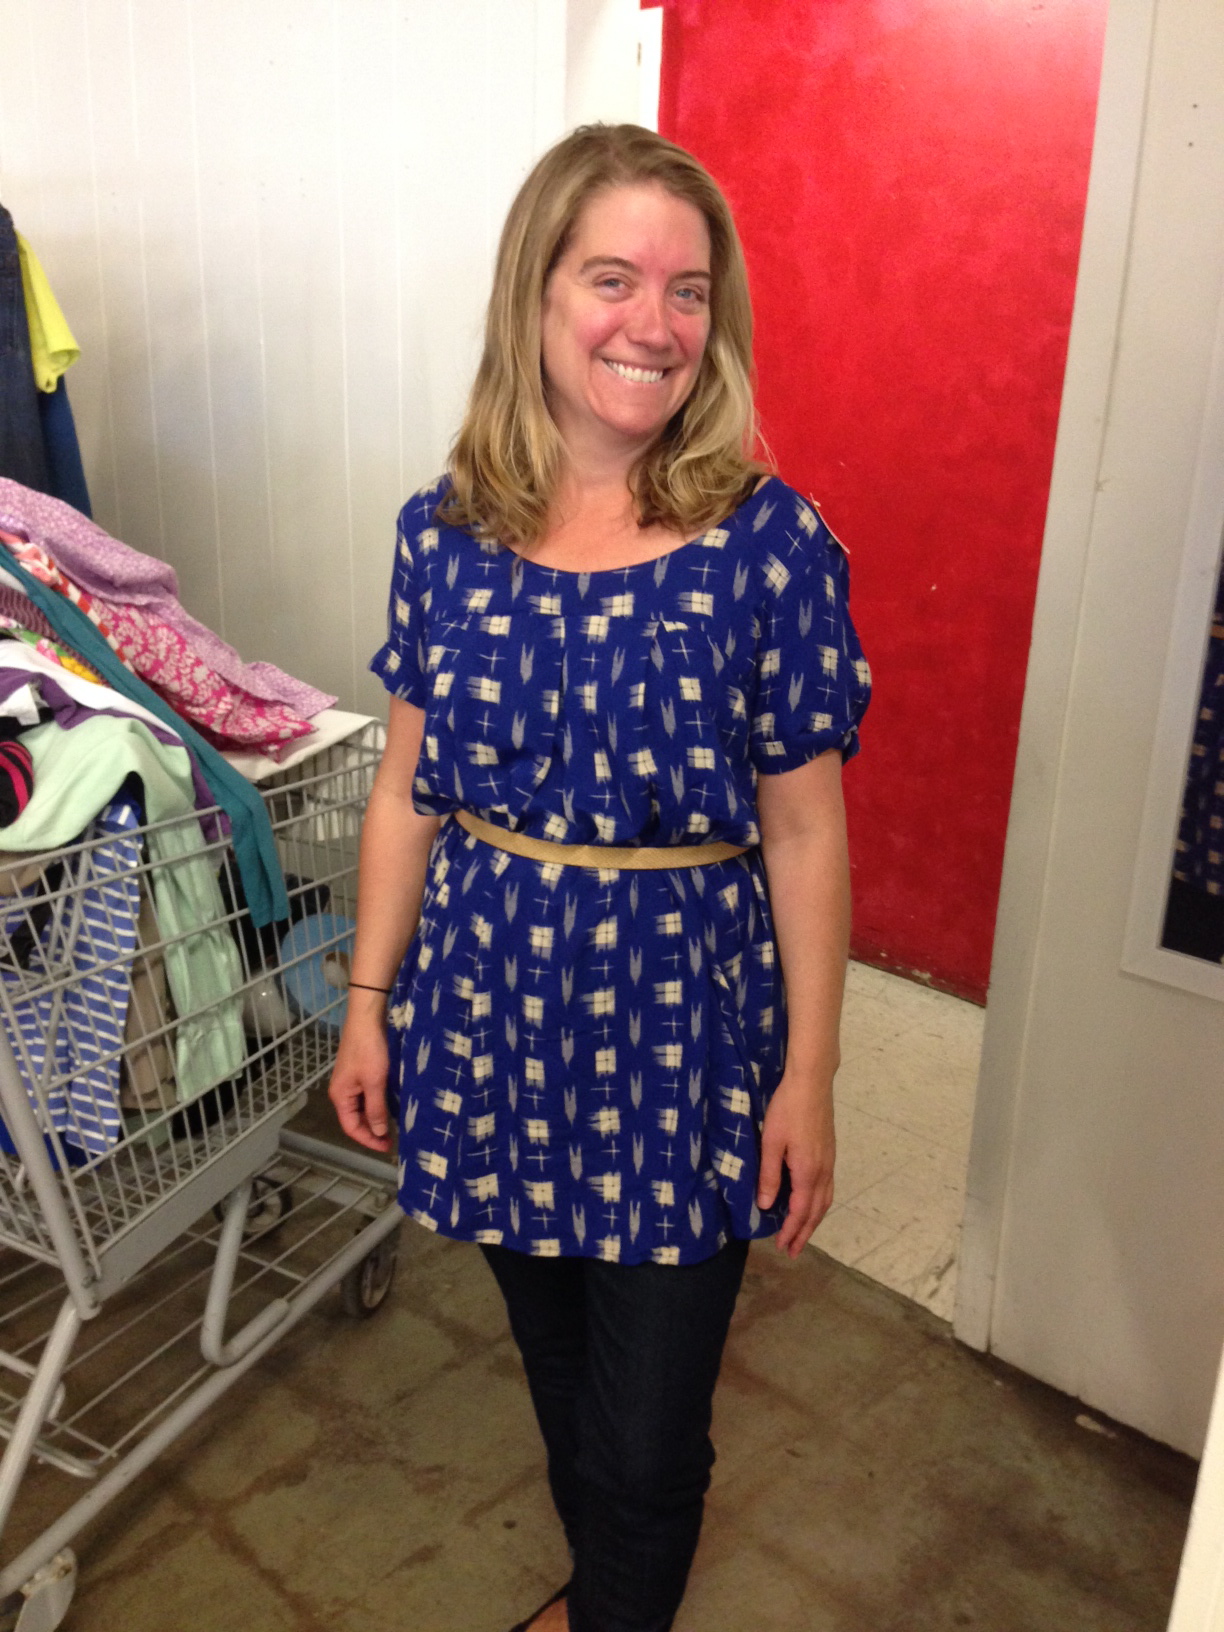
She came away with the blue dress, a striped mini skirt, a comfy Gap sweatshirt and jeans. I found a couple of pairs of perfect-fitting pants and red patent leather flats.

Karen models her Salvation Army finds; total cost, about $5:
Quick tip: check the rack of recently tried-on clothes. Often times people do the hard work of digging for you and don’t end up buying what they find. That’s where I discovered some awesome Vigoss pedal-pushers.
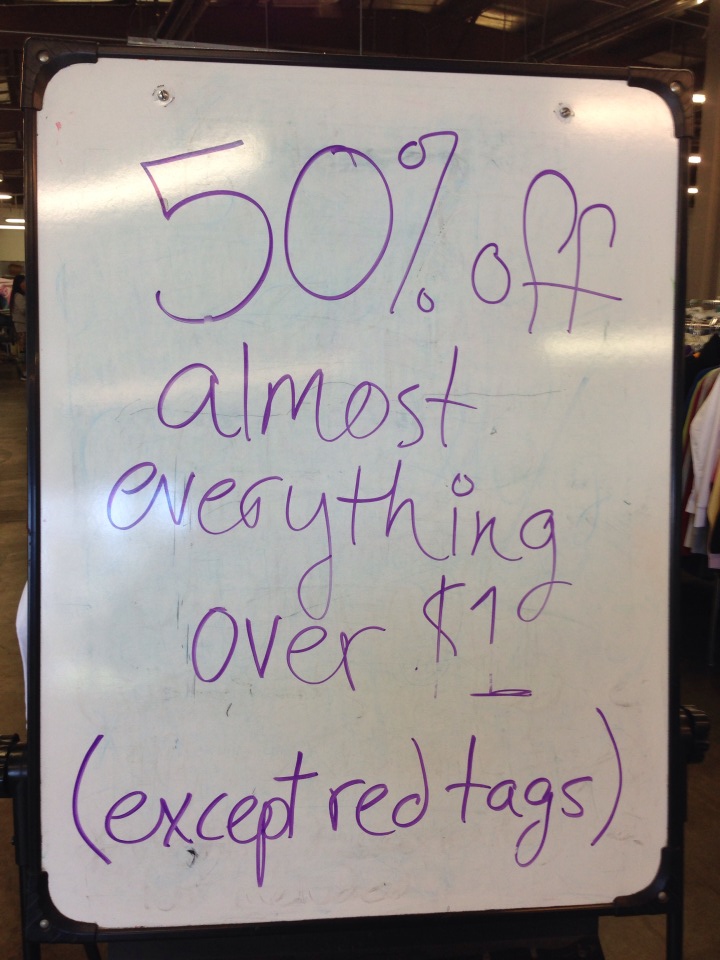
It was our lucky day because *almost* everything was 50 percent off, so we walked out with an armload for under $20.
S.P.C.A. Thrift Shop — Arctic and International

This gem is nestled in a strip mall on International Airport Rd. with Guido’s and Partycraft. Enjoy a saketini at The Dish and get your thrift on because the S.P.C.A. won’t disappoint. Psst! Here’s a secret: a beloved local consignment store often donates their unsold items to this place. I’ve found designer brands here for mere pennies. Plus, your purchases go toward helping animals so what isn’t there to like?
Most of the clothing follows a flat pricing list, save for a small rack up front with “fancy” clothes. The items on this rack range from $10-20. A few weeks ago I spotted a cashmere argyle sweater vest from J. Crew for $10. Pretty good deal!
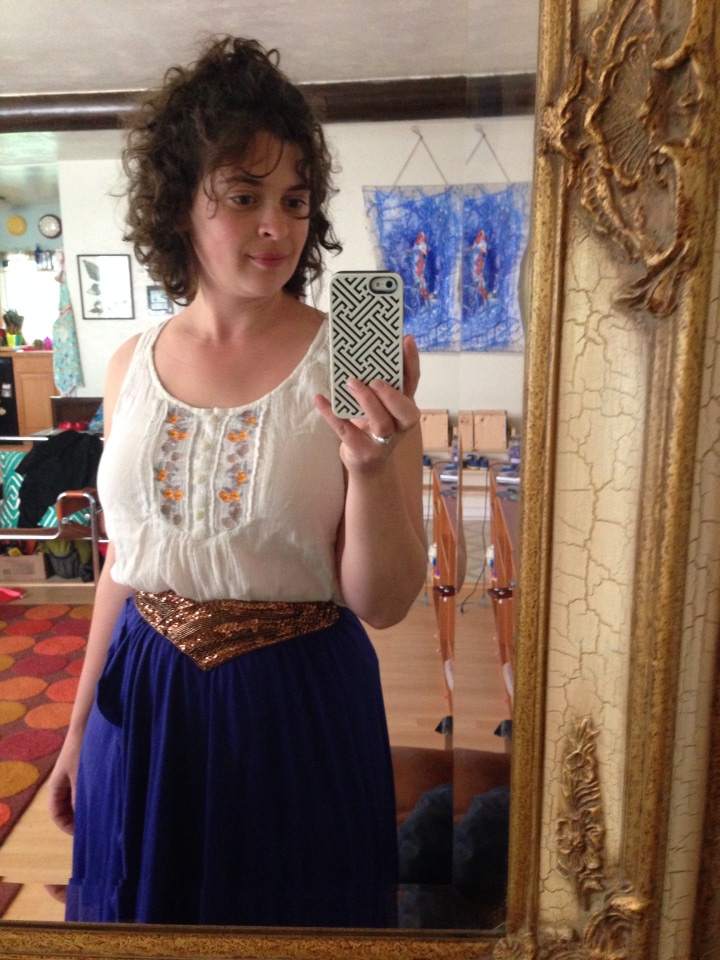
Karen didn’t find much on our visit — just a Merona denim-colored skirt. But I found two Columbia brand skirts — with pockets — and an unusual sequined belt.
Don’t forget to remind the cashier to give you a punch card if you spend more than $10. I don’t remember what happens when you fill it up, but it’s a perk nonetheless.
Value Village — Dimond or Boniface
The “Buy more, spend less” mantra isn’t always accurate and I hesitate to say that Value Village is a good thrift store. Often its knickknacks are grossly overpriced and they have a pathetic furniture selection. But they do stock an unbelievable number of jeans and tops at reasonable prices, which is why I’m including it on today’s list. Skip the dresses at VV because most of them are priced at $30, and that’s just crazy! Pricers here understand the value of a designer label and won’t hesitate to mark a Calvin Klein top with holes in it at $20. But most of the tops and jeans are about $7-10, which I can handle.

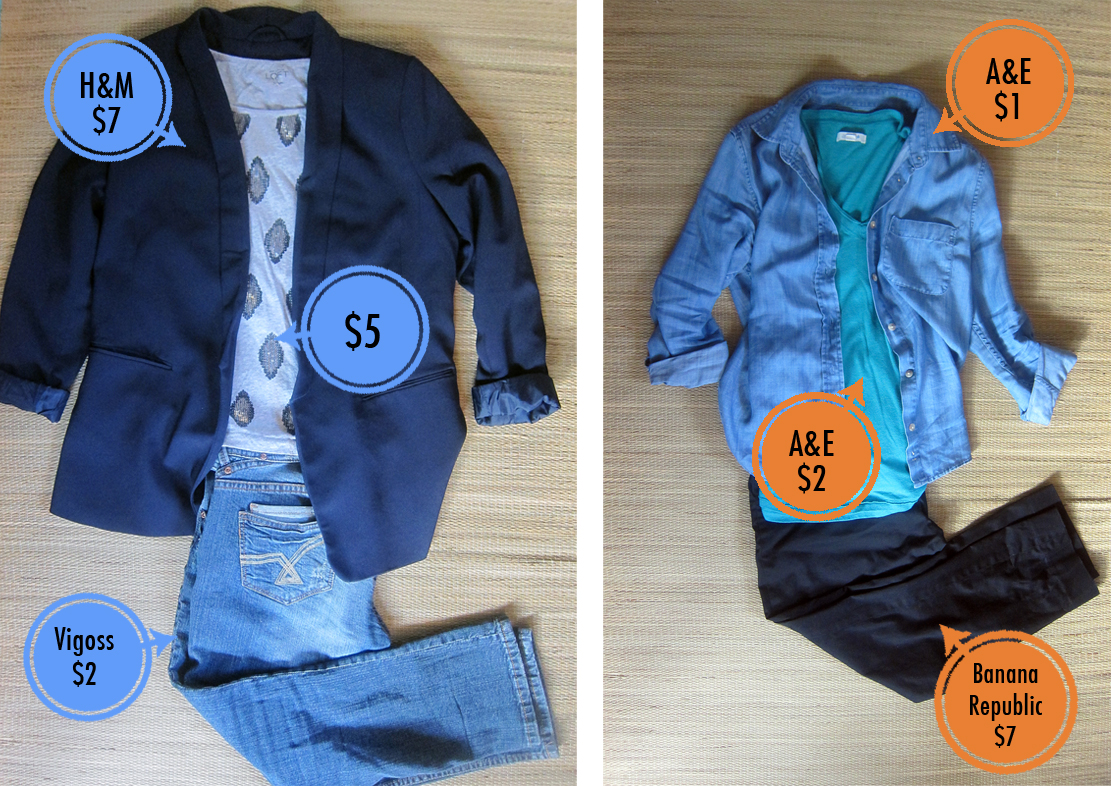
I went solo on this Value Village trip and came out with black cropped dress pants from Banana Republic for just $7.
Karen and I had a medium-good thrifting day. I had to remind her not to give up. Thrifting can be rewarding, especially when you find just what you’re looking for at a good price. She definitely bulked out her wardrobe with a dress, skirt, pants and shirts without spending more than $25. I call that a thrifting success!
What thrift stores do you visit to find great duds? How do you fill your clothing cravings without overspending?
Visit my blog at www.alaskaknitnat.wordpress.com and keep any eye out for the rest of my Anchorage thrift store series.