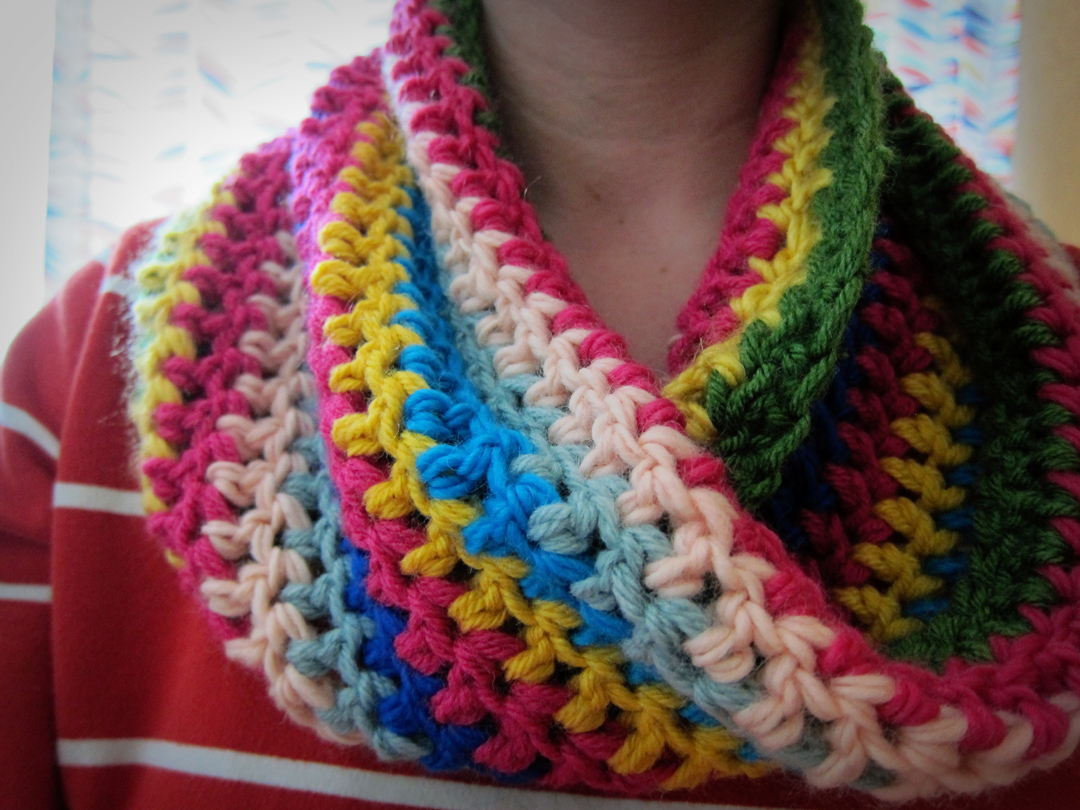
Baby Craft: Homemade Teething Biscuits

Jack is getting into gnawing. He’s got two tiny bottom teeth and pretty much anything he gets his mitts on will get gnawed: the coffee table, my W-2 sitting on the coffee table, day-old floor apple bits, etc. I recently visited an old friend whose daughter was sucking on a little brown slab. She seemed to be going to town on it. When I asked her what it was she told me it was a teething biscuit she had baked herself.

I was intrigued, so I decided to give it a whirl. Jack loved it. He dedicated 10 whole minutes of gnawing to one biscuit and he only chewed up half of it. One batch made about two dozen little rectangular cookies. They are hard as a rock, but that’s perfect because they won’t fall apart while your baby is slobbering all over it.

The recipe my friend sent me called for whole milk, but since I still haven’t fed my 9 month old cow’s milk, I decided to try it with breast milk. It was kind of funny baking with my own milk, but that ensures baby gets some homegrown nutrients in every gummy bite. It also calls for unsulphured molasses, which is a decent source of calcium, magnesium and iron.

Homemade Teething Biscuits

Ingredients:

1/2 cup milk

1/4 cup unsulphured molasses

1/4 cup vegetable oil

1.5 cups white flour

1.5 cups whole wheat flour

Note: you can use any combination of whole wheat and white flours. I used half and half. Experiment with different types of flours, if you dare.

Directions:

Mix together the wet ingredients in a large mixing bowl. Add the flours to the bowl and combine till a tough dough forms. Knead the ball for about 5 minutes on a floured surface. If your dough is flaky and dry, add a little bit of water. Knead till the dough is smoothish. It should be pretty tough, but hold together well. Wrap in plastic wrap and let it rest for 20 minutes.

Preheat oven to 350 degrees.

Roll out your dough till it’s a rectangle about 1/4-inch thick (I didn’t measure at all). If the dough doesn’t stay together very easily, add a teaspoon of water and fold the dough back on itself and re-roll it out. It was tough to roll it, but luckily this dough has no elasticity, so it will stay in the shape you make it.

Cut the dough into 1 x 2.5-inch rectangles and place them on a baking sheet. Cover with foil and let sit for 15 minutes. Uncover and bake for 30 minutes. Let cool completely before storing. I placed them in a Ziploc in my freezer so they’ll keep longer.

Good luck with teething!

Homemade Teething Biscuits

Insta-craft: Lace Sweater Trim

As you can see by my lack of posts these days I don’t have a lot of time to craft out. But sometimes I just need a craft fix.

Spruce up an old cardigan with trim. All you need is a sewing machine with a straight stitch and some pins. Months ago I found a big bag of lace trim at the thrift store and I knew it would come in handy some day. Observe this boring but comfy cardi my little sister rejected and I scooped up:

Insta-craft: Sweater Trim

Fifteen minutes later I had a cute piece of clothing that I can wear with a long t-shirt and some leggings. I have no one to take photos of me, so you’ll have to imagine the cardigan with a long t-shirt and some leggings.


Insta-craft: Sweater Trim


Materials:

One old cardigan

About two yards of lace trim

Straight pins


swetaertrim2


Directions:

Look closely at your trim and you’ll see that one side is more obviously the outside. If you can’t tell, then no one else can either so don’t worry about it. Start at the bottom of one side of the cardigan. Pin the trim to the bottom leaving an inch to wrap around and pin on the inside so the raw edge of the trim doesn’t show. Now start pinning the trim all around the edge of the sweater, up around the neck, and back down to the other bottom edge. Cut leaving an inch of trim and wrap that around the bottom and pin to the inside.

Insta-craft: Sweater Trim

Sew along the trim’s pre-made stitch, backstitching at the beginning and end. Trim threads. Rock out cause you just crafted out.

Insta-craft: Sweater Trim

Leftover Hambone Soup

“If you saw two guys named Hambone and Flippy, which one would you think liked dolphins most? I’d say Flippy, wouldn’t you? You’d be wrong though. It’s Hambone.”

-Jack Handey

– November 2024 Update –

I made this recipe back in 2013 and realized I don’t really eat ham that much, so when I insisted my husband bring home a hambone from his work’s Thanksgiving lunch I decided to give this recipe another go. I made a few adjustments.


I’ve been trying to figure out what to do with my leftover Christmas ham. The bone seemed too good to just throw away. I did a few recipe searches and I found this one, and it sounded really good.

I didn’t follow it exactly, so I thought I should write out my version here. If you have the foresight to soak the beans while you’re at work, this soup could be made as a weeknight dinner. You could use canned beans in a pinch, but then the beans might not be as flavorful since the dried beans simmer in the ham-steeped stock till tender. This was the best soup I have made in a long time.

Leftover Hambone Soup

Serves 6-ish
Cook time: 2 hours

IMG_9152

Ingredients:

  • 1/2 pound dried beans (navy or pinto work great)
  • 6-8 cups chicken stock
  • 1 onion, finely chopped
  • 2 medium carrots, chopped
  • 3 garlic cloves, finely chopped
  • 1 meaty hambone plus extra ham
  • 1 piece of Parmesan rind (optional)
  • freshly ground pepper
  • 1 bay leaf
  • 1-2 teaspoons smoked paprika
  • 3 sprigs fresh thyme
  • 4 small Yukon gold potatoes, cubed
  • Salt, to taste
  • 2 tablespoons butter (optional, read recipe)
  • 2 tablespoons flour (optional, read recipe)
  • Fresh parsley, to serve
  • Sour cream, to serve

Leftover Hambone Soup

Directions:

Pour the dried beans into a saucepan and cover with plenty of cold water. Cover and soak beans for six hours.

Drain and rinse the beans and add them to a large dutch oven.  Add enough chicken stock to cover the beans by two inches. Add the onions, carrots, garlic, hambone, parmesan rind, pepper, and bay leaf. The hambone will probably stick out a bit. Cover and bring to a simmer. Turn the heat to low and let simmer for 1.5 hours or until the beans are tender. Add more stock if needed.

Remove the hambone and take off most of the meat. Let the meat cool and break it up into bite-sized pieces or cube up any leftover ham you might have saved so you have about 1.5 cups of ham bits. Place the bone and meat back into the pot along with the paprika, thyme and potatoes. Add more stock if it’s looking like it isn’t soupy enough. Let it simmer partially covered until the potatoes are tender, about 15 minutes, stirring occasionally. Remove and discard the bone, bay leaf and the parmesan rind (if you can find it – if someone finds it in their soup bowl it’s good luck maybe!) Add salt to taste.

If you’d like your soup to be thicker, create a roux as follows: about 10 minutes before serving, heat the butter in a small sauté pan. Add the flour and stir into a paste. Cook for one minute on medium. Add about 1/2 cup of hot soup to the pan and whisk till thick and smooth. Add this roux to the soup. Cook soup another 5 minutes to thicken. If it’s too thick, add a little water.

Serve in large soup bowls with a dollop of sour cream, fresh parsley and a piece of rustic bread.

Nifty Thrifty — Shower Curtain Curtains

I’m always trying to improve our living space without having to spend a fortune. Many things I can find at the thrift store, such a pillows, tables, shelves, vases and such, but curtains is one thing that I have a hard time finding second hand. Mostly they are old, dirty and unattractive. New curtains are pretty spendy. This is why my living room curtains have looked like crap for four years now. When we first moved in we were spending a lot to furnish the place. The landlord did not have any blinds on the windows so we needed curtains in every room. It was adding up. Most panels are $20-40 apiece so I ended up buying hideous curtains at an outlet store.

I finally got fed up and had a brilliant idea. Shower curtains don’t seem as pricey as regular curtains. They are made out of fabric and I know they will fit our windows. I headed to the place that always has the best deal on linens: Kohl’s.

Sure enough we found some groovy shower curtains that were half off. We opted for cheapo clear shower curtain rings and just swapped the old crappy curtains with shower curtains. Not only do they look great, but they glide across the curtain bar much more easily than the traditional curtains.

Total cost for two large windows: $70. Not bad if you consider the alternative.

Recycled Cashmere Baby Booties — Free Pattern

It’s getting cold up here in Alaska and my son is still too small for winter boots, but he’s outgrown his cute little warm booties. I’ve been collecting thrift store cashmere sweaters for a while now with no real plan for them. I washed and dried them several times to felt them up a bit and strengthen the fabric and I decided a pair of sock-like booties would be just right for winter.

I did a little Google searching but couldn’t find a pattern I was satisfied with, so I made one. You can access it here.

These booties were pretty simple to make and only took me about 45 minutes. When printing off the pattern be sure your printer doesn’t scale it down. I had to go to my settings and change the scale to 100% and it printed off just fine. If you have troubles, please let me know.

What you’ll need:

Free Alaska Knit Nat Bootie Pattern

One cashmere sweater you’re willing to cut up (or any old sweater for that matter)

Two 2-inch pieces of narrow elastic

Sewing machine

Pins

Fabric scissors

Stretchy sewing machine needle (not required, but really helpful)

1. Using the pattern, cut the body of the bootie along the bottom of the sweater so the ribbing will become the cuff of the bootie. You’ll be cutting four pieces out, but you can cut through the front and back of the sweater at one time. Cut two soles from the sweater being sure to lay the pattern on a fold.

2. Lay the body of the booties right sides together. Pin and sew up the back of the bootie using 1/4-inch seam allowances.

3. Trim the seam toward the top so no raw edges stick up. Lay the bootie out flat, wrong side up and place the 2-inch piece of elastic a few inches from the top (I just used the end of the ribbing as a guide). Stretch the elastic across the back to see where you should start sewing. Sew along the length of elastic, stretching it as you go. This will ripple the bootie in the back so hopefully they will stay on better. You could skip the elastic altogether and sew laces to the back when you are finished.

4. With right sides together, pin and sew along the front of the bootie. The only raw edge remaining should be the bottom of the bootie.

5. Pin the sole wrong-side out around the edges of the bootie. Make sure the wider part of the sole is at the front and the narrower part is in the back. It seems like a no-brainer, but why do you think the booties in the photo look so pointy? Sew around. I didn’t trim because I figured the extra bulk inside would add some more warmth.

6. Turn right-side out. Pop onto cute baby feet. This is where you could add a long lace to the back and wrap it around the bootie and tie if you don’t want to use elastic. I might even crochet a long chain and put pom-poms on the ends.

Please let me know if you have any questions about this pattern, as I’m not used to writing my own patterns.

Grown-up Sloppy Joes

Despite what you might think, I’m no super mom and sometimes all I can muster up after a long day of work is something easy like sloppy joes. This quintessential American dish was one of the first I ever cooked at the young age of 10 when my mom gave me a Klutz brand cookbook for kids. All it called for as I remember it was ketchup, mustard, onion and garlic powder and maybe salt and pepper.

My grown-up version has the same base as my kid version, but I decided to spice it up a little. All of these measurements are estimated, as I usually toss everything in without measuring.

Ingredients:

  • 1 pound ground beef
  • 1/2 medium onion, chopped
  • 5 mini bell peppers or 1 regular bell pepper, chopped
  • 1 Tbs. olive oil
  • salt and pepper to taste
  • 1 tsp. garlic powder
  • 1/2 tsp. smoked paprika
  • 1/4 cup ketchup
  • 1 tsp. Dijon mustard
  • 1 tsp. apple cider vinegar
  • 1 tsp. Worcestershire sauce
  • 1 tsp. soy sauce
  • 1/4 cup red wine
  • hamburger buns

In a large saute pan, heat up the olive oil. Add the onion, peppers and mushrooms and cook till onions are soft, about 5 minutes. Add the ground beef and cook till beef is brown. Drain. Season with salt, pepper, and paprika to taste. Add the ketchup, mustard, vinegar, Worcestershire sauce, soy sauce and red wine and stir occasionally until there is a saucy mess in the pan. Slop onto toasted buns.

Chicken Stew in Red Wine with Bell Peppers and Mushrooms

Our new Costco staples these days are the mini bell peppers and baby portobello mushrooms. They are incredibly versatile and we use them for breakfast and dinner all the time.

Tonight I made something from scratch having not used a single recipe or reference. I just followed my nose and what I came up with was a flavorful chicken stew that was fantastic over a bed of saffron jasmine rice. Many of the ingredients can be left out or substituted, but I just went with what we had in the cupboards.

Here’s how to make it since I’m sure I’ll forget and will need to reference this recipe again. I apologize for the poor quality photo. Unfortunately it’s always dark when I make dinner so I get no natural light for my photos.

Ingredients:

Chicken parts; I used two thighs and a large breast cut in two

flour

2 strips of bacon, roughly chopped

olive oil

1/2 onion, chopped

6 mini red, orange and yellow bell peppers, chopped

6 baby portobello mushrooms, sliced

2 cloves garlic, minced

1/2 cup chicken stock

1/2 cup red wine

1 tsp. porcini powder

2 tsp. dried thyme

salt and pepper

smoked paprika

1 Tbs. tomato paste

1 large ripe tomato or 1 regular can diced tomatoes, drained

1 cup dried jasmine rice

pinch of saffron


Directions:

Preheat oven to 375 degrees. Place some flour in a paper bag and toss the chicken around till the pieces are well coated.  Heat a dutch oven over medium high heat and add the bacon. When bacon is browned, remove from pot and set aside. Add a couple of teaspoons of olive oil and then add the chicken pieces. Sprinkle with salt and pepper and smoked paprika and flip when chicken is golden brown. Brown the other side of the chicken and remove and set aside. Add a couple of more teaspoons of olive oil and add the onion, peppers, garlic, and mushrooms. Cook till onions become translucent, about 5 minutes. Season with salt and pepper and paprika. Be sure to scrape up all the browned bits on the bottom of the pan. Add the stock, tomato paste and wine; stir and scrape. add the thyme, porcini powder and tomatoes. Place the chicken and bacon back in the pot. Bury the chicken in the other ingredients, cover pot and place in the oven for one hour.

When there’s 15 minutes left on the chicken, cook your rice according to packaging. Sprinkle in the saffron when you add the rice to the boiling water.

The chicken should be tender and falling apart. Serve over the rice. Yum! I think kalamata olives would be a good addition to this dish, but I didn’t have them today.

Slow Cooked Pork Shoulder Ribs over Creamy Polenta

My whole plan for this lazy Sunday was to slow cook some chicken, but when I got to the grocery store I found some pork shoulder ribs on sale. I’ve never cooked this type of meat before and I thought I should give it a try.

After a few Google searches for slow cooked pork shoulder ribs, I decided on this one from DadCooksDinner.com. This sounded easy, delicious, and I happened to have all the ingredients already. I used this fellow’s recipe for his BBQ dry rub and his BBQ sauce, but with the sauce I added some liquid smoke and a dollop of Dijon mustard.

My pork shoulder ribs looked wider than the ones in his recipe and I was only able to squeeze three ribs in the bottom of the Crock Pot, which was a perfect serving for my husband and me (and lunch tomorrow). I’m sure you could stack the ribs in the Crock Pot if you were feeding more. I also used more than 1 teaspoon of the dry rub. I didn’t measure; I just coated the ribs on both sides.

Although this was a BBQ-style dish, I just knew the juices from the ribs would be scrumptious over creamy polenta, so I made some of that too. The pork was falling off the bone and super flavorful. I will definitely be making this dish a staple in our household.

Here’s how you can make it.

Ingredients:

DadCooksDinner.com’s dry BBQ rub

DadCooksDinner.com’s BBQ sauce, or BBQ sauce of your choice

2.5-3 lbs. pork shoulder ribs

kosher salt

2 cups water, divided

2.5 cups chicken stock

1 cup dry polenta, or cornmeal

1/2 cup parmesan cheese, grated

1/4 cup half and half

salt and pepper


Directions:

Coat both sides of your ribs with kosher salt and spice rub and place the ribs in your slow cooker. Pour 1/2 cup of water into the cooker, cover, and cook on low for 6 hours or so. Add 1/2 cup of BBQ sauce and cook another hour. I turned my slow cooker to high for the last hour, but I’m sure it doesn’t make a big difference.

When you have 45 minutes left on the meat, start boiling the chicken stock in a large saucepan. In a bowl, combine the polenta with 1.5 cups of water. When the stock is boiling, slowly add the polenta sludge and stir constantly until it’s smooth. Turn heat to medium low, cover and cook for 40 minutes, stirring every 5 minutes or so. If polenta is getting too thick, add a couple of tablespoons of stock. Turn off the heat, add cheese, half and half, and salt and pepper to taste. Set aside while finishing up the meat.

Transfer the ribs to a serving platter. Pour the juices into a measuring cup and remove as much fat as possible with a ladle. Reserve 1/2 cup of the juice and add 1/2 cup of BBQ sauce to it.

Serve the ribs on a big dollop of polenta and smother it all in sauce. Green beans make a great side.


The Best Damn Roast Potatoes Ever

My dad makes the best roast potatoes — ever. Hands down. They are crispy on the outside and fluffy on the inside. They are salty and smokey and buttery. And there is a simple secret to making them.

I apologize for the photo. These were so good I forgot to snap a photo until there were only a few left.

Ingredients:

6-8 medium yukon gold potatoes

2 tbs. butter (or if you have duck or goose fat, use a combo)

salt and pepper to taste

smoked paprika to taste

Directions:

Preheat oven to 425 degrees. Cut the potatoes in half lengthwise so the halves are shallow (if that makes sense). Place potatoes on a plate and microwave for 4 minutes. Turn potatoes over and microwave another 4 minutes. Place potatoes into a baking dish and coat with butter and duck/goose fat (if you have it). Add salt, pepper and paprika to taste. I go heavy on the paprika. It’s absolutely amazing. Roast in the oven cut side down for 10 minutes. Flip the potatoes and bake another 10 minutes. Flip one more time and bake 5-10 minutes, or until the skins of the potatoes are all browned.

Uhhhhhhhmazing!

White Bean Salad with Basil and Heirloom Tomatoes

On my way into work yesterday morning I stopped by the local fancy grocery store for a microwave burrito. I didn’t have time to make lunch and with our tight budget I really can’t afford to buy scrumptious lunches. At the checkout lane was a special on heirloom tomatoes — you know the ones, mutant and delicious looking that Martha Stewart and Food Network chefs go ga-ga for? I’ve never been able to afford them since they are usually about $6 a pound up here in Alaska, but for some reason they were only $1.99 a pound yesterday. I went ga-ga!

I’m not used to cooking with fresh tomatoes. Good fresh tomatoes are pretty much non existent up here unless you’re willing to pay the big bucks in the summer for home grown. So when I brought home these funny tomatoes I wasn’t sure what to do with them.

I had to sleep on it, and this morning it was clear: bean salad. It’s a great lunch food because it requires no reheating and can sit at room temp for a while and still be good. In fact, it’ll probably be better since it’ll soak in the flavors of the seasonings.

 Ingredients:

1 can canellini beans, drained but not rinsed

1 medium ripe tomato, cubed

1/2 cup fresh basil, chopped

1/4 cup feta cheese, crumbled

1 tsp. dried parsley

1/2 tsp. dried oregano

1/4 tsp. garlic powder

salt and pepper to taste

2 Tbs. olive oil

2 tsp. baslamic vinegar


Directions:

Combine all the ingredients, wait till lunchtime to eat. Easy!

Free knitting patterns, DIY crafts, easy recipes and more!