Category Archives: Knit & Crochet

Guest Post: Fan and Feather Lovey — Free Pattern

Today I have the honor of hosting a pattern by the ever-so-lovely Annie Ciszak Pazar, owner of Anchorage’s Bella Boutique and author of the crafty blog Annie’s Arts and Follies.

I’ve always admired this lady for her unique jewelry and undying motivation for knitting big ol’ scarves and cowls.

Recently a mutual friend of ours had a baby — today actually! I felt like there was no better day to showcase the stunning blanket Annie made for her new little girl. So I’ll hand it over to Annie:

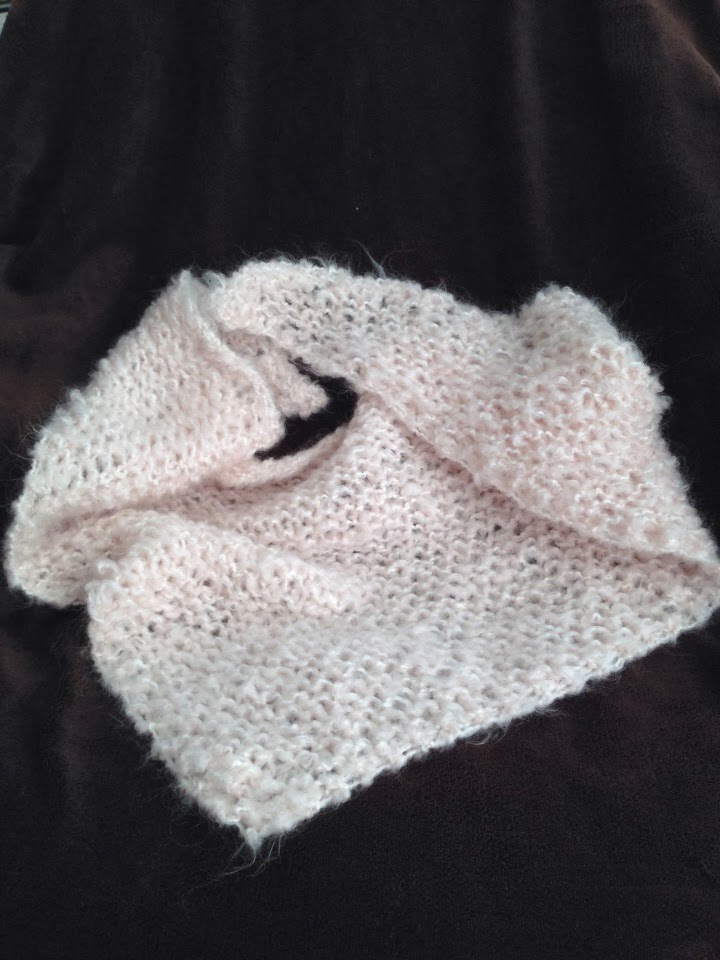
I have a blanket on my bed which I affectionately call Lovey. Lovey was a gift from my grandmother at my mother’s baby shower for me, 30-some years ago. Lovey is still around. And on my bed. Needless to say I have a very tolerant husband and perhaps some slight attachment issues. So when it comes time to make special soft and cuddly things for my friend’s little ones, I choose the Lovey pattern – also known as Fan and Feather for those in the biz.

Fan and Feather Baby Blanket | Free Pattern

The first blanket I made was for my friend Jeni when she was expecting her second little one, Robert, as she and I have known each other for 97% of our lives – so it was only fitting she have a Lovey too.

Fan and Feather Baby Blanket | Free Pattern

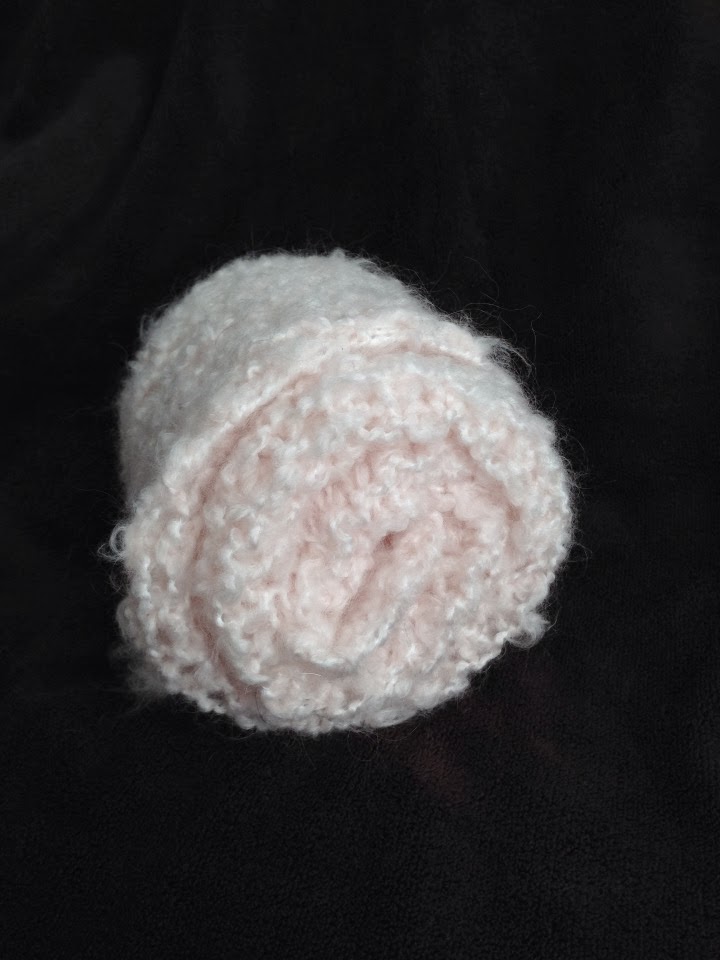
(Left: my Lovey in 2011. Right: Robert’s Lovey)

  • Using a US6 (4mm) needle cast on a multiple of 18 stitches + whatever you want for a border, but at least 1 stitch on either end (I add 10 – 5 on each side).
  • Knit 10 rows
  • Assuming 5 stitches at each end, work the following 4 rows until you reach desired length:
  • Row 1: knit
  • Row 2: purl
  • Row 3: k5, * k2 tog 3 times, (k1, yo) 6 times, k2 tog 3 times * repeat from * to * until last stitch, k5
  • Row 4: knit
  • When you have reached desired length, knit 10 rows to finish border. Weave in ends.

Fan and Feather Baby Blanket | Free Pattern

This latest blanket is for a local fab lady who keeps me in popsicles all summer on her funky custom PopCycle bike complete with cooler sidecar. I worked on this one from Alaska to New York and back again, and find it only appropriate that it already be travelling as the parents to be met while exploring the world in another country.

This is a super easy and rather fast pattern which looks more complicated than it is. In a bout of bravery I entered one in the Alaska State Fair 2 years ago and brought home a green ribbon and honorable mention in the baby blanket category. But what it really comes down to, is my hope that the kiddos for whom I make these little Lovey’s, love them as much as I love mine (or maybe a little less – there’s that attachment thing…).

Want to see more of Annie’s work? Check out her Etsy store!


Simple Striped Baby Blanket — Free Pattern

Knitting a blanket isn’t difficult. It can be a bit monotonous and seemingly endless. I much prefer knitting hats where there’s a definite start and end and it can be completed in an afternoon.

That being said, there is something special about giving someone a hand-knitted blanket. It shows you care enough for the person to spend a lot of time and sometimes money on a thing she will hopefully cherish for years and years.

Simple striped baby blanket --Free Pattern

Here’s a pattern for a lovely baby blanket that measures approximately 29″ x 32″. I recommend it to knitters of all levels. I used a worsted superwash wool so no matter what temperature the gift recipient washes it in, it will not shrink.

Simple striped baby blanket --Free Pattern

I based my pattern on two different designs from Altadena’s Baby Designs and the TLC Channel’s website (who knew they had knitting patterns?) You can make this pattern on whatever needle size you like and make it as long as you like. I randomly selected the color pattern and width of the stripes, but what follows is the exact rows and combinations for this particular blanket. Make the stripes the way you want. This is more of a guide.

Simple striped baby blanket --Free Pattern

If you’re wanting to knit this pattern with a different needle size and different weight yarn, I am unable to adjust the pattern for you. This pattern is written for a specific needle size and yarn weight.

Materials:

Long size 8 circular needle (mine is about 38 inches)

2-3 balls Ella Rae worsted superwash wool in light grey (I used exactly two balls, so you may want three just in case)

1 ball Ella Rae worsted superwash in limestone green

1 ball Ella Rae worsted superwash in moody blue

darning needle

Directions:

Except when you’re bringing in new color, slip the first stitch of every row.

Cast on 144 stitches. Knit in garter stitch for 16 rows.

Row 1: Knit across

Row 2: K8, P8, *K4, P8*, repeat * until 8 stitches remain. Knit 8.

Repeat rows 1 and 2 while following this stripe pattern:

14 rows grey, 6 rows limestone, 12 rows blue, 6 rows limestone, 26 rows grey, 4 rows limestone, 4 rows blue, 10 rows grey, 8 rows limestone, 30 rows grey, 12 rows blue, 10 rows limestone, 8 rows blue, 4 rows limestone, 20 rows grey, 6 rows limestone, 6 rows grey, 14 rows blue, 6 rows grey, 12 rows limestone, 6 rows blue, 6 rows limestone, 14 rows grey.

Knit 15 rows in garter stitch and bind off using the stretchy method.

Simple striped baby blanket --Free Pattern

Now the fun part! Weave in all ends. This is the downside to stripes. A whole lot of ends. I don’t have any scientific method of weaving in ends, so do what works for you.

Simple striped baby blanket --Free Pattern

You could also block your blanket, but I figured this one won’t be shrinking much so I didn’t bother. If you have a good reason why I should block it, please leave me a comment. 🙂

Simple striped baby blanket --Free Pattern

Hope you find this pattern helpful and good luck knitting a blanket. You’ll feel a great sense of accomplishment and relief when you’ve finished.

-Natasha

Here’s baby George all bundled up and cozy with his new blanket:

Simple striped baby blanket --Free Pattern

Preemie Football Hat — Free Pattern

My friend Laura asked me to make her new little one a tiny football hat. I was definitely up to the challenge. I was surprised how few knitted patterns there were floating around Pinterest. Most of the patterns are crochet, which can be made very quickly, but for a football hat I think knit has more room for detail.

This hat is so cute and teeny! It’s based on a tiny Steelers hat I made Laura’s second child a couple of years ago.

Preemie Football Hat -- Free Pattern | Alaska Knit Nat
Photo courtesy of www.laurastennetphotography.com

Materials:

Red Heart Brand worsted yarn in white and brown

size 8 double pointed needles

darning needle


Abbreviations:

k1, p1 = knit one, purl one ribbing

k2tog = knit two stitches together


Directions:

With your double pointed needles, cast on 56 stitches (14 stitches per needle) in brown. Join your work, being sure the stitches aren’t twisted and k1, p1 rib for three rounds.

Knit two rounds regularly and switch to the white. No need to cut the brown yarn. Knit two rounds in white and cut leaving an 8-inch tail. Bring up the brown and knit 15 rounds. Knit two rounds white without cutting the brown. Cut the white leaving an 8-inch tail and knit one round in brown. Decrease as follows:

*k2tog, k6* Repeat * till end of round
K one round
*K2tog, k5*, repeat * till end of round
K one round
*K2tog, k4*, repeat * till end of round
K one round
*K2tog, k 3*, repeat * till end of round
K one round
*K2tog, k 2*, repeat * till end of round
K one round
*K2tog, k1*, repeat * till end of round
*K2tog*, repeat * till end of round.
Cut yarn leaving an 8-inch tail. Using a darning needle, weave in all ends.

For the football stitches, thread a darning needle with a 24-inch length of white yarn. On the front of the hat, whipstitch the vertical line using short diagonal stitches stacked on top of one another. Then run three wide stitches perpendicular to the vertical line. Tie off the yarn and weave in the end.

To make this hat for a newborn-3 month size, cast on 64 stitches and follow the same pattern.

Preemie Football Hat -- Free Pattern | Alaska Knit Nat

Retro Baby Ski Hat — Free Pattern

I’m getting down to the knitty gritty here for Christmas presents. I just had one more hat on my list and that was for my best friend’s new baby.

I knit this up in just a couple of hours — and you can too with this simple pattern.

Retro baby ski hat -- Free Pattern | Alaska Knit Nat

Retro Baby Ski Hat — for a 3-6 mo. baby

If you’re wanting to knit this pattern with a different needle size and different weight yarn, I am unable to adjust the pattern for you. This pattern is written for a specific needle size and yarn weight.

Materials:

Vanna’s Choice worsted weight yarn — mustard, teal and light blue

Size 9 circular needles

size 9 double pointed needles

darning needle

large fork or pom pom maker

Abbreviations:

k1, p1 = knit 1, purl 1 ribbing

k2tog = knit two stitches together

Directions:

With your circular, cast on 64 stitches with mustard color and knit last stitch to first stitch without twisting the stitches. K1, P1 for six rounds. Knit 8 rounds in stockinette stitch.

Switch to teal and knit three rounds. Do not cut mustard yarn.

Cut teal yarn with an 8-inch tail. Switch to mustard yarn and knit two rounds.

Switch to light blue and knit two rounds. Do not cut mustard yarn.

Cut light blue yarn with an 8-inch tail and knit 10 rounds with mustard.

Begin decrease as follows:

Place a marker if you need to, but I can tell where the beginning of the round is based on the stripes.

K2tog, K6, repeat till end of round

Knit one round

K2tog, K5, repeat till end of round

K one round

K2tog, K4, repeat till end

K one round while transferring to double pointed needles. Or knit the round and transfer stitches — whatever’s easier for you.

K2tog, K3, repeat till end

Knit one round

K2tog, K2, repeat till end

Knit one round

K2tog, K1, repeat till end

K2tog, repeat till end.

Cut yarn leaving a long tail. With darning needle, draw up remaining stitches and weave in all ends.

For the pom pom:

Take both the teal and light blue yarn and wrap them around a large serving fork till it’s pom pom sized. With a doubled piece of yarn about one foot long, tie the yarn around the middle tine and remove from the fork. Cut the loops and trim pom pom to your liking. Using a darning needle, attach to top of hat. To better secure pom pom, run the yarn back up through the pom pom and back down into the inside of the hat.

Retro baby ski hat -- Free Pattern | Alaska Knit Nat

Simple Fox Hat — Free Pattern

In case you haven’t noticed, foxes are really in right now. This season I’ve already crocheted a nifty fox basket and sewn several felt fox ornaments. I really wanted to make a fox hat for a friend’s baby, but I’m pretty terrible at fair isle and halfway through my first attempt, I scratched the whole thing. The snout was all scrunched and I didn’t like the look of it.

I decided on something much simpler — my regular old hat pattern with some ears sewn on top. I winged the ears, but I really like how they turned out. For this project I used some Montera Classic Elite llama/wool chunky yarn I’d been coveting for some time. This hat is fuzzy, warm and downright delightful.

Simple Fox Hat -- Free Pattern | Alaska Knit Nat

If you’re wanting to knit this pattern with a different needle size and different weight yarn, I am unable to adjust the pattern for you. This pattern is written for a specific needle size and yarn weight.

Here’s what you need:

1 skein of orange chunky yarn (I used Bolsita Orange from Montera Classic Elite)

size 9, 16-inch circular needle

one set of size 9 double pointed needles

darning needle

Size: This pattern fits a 12-18-month baby. For a larger hat (2T-3T), cast on 72 stitches and follow the same pattern. For a smaller hat, knit this same pattern on size 8 needles.

Gauge: I do not gauge my work, but according to Montera yarn’s website, it should be 3.5-4 sts/inch on size 9 needles.

Abbreviations:

k2tog= knit two stitches together

For the main body of the hat, cast on 64 stitches on the circular needle and knit last stitch to first stitch without twisting the stitches. Knit 1, purl 1 ribbing for five rounds. Knit in stockinette stitch for 22 more rounds, or until piece measures about 5.5 inches.

Decrease as follows:

Place a marker at beginning of round.

K2tog, K6, repeat till end of round

Knit one round

K2tog, K5, repeat till end of round

K one round

K2tog, K4, repeat till end

K one round while transferring to double pointed needles. Or knit the round and transfer stitches — whatever’s easier for you.

K2tog, K3, repeat till end

Knit one round

K2tog, K2, repeat till end

Knit one round

K2tog, K1, repeat till end

K2tog, repeat till end.

Cut yarn leaving a long tail. Run the yarn through the remaining stitches with a darning needle and draw up the hole tight. Weave in ends.

Ear (make 2):

Simple Fox Hat -- Free Pattern | Alaska Knit Nat

With three double pointed needles, cast on 16 stitches (5, 5, 6), leaving a 12-inch tail. Connect last stitch to first stitch and begin knitting in the round. Knit 3 rounds.

K2tog, k3, K2tog, k3, K2tog, k4

Knit 2 rounds

K2tog, k2, k2tog, k2, k2tog k3

Knit 1 round

K2tog, k1, k2tog, k1, k2tog, k2

Cut yarn leaving a 6-inch tail. Run yarn through the remaining stitches and draw up tight. Weave in the end on the inside of the ear.

With your darning needle and the long cast-on tail, sew the bottom of the ear closed.

Simple Fox Hat -- Free Pattern | Alaska Knit Nat

As for sewing on the ears, I folded my hat in half and determined the best placement of the ears. I sewed each ear on with the remaining length of cast-on yarn. I didn’t use any special technique for sewing, so I recommend whatever you feel most comfortable with. I actually didn’t have enough cast-on yarn so I did some touch ups with extra yarn.

Simple Fox Hat -- Free Pattern | Alaska Knit Nat

Now it’s up to you whether to stitch a little nose and eyes on the front of the hat. I decided not to as I figured the child’s face would be the fox’s face. Either way would be cute!

Simple Fox Hat -- Free Pattern | Alaska Knit Nat

Baby Candy Cane Stocking Cap — Free Pattern

My photographer friend commissioned me to make a cute stocking cap for her holiday baby photo shoots.

I’ve never made anything so tall and pointy, but I think the effect is perfect. Could a baby look more like an adorable naked Christmas elf?

Photo by Laura Stennett Photography

This pattern is for a 3-6 month head. It’s also a great introduction to knitting stripes.

Ho ho hope you enjoy it!

If you’re wanting to knit this pattern with a different needle size and different weight yarn, I am unable to adjust the pattern for you. This pattern is written for a specific needle size and yarn weight.

Baby Candy Cane Stocking Cap

Materials:

One skein of red worsted weight yarn

One skein of cream worsted weight yarn (I used Red Heart soft)

Size 9 circular needles

Set of 9 double-point needles

darning needle

pom pom maker or large fork

Abbreviation: K2tog = knit two stitches together

Directions:

With the red yarn cast on 64 stitches on your circular needle. Join with first stitch being careful not to twist the stitches. Begin ribbing in k1, p1 for six rounds.

Switch to white yarn and knit 2 rounds. There is no need to cut the red yarn as the rows are so narrow you can easily bring up the other yarn when you need it.

Continue knitting in stockinette stitch for 25 more rounds changing colors every 2 rounds. Transfer stitches to double pointed needles and begin decreasing as follows (while continuing to switch colors every 2 rounds):

*K2tog, k6, repeat * till end of round

knit 3 rounds

*K2tog, k5, repeat * till end of round

knit 4 rounds

*K2tog, k4, repeat * till end of round

knit 6 rounds

*K2tog, k3, repeat * till end of round

knit 15 rounds

*K2tog, k2, repeat * till end of round

knit 16 rounds

*K2tog, k1, repeat * till end of round

knit 5 rounds

*K2tog, repeat * till end of round

k 4 rounds. Cut yarn leaving a 12-inch tail. Using a darning needle, draw up remaining stitches and weave in all ends.

Make your pom pom and sew it to the top.

Happy Holidays from Alaska Knit Nat!

Pink Elephant Scarf

A few years back I got hooked on a pattern from Pickles.no called the Simple Luxury Scarf. It was indeed simple and I must have made five or six of them.

The pattern calls for two different high-quality yarns to be knitted at once. Each scarf was setting me back about $28.

Now that I’m not able to splurge on every yarn desire I decided to try the pattern with an inexpensive yarn. It turned out great and totally gift worthy. Patons Divine Yarn contains a little wool and mohair so you still achieve the fluffy, luxurious look and feel. I call it scrumptious. And at $4 after a JoAnn’s coupon, I call it a great deal.

I didn’t refer to Pickles’ pattern this time around and it turns out I made it slightly differently, which is why I’m providing my pattern below; but I want to be clear that it originated from Pickles’ pattern.

This pattern is for any level of knitter. It’s a great way to pass winter weekend where it’s -3 degrees outside.

Materials:

1, 100-gram ball of Patons Divine Yarn (I used the Chantilly Rose color)

a long size 15 circular needle

darning needle

Abbreviations:

M1FB = Make 1 stitch in the front and 1 in the back of the same stitch, thus increasing your work by one stitch.

M1 = make 1 stitch

Special note: You’ll be using a circular needle only to easily hold a large number of stitches required for this scarf. You will not be joining the work in the round.

Directions:

Cast on 4 stitches.

M1FB into the first stitch. Knit to end of row.

Repeat previous row until you have used most of the yarn.

Final row: M1FB, K1, M1 *K3, M1. Repeat * to end of row. It’s ok if you have a few extra stitches at the end. Just knit those. Cast off final row. Using darning needle, weave in ends.

Ice Cream Sundae Hat — Free Pattern

During my bedtime Pinterest bingeing (I like to call it “pingeing”) I came across a lovely knitted hat from muitaihania.blogspot.dk/

I don’t know Finnish, but I’m pretty sure the blogger didn’t post a pattern for it. *Correction: after 30 seconds of browsing the site, I did find the pattern. Oh well!

So here’s my version. It’s called the Ice Cream Sundae Hat and it’s lovely. I made it up as I went along and the pattern is simple enough that I don’t think I need to provide a chart as long as you follow the instructions.

Materials:

3 colors of bulky yarn such as Lamb’s Pride Bulky, (Color A, Color B, and Color C)

Size 9 circular needles

Size 9 double-pointed needles

darning needle

pom-pom maker or giant fork

Abbreviations:

K = knit

P = purl

k2tog = Knit two stitches together

Special notes: You’ll be knitting a basic fair isle pattern, so carry the unworked yarn across the back of the stitches you’re working, being VERY CAREFUL not to pull the unworked yarn too tightly. Your hat will shrink significantly in diameter if you don’t pay attention to the unworked yarn. I intentionally made my pattern bigger than my normal hats to account for my habit of pulling too tightly.

On your circular needle, cast on 80 stitches with Color A. Place marker on needle. Knit into the first stitch, being careful the stitches aren’t twisted. K2, P2 for five rounds. Knit 3 rounds regularly.

Round 9: With Color A, Knit 3 stitches. *With Color B, knit 4 stitches. With Color A, knit 6 stitches.* Repeat ** till end of round (you’ll end by knitting 3 stitches with color A).

Round 10: With Color A, Knit 2 stitches. *With Color B, knit 6 stitches. With Color A, knit 4 stitches.* Repeat ** till end of round, ending with 2 stitches of Color A.

Round 11: With Color A, Knit 1 stitch. *With Color B, knit 8 stitches. With Color A, knit 2 stitches.* Repeat ** till end of round, ending with 1 stitch of Color A.

Rounds 12 & 13: With Color A, knit 1 stitch. *With Color B, knit 9 stitches. With Color A, knit 1 stitch.* Repeat ** till end of round. Cut Color A leaving a six-inch tail.

Knit 5 rounds with Color B.

Repeat rounds 9-13 with Colors B & C.

Knit 6 rounds with Color C.

Decrease as follows:

Round 1: Knit two together, knit 6. Repeat for one round.

Round 2 (and all even rounds): Knit

Round 3: K2tog, K 5 for one round

Round 5: K2tog, K 4 for one round (this is where you should probably switch to the double points).

Round 7: K2tog, K 3

Round 9: K2tog, K 2

Round 11: K2tog, K 1

Round 12: K2tog

Cut yarn leaving a 12-inch tail. Gather remaining stitches with a darning needle and fasten off. Weave in all tails.

For the pom pom:

I recommend a pom pom maker, which you can buy for about $6 at any big-box crafts store. Another super technique I found on Pinterest, where you use a serving fork. It’s pretty great if you’re feeling lazy.

Secure your pom pom to the hat using yarn and a darning needle. Run the yarn through the pom pom a couple of times and tie on the inside of the hat. I always try and leave a little length in case the pom pom loosens so I can easily refasten it.

Thanks again to Muita Ihania for the pretty design.

Please contact me if there are any errors in the pattern. I’ve already given the hat away so I wasn’t able to look at it as I was writing the pattern.

Simple Knitted Boot Cuffs

Don’t know how much Game of Thrones you’ve been watching, but Winter is Coming.

That means scarves and coats and mittens and boots! Knitting season is officially on so why not start off with a super simple project to give your new fall outfits a little more refinement?

Simple Knitted Boot Cuffs from Alaska Knit Nat

These boot cuffs can be made in just a couple of hours. Nothing fancy, but they are the perfect touch for those cute brown boots you’ve been waiting all summer to wear. You won’t have to worry about bulky wool socks and hot feet when your boot cuffs are peeking out.

Here’s what you need:

Bulky yarn — less than one skein
Size 10, 16-inch circular needle
Darning needle

Simple Knitted Boot Cuffs from Alaska Knit Nat

Cast on 48 stitches on your circular needle. Join the round, making sure not to twist the row.

K2, P2 around.

Repeat for 20 rounds.

Loosely cast off. Weave in ends.

Repeat for other cuff.

Wear as is or decorate with a cute button.

Easy as pie! Cute as cake?

Simple Knitted Boot Cuffs from Alaska Knit Nat

Crochet Candyland Cowl

Chunky cowls are in. Crochet is in. Color is in. Let’s do this!

I tinkered with a couple of large crochet hooks this weekend and decided to use up some of my yarn stash by making a cozy, some might say yummy, cowl. This only took a couple of hours to make and only uses one type of crochet stitch, so it’s perfect for a beginner or a sourdough who just wants to race through her bits of yarn.

You’ll be crocheting two strands of yarn at once to make it chunky so you’ll have to make separate balls out of your already existing skeins. What’s really handy is if you are able to find both ends of one skein because then you could crochet with them at the same time without having to make an extra ball.

The other great thing about this pattern is that it doesn’t have to be exact. If you end up with more stitches than you’re supposed to you won’t be able to notice. Just wing it! It’s also up to you how you want to change colors as you go. I did it one time where I brought in the new color as I went and another time I finished each row, drew up the end through the last loop and then brought up the new color on the next round. Whatever makes more sense to you is what I would do.

Crochet Candyland Cowl -- Free Pattern

Materials:

Various colors of worsted yarn.

Size P crochet hook

Darning needle

Directions:

Crocheting with two strands at the same time, chain 52 stitches. I like to do the foundation-free method, which can be found here. This way I don’t have one row that’s wider than all the rest. Slip stitch into the first stitch, creating a big loop.

1. Bring in your next color by chaining 2 stitches. DC into each stitch all the way around, making 2 DC in the last stitch. Slip stitch to the top of the first DC.

2. Bring in the new color and Ch 2. DC all the way around and slip stitch into the top of the first DC.

Repeat steps 1 and 2 until you have 58 stitches or 13 rows, whichever comes first.

Cut yarn and draw up through the last loop. Weave in all the ends. I weave them in as I go, but you could also tie the bits of yarn to one another and clip them short.

Crochet Candyland Cowl