Girdwood Forest Fair Preview

I found out a week ago that a friend and I are sharing a booth at the Girdwood Forest Fair, an annual festival dedicated to homegrown food, crafts and music. I’ve been attending the Forest Fair since I was able to bum rides from older friends — so….15 years?

I’ve been busy as the busiest bee and/or beaver in the last few days trying to get my crafts together. Here’s a small preview of some of my wares. Come down to the Forest Fair July 1, 2, and 3 and I’ll give you a special Knit Nat discount on any of my crafts!

Headbands Galore!

Sangria on the Lawn

It was a priceless Alaskan summer today. One of those days where you feel guilty if you’re inside. So naturally it was sangria time. Kelly and I made jewelry all evening while drinking this stuff.

Ingredients:
1 bottle of white wine
2 cans of ginger ale
1 bag of frozen peaches
1 container of raspberries
1 container of blackberries
2 tsp. splenda or sugar
ice

Directions:
In a 2-litre pitcher combine the fruit, sugar and wine. Set out in the sun while you lie out there and tan. After a while, pour in the ginger ale and mix with a wooden spoon. Ladle out some fruit into a glass then pour in the sangria.

Garage Sale Find

Ever since my mother-in-law gave us an antique brass bed frame I’ve been itching to ditch our particle board dresser and put in an antique wooden one. This is more difficult a task than you think. Up in Alaska, good furniture is a rarity. Good furniture at a good price is an oxymoron. People just don’t move their furniture up here so there is basically crap. And it’s not inexpensive crap. Most couches at the Salvation Army are at least $250 and you’re lucky if all the cushions are in tact. Unless you’ve got $800 to throw on a valuable piece at an antique store, you mainly have to rely on luck.

And luck smiled on me last weekend. I was up in Fairbanks for a wedding and just before the bride walked down the aisle, my mom sent me a photo of an antique mahogany dresser at a garage sale back home in Anchorage. It was $150 and the seller said it was more than 100 years old. She bought it for me and this weekend Stephen moved out the old dresser and moved in the really old dresser.

I just love it. It’s everything I wanted in a dresser. Stephen added his manly jewelry box and his vintage stoplight.

He even made a hubby craft! Check out the homemade cork board!

Homemade Wallet

In high school I used to sew wallets for my close friends. I modeled them after my brother’s ’80s velcro wallet he’d left behind when he moved out. My wallets were hastily made, often crooked, but they were made with love and I always stitched my friends’ names or initials on the overflap.

Fast forward more than a decade. I’m starting to get back into sewing and I’m about to leave on a trip to New York. I purchased at the thrift store a red, watermelon slice-shaped sling purse and I couldn’t fit my checkbook wallet inside. So I decided to make one.

Making a wallet takes some planning. You have to know when to sew what so you aren’t left with unsewable raw edges. I like to map out what I’m going to do and when I’m going to do it. I use construction paper and cut out all the wallet’s components and make sure I leave enough seam allowance to still fit credit cards in the slots (I failed on the left-side slots as you can see below). I lay out my paper wallet so I can physically see how the wallet is assembled.

My wallets have a long pocket down the middle for bills and two pockets inside which have credit card slots sewn on top of them. They velcro close so I have to sew the velcro on first since I can’t sew it when all the pockets are assembled (you’d be sewing the pockets closed).

First I iron interfacing to all the wallet pieces. For the main body of the wallet I use heavy interfacing and for the pockets and slots I use lighter weight interfacing.

Next step is to turn down and sew the top edges of the credit card slots. Iron, iron, iron! It’s the only time I ever iron is when I am sewing. It makes crisper edges and everything is easier when you iron.

Next you turn under and sew the edges of the inside pockets. I like to baste all the inside components together before the next step, which is to turn down and sew the long inside edge of the pocket.

You can see in the wallet above that I skipped a step and had to hand sew the right-side pocket closed. I failed to sew this down before sewing the outside to the inside. Too late once it was flipped!

Then only other thing I’d do differently when I sew the outside to the inside is instead of leaving an open seam and hand-sewing it shut, as I would a pillow, I should just leave the whole top edge of the wallet open and then turn it under and sew it down once it’s right-side out.

Rose Blossom Jelly

It’s summertime in Alaska and the wild roses are in full bloom. Last week my friend Kelly and I tried to make dandelion jelly and we added some wild roses on a whim. Unfortunately we didn’t follow the pectin directions so we ended up with dandelion syrup.
We weren’t discouraged and we tried again, but this time we just used rose blossoms. What we came up with was a delicate, sweet, fragrant treat that we can’t wait to spread on toast for the rest of the year.
Here’s how we made it.
Ingredients:
1 quart tightly packed wild roses, free of pesticides
4 Tbs. freshly squeezed lemon juice
4 cups water
1/4 cup edible rose water (found at specialty grocery stores)
7 cups sugar
1/2 tsp. butter
2 packets liquid pectin
1-2 drops red food coloring (optional)

Directions:

Pick the entire bud of each rose. Try to pick buds that are free of bugs. Rinse roses and remove any dirt. Reserve 8 whole buds for garnishing. Place roses in a saucepan with the water and rose water. Bring to a rolling boil then remove from heat and let sit for 10 minutes.
Meanwhile, bring a gigantic stockpot of water to a boil. This is for the sealing process.
Strain the rose liquid into a quart-sized measuring cup using a wire mesh strainer. Press the flowers with a wooden spoon to get out as much liquid as possible. Stir in the food coloring. Measure exactly 3.5 cups of the liquid and pour back into saucepan. Stir in the lemon juice, butter and sugar and bring mixture to a rolling boil, stirring frequently.
Once liquid is at a rolling boil that doesn’t stop bubbling if stirred, quickly stir in the pectin packets. Return to a full boil for exactly one minute, stirring constantly.
Remove from heat and quickly ladle liquid into jars, leaving 1/8-inch space from the top. Wipe the rims and threads with a damp cloth to remove excess liquid. Lightly set a rosebud on the jelly before sealing. Make sure the jar tops are totally dry. Seal the jars tightly.
Place the jars in the giant pot of boiling water and boil for five minutes. Remove jars and set them on a kitchen towel. Let cool unrefrigerated for 24 hours. Jars will keep for one year if sealed and three weeks once opened.

Thrift Finds 5 — Any Suggestions?

I’m not one to dress like a hipster. In fact, I very much enjoy poking fun at hipster men and women, what with their floppy hats, floral skirts and oxford shoes.

What I’m trying to say is I bought some little oxford shoes for $1.25 at the Salvation Army and I don’t know what to do with them.

I don’t know how to wear them. I could try and be a hipster poser, I don’t mind that at all. I feel seriously funny when I wear them with a skirt above the knee. I don’t like how skinny jeans look on me — I feel like a mom. Capris make me feel short since my legs are already kind of stumpy. Am I not cut out for cute little oxfords? Any advice would be greatly appreciated.

Thrift Finds 4

While in New York last month Stephen and I did a lot of thrifting and antiquing. We found lots of awesome clothes and shoes, but nothing that needed to be blogged about.

While surfing Craigslist last week, I found an ad for a new thrift store. NEW THRIFT STORE. That’s my favorite statement. I had to check it out. It’s called Yours, Mine and Ours and it’s on Arctic and 70th.

It’s an odd store. It almost looks like someone emptied his storage unit and put prices on everything. Turns out the owner goes to storage unit auctions and then empties out those units and puts prices on everything.

Lots of grungy clothes, not worth digging through, lots of records and old Martha Stewart magazines. Christmas decorations in June, pawn shop-type gold jewelry, DVD’s, and knick-knacks. Great knick-knacks, in fact. Check out this ’60s handmade doll furniture. It displays my homemade jewelry perfectly.

Also irresistible was the collection of tins for sale. I managed to pare my selection down to two:

Thrift store score! 

Cooking with Fiddlehead Ferns

I was at my friend Faon’s place the other night and she asked me if I knew how to cook fiddlehead ferns. I consider myself a bit of a connaisseur when it comes to Alaskan wilderness edibles, but I’d never attempted  picking or cooking fiddlehead ferns.

This is the time of year to pick ferns in Alaska — right when they are unfurling their spiral tendrils from the previous years’ mound of dead fern. Just snap them off at the base of the stem like asparagus.

Here is a photo of some ferns in Kodiak in June.

You should pick fiddlehead ferns when they are even shorter and more coiled up than these ones. This is just the only photo I happen to have. The ones we picked didn’t have any leaves sticking out yet and they were about five inches tall.

Faon and I decided to serve them at my parents’ house this evening. They were surprisingly delicious. For some reason I expected them to be tough and bitter like rhubarb, but they were tender and flavorful like asparagus.

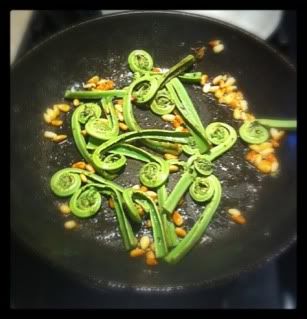
We first blanched them and then sauteed them in garlic oil with roasted pine nuts and fresh oregano.

First, I’ll tell you how to make garlic olive oil

Ingredients:
40 cloves of garlic, peeled.
1 litre of olive oil

Directions:
Cut each clove of garlic in half. Place in a large jar or sealable container. Fill container with olive oil. Cover and let sit 10-14 days at room temperature. Remove the garlic cloves and either toss them or use them in focaccia bread or pizza.

If you don’t have time to make garlic olive oil, the fern recipe could be altered by first sauteing a few garlic cloves in the olive oil before adding the pine nuts and oregano.

Ingredients:
15-20 fiddlehead ferns, rinsed in cold water
2 Tbs. garlic olive oil
1 Tbs. fresh oregano, chopped
2 Tbs. pine nuts
salt

Directions:
Trim the ends off of each fern and pull off any fuzzy leafy bits in the spirals.
Prepare a bowl with ice and cold water and set by the stove.
Heavily salt a medium pot of water and bring to a boil. When water is boiling, toss in the ferns and boil for four minutes.
Meanwhile, heat a small saute pan with the olive oil. Add the oregano and the pine nuts and brown the pine nuts over low heat.
When the ferns are done boiling, add them to the ice bath. Gently dry off ferns with a paper towel.
When the pine nuts are brown, toss in the ferns until they are heated through. Sprinkle with salt and serve.

Little Orange Jewels

It’s that time of year again when my family’s home is filled with the scent of smoked fish. This smell instantly transports me to my childhood summers with endless days of light, playing in our enchanted woods out back and downing smoked salmon like it was candy.

Each year my father buys fresh king salmon, cleans it on top of the hot tub on the deck, fillets it and smokes it to perfection. The added bonus to his smoked salmon is silky, salty roe. As a child, the thought of eating salmon eggs was beyond revolting, but recently my adult tastes can’t seem to get enough.

Preparing the roe is simple. You’ll need a piece of 1/4-inch wire mesh grate. It looks like really small chicken wire. The holes need to be about the size of the salmon eggs. You can find it at any hardware store.

Here’s how my father does it:

Remove roe from female fish. Push the roe through the mesh grate using your hands. Doing this will remove the membrane from the eggs.

Prepare a bowl of very cold water that is super saturated with non-iodized salt. This is a basic brine.

Pour the separated eggs into the bowl of brine. Stir occasionally. Depending on the species of salmon (that is, the size of the eggs) they will be ready in 15-30 minutes. Start checking them at 15 minutes by removing a tablespoon of eggs, placing them in a tiny mesh strainer, rinsing off the salt with cold water and tasting them. When they are salty enough for your satisfaction they are done. If too salty, pour the eggs into a bowl of unsalted cold water, which will reverse the process, and de-salt the eggs.

When the eggs are ready to your taste pour them into a large strainer, and rinse them for a minute or two with cold water spray from your kitchen sink, turning the eggs over several times with your hands to remove excess salt.

Take the strainer with the eggs and place it in a large bowl, which has an inverted small saucer in the bottom to keep the strainer from touching the bottom of the bowl. Fill a gallon Ziploc bag with cold water, and put the bag on top of the strainer and put it in the fridge overnight or for 12 hours. This will remove excess water and compress the product.

Place roe into jars and serve with Carr’s crackers and chilled white wine.

Mom enjoying king salmon roe

Free knitting patterns, DIY crafts, easy recipes and more!