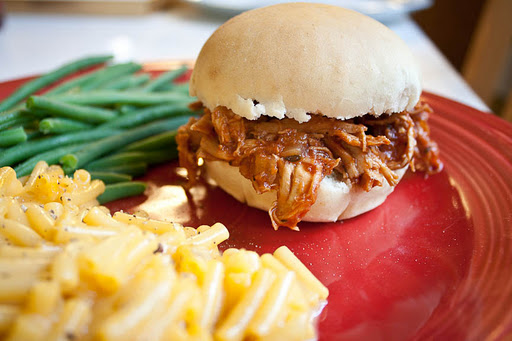
Crock Pot BBQ Chicken on Homemade Buns

In one of Stephen’s many lunchtime thrift store pursuits, he acquired me a Crock Pot. This appliance has never existed in my home nor in my parents’ home. It is a foreign object to me. It sat in the cupboard for about two months before I finally decided to do something with it.

Boneless, skinless chicken breasts are the most boring cut of meat. I don’t like cooking them because usually I create boring meals.

So I made pulled chicken sandwiches. I let the chicken cook alllllll day and shredded it up and cooked it for even longer. It turned out pretty well, except my homemade BBQ sauce tasted like sweet mutant tomato paste, so I cheated and added some Sweet Baby Ray’s and liquid smoke and everything balanced out.

The buns were a little dense, but I think it’s because the recipe I used called for instant rise yeast and I only had regular yeast so I should have proofed it. I am not including the recipe for the buns because I only did a Google search and picked the first recipe I found. I’d try a different one next time. I just really didn’t feel like going to the store just for hamburger buns.

Ingredients:
3-4 chicken breasts, mostly thawed
1 tiny can of tomato paste
2/3 of the tiny can of water
1/2 onion, chopped
1/4 cup apple cider vinegar
1 Tbs. Worcestershire sauce
salt and pepper
some dried basil
some dried thyme
1/4 cup BBQ sauce
1 tsp. liquid smoke

Directions:
Place the chicken on the bottom of the crock pot. Mix all the other ingredients in a bowl and add to the crock pot. Set crock pot to low for four or five hours. Shred up the chicken with a fork and cook another two hours.  Scoop on to a bun and enjoy.

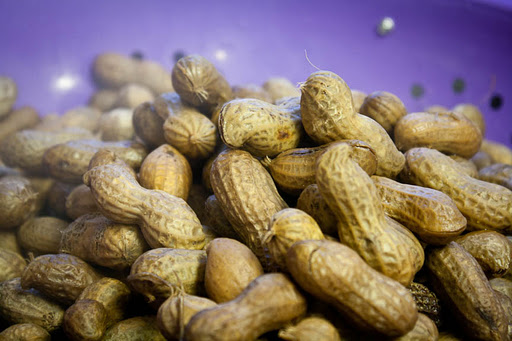
Boiled Peanuts

I’m not a big fan of peanuts. I can do without peanut butter and I’ll munch on the roasted kind if it’s the only thing available at a bar, but the one type of peanut I really adore is the boiled peanut.

The first time I had them was about six years ago in Seward, Alaska. Someone was selling them at a local bar. They are salty and soft — a little like edamame.

Fast forward to present day. I really didn’t think pregnancy was affecting me in the cravings department, but when my step sister-in-law posted on Facebook a photo of a Georgian boiled “P-nut” stand, that is the only thing I ever wanted to taste.

The reason I’ve never been able to make them myself is that you need raw peanuts — ones that haven’t been roasted. You just can’t get them up here.

Thanks to my mother-in-law’s thirst for online shopping, she was able to have some shipped up to me via Amazon.com.

I didn’t know what to expect. I was worried they would be fresh like sprouts where they could go bad very quickly. When I opened the box, I surely thought she had mistakenly sent me roasted peanuts because they were dry and hard. Then I read they were cured and raw so I knew I was good to go!

Give yourself an afternoon to make them, because it takes several hours. The longest, easiest snack this side of the Mississippi!

Directions:
Place about a pound of raw peanuts (still in their shells) into a large pot. Fill the pot with water and add 1/2 cup of salt. Put the lid on and bring to a boil. Turn heat down so your peanuts are still simmering and cook for hours until they are soft to your liking.

They can be stored for up to 10 days in the fridge and I’ve read you can freeze them for even longer.

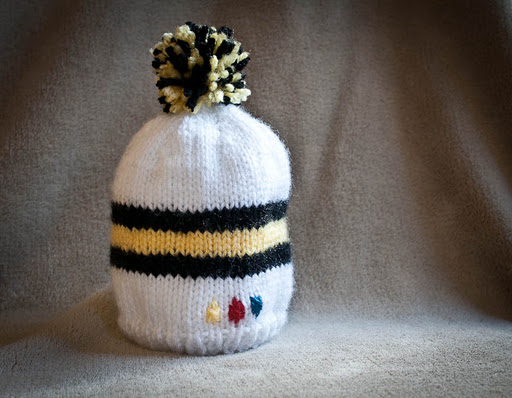
The Tiniest Steelers Fan!

My friend Laura had her son five weeks early. A few days after he was born she asked me if I would make him a Steelers hat (even though I know she’s a Colts fan, but I guess he’s daddy’s boy in the sports department).

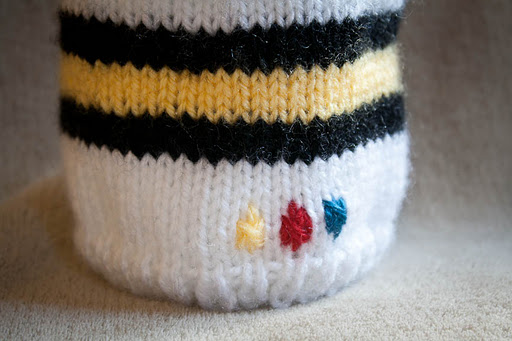
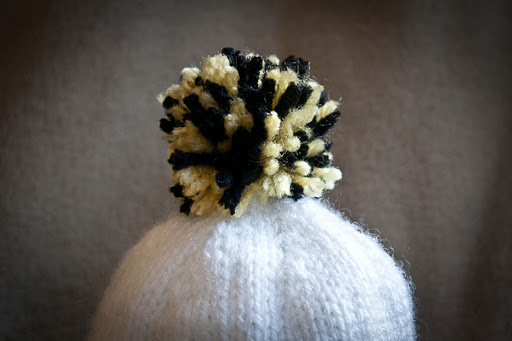
I made the little guy the littlest hat. I couldn’t imagine this hat fitting a person, but it looks like it fits him just fine and with lots of room to grow.

I made the hat using the magic loop method because it was so small that I would have had to use double points from the get-go. A normal circular needle would have been too long. Magic loop uses an extra long circular needle and you work half the stitches at a time while the other half rests on the bendy part of the circular. This sounds confusing, but once you get the hang of it it can be much faster than using double points. Just remember, every knitting technique I know I’ve had to learn backwards since I’m left handed, so if I can do it, you can do it!

Preemie Steelers Hat

Materials:

Worsted baby yarn in yellow, black and white
At least a 32-inch long size 8 circular needle or one set of size 8 double points
Tapestry needle

Directions:

Cast on 56 stitches of the white yarn either using the magic loop method or divided onto three double pointed needles.
Join your work, making sure the yarn isn’t twisted. Place a marker if needed.
k1, p1 rib for five rounds.
Knit eight rounds in stockinette stitch. Switch to black. Knit three rounds. Switch to yellow. Knit four rounds. Switch to black and knit three rounds. Switch back to white and knit eight rounds.
Decrease as follows:
At stitch marker, *k2tog, k6* Repeat * till end of round
K one round
*K2tog, k5*, repeat * till end of round
K one round
*K2tog, k4*, repeat * till end of round
K one round
*K2tog, k 3*, repeat * till end of round
K one round
*K2tog, k 2*, repeat * till end of round
K one round
*K2tog, k1*, repeat * till end of round
*K2tog*, repeat * till end of round.
Cut yarn leaving an 8-inch tail. Using a darning needle, weave in all ends.

For pom-pom:
Using something small, like a matchbook, wrap yarn around and around a ton of times. Remove the matchbook and tie a 12-inch piece of yarn around the middle of the yarn loops. Cut the loops. Trim pom pom to preferred size.

Shake Your Booties!

“All the hotties at the party feeling naughty shake your boobies, yeah
Who likes to rock the party? Who likes to rock the party?
All the ladies with their babies make their babies shake their booties, yeah”


Ok, that’s always what I think of when I think about knitting booties. If you don’t know what I’m talking about, Google it. It’s funny.


I’ve never been a big fan of bootie making. I guess it’s cause they are tiny and you have to make two of them and I really dislike knitting things flat and then stitching them up at the end. I am a knit-in-the-round type of gal.


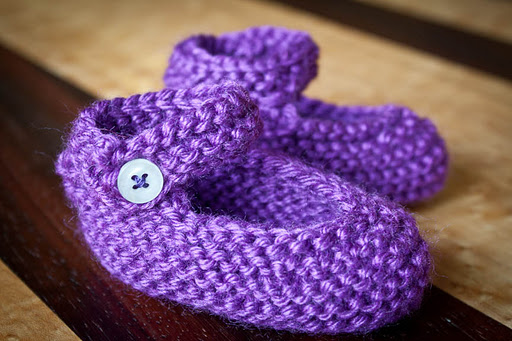
After downloading the Red Heart Yarn app the other day, I did some bootie searching and found a pattern I actually liked. I went so far as to use the exact yarn in the pattern. They turned out just like the pattern picture!


Don’t tell my husband, but I stole spare buttons off one of his dress shirts. It was a really quick knit. I made one during an episode of Law and Order, so it must have taken two hours to make both. The pattern is free and can be accessed Here. Now I need to give them to a baby so I can see them in action. 


El Jefe Morning Sandwich

My boss and I share an office and yesterday morning he started describing an egg sandwich that sounded delectable. Something about Dave’s Killer Bread, pepper jack cheese and avocado. He mentioned how it was everything you needed in a meal: grain, veggie, calcium and protein.

He had me thinking about it all day. So I texted him yesterday evening to ask how he made it. I made just a couple of adjustments, but boy, this was a yummy breakfast. I’m sorry the photo doesn’t do it justice.
Ingredients:
One slice of Dave’s Killer Bread (or any sort of whole grain bread)
1/4 avocado, thinly sliced
cream cheese
some sort of mild melty cheese (I used Raclette Chevre)
one egg
Cholula hot sauce
Directions:
Lightly toast your bread. Spread the cream cheese on the toast and add the avocado. Top with the cheese. Place in the toaster oven on the broiler setting to get everything all melty. Meanwhile, fry an egg till it’s over medium. Place the egg on top of the cheesy melty toast and douse in Cholula sauce. Best eaten with a knife and fork.

Killer Nachos

Yum! Easy! Here’s how!

Ingredients for Guacamole:
1 ripe avocado
6 cherry tomatoes, chopped
2 tbs cilantro, chopped
juice of 1/2 lime
salt and pepper

Directions:
Combine all the ingredients with a fork

Ingredients for Cheese Sauce:
1 Tbs. butter
1 Tbs. Wondra flour, or regular flour
1/2 cup whole milk
4 slices American cheese

Directions:
In a small saucepan, melt the butter over medium heat. Add the flour and whisk together. Cook for a minute and then add the milk, stirring frequently till thickened. If it’s too thick, add more milk. Add the cheese and stir till cheese is melted.

Chop up two green onions.

Spread some corn chips on a plate. Pour on some of the cheese sauce. Add more chips on top. Add the remaining sauce and sprinkle with green onions. Place the guacamole on top of the nachos. Eat them!

Homemade Basil Pasta with Cherry Tomatoes and More Basil

My friend Kelly and I wanted to make bruschetta today so we asked my dad if we could raid his homegrown basil. My father doesn’t just have an herb garden by the window. He dedicates two thirds of our dining room table to growing his own basil, oregano, thyme, rosemary and now, hot chile peppers. He uses special hot pink LED grow lights for his little herbal infatuation and what he produces are the bushiest, biggest, almost mutant-like herbs and peppers. His basil is no exception.

When we went up to snag some my dad said “It’s either all or nothing” and forced us to butcher his entire crop. We were left with a conundrum — what the heck do we do with all this basil?

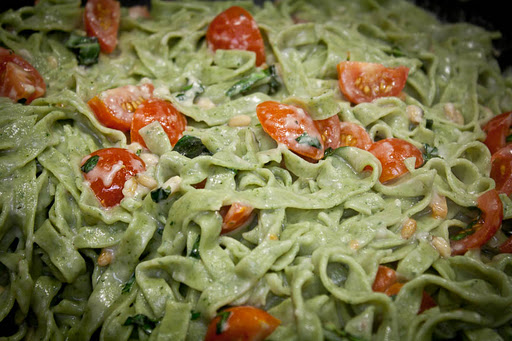
Make green pasta, ff course. And top it with more basil. Double of course!

We came up with the brightest green pasta, tossed it with a creamy sauce and then topped it with cherry tomatoes. Amazing!

And here’s how we made it.

Ingredients

For the Pasta:
3 cups flour
3 eggs
3 cups packed basil leaves
1/2 tsp garlic powder
pinch of salt
3 tbs. olive oil
water

For the sauce:
2 Tbs. olive oil
3 Tbs. pine nuts
1 cup cottage cheese
1/2 cup Parmesan
1/2 cup chicken stock
2 Tbs. Wondra flour, or regular flour
salt and pepper
chopped cherry tomatoes
chopped basil

To make the dough:
Add the flour, garlic powder and salt to a food processor and pulse a few times. Add the basil, eggs and oil and start processing. Through the little tube in the top, start slowly pouring in water until a rough ball of dough forms. Turn on to a floured surface and knead for a few minutes, incorporating more flour if it’s too sticky. What you should end up with is a smooth, elastic dough. Place in a bowl and cover with saran wrap for 30 minutes or so.

Set up your pasta roller. If you do not have a roller then this is going to be a long cooking job for you and I recommend putting your dough in the fridge and driving to a store that sells a pasta roller.

Using lemon-sized balls of dough, run it through the largest setting, folding it over itself and adding more flour if necessary. This kneads the dough for you. Make sure the dough isn’t sticky at all during this process. Fold the dough on itself and run it through this setting about seven times. Now start adjusting the rollers thinner and thinner, running the dough through once each time till it’s as thin as you prefer. I like setting 6 on my roller.

Flour each sheet of pasta on both sides and set on a cookie sheet. Repeat with lemon-sized balls of dough till you’ve rolled out all the dough.

Set a large pot of salted water to boil.

In a large saute pan, heat the oil and add the pine nuts, stirring frequently, till they are lightly toasted. Add the chicken stock, cottage cheese, salt and pepper, flour and Parmesan cheese stirring rapidly until it thickens. Turn heat to low.

Meanwhile, run your sheets of pasta through the cutters. I like the fettucini setting because the vermicelli can be stickier sometimes. If your pasta sticks together a little, just separate the noodles when they’ve gone through the cutter and dust with flour. Collect on a tray.

When the water is boiling, add the pasta and stir to make sure noodles don’t stick. Cover the pot till it boils again and then cook the noodles for about 30 seconds. Test a noodle. It should have a bite to it. Before draining the water, reserve about 1/2 cup of the noodle water and add it to the sauce.

Steaming pile of noodle

Drain the noodles and immediately transfer to the saute pan. Turn the heat to med-high and add the tomatoes and chopped basil. Toss till the noodles are well coated and the tomatoes cook a little bit, about 3 minutes.

Enjoy all the hard work you put into making a delicious meal. You deserve it!
Eggplant Parmesan

This recipe is inspired by America’s Test Kitchen, Cooking for Two.
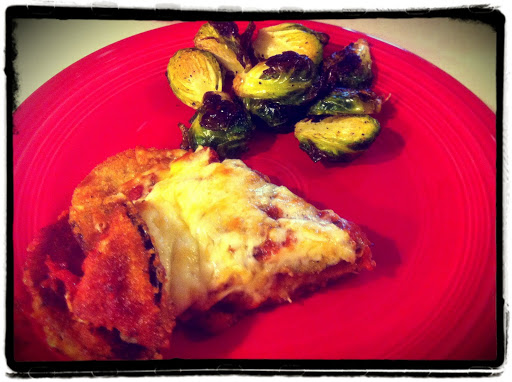
I’ve never been a fan of eggplant, but holy moly, this stuff was GOOD.
Ingredients:
A half batch of Oliver’s Marinara
1 eggplant, about 12 oz.
Four slices of fancy white bread, torn into rough pieces
3/4 cups Parmesan
salt and pepper
3 eggs
1/2 cup flour
1 cup shredded mozzarella
1/2 cup vegetable oil
Directions:
Preheat oven to 425 degrees. Make or heat up the sauce. Slice the eggplant into 1/4-inch slices. Toss the bread into a food processor and pulse till fine crumbs are formed. Toss them into a pie pan and mix with 1/2 cup parmesan, salt and pepper.
Whisk the eggs into a separate pie pan.
Put the flour into a large ziploc and add the eggplant slices. Toss them around in the bag till they are evenly coated with flour. Shake off remaining flour. In batches, coat the slices in the egg and then in the breadcrumbs. Set them on a wire rack on top of a rimmed baking sheet.
Heat the oil in a 12-inch oven-proof pan over med-high heat. Add half of the eggplant slices and brown four minutes on each side, or till golden brown. Set them on the wire rack. After browning the second batch, turn off the heat, discard any excess oil in pan and wipe clean with paper towels. 
Coat the bottom of the pan with one cup of sauce. Place slices in the pan, overlapping one on top of the other from the outside to the inside. Top with another cup of sauce, but do not cover the outer edge of the slices so that these will stay crispy and un-soggy.
Top with remaining parmesan and sprinkle the mozzarella on top.
Place in the oven and bake for about 14 minutes, or until the top is slightly browned. Remove from oven and let sit for five minutes before serving.

Free knitting patterns, DIY crafts, easy recipes and more!