Category Archives: Crafts

Quick Craft — Homemade Mini Calendars

There’s something so wonderful about miniature things: Mini Coopers — cute, teacup dogs — adorable, Mini Me — freakishly endearing.

When my dad opened up a small package of miniature calendars the other day, my mini “awwww” reaction kicked in and so did my crafty brain.

I’ve been stashing away some 1960’s McCalls Craft magazines for several years now, not sure what to do with them. Now I know: mini calendars for stocking stuffers.

Quick Craft -- Mini Calendar | Alaska Knit Nat

Here’s what you need:

Mini self-adhesive calendar pads.

Heavy card stock (I used file folders)

Magazine clippings

Glue stick

Double-sided adhesive wall-mount stickers (found in the Scotch tape aisle)

Scissors

Ruler or straight edge

Directions:

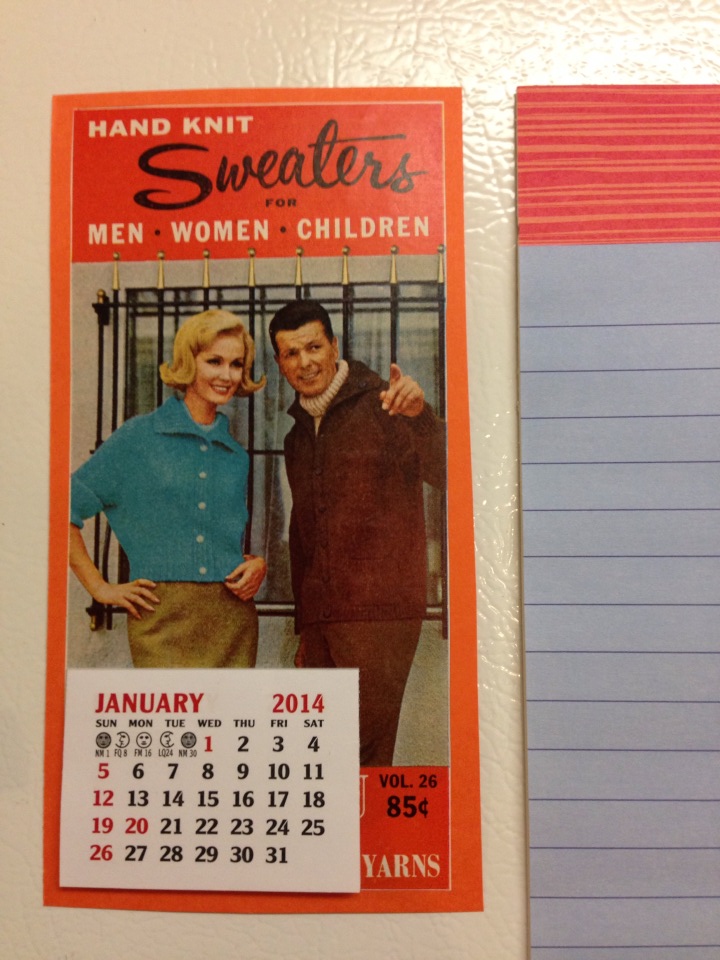
Find some small photos or magazine clippings for your calendar background. Cut out a piece of card stock the same size as your clipping plus the size of the mini calendar pad.

Glue clipping to card stock. Remove the adhesive strip from the back of the calendar pad and stick it where you want it.

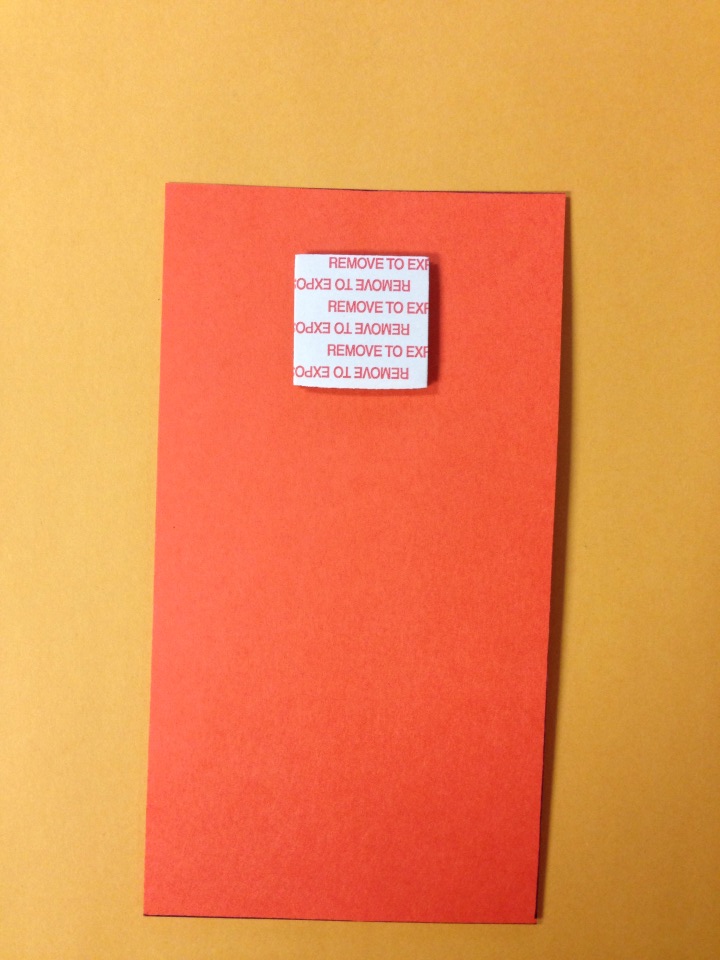
Turn mini calendar over and adhere one side of your double-sided mounting tape to the back.

Quick Craft -- Mini Calendar | Alaska Knit Nat

Use as a gift topper or stocking stuffer.

Quick Craft -- Mini Calendar | Alaska Knit Nat

Quick Craft — Felt Christmas Tree

We recently put up our Christmas tree and I’ve discovered that my year-and-a-half-old son enjoys dismantling the lower part of the tree as often as possible.

So I made him his own tree for about $5. His tree is 2-D, felt and has occupied about 30 minutes of his attention — which is a lot!

Quick Craft -- Felt Christmas Tree | Alaska Knit Nat

Here’s what you need:

1 yard green felt

chalk

scraps of felt in many colors

fabric scissors

masking tape

pinking shears (optional)


Directions:

Fold your green felt hotdog style and make half a tree shape along the fold. Cut out your tree shape and tape to a wall at toddler height.

Quick Craft -- Felt Christmas Tree | Alaska Knit Nat

Cut out various shapes from the other felt — hearts, diamonds, circles, ovals, stars, etc. Use pinking shears for decorative value.

Quick Craft -- Felt Christmas Tree | Alaska Knit Nat

Hand the shapes to your toddler and watch him go to town. The felt sticks to the felt.

Obviously not decorate by a toddler.
Obviously not decorated by a toddler.

Mexican Oilcloth Dining Chairs

Every time I am down in Mexico I’m attracted to the  long rolls of colorful oilcloth. Adorned with fruits, flowers or fake lace, oilcloth is durable material that could be used for myriad projects. I just never know what to do with it. I’ll get a meter here and a meter there and sometimes try sewing with it or gluing it to old cans.

I finally decided on a decent (and super easy) oilcloth project. Since we have a little one and mealtime tends to be messy, I thought that recovering our dining chairs would not only brighten our living space, but cleanup would be a breeze!

Mexican Oilcloth Dining Chairs

I’ve already posted a tutorial on reupholstering furniture, so feel free to check it out here or here. But look at the vast improvement!

IMG_3191
Before
Mexican Oilcloth Dining Chairs
After

Here’s a brief tutorial of the process:

IMG_3192
Cut oilcloth with enough of an edge for it to wrap around the cushion and still have a couple of inches worth of an edge.

IMG_3198
Try to fold the corners in an elegant way so it’s not all bunched up.
IMG_3193
Use a staple gun to secure the oilcloth all the way around.
IMG_3197
Make sure the baby helps!


Insta-craft: Lace Sweater Trim

As you can see by my lack of posts these days I don’t have a lot of time to craft out. But sometimes I just need a craft fix.

Spruce up an old cardigan with trim. All you need is a sewing machine with a straight stitch and some pins. Months ago I found a big bag of lace trim at the thrift store and I knew it would come in handy some day. Observe this boring but comfy cardi my little sister rejected and I scooped up:

Insta-craft: Sweater Trim

Fifteen minutes later I had a cute piece of clothing that I can wear with a long t-shirt and some leggings. I have no one to take photos of me, so you’ll have to imagine the cardigan with a long t-shirt and some leggings.


Insta-craft: Sweater Trim


Materials:

One old cardigan

About two yards of lace trim

Straight pins


swetaertrim2


Directions:

Look closely at your trim and you’ll see that one side is more obviously the outside. If you can’t tell, then no one else can either so don’t worry about it. Start at the bottom of one side of the cardigan. Pin the trim to the bottom leaving an inch to wrap around and pin on the inside so the raw edge of the trim doesn’t show. Now start pinning the trim all around the edge of the sweater, up around the neck, and back down to the other bottom edge. Cut leaving an inch of trim and wrap that around the bottom and pin to the inside.

Insta-craft: Sweater Trim

Sew along the trim’s pre-made stitch, backstitching at the beginning and end. Trim threads. Rock out cause you just crafted out.

Insta-craft: Sweater Trim

Man Shirt Redo

My husband has become addicted to Pendleton. Used Pendleton plaid wool shirts. He keeps finding these beautiful shirts all over the thrift circuit and now he has a full lumberjack wardrobe.

The other day he found me a little Pendleton. Most likely it was shrunken in the wash because the tag indicates it’s a size large. The colors are beautiful, but it is such a boxy shape and pretty unflattering.

Once again my crafty mind was reeling late at night and there’s no better time than the present. I got an idea in my head and went with it.

I’ve seen around the Pinterest arena lately heart-shaped elbow patches. It’s pretty cute. I had some scraps of a cashmere sweater lying around and presto! Cute little heart elbows.

But I still wasn’t satisfied. The shirt just wasn’t wearable in my book. So I had my husband help me pin darts in the back and I basted them up. I didn’t use any kind of pattern but it turned out splendidly. Now I too can look like a lumberjack!

Retro Craft: Felt + Glue = Soft Baby Book

I’ve been a crafty lady — three blog posts in one day! This craft was the result of my crafty brain not shutting off in the wee hours of the night. I started it at 11:30 p.m.

Baby Jack still isn’t into books — reading them, that is. He loves tasting them and drooling on them. I thought it would be fun to make a felt book with no particular story, since he really doesn’t care at this point. It was fun. I even got my husband involved. He proved far artsier than I, which is why I saved his page for the very end.

Felt always makes me think of crafting in the olden days — back when all I had access to were arts & crafts books from my school library where the copyright date was around 1974. It included projects with toilet paper rolls, ric rac and dried macaroni.

This project definitely brought me back.

What you’ll need:

Felt

Fabric scissors

Tacky glue or fabric glue

Darning needle

Embroidery thread

Cut your felt pages to the size you like. I used a CD. Sew them together using embroidery thread. Then cut out shapes and glue them to the pages. Let glue dry. Give to baby. Let baby drool on it and eat it. See how long book holds up. I’m giving it a few days.

Paper crane mobile

I was a crafty kid, believe it or not, and one of my favorite kid hobbies in addition to lanyard making, collages and friendship bracelets was origami. I could make a paper crane in about a minute. I thought a mobile of paper cranes would be a colorful and simple addition to the baby room.

I have to admit, my origami skills were a tad rusty and when I first attempted a crane I somehow inadvertently made a balloon, so I found a link on Google to use as a refresher course. Reading and understanding origami instructions can be a challenge as it requires you to think outside the box once in a while, but paper cranes aren’t too tricky once you figure it all out.

My husband and I went on a walk the other day and found a nice birch tree branch as the mobile base. I used silver thread and with a long needle, poked up from the bottom of each crane, through the top of the back and then just played it by ear in terms of crane placement.

It wasn’t hard to balance the branch. I tied two pieces of string on either end of the branch and brought them to the center so it balanced just right and tied a knot. Then my 6-foot-2 husband used a lightweight hook to affix it to the ceiling.

I hope my baby finds it enjoyable!

Beautifying the Medicine Cabinet

I stayed up too late last night and I can never sleep past 9:30 a.m. This gives me lots of time to myself before my husband — who could sleep standing up if he had to — stumbles out of bed at around noon. So today I made up my mind to organize my medicine cabinet.

Yes, I’m aware of the lameness of this decision. But it wasn’t so lame, trust me!

I took out all the little cartons of Alka-Seltzer and Day Quil and transformed them into bright, flowery containers fit for a magazine medicine cabinet.

Using Mexican oilcloth, scissors, scotch tape, paper, pen and glue I spent my afternoon turning something that people rarely see (unless they are poking around) into what is nearly unattainable — an organized space.

Useless garbage? I think not!
Ta-da!

Halloween Garland

My friend Rosey and I crafted out today. It was a beautiful not-quite-winter day. The afternoon sun dappled the kitchen table as we cut and pasted.

Rosey made a simple vertical garland with orange, black and tan construction paper. She traced around a tin can and cut out about 64 circles. She cut lengths of string and glued the string in between two circles and spaced them about two inches apart from one another.

Pretty spooky!

How to Upholster a Padded Stool

Take a thrift store padded stool and a scrap of fabric and in just a few minutes you’ll have a transformed piece of furniture that’s worthy of your home!

Here’s how.

What you’ll need:
A padded, fabric-covered stool
A piece of awesome fabric that’s a big bigger than the seat of the stool
Screwdriver
Staplegun

Bone color — how neutral!

Directions:

  • First, remove the screws from the stool and set them aside. The seat should easily separate from the frame.
  • Place the seat, padding side down, onto the wrong side of your fabric and cut cut around the cushion leaving about two inches of room. Just make sure there is enough extra fabric to wrap around the cushion on all sides.
  • Make sure your fabric is flat and there are no wrinkles. Staple four edges in place and then start working around the cushion, making gathers if necessary. 
  • Staple all around, double checking the top of the cushion every so often to make sure there are no wrinkles. 
  • Trim any excess fabric.
  • Screw the cushion back onto the frame.

Pizazz!

Ta-da! Ten minute project. The best kind.