All posts by alaskaknitnat

Welcome to Alaska Knit Nat! I was born and raised in Anchorage and have always had a passion for making useful things, whether they are eaten, knit, crocheted, sewn or randomly glued and assembled. I received my bachelor’s degree in French and journalism from the University of Alaska Anchorage and work almost full time at a nonprofit and way over time as a mom.

Fabric Scraps Garland

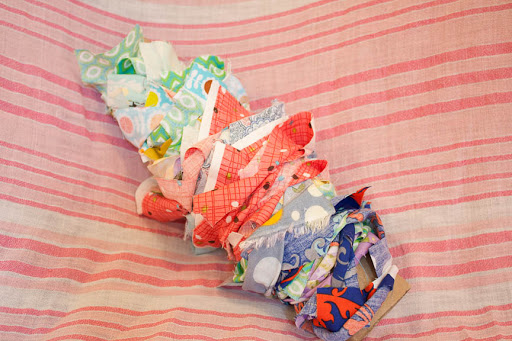
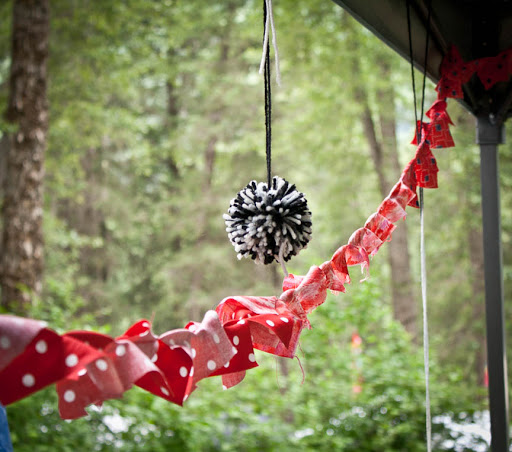
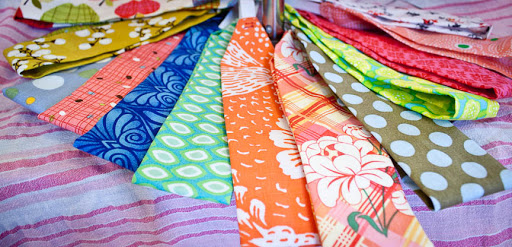
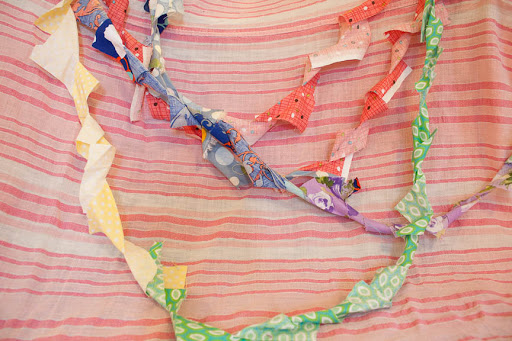
Whenever I sew I always feel obligated to keep all of my fabric scraps, no matter how useless they seem to be. When it came to setting up my crafts booth last weekend, I knew I wanted some cool decorations and that’s when those fabric scraps came in handy.

I thought of it in the middle of the night last week — some long ago paper crafts project I might have seen in an old library book as a kid. You cut strips of paper like a continuous “S” and then stretch it out.

First thing in the morning, I did a test on a strip of fabric. What I came up with was a delightful way to decorate any event.

And here’s how I made it:

Ingredients:
Several scraps of fabric, about 4 inches wide.
Sewing machine
Fabric scissors

Directions:
Your scraps do not have to be perfect. They could be different widths if you like, but I found 4 inches is a good width. All you do is sew your scraps end to end. It’s OK if right sides aren’t always facing because you’ll be able to see both sides of the fabric from all angles. When you’ve sewn as many scraps as you feel is adequate (a little goes a long way), start cutting the strips like so:

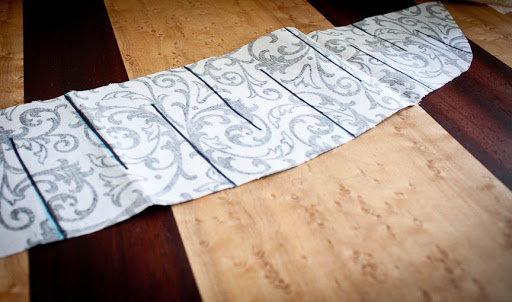
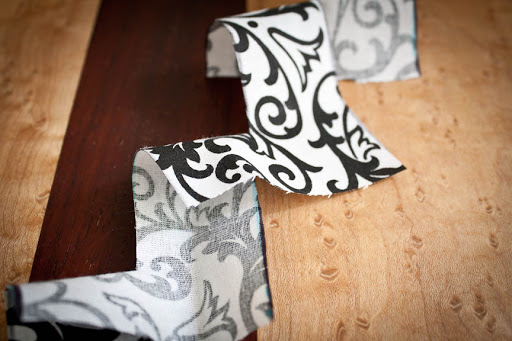
You do not need to draw the lines. I just did that so you could see what I was cutting.  Pull the fabric apart and see what you’ve created!

If it’s not long enough, add more scraps. Then hang up your garland, or store it on a paper towel roll.

I’m coming out of the booth!

After three days and 25 hours of customer service I’ve decided this booth was a great idea. I had the time of my life. I put in 63 feather hair extensions and sold 17 headbands, 10 purses, 5 hats, 20 magnets, 3 necklaces, 3 pairs of earrings, 4 leather bracelets, 4 jars of jam, and about a dozen matchbooks. My mom hung out with me all three days and helped be my cashier.

Next year I’ll be much more prepared and actually have knitted stuff to sell.

Here are some photos of the booth. What I loved is people were drawn to the booth just because of the decorations. Even if they didn’t buy anything, people enjoyed being in our tent.

Purses were displayed using a tree branch

The tent was adorned with pom poms and scrap garlands

A thrift store sheet covered the main display table. Appetizer dish displayed the matches

Tiny doll furniture from the thrift store really came in handy!

The view of our booth from across the way. Boothmate Alex is setting up her wares

Cranberry marmalade 

Kelly’s monsters chilling in an old suitcase. A few found loving homes

Macrame leather bracelets were a big hit.

Girdwood Forest Fair Preview

I found out a week ago that a friend and I are sharing a booth at the Girdwood Forest Fair, an annual festival dedicated to homegrown food, crafts and music. I’ve been attending the Forest Fair since I was able to bum rides from older friends — so….15 years?

I’ve been busy as the busiest bee and/or beaver in the last few days trying to get my crafts together. Here’s a small preview of some of my wares. Come down to the Forest Fair July 1, 2, and 3 and I’ll give you a special Knit Nat discount on any of my crafts!

Headbands Galore!

Sangria on the Lawn

It was a priceless Alaskan summer today. One of those days where you feel guilty if you’re inside. So naturally it was sangria time. Kelly and I made jewelry all evening while drinking this stuff.

Ingredients:
1 bottle of white wine
2 cans of ginger ale
1 bag of frozen peaches
1 container of raspberries
1 container of blackberries
2 tsp. splenda or sugar
ice

Directions:
In a 2-litre pitcher combine the fruit, sugar and wine. Set out in the sun while you lie out there and tan. After a while, pour in the ginger ale and mix with a wooden spoon. Ladle out some fruit into a glass then pour in the sangria.

Garage Sale Find

Ever since my mother-in-law gave us an antique brass bed frame I’ve been itching to ditch our particle board dresser and put in an antique wooden one. This is more difficult a task than you think. Up in Alaska, good furniture is a rarity. Good furniture at a good price is an oxymoron. People just don’t move their furniture up here so there is basically crap. And it’s not inexpensive crap. Most couches at the Salvation Army are at least $250 and you’re lucky if all the cushions are in tact. Unless you’ve got $800 to throw on a valuable piece at an antique store, you mainly have to rely on luck.

And luck smiled on me last weekend. I was up in Fairbanks for a wedding and just before the bride walked down the aisle, my mom sent me a photo of an antique mahogany dresser at a garage sale back home in Anchorage. It was $150 and the seller said it was more than 100 years old. She bought it for me and this weekend Stephen moved out the old dresser and moved in the really old dresser.

I just love it. It’s everything I wanted in a dresser. Stephen added his manly jewelry box and his vintage stoplight.

He even made a hubby craft! Check out the homemade cork board!

Homemade Wallet

In high school I used to sew wallets for my close friends. I modeled them after my brother’s ’80s velcro wallet he’d left behind when he moved out. My wallets were hastily made, often crooked, but they were made with love and I always stitched my friends’ names or initials on the overflap.

Fast forward more than a decade. I’m starting to get back into sewing and I’m about to leave on a trip to New York. I purchased at the thrift store a red, watermelon slice-shaped sling purse and I couldn’t fit my checkbook wallet inside. So I decided to make one.

Making a wallet takes some planning. You have to know when to sew what so you aren’t left with unsewable raw edges. I like to map out what I’m going to do and when I’m going to do it. I use construction paper and cut out all the wallet’s components and make sure I leave enough seam allowance to still fit credit cards in the slots (I failed on the left-side slots as you can see below). I lay out my paper wallet so I can physically see how the wallet is assembled.

My wallets have a long pocket down the middle for bills and two pockets inside which have credit card slots sewn on top of them. They velcro close so I have to sew the velcro on first since I can’t sew it when all the pockets are assembled (you’d be sewing the pockets closed).

First I iron interfacing to all the wallet pieces. For the main body of the wallet I use heavy interfacing and for the pockets and slots I use lighter weight interfacing.

Next step is to turn down and sew the top edges of the credit card slots. Iron, iron, iron! It’s the only time I ever iron is when I am sewing. It makes crisper edges and everything is easier when you iron.

Next you turn under and sew the edges of the inside pockets. I like to baste all the inside components together before the next step, which is to turn down and sew the long inside edge of the pocket.

You can see in the wallet above that I skipped a step and had to hand sew the right-side pocket closed. I failed to sew this down before sewing the outside to the inside. Too late once it was flipped!

Then only other thing I’d do differently when I sew the outside to the inside is instead of leaving an open seam and hand-sewing it shut, as I would a pillow, I should just leave the whole top edge of the wallet open and then turn it under and sew it down once it’s right-side out.

Rose Blossom Jelly

It’s summertime in Alaska and the wild roses are in full bloom. Last week my friend Kelly and I tried to make dandelion jelly and we added some wild roses on a whim. Unfortunately we didn’t follow the pectin directions so we ended up with dandelion syrup.
We weren’t discouraged and we tried again, but this time we just used rose blossoms. What we came up with was a delicate, sweet, fragrant treat that we can’t wait to spread on toast for the rest of the year.
Here’s how we made it.
Ingredients:
1 quart tightly packed wild roses, free of pesticides
4 Tbs. freshly squeezed lemon juice
4 cups water
1/4 cup edible rose water (found at specialty grocery stores)
7 cups sugar
1/2 tsp. butter
2 packets liquid pectin
1-2 drops red food coloring (optional)

Directions:

Pick the entire bud of each rose. Try to pick buds that are free of bugs. Rinse roses and remove any dirt. Reserve 8 whole buds for garnishing. Place roses in a saucepan with the water and rose water. Bring to a rolling boil then remove from heat and let sit for 10 minutes.
Meanwhile, bring a gigantic stockpot of water to a boil. This is for the sealing process.
Strain the rose liquid into a quart-sized measuring cup using a wire mesh strainer. Press the flowers with a wooden spoon to get out as much liquid as possible. Stir in the food coloring. Measure exactly 3.5 cups of the liquid and pour back into saucepan. Stir in the lemon juice, butter and sugar and bring mixture to a rolling boil, stirring frequently.
Once liquid is at a rolling boil that doesn’t stop bubbling if stirred, quickly stir in the pectin packets. Return to a full boil for exactly one minute, stirring constantly.
Remove from heat and quickly ladle liquid into jars, leaving 1/8-inch space from the top. Wipe the rims and threads with a damp cloth to remove excess liquid. Lightly set a rosebud on the jelly before sealing. Make sure the jar tops are totally dry. Seal the jars tightly.
Place the jars in the giant pot of boiling water and boil for five minutes. Remove jars and set them on a kitchen towel. Let cool unrefrigerated for 24 hours. Jars will keep for one year if sealed and three weeks once opened.

Thrift Finds 5 — Any Suggestions?

I’m not one to dress like a hipster. In fact, I very much enjoy poking fun at hipster men and women, what with their floppy hats, floral skirts and oxford shoes.

What I’m trying to say is I bought some little oxford shoes for $1.25 at the Salvation Army and I don’t know what to do with them.

I don’t know how to wear them. I could try and be a hipster poser, I don’t mind that at all. I feel seriously funny when I wear them with a skirt above the knee. I don’t like how skinny jeans look on me — I feel like a mom. Capris make me feel short since my legs are already kind of stumpy. Am I not cut out for cute little oxfords? Any advice would be greatly appreciated.

Thrift Finds 4

While in New York last month Stephen and I did a lot of thrifting and antiquing. We found lots of awesome clothes and shoes, but nothing that needed to be blogged about.

While surfing Craigslist last week, I found an ad for a new thrift store. NEW THRIFT STORE. That’s my favorite statement. I had to check it out. It’s called Yours, Mine and Ours and it’s on Arctic and 70th.

It’s an odd store. It almost looks like someone emptied his storage unit and put prices on everything. Turns out the owner goes to storage unit auctions and then empties out those units and puts prices on everything.

Lots of grungy clothes, not worth digging through, lots of records and old Martha Stewart magazines. Christmas decorations in June, pawn shop-type gold jewelry, DVD’s, and knick-knacks. Great knick-knacks, in fact. Check out this ’60s handmade doll furniture. It displays my homemade jewelry perfectly.

Also irresistible was the collection of tins for sale. I managed to pare my selection down to two:

Thrift store score!