Welcome to Alaska Knit Nat! I was born and raised in Anchorage and have always had a passion for making useful things, whether they are eaten, knit, crocheted, sewn or randomly glued and assembled. I received my bachelor’s degree in French and journalism from the University of Alaska Anchorage and work almost full time at a nonprofit and way over time as a mom.
Every time I travel to Mexico I can’t resist buying a meter or two of brightly colored oilcloth. You see it everywhere down there, mostly as cheerful tablecloths. I use it for just about everything. I cover cans with it, I reupholstered my dining chairs and I love to use it for coin purses.
I have a simple pattern for my coin purses. You could use any fabric you like, but since the oilcloth is so thick I don’t have to use any stabilizer. That cuts down on project time, which is good because I have a really short attention span for sewing.
Oilcloth coin purse: a free tutorial from Alaska Knit Nat
Materials:
2, 6×8-inch pieces of oilcloth
one long, nylon zipper (9 inches or longer makes it easier)
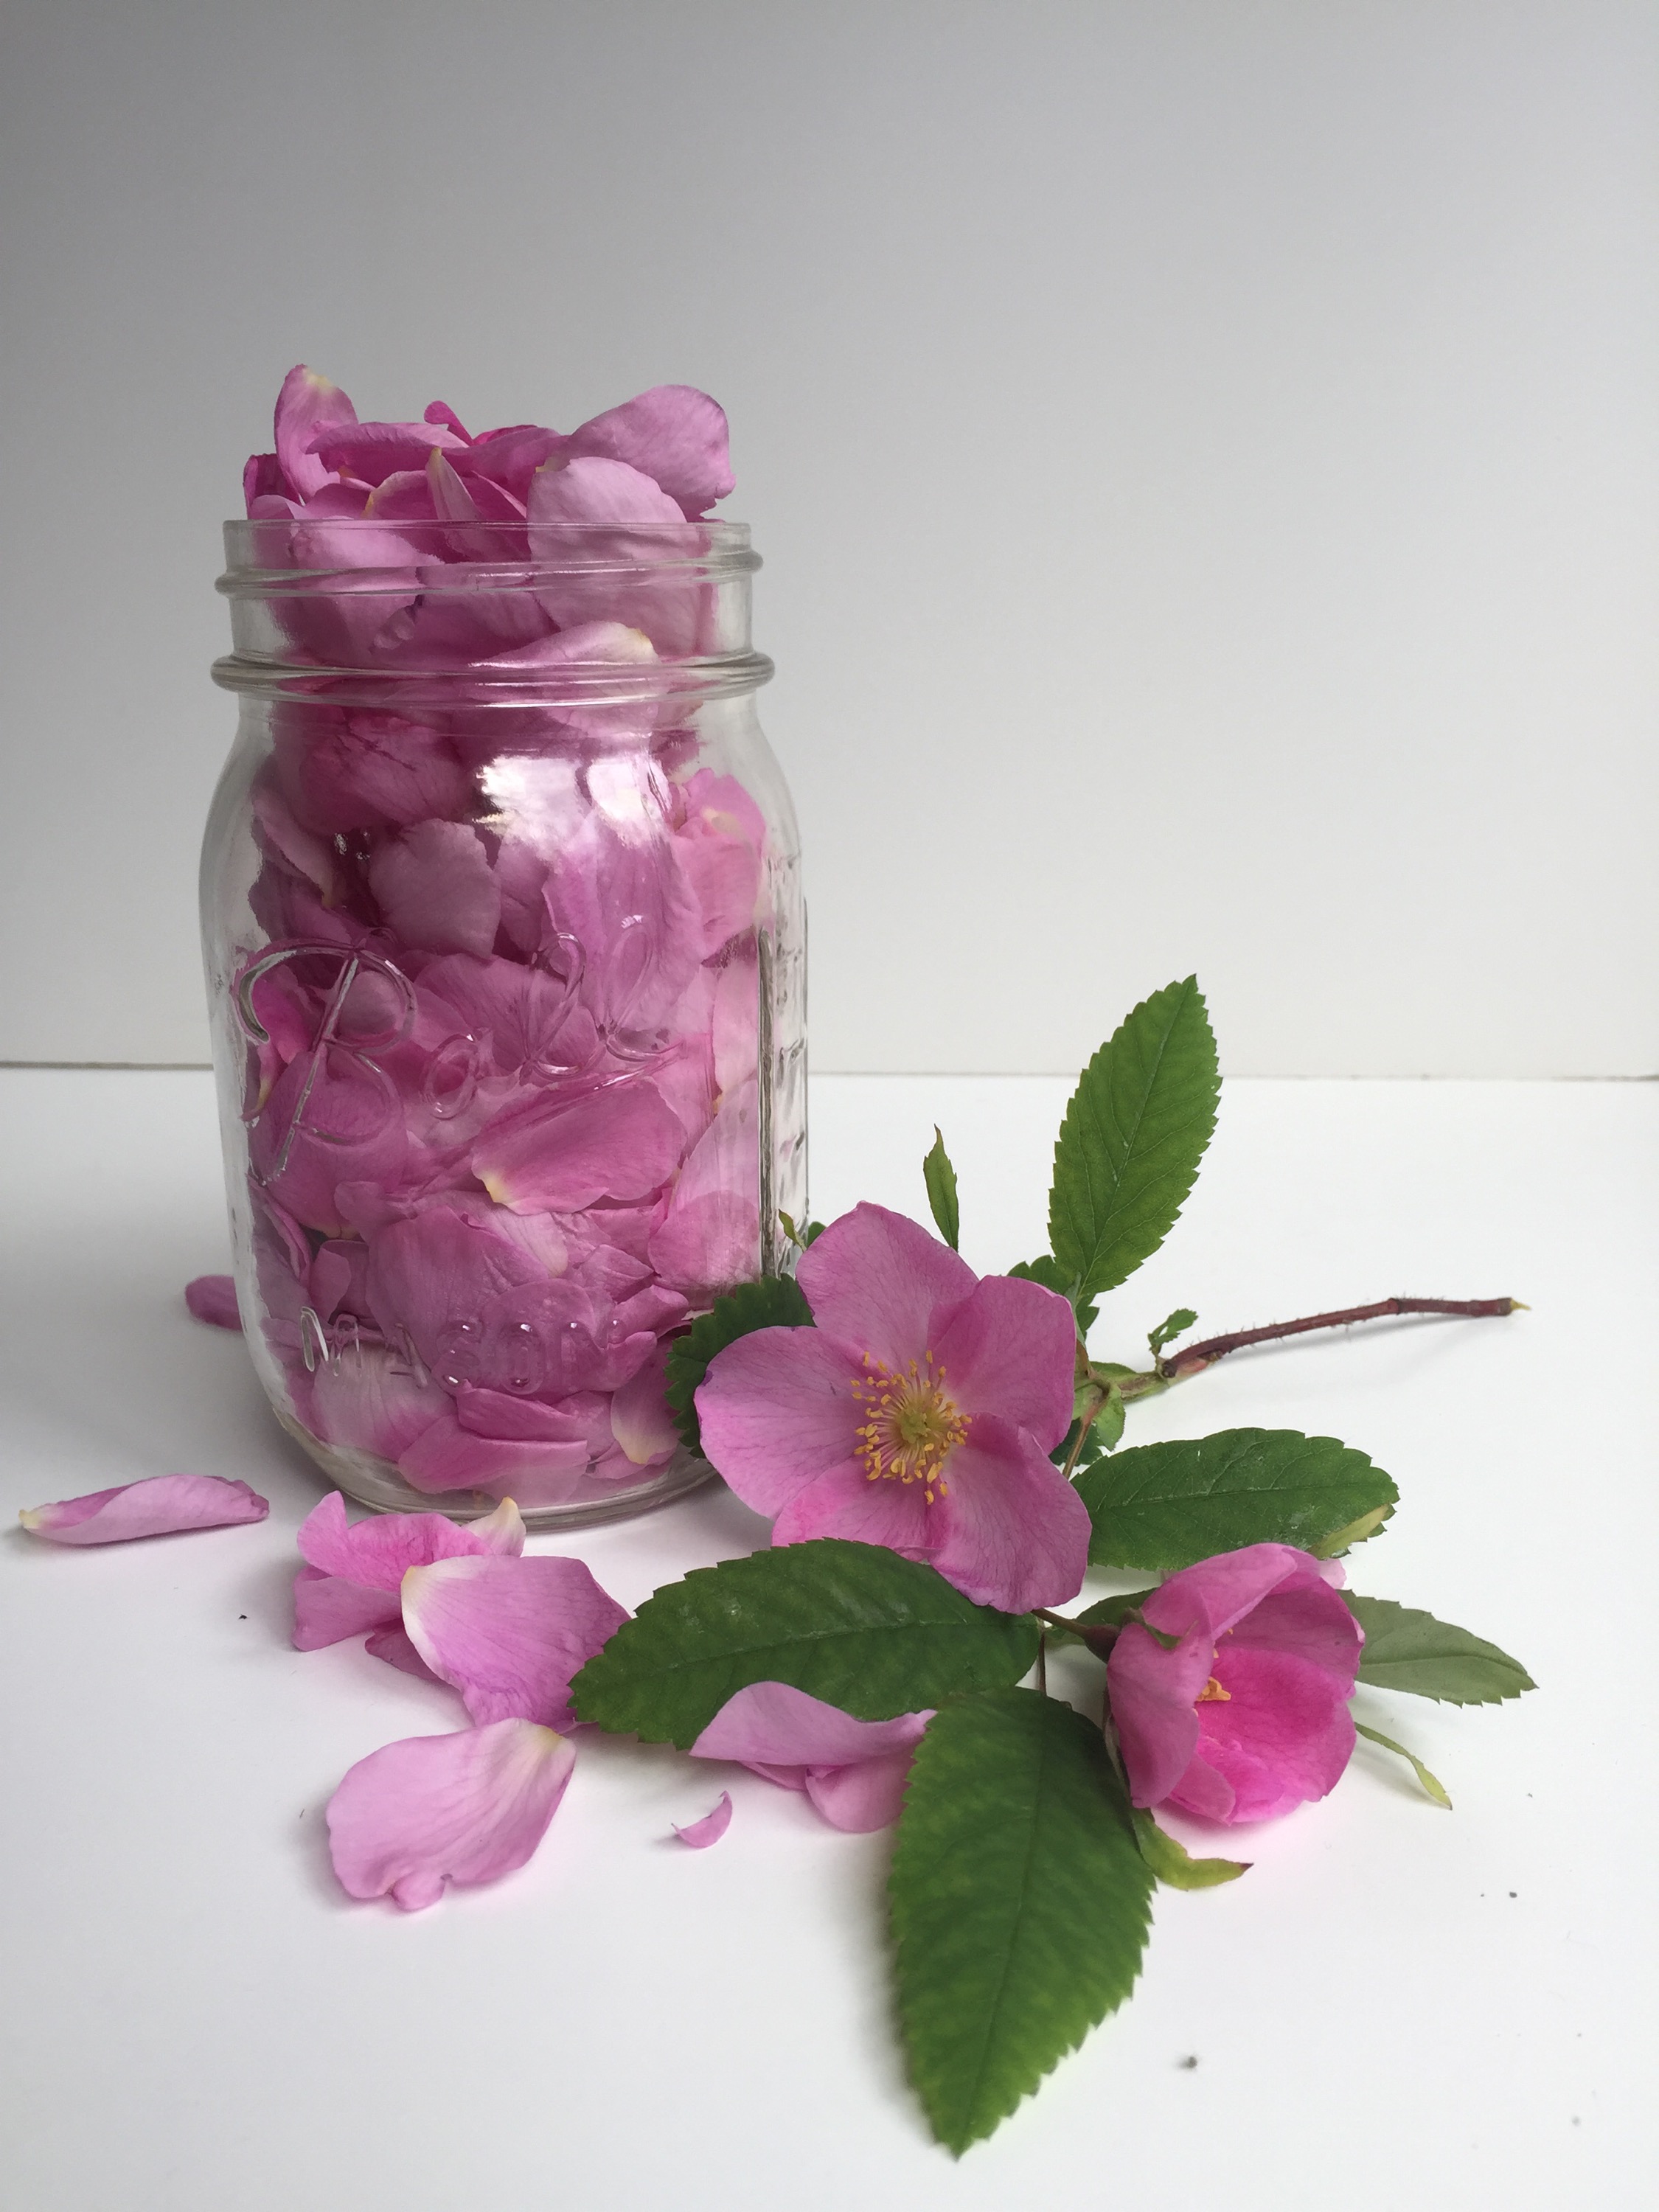
As part of my personal challenge to forage at least one edible plant a month this summer in Anchorage, I decided to revisit wild rose petals. Several years back I collected these perfectly pink petals and made a just-OK jelly out of them. Thing is, I don’t eat jelly. I’m not a toast and jam kind of gal, I guess.
This time I opted to make rose petal syrup. It was easy to prepare and resulted in a gorgeous pink concoction that tasted as good as roses smell.
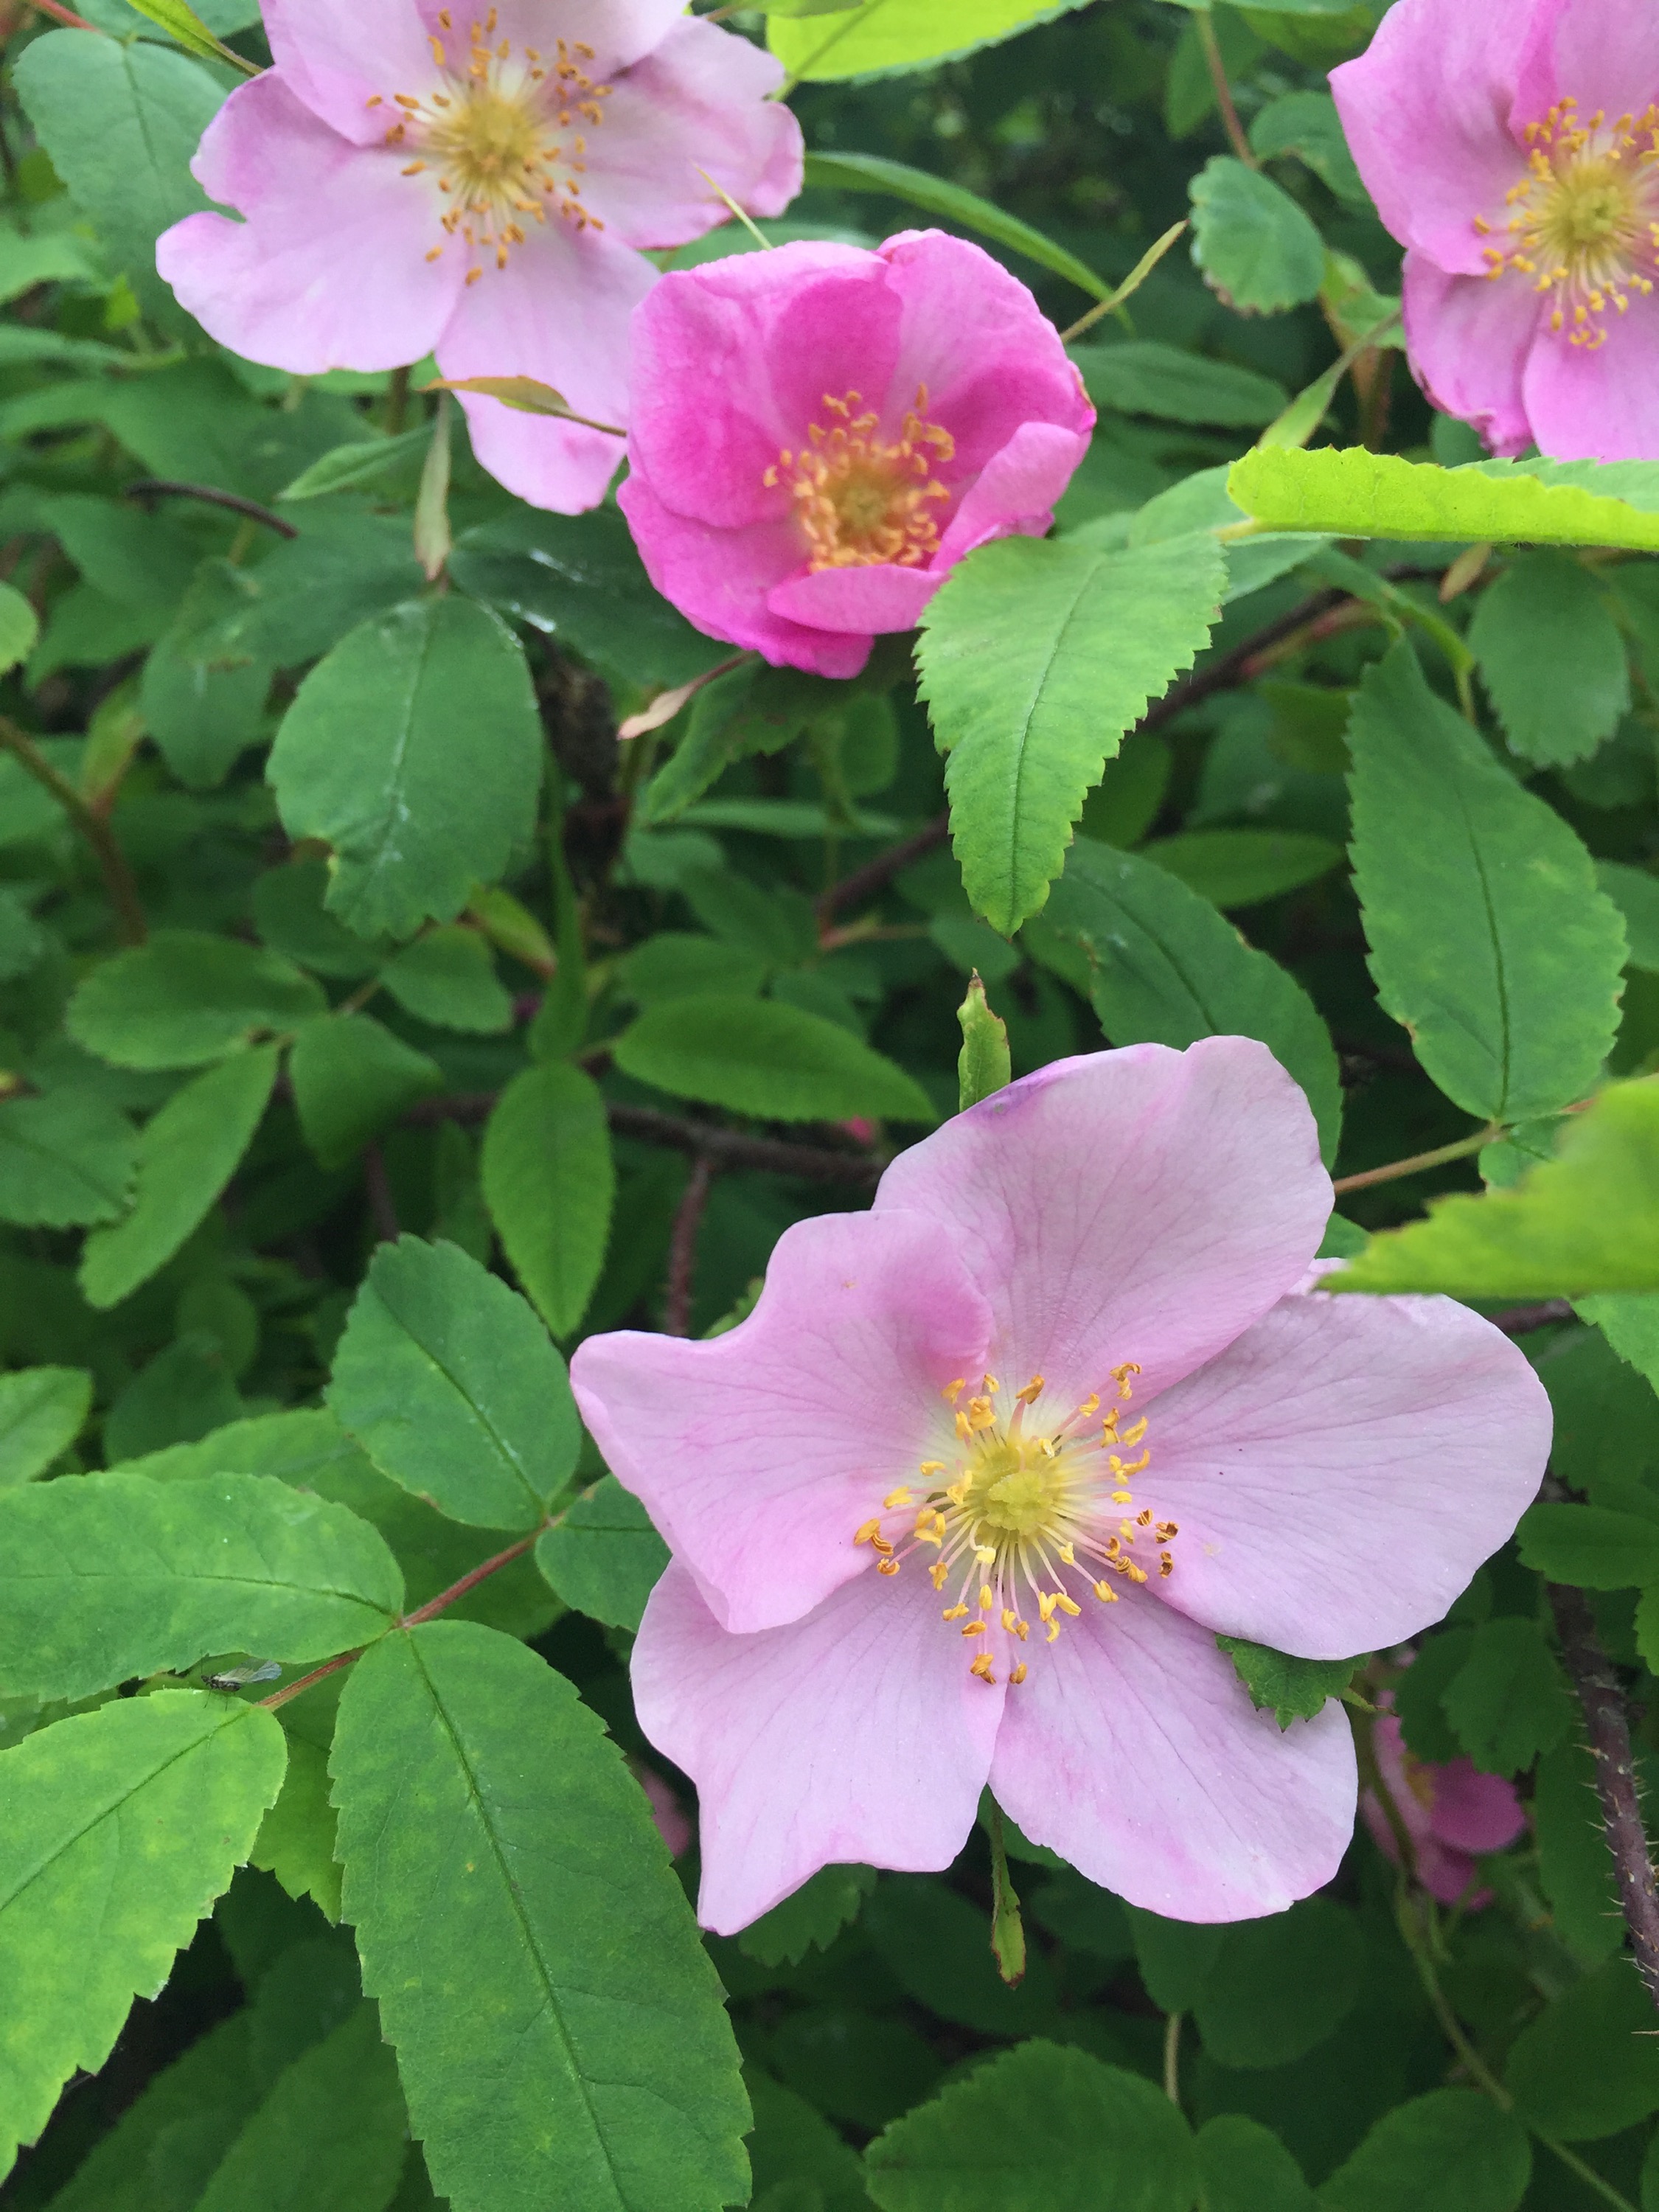
You can find wild roses just about everywhere in Anchorage in June. This bush is on the on-ramp to the Seward Highway.
The wild roses are in full bloom here in Anchorage and it’s hard not to find them. I picked petals on the side of the highway, on my street and in my back yard. They have been in bloom since the first week of June and will probably be around for another week before they fade, fall and begin to turn into rose hips (and that’s another foraging adventure!)
Rose Petal Syrup
To make one bottle of syrup I collected about 2 gently packed cups of petals. Be ready to encounter some caterpillars, bugs and spiders (I lost about a cup of petals when I spotted an arachnid creeping around my collecting jar).
*2023 update* – I realized I didn’t have a written recipe for the syrup. Here it is!
Ingredients:
6 cups fresh wild rose petals
5 cups sugar
1 quart plus 1 cup of water
2 teaspoons salt
2 tablespoons lemon juice
Fill the sink with cold water and pour in the petals. Stir them around and let the bugs and debris settle. Spin the petals dry in a salad spinner and place in a medium mixing bowl. Add 3/4 cup of sugar and muddle the petals with a potato masher.
Place the pulpy petals in a sealable container in the fridge overnight. Before cleaning the mixing bowl, scoop out remaining sugar gloop and exfoliate your hands. It’s lovely.
The next day, bring the water to a boil. Add the remaining sugar till dissolved. Toss in the petals and any pulp, lemon juice and salt and simmer on low until the color has been extracted from the petals. There’s no science to this. I think I simmered mine for 30 minutes. The liquid should be bright pink.
Turn off the heat and let the syrup cool. Using a mesh strainer lined with a clean linen dishcloth, ladle the syrup into a pitcher, pressing on the petals and tossing them as you go.
Pour into sanitized jars or bottles. Keep refrigerated. Keeps for several months.
As a lifelong Alaskan I am familiar with how unpredictable the weather is. We tend to hope for the best and plan for the worst, which is why I’ve decided to design a winter hat in the summertime.
Fourth of July in Alaska can be a bit of a downer. For one thing, the sun doesn’t really set so fireworks are pretty lame. Also, it’s sometimes cold, rainy and windy; but we Alaskans don’t let a little crappy weather get in the way of summer holiday fun.
So I’ve designed a Fourth of July hat. No one in the rest of the contiguous 48 states (or Hawaii, for that matter) would find this hat particularly useful in the middle of summer, but hey, you can be patriotic year round, right?
Old Glory Slouchy Hat — a free knitting pattern from Alaska Knit Nat
Last fall I attended a networking getaway in Homer hosted by The Boardroom called End of Summer Camp. It was a weekend full of meeting and making new friends. During that time I met Crystal and Carrie, owners of Toast of the Town event planning. I told them I was a flower lady and they said they would keep me in mind for future events.
Six months later they set me up with Charlee, a whimsical bride who wanted her flowers colorful, unkempt and carefree — just my style!
I had so much fun putting together the florals for Charlee and her fiancé Marc. I got to work with nearly a dozen different types of flowers from the most fragrant mauve garden roses to my favorite accent flower, craspedia.
I got to do something new, which I’m calling “hair flair.” Charlee had wanted hair combs with fresh flowers for the bridesmaids, but after a hair trial with another bride I discovered that the plastic combs I was using were not easy to work with. What I decided to do was make teeny flower bouquets with wire and floral tape to be pinned into the bridesmaids’ hair.
My niece and I made about 35 pieces of hair flair so the bridesmaids could pick and choose the flowers they liked best for their hairstyle. It was a lot of fun.
I delivered the flowers to Glory View Farm in Wasilla where Crystal and Carrie were setting up the most magical hootenanny.
Congratulations to Marc and Charlee and I wish them all the best!
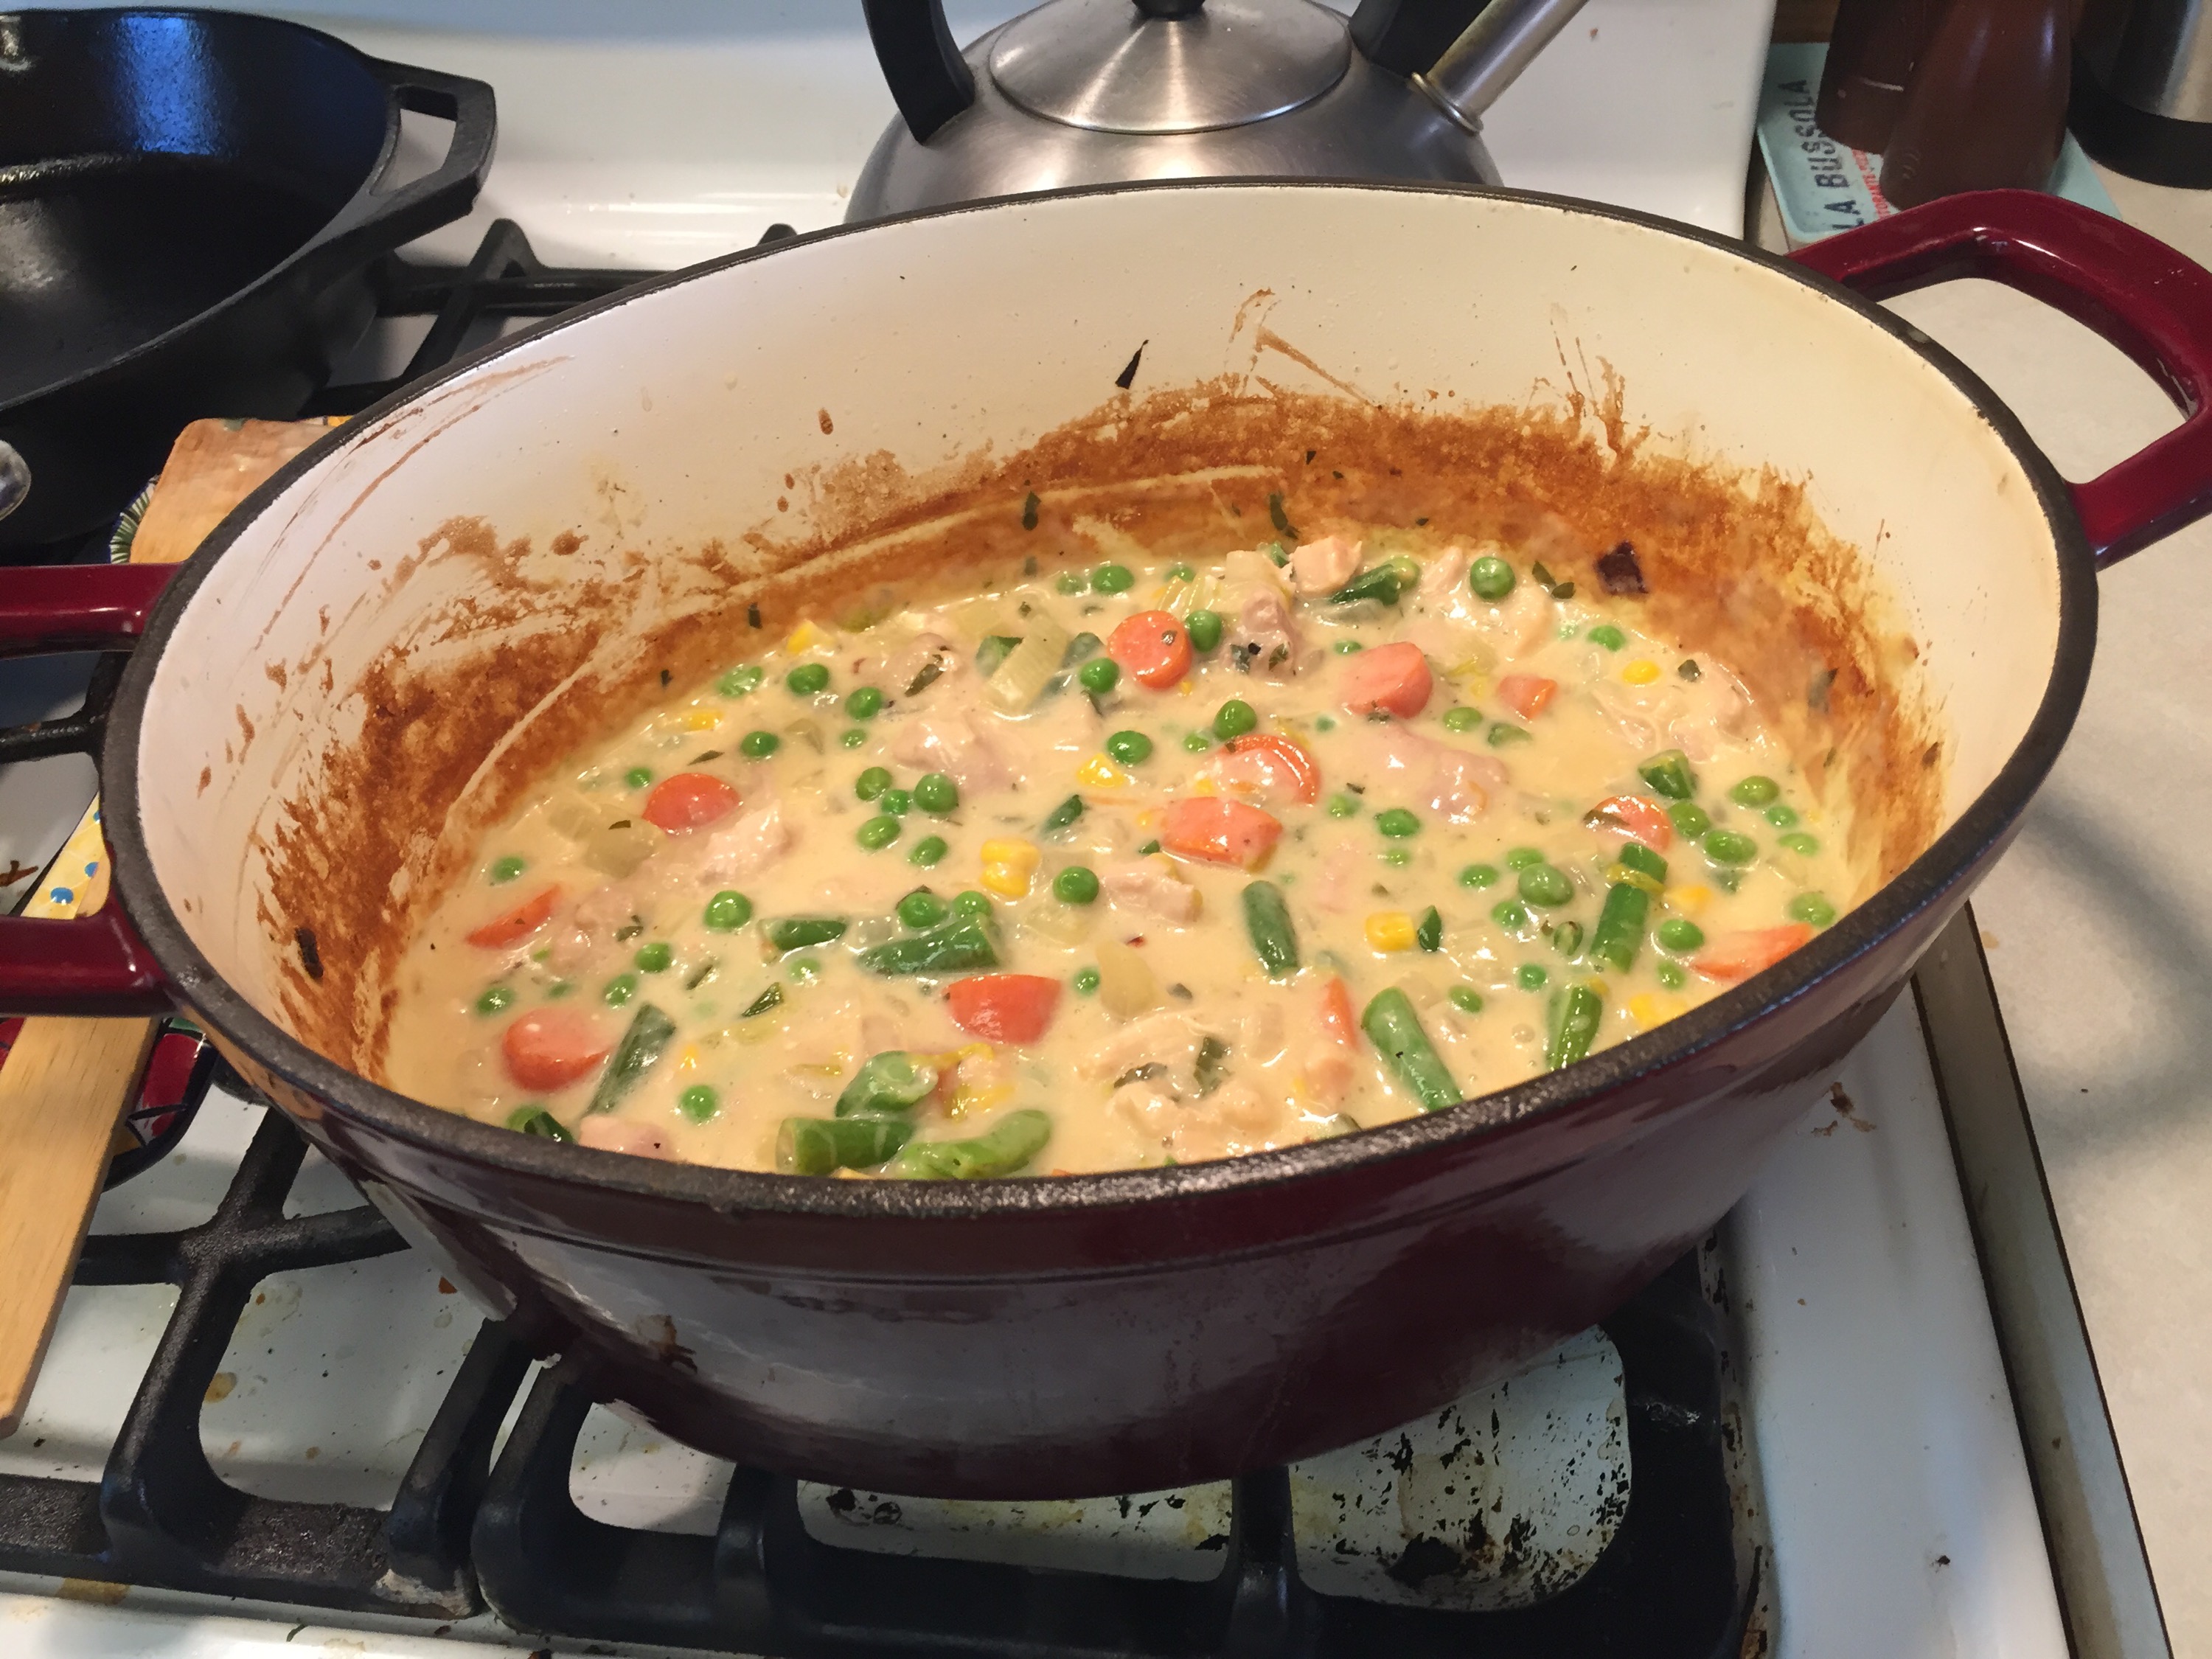
I came home from work today and didn’t want to think much about making dinner. What with eight wedding floral gigs this summer, parenting, plus my near full-time job, I have a lot of other things on my mind.
Enter condensed cream of chicken soup. I tend to avoid recipes that call for this salty, globby ingredient but sometimes I’ll make an exception.
Chicken, veggies, herbs and soup over rice or noodles is always a crowd pleaser. Comfort food at its finest.
This was simple to assemble and although it’s not quick, it requires very little effort or thought, which is perfect for today.
Chicken & Vegetable Stew-like Casserole Dinner
Serves 4
Ingredients:
2 tbs. butter
olive oil
3-4 skinless chicken thighs (breast works too)
1/2 cup flour
3 celery stalks, chopped
1/2 onion, chopped (about 1 cup)
3 carrots, chopped
1 bay leaf
2 Tbs. chopped fresh parsley
1 can cream of chicken soup
6 oz. cream cheese
chicken stock
1/2 cup frozen peas
1/2 cup frozen green beans
1/2 cup frozen peas
salt and pepper
Directions:
Preheat oven to 350 degrees F. Heat butter and 2 Tbs. olive oil in a dutch oven oven. Place flour in a pie pan. Dredge chicken thighs in flour and shake off any excess. Place thighs in dutch oven and brown on both sides, about 5 minutes total. Set thighs aside and pour out excess oil.
Add another tablespoon of oil and toss in the celery, onion and carrot. Cook until onions are soft, about 5 minutes. Add the parsley, bay leaf and cream of chicken soup. Fill the empty can with chicken stock and pour that too. Break up the cream cheese with your fingers and add to the pot. Add salt and pepper to taste.
Nestle the thighs into the sauce and place into the oven. Take out and stir the pot every 20 minutes or so to prevent any burning.
After 45 minutes in the oven, stir in the frozen veggies and break up the thighs with a fork. Place back in the oven and bake another 30 minutes.
Remove from oven and break up any other chicken pieces. Remove bay leaf and serve over egg noodles or brown rice.
After my less-than-stellar morel hunt last weekend I needed to forage something more gratifying. It’s the perfect time for spruce tips. Pretty much all the spruce trees in town are boasting bright green tips with brown papery casings. I ventured as far as my yard to collect a pound of them. They required very little processing; just remove the papery casings and you’re good to go.
I’ve never been quite sure what to make with these edibles. I’m not much for tea or jelly. I wanted something savory.
I first referenced the Goddess of Alaska Forests, Laurie Constantino, and made a delectable dip with mayo, Greek yogurt, lemon juice and minced spruce tips. It was perfect for the garlic bread crusts I had leftover on my dinner plate last night.
Recently a friend of mine told me about a Juneau-based blog that’s all about foraging Alaska edibles. There was an intriguing recipe for spruce tip gnocchi. I had to try it.
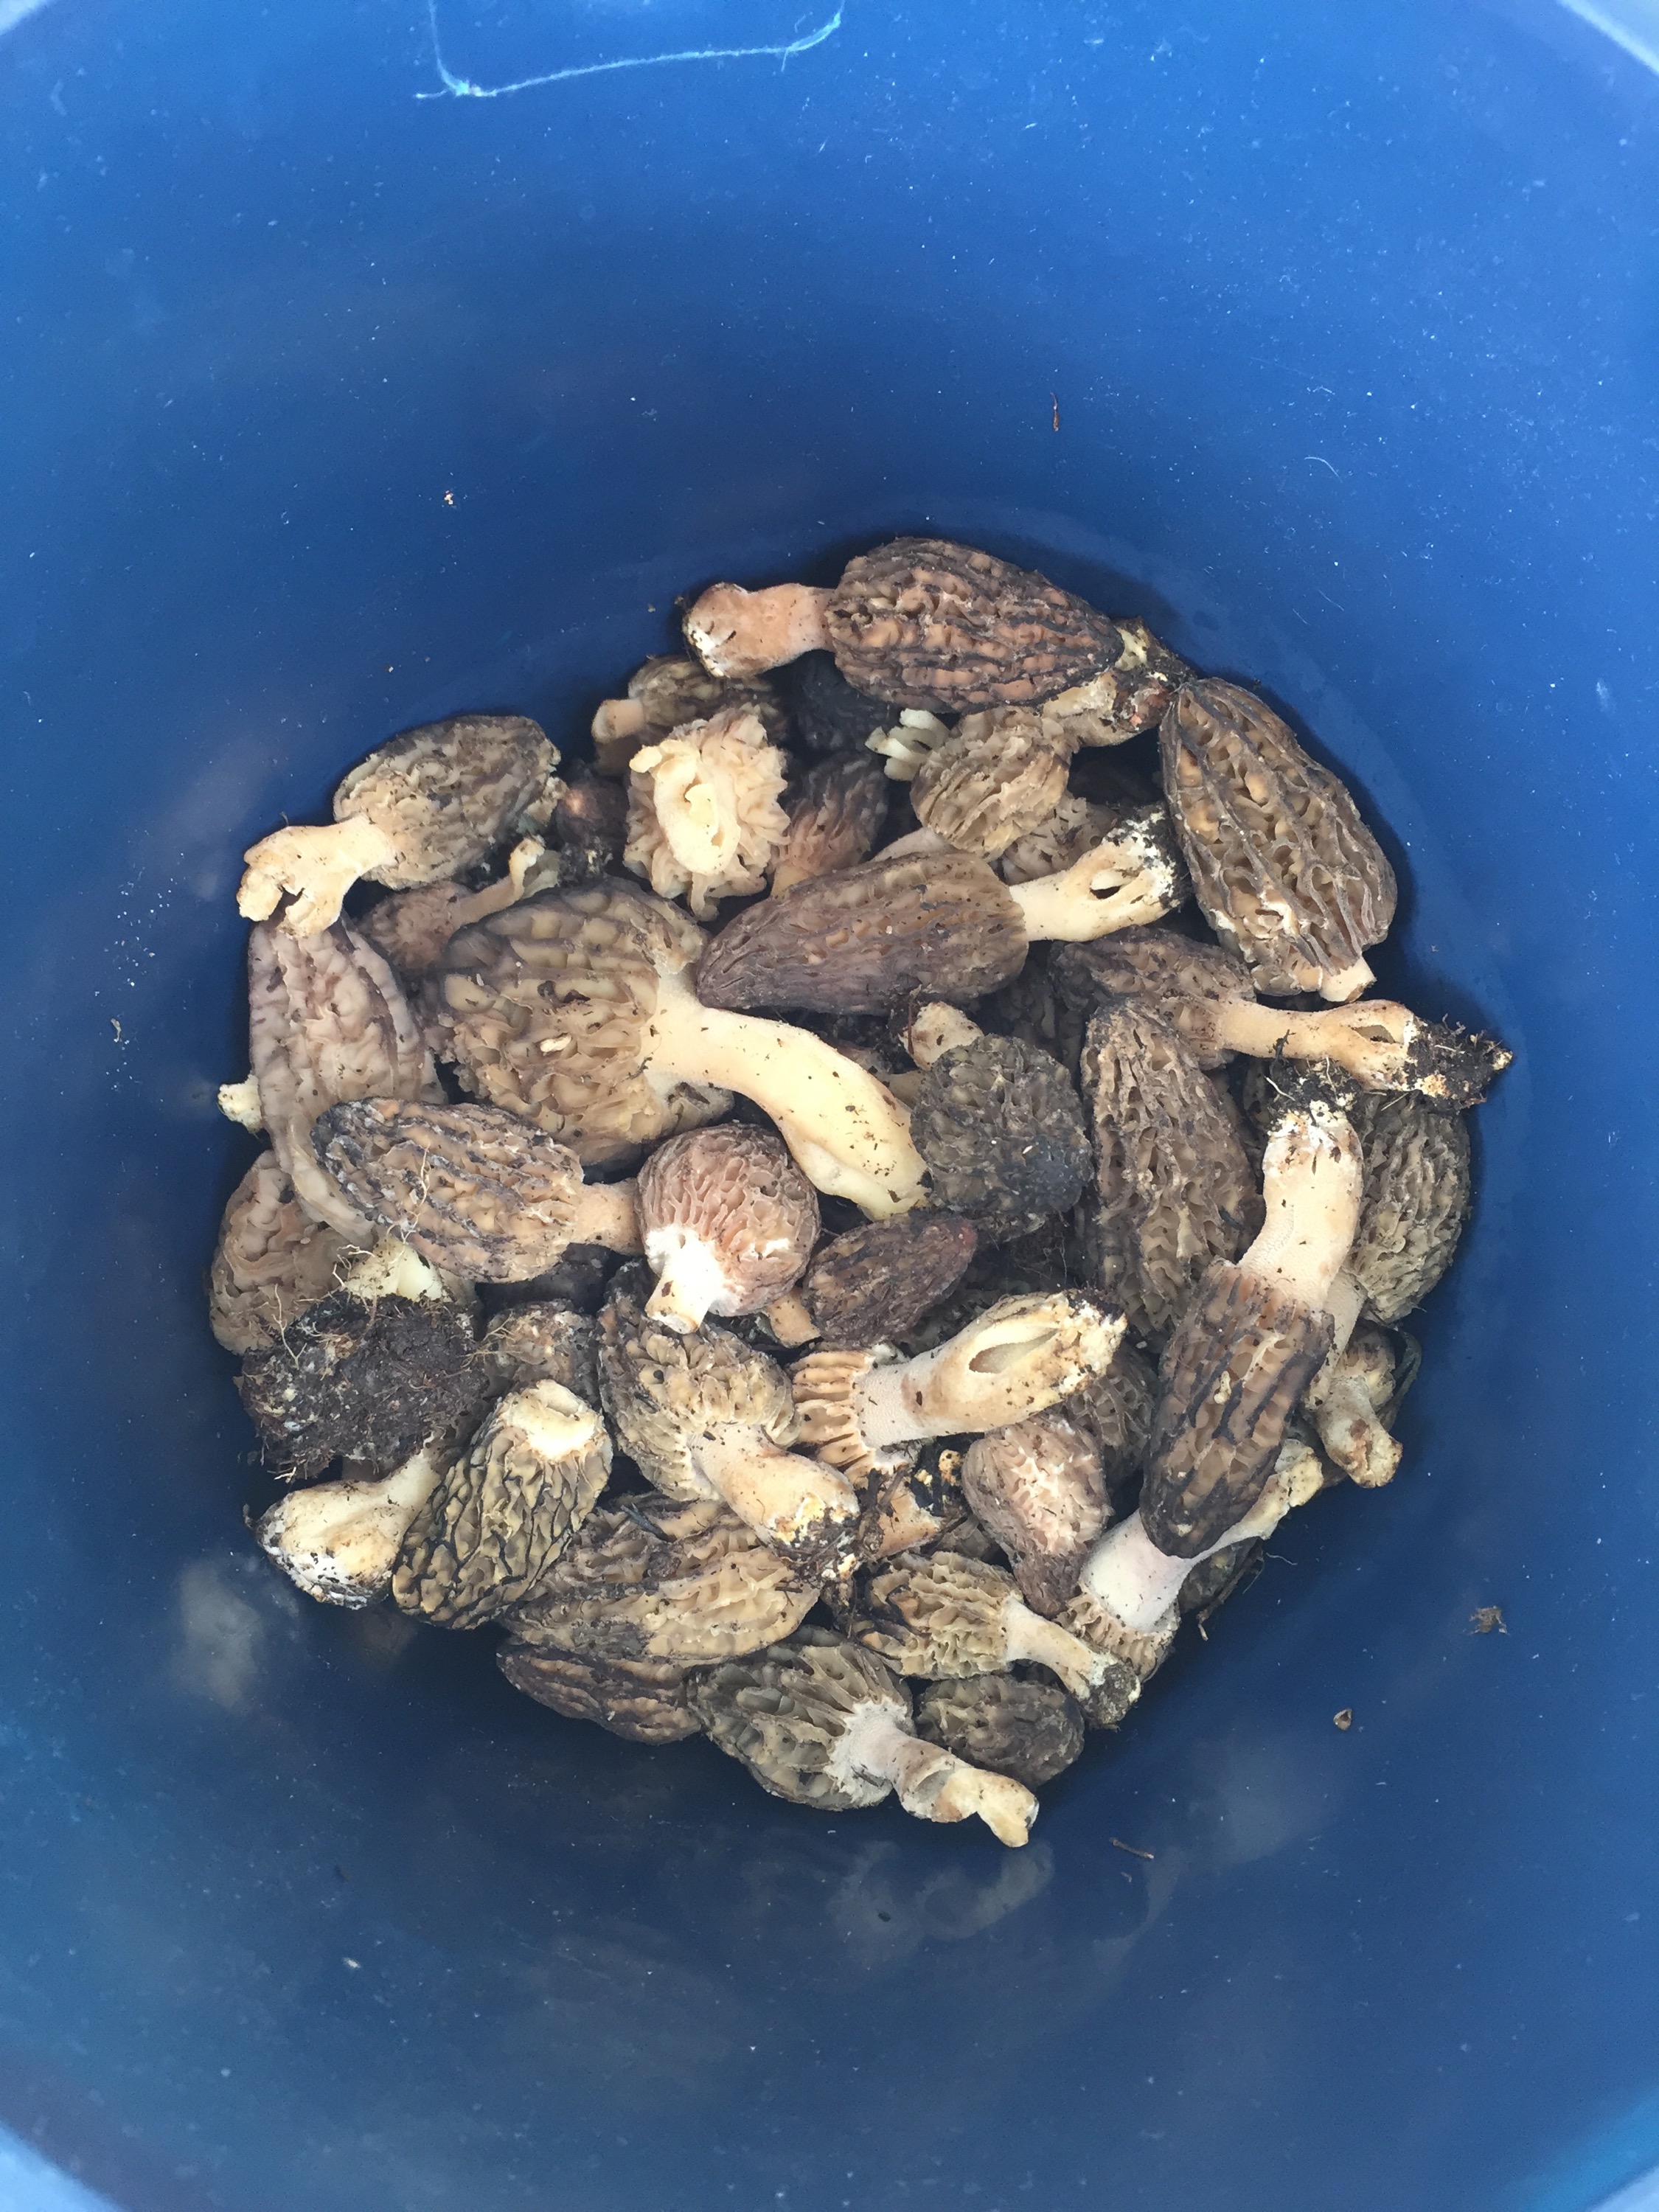
For my third segment of “Harvesting Anchorage,” I decided to go beyond city limits and venture out to the Kenai Peninsula in search of morel mushrooms.
My family and I have always been avid boletus mushroom hunters, but we’ve never looked for morels. I heard they tend to pop up in areas where there have been forest fires. After last year’s Funny River fire consumed more than 155,000 acres of land, I decided to keep an eye on this area through a secret informant. Ok, I have a friend who lives out there and is also a gatherer like myself. She gave me the news last week that the morels were up so my mom and I set out on a tiny road trip to Soldotna in search of these pristine, delicate, flavorful fungi.
Much like boletes, my friend told us morels tend to grow near birches. We pulled off to the side of Funny River Road and hiked about 1/4 mile into the burned spruce tree forest in search of patches of birch trees.
The hunt wasn’t wildly successful, but I was thrilled even to find a few because these little suckers are hidden! Unlike boletes, which stand prominently and proud, morels look like burnt spruce cones and are about the same color as the earth. I had to get low to the ground to see any at all, but on the plus side, when I found one morel I usually found at least two more in the same area. It truly felt like a treasure hunt.
False morels look really different from the real deal.
We immediately spotted some false morels, which looked completely different from the real things. Most of the real morels were pointy and brown. The false morels looked like misshapen blobs and were much lighter brown, like burnt sienna.
We spent a good three hours yesterday and today hunting. There was competition. Lots of cars were parked along the road and I saw one fellow with a tall laundry basket fashioned into a backpack that was half full. Another man had a full trash bag of morels, so it was obvious there were some experienced hunters among us.
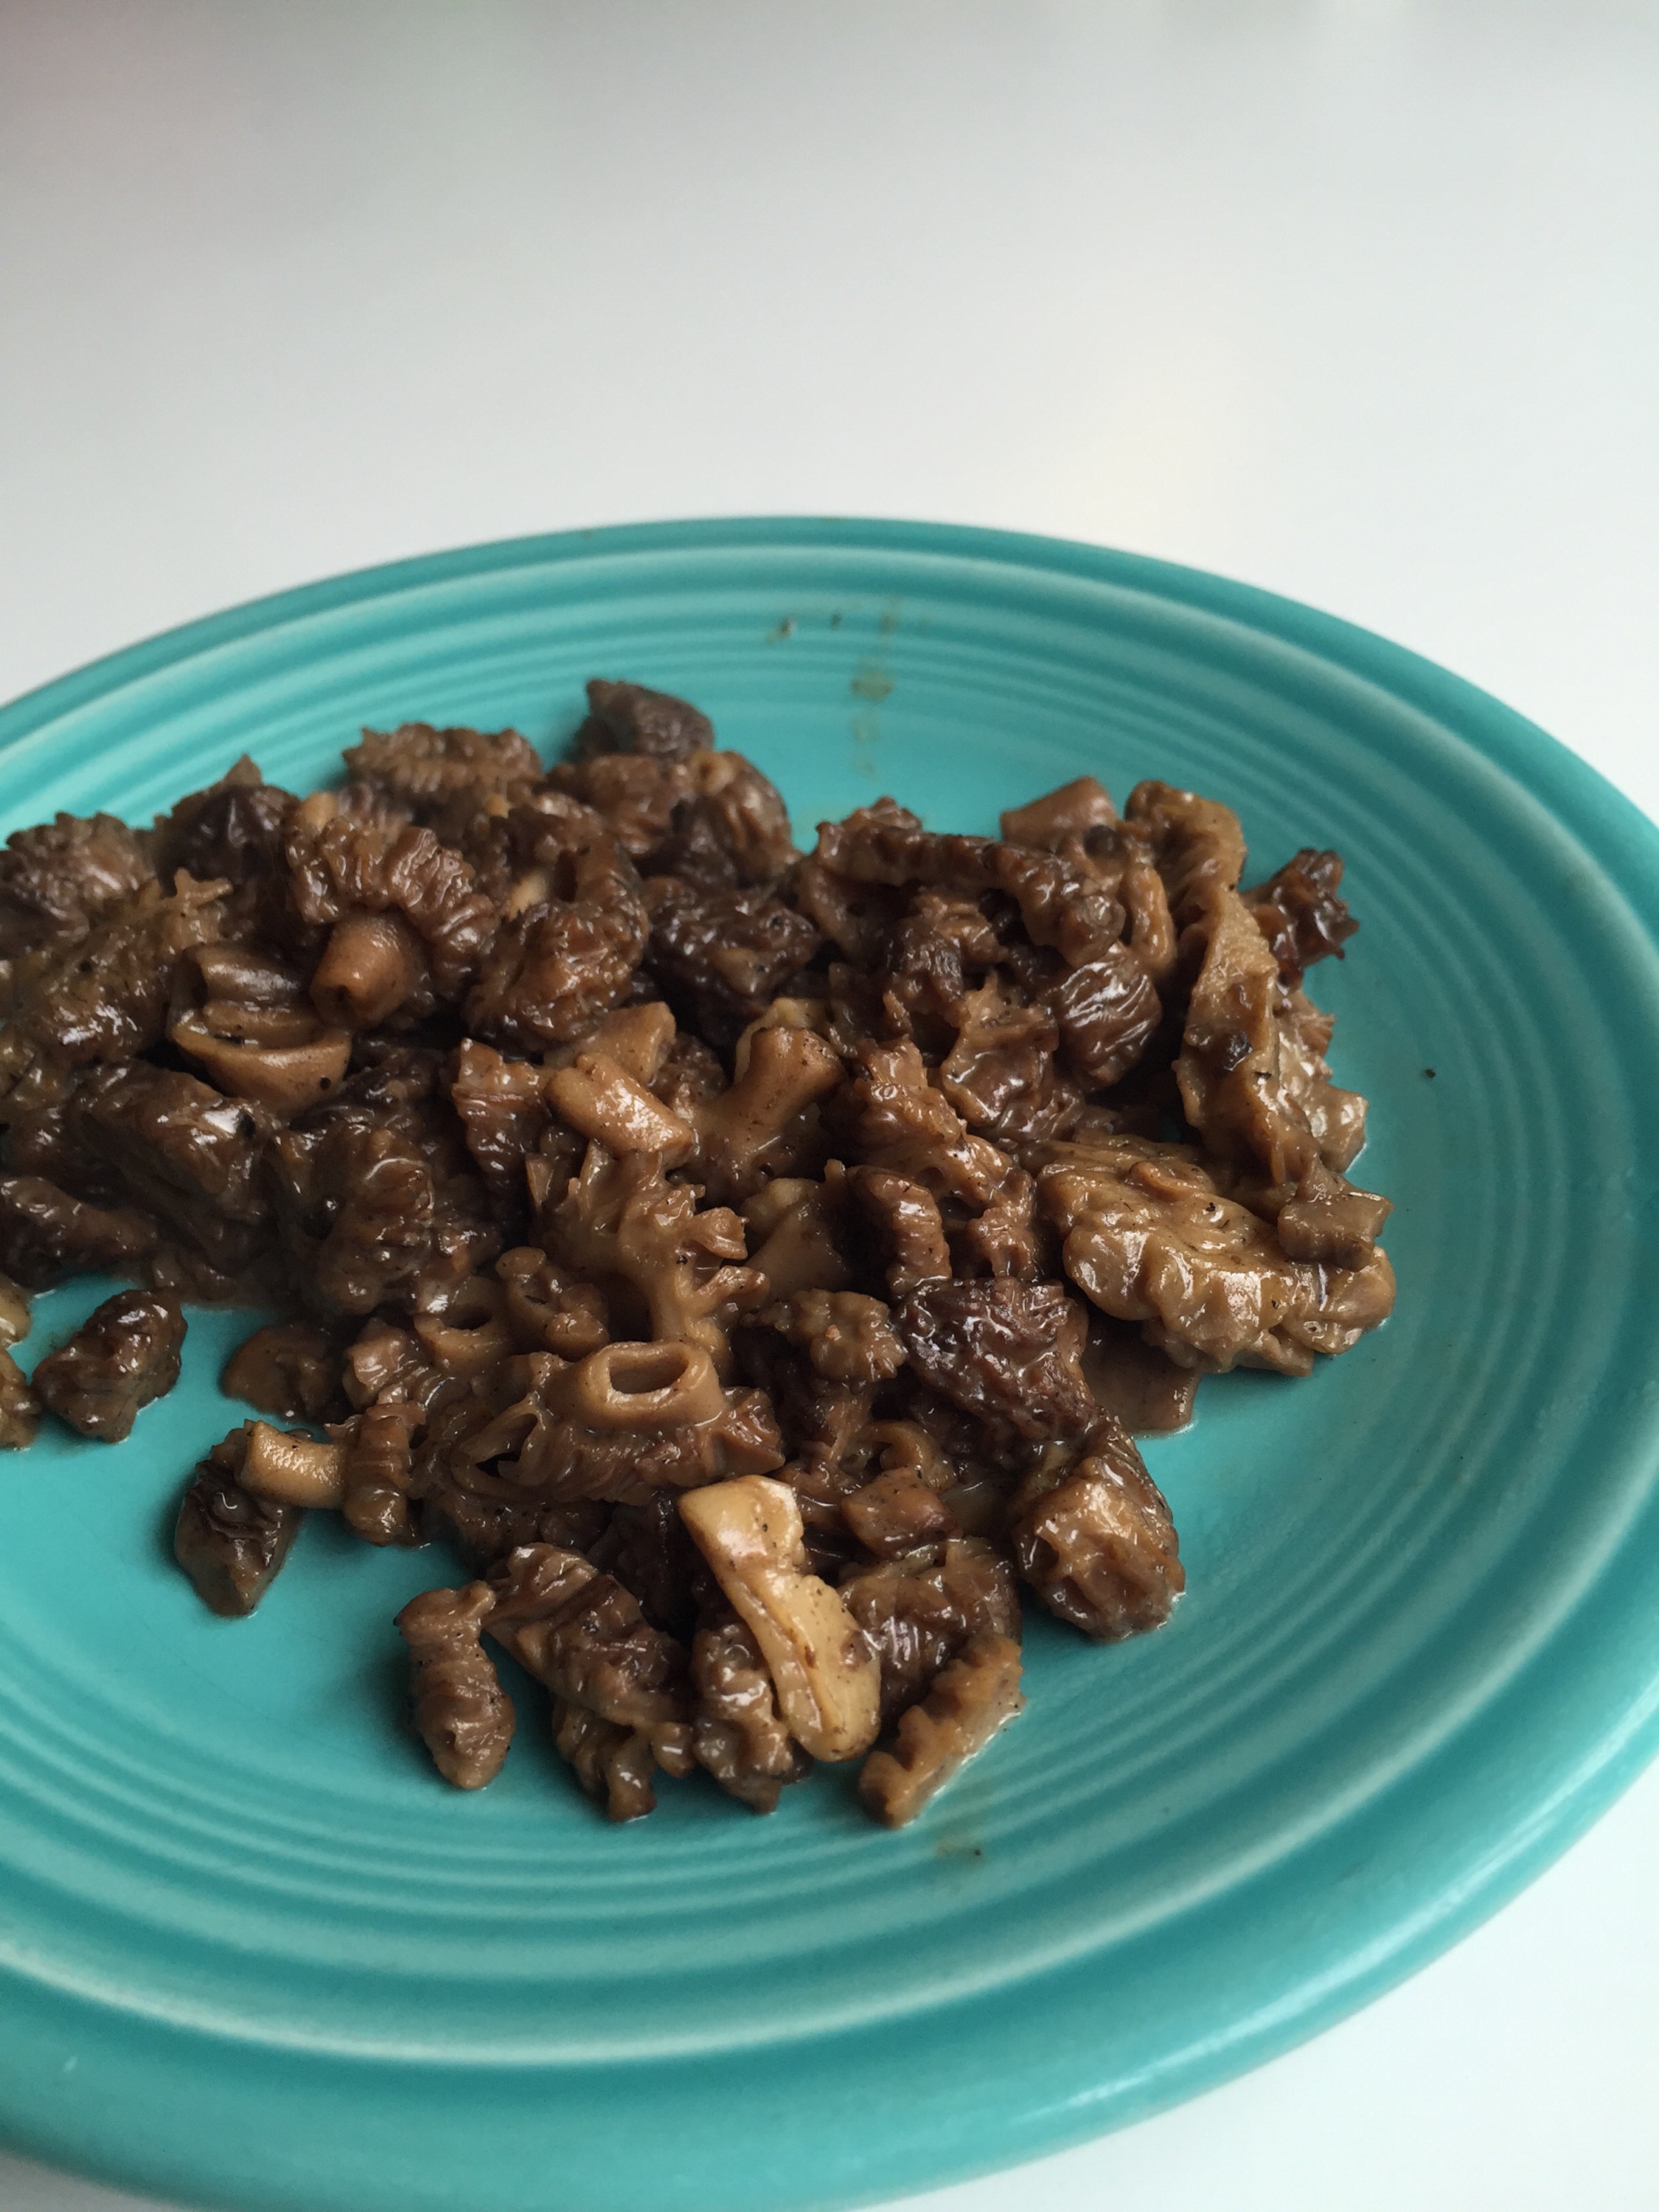
I’m happy with our small haul. I sent my mom home with the majority of our pick because she has the dehydrator. I took home a couple of dozen, cleaned them, sliced them and sautéd them in butter. They had an earthy, mushroomy flavor (surprise!) but an altogether different taste from boletes.
I’ve heard morels grow here in Anchorage and I’m now confident in what they look like so I can add them to my list of foods to search for when I’m out in the woods.
Have you ever picked morels in Anchorage? Tell me about it!
As Part Two of my summertime Alaska blog series, I tried to harvest a few things such as fiddlehead ferns and fireweed shoots, but I only successfully cooked something using devil’s club.
You’ve probably encountered devil’s club in any Alaska forest. It’s pretty much the last plant you want to encounter because it’s covered top to bottom in sharp thorns that can easily embed themselves in your skin; but in the spring the plants produce short buds covered in premature, soft thorns. This part of the plant is edible. Is it good? That’s what I aimed to find out.
I embarked on my devil’s club hunt on a sunny spring day after the birch trees had started budding. I had no trouble finding a thicket of devil’s club up on the hillside. They all had 1-to-3-inch buds emerging from the dry, wheat-colored stalks. I used a gardening glove to pluck them and collected them in a bucket.
This one isn’t quite ready yet. There should be an inch or two of green coming out of the brown sheath.This one is ripe for the plucking!
After getting stuck with thorns a few times I felt as though I had enough to work with. On the drive home my car started smelling like an Alaska forest. The devil’s club buds had a spicy, celery-like scent.
In an effort to spiff up some of my past recipes, I made this winner dinner tonight and have decided it shouldn’t be called “Lazy Lasagna” but rather, “Skillet Lasagna.” It is much easier to break up the lasagna noodles and not deal with slippery, boiling hot noodles and layering and all that, but it still takes some time to make this recipe and it’s still totally worth it!
***
My family requested lasagna for dinner yesterday, but I didn’t get home till 5 p.m. so it would have been a mad dash to get lasagna on the table by 6:30.
Here’s what I made instead. Although it’s about the same ingredients as lasagna I didn’t have to take the time to layer everything out. I just threw it all together, topped it with cheese and stuck it in the oven. Easy peasy.
Skillet Lasagna
From start to finish: 1 hour 30 minutes
Serves 6
Ingredients:
12 ounces lasagna noodles
2 tablespoons olive oil
8 ounces button or crimini mushrooms, roughly chopped
1/2 teaspoon salt
1 pound loose Italian sausage
6 ounces baby spinach, roughly chopped
3 cups marinara sauce
1 cup shredded mozzarella cheese, divided
1 cup freshly grated parmesan cheese, divided, plus more for serving
Directions:
Preheat oven to 375F. Bring a large pot of salted water to a boil. When the water boils break up the lasagna noodles into irregular pieces and add to the pot. Cook according to box instructions, about 12 minutes. Drain and set aside.
While the water boils and the noodles cook, heat the olive oil in a large cast iron skillet. Add the mushrooms and salt and sauté until some of the liquid has evaporated, about 7 minutes. Add the spinach and cook until spinach is wilted, another couple of minutes. Transfer mushrooms and spinach to a bowl and set aside.
Without cleaning the pan, add the sausage and break it up with a wooden spoon. Cook until sausage bits start to brown. Add the sauce, mushrooms and spinach. Combine well.
Add the noodles, 1/2 cup mozzarella and 1/2 cup parmesan and stir till the noodles are well coated. Top with the remaining cheeses, cover and bake for 35 minutes. Uncover and bake another 10 minutes. Remove from oven and let cool 10 minutes. Slice up like a pie and serve with additional grated parmesan cheese.
This summer my goal is to gather or harvest at least one plant a month. Usually I gather fiddlehead ferns and fireweed shoots in May, pick wild strawberries in June (I can’t disclose my secret spot!), hunt for boletes in the mid/late summer and harvest berries in the fall.
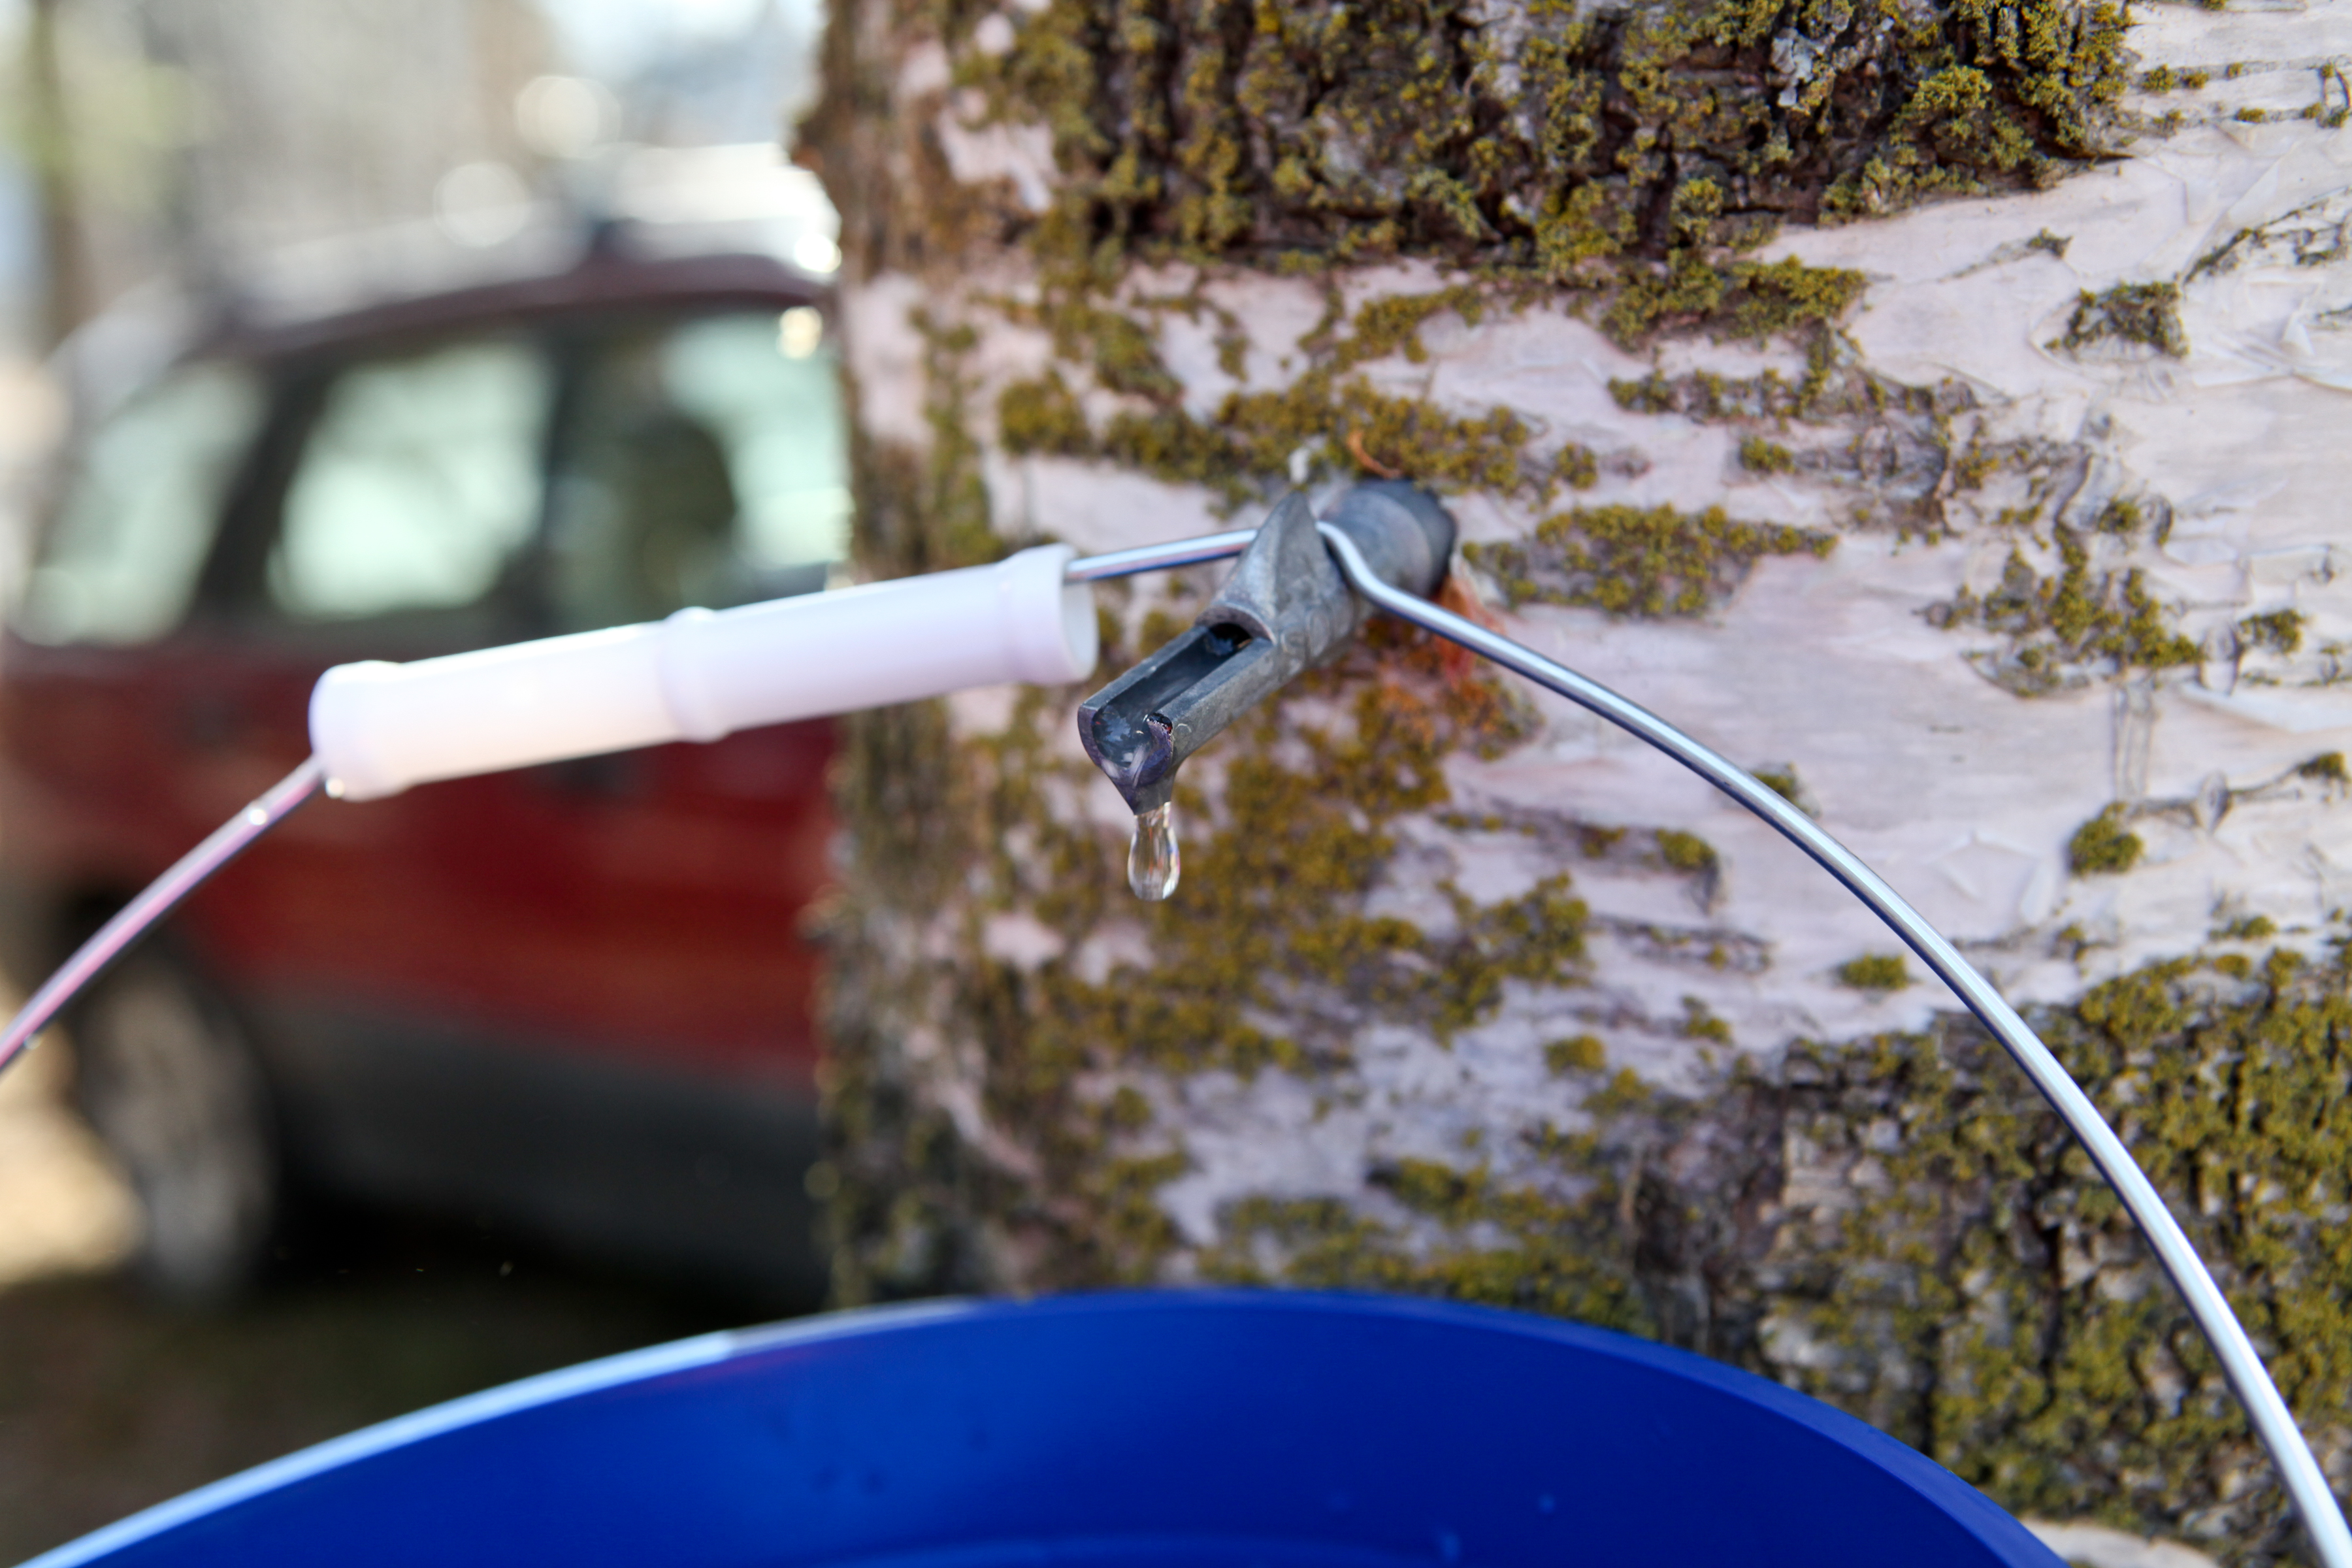
When UAF Cooperative Extension Service tweeted about birch tree tapping in mid-April, I knew I had to start my harvesting season early. I texted my good friend Ivan, knower of all things apian, and he told me I could find spiles, or birch tree taps, at Alaska Mill & Feed. I have several big birches in my yard, so it was worth a try!
With just a little hardware and a whole lot of stove time, you can have your own homemade birch syrup (I still haven’t reached syrup state, but you’ll see what I came up with in the meantime if you read below). I didn’t take step-by-step photos only because they would be pretty boring. It’s a lot of boiling. Follow this handy guide for a complete explanation.
Please keep in mind that I’ve never done this before, so I have no idea whether I’m doing it incorrectly. The instructions below is what worked for us. Let me know if you use a different/better technique!
Birch Tree Tapping in Anchorage
Materials:
2 or more 7/16″ birch tree spiles ($5.99 each at Alaska Mill & Feed)