I love my mama

My mama turned 60 this week. It’s hard for me to fully understand this as she’s got the spirit of a 20-year-old. She went salsa dancing twice this week and she always makes room for yoga and aerobics (she did, after all, found the aerobics association here in Anchorage in the mid-80s.) She plans on staring up pilates  soon too.

But that’s not why I love my mother. She is an exceptional person. Always level-headed. Makes practical choices. She’s an incredible quilter and sewer. She gives everything her best.

When I was a teenager, I didn’t understand why other girls my age were mortified of being seen with their mothers. My mom was my best friend and my confidante. Sure, she was silly, but that never embarrassed me. I was proud to have such an awesome mom.

As a young woman, she didn’t always make the best life choices, but it was those stories of her past that helped shape my future. Her wisdom helped me with some of my toughest decisions. She’s the one who solidified my philosophy of life: There’s no such thing as a mistake. There are choices you make in life and the best thing you can do is learn from those choices in order to live happily.

Her 60th birthday hasn’t fazed her much at all. In fact, it’s made her more motivated to live life to its fullest.

So happy birthday mama. I love you.

-Ta

Homemade Saag Paneer

Saag Paneer, an Indian spinach dish with fresh cow cheese, is one of my favorite foreign dishes. It’s creamy and spiceful (as opposed to spicy) and it’s got my favorite food — cheese!

My friend Mat loves to cook. Sometimes he lets me eat his delicious meals. Tonight we made this traditional Indian dish and it was fantastic. The cheese is surprisingly easy to make. I’ll provide the recipe. I’ll have to ask Mat to give me his recipe for the saag, but from what I watched him add, it seems pretty similar to this recipe by Tyler Florence, although Mat omitted butter and regretted it. :o( So below is a conglomeration of both paneer recipes.

Homemade Paneer 
Saag Paneer with Basmati Rice

Serves 4

Ingredients for the Paneer:
1 gallon of whole milk
3 Tbs. salt
juice of 1 lemon
up to 2 Tbs. white wine vinegar
Cheesecloth

For the Saag:
2 tbs. butter
2 packages of frozen chopped spinach
2 onions, chopped
4 cloves garlic, chopped
2 teaspoons freshly grated ginger
1 cup cream
2 teaspoons garam masala, or curry powder
1/4 teaspoon cinnamon
salt to taste
3 cups basmati rice

Directions:
Pour all of the milk into a large saucepan over medium heat, stirring occasionally. Add the salt. While the milk heats up, skim off any large amounts of foam (otherwise you won’t be able to tell if it starts boiling). Meanwhile, thaw out the spinach and squeeze out some of the liquid. Set aside. Place a large piece of cheesecloth in a colander.

When the milk starts coming to a simmer, turn down the heat and add the lemon, stirring constantly. If it doesn’t start to curdle in the next 30 seconds, add a swig of vinegar. Small curds should start developing rapidly. If the milk is still clear of curds, add another swig of vinegar. When you see lots of curds, it’s time to drain the milk into the cheesecloth. Let the liquid filter out and loosely gather up the edges of the cheesecloth so none of the curds escape. Do not squeeze the curds or the cheesecloth will stick to it and you won’t get as much cheese. Just let it rest for about 10 minutes. When it’s slightly cool, place the cheesecloth between two rimmed baking sheets and place a couple of cans of soup on top to weigh it down. Just leave it there till you’re ready to prepare the dish.

Prepare the rice according to the bag’s directions.

For the saag, heat the butter in a large saute pan over medium high heat. Add the onions and saute a couple of minutes, then add the ginger and garlic and cook till onions are translucent. Sprinkle in the garam masala and cinnamon and cook about one minute. Add the spinach and mix well. Cook for about 5 minutes then add the cream. Give it a good stir and transfer to a blender. Blend till blended. Ha!

Cube up the cheese and add it to the pan, browning slightly on all sides. Return the saag to the pan. Serve over basmati rice.

Summertime Mocktail

I hung out with my friend Ashley last night and helped her sew some curtains. She had had a small party the night before and needed me to clear away some left overs. No problem! In addition to halibut chowder and cheesy bread, I downed about five glasses of this deeeelightful concoction:

And here is her recipe for it:

1 bag of frozen strawberries
some lemon slices
2 cans lemon San Pellegrino
2 cups of Sprite
2 cups of lemonade

Check out Ashley’s fun photos at her blog.

Funky Ruffle Skirt

I found this skirt pattern and really wanted to make it, but I was afraid Jo Anne’s wouldn’t have the ruffle fabric it calls for. I was wrong! They had in the discount section a bunch of crazy ruffle fabrics in all sorts of semi-hideous colors. Since this skirt was definitely an experiment, I just decided to go for it.

My machine despised sewing the elastic, but after two broken needles I was pretty satisfied. I made my skirt 20 inches long instead of 26. I’m short so that mid-calf length doesn’t do much for me. I could totally go dancing in this skirt! Also, I’m pretty sure the original pattern uses a higher quality ruffle fabric, but this was the best I could do on short notice.
Also, thanks to my friend Ashley for being a great crafter host. I had a really fun time helping her with her new sewing machine. 

Baby Beckham Set

I have recently reunited with a high school friend via Blogland and we’ve been having a good time exchanging ideas and knowledge. She’s expecting a baby boy so I sent her a little hat and mitts set.

**Click HERE for the mitten pattern**

The pattern for the Stay-Put Mitts are from Sknitty.wordpress.com. I found it on Ravelry. They knitted up quickly and I really liked the twisted rib stitch on the cuff.

The pattern for the hat is as follows:

Worsted weight yarn, a skein of each color (you don’t need a whole skein)
size 7 circular needle
size 7 double points
darning needle

Cast on 64 stitches in your main color (MC). Connect the last stitch to the first being sure not to twist your work. Place a stitch marker if you need to. Make a rib of k2, p2 for five rows. Knit 3 rounds of contrast color (CC), then 4 rounds of main color. Either cut the yarn each time you change colors (leaving a six-inch tail), or carry up the yarn when you need to use it. If you do this, don’t pull too tightly when you bring in the next color or else it will make a gap in your work. *K 3 rounds CC, K 4 rounds MC* two more times. K 3 rounds CC and cut yarn leaving a six-inch tail. Knit 1 round MC and begin decreasing as follows:
*K2tog, k6*, repeat till end of round.
K 1 round
*K2tog, k5*, repeat till end of round.
K 1 round
*K2tog, k4*, repeat till end of round.
K 1 round. While doing this, transfer to the double points as you go so there are about 14 stitches on each needle (four in all).
*K2tog, k3*, repeat till end of round.
K 1 round
*K2tog, k2*, repeat till end of round.
K 1 round
*K2tog, k1*, repeat till end of round.
K 1 round
*K2tog*, repeat till end of round.
Cut yarn, leaving a long tail and with darning needle, run the yarn through the rest of the stitches and pull shut. Weave in all ends.

Lemon Fizz

It was our first really sunny day this month, so I thought I’d celebrate with this:

Ingredients:

  • 1 shot glass of vodka
  • juice of 1/2 lemon
  • 1/2 teaspoon of ultra fine sugar or Splenda
  • club soda
  • ice
  • lemon slice, for garnish

Fill a highball glass with ice. Add vodka, lemon juice, sugar and top off with club soda. Stir, add lemon garnish and enjoy!

Thread and Scissor Rack — A Tutorial

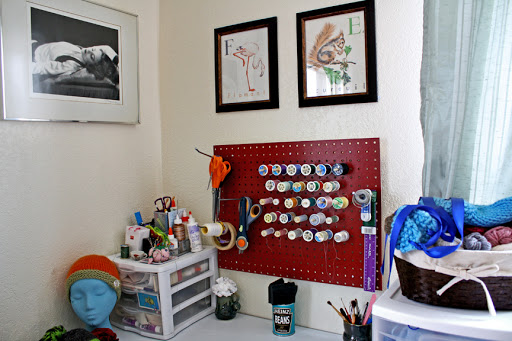
While my husband was busy at Lowe’s buying tie rack supplies, I found a piece of pegboard for $5.50. An idea popped in my head — a rack to hold my threads and scissors. So I had the hardware man cut a piece 2-ft.x1.5ft. I’m not woodworker, but with a few inexpensive supplies and a little elbow grease, I came up with this:

And here’s how to make it:

Materials:

  • 1 piece of peg board, cut to a size you prefer
  • 2 long wooden dowels, the thickness to fit snugly inside the holes in the peg board
  • 2 pieces of 1.5x.5-inch wood, the length of your peg board
  • 6 short screws
  • 2 big nails or a way to hang the board like a picture frame
  • spray paint
  • Metal hooks to fit in a pegboard (in the pegs section of Lowe’s)

Tools:

  • Piece of sandpaper, about 120 grit
  • A Saw
  • Drill
  • Wood glue
  • wet rag
  • Newspaper or big plastic bag
  • 2 pieces of scrap wood
  • pencil

Have your pegboard cut to your specifications. Mine is 1.5 ft x 2 ft. Lay out some newspaper in a ventilated area and rest the peg board on two pieces of scrap wood. Spray paint one layer onto the peg board. Let it dry and do one more coat.

Meanwhile, figure out how long you want your pegs to be. I took my longest spool of thread and added the thickness of the board plus a little sticking out the end — about 3 inches? I didn’t measure. I sawed off that length from a dowel and then with a pencil marked that length all the way down the dowel. Saw as many pegs as you see fit. I made 28. It’s OK if they splinter a little bit on the edges.

Lay your sandpaper on a table, grit side up, and sand one end of each dowel so the edges and corners are all smooth. It doesn’t have to look perfect — no one is going to be inspecting them.

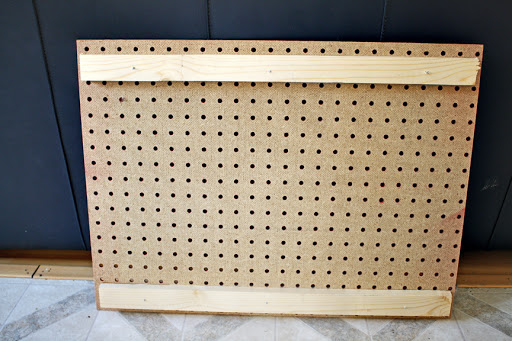
When the paint is dry, drill the 1.5x.5 pieces of wood to the top and bottom of your board, on the back. For each board, I drilled three screws from the front to the back through the holes in the peg board. Drill one on either end of the wood and one in the center. Here’s a picture of the back of my peg board, since I’m absolutely terrible at describing this:

My screws were slightly too long, but that’s because I didn’t bother to buy screws for this project. I just found some lying around my garage. I’m not a perfectionist so I was fine with it.

Now place the pegs on the board and figure out how you would like the layout to be. I knew I wanted to hang scissors on one side and I wanted room at the bottom for a possible shelf in the future, so I arranged my pegs off-center.

One at a time, remove a peg, add a little wood glue to the rough end, add a little glue in the hole the peg is going into and insert the peg, feeling in the back for the end. Make sure the rough end is as flush as you can get it with the back of the peg board. Make sure the peg is straight and wipe off any excess glue with a wet rag.

Do this for each peg and let dry a couple of hours. When everything is dry, hang up your board like you would a picture frame, if you have the hardware. I just put two fat nails in the wall and hung it up that way. Arrange the metal hooks how you like them. Enjoy an organized craft space!

Free knitting patterns, DIY crafts, easy recipes and more!