Cooking with Fireweed

It’s just starting to be spring here in Alaska and that means the fireweed has started to come up. The small reddish shoots are edible, but I’d never actually tried eating them till this week.

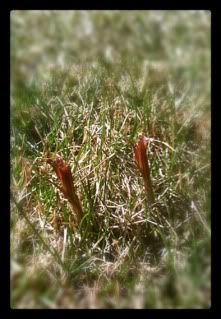
My mom and I went on a fireweed hunt and came back with quite a harvest.

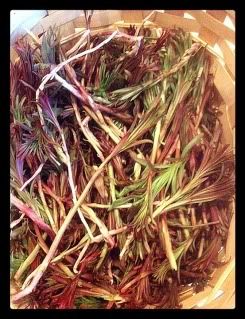
We decided to prepare them as I did the fiddlehead ferns. We blanched them in boiling water for 3 minutes, put them in an ice bath and then sauteed them in garlic olive oil and pine nuts. They were pretty good! Not as tasty as the fiddleheads, but definitely worth the effort.

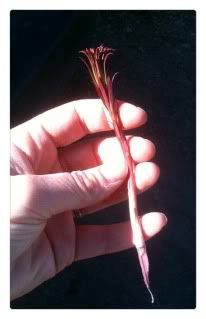
When picking fireweed shoots, try and get as much of the stem as possible, as that’s the tastiest part. I would strip off any big leaves as they tend to be bitter. The bigger the plant the more bitter it tastes, so try and pick ones that haven’t really grown a lot. Here’s a photo.

We rinsed the shoots in cold water and dried them in a salad spinner. We also tossed some into a chicken stir fry. It was a good way to bulk up the stir fry. They looked a little stringy and not too appetizing, but they offered good sustenance.

Flat sheets really come in handy — another Tokyo tie bag

After making a Tokyo Tie Bag the other day, I decided to experiment with the dimensions and make a bag that has a size I prefer. I like the dimensions of the pattern I was given, but I wanted it a little deeper and the handles a little longer. So I busted out my butcher paper and made a better pattern. Here’s a photo of the original pattern on top of a pair of pyjamas.

I just added two inches to the bottom of the bag and three inches to the top where the handle is.

The dimensions are as follows:

  • The height of the handle is 1 and 1/8th inch
  • The length from the top of the handle to the first line is 12 inches
  • The first line is 2.5 inches tall
  • The length from the first line to the second line is 2.75 inches
  • The second line is 5.75 inches (also the same height as the bottom of the bag)
  • The length from the second line to the bottom of the bag is 8.25 inches

I drew the curves out by hand between the two lines and the top of the handle.
After I figured that out I transferred the pattern to a piece of tagboard I nabbed from a boot box (thank goodness I work at a shoe store — endless supplies of cardboard). So now I have a stiff pattern so all I have to do is trace around it on my fabric and cut it out. Presto!

Anyway, to get to this posting’s title, I never use flat sheets on our bed. But they make awesome curtains and scrap fabric. I used a dark red flat sheet as the lining for my new purse.

Look at that 400 thread count Egyptian cotton! The handles are just the right length to sling over my shoulder.

Embellished Sweater

Several months ago I purchased this sweater from Her Tern Boutique:

I love the flower embellishments. The petals seem to be made of sweater material and were hand sewn onto the garment.

I had a couple of sweaters I never wear, so I thought I’d give it a try.

I made a little petal template out of tagboard and cut out five petals for each flower. I pinned them in place and then sewed them onto the sweater. Then I used embroidery thread to make the center of each flower.

 I think I might add more tonight, but I wanted to wear my newly refashioned sweater to work.

Knit Nat Crafts Giveaway — Enter to Win!

Creativity is in the air here at Knit Nat AK, which means it’s time for a crafty giveaway. One lucky person will win a hand made craft from Knit Nat!

Here’s how to enter:

  1. Visit www.knitnatak.blogspot.com and scroll to the bottom of the page where it lists the blog’s followers
  2. Click the “follow” button and enter your Gmail account address
  3. Any person who becomes a follower in the next FIVE days will be entered into a drawing
  4. On May 6 a random follower’s name will be chosen 
  5. Knit Nat will contact the winner and will mail out a crafty item ABSOLUTELY FREE. Pay no shipping!
Becoming a Knit Nat AK blog follower is simple and hassle free. You won’t receive e-mails from me (unless you request it). It’s a fun way to support your friends and to keep up on crafty ideas.
So sign up to win! 

Hubby Cook — Breakfast egg cups

My husband left today on a two-week road trip through Canada. He knows it makes me sad to see him go, so he made us breakfast this morning. This is a rare occurrence since he claims he can’t cook. How wrong he was! After devouring two of his ham and cheese egg cups, I am convinced that I’m not the only one making dinner from here on out!

He got the recipe from Cook’s Country Magazine. It was a laborious preparation — he said — but the results were pretty tasty. The bread had the texture of puff pastry and all of the ingredients blended well.

Here’s how to make it.

Makes 5 servings

Ingredients:
5 eggs
5 slices white sandwich bread with the crusts cut off
2 Tbs. unsalted butter, melted
5 thin slices of cheddar
3 thin slices of black forest ham, halved crosswise
salt and pepper

Directions:
Preheat oven to 375 degrees F. Place eggs in a large bowl of hot water for 10 minutes.
Using a rolling pin, roll the pieces of bread till they are thin. Pinch the sides of the bread and fit each one into little ramekins or a muffin tin. Brush each piece with butter and bake until golden brown, about 5-7 minutes.
Top each cheese slice with a ham slice. Make a cut from center to one side of each stack. Shape it into a cone and press into the toasted bread. Crack an egg into each ramekin/muffin tin and season with salt and pepper.
Bake about 15 minutes. Remove from oven, cover with foil and let sit about 5 minutes.

Tokyo Tie Bag

An acquaintance came into the store the other day with the loveliest little purse. It was a simple design and when I commented on it, she said she bought it in a little arts market in New York City, but a friend of hers had scanned a pattern for something similar.

She forwarded me the pattern and it was for a Tokyo Tie Bag. Here was my first attempt:

If you do a Google search for this, you will find several patterns that resemble the one I made. I recommend this pattern from Darling Petunia’s Blog. Her pattern looks like the one I made, but the dimensions are slightly different.

Besides cutting the fabric, it only took about 30 minutes to construct. It’s really worth trying.

After whipping out my first one, I decided to tweak the pattern a little. I wanted my next one to have a flat bottom, but to also have a sort of kimono look to it. I was hoping the crossover of the fabric would create a little pocket, but it turned out too floppy so I had to sew it shut. I like how it turned out decoratively, though.

I’m going to have to make a ton of these. I think for my next one I’ll make the straps longer. My friend Robert suggested making large versions out of T-shirts, so I’m going to give that some thought. It also dawned on me that thrift store pillowcases could be put to good use with this pattern.

Hubby Craft 2

My mother-in-law gave us an antique kitchen scale last week.

My plan was to simply spray paint it a different color. But then I lost motivation. My husband picked up that motivation and went all the way. He got a wire brush that attaches to his power drill and sanded off most of the paint. Then he took acetone to it to get off any remaining paint. Then he spray painted it.

In other words, he did a much better job than I ever would have.

Way to go, Stephen!

Free knitting patterns, DIY crafts, easy recipes and more!