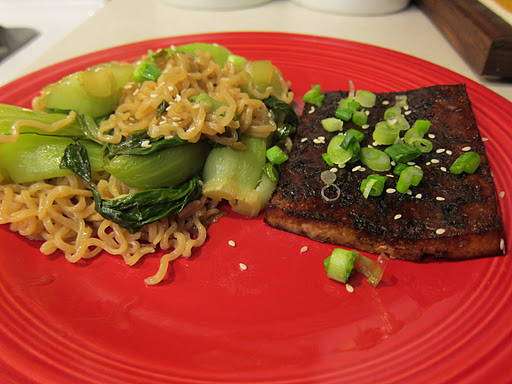
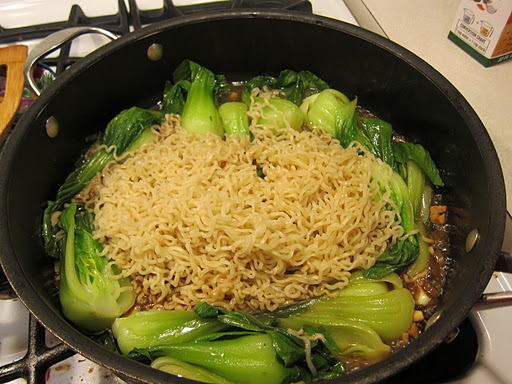
Printer Cozy — A Tutorial

I’m trying to streamline our living room and I’m almost there. We’ve got the bookshelves organized, video games stashed away and pretty accoutrements scattering the room. The one big eyesore is the printer. It’s this boxy plastic thing that makes me cringe when I look at how sleek the rest of the room is.

So I actually made a cozy for it. I’ve never been a big fan of cozies — tea, blender and the like — but this printer needed one. I didn’t use a pattern and I just followed my sewing instincts. I have to toot my own horn here. It turned out just great!

Here’s how I constructed it.

Step 1: Measure all the sides of the printer. The paper tray on ours can’t be removed so I made sure to measure how far it sticks out. I decided to have one panel for the top and front of the printer and one panel to go around the sides and back of printer. Then there were two triangular areas where tray sticks out from the front so I had to figure out the measurements of that.

I added an inch to each measurement for selvedge. The top front panel was 21.5 inches in length by 20 inches in width. The sides and back were 40.5 inches in length and 11 inches in height. The printer tray stuck out 5.5 inches (6.5 with selvedge) and the height was 10 inches (11 with selvedge). I made a triangle where one side was 6.5 inches and the other side was 11. Then I connected those sides to complete the triangle. I think it was around 12.5 inches.  Whew! That’s a lot of measurements! Here’s a visual:

Squarish panel is the top/front, rectangle is the side/back/side

Make two triangles, but be sure one is cut on the right side and the other on the wrong side.

Step 2: I pinned all the pieces together to see that it would fit properly around the printer. When pinned altogether it should look like an inside-out cozy.

This is before I realized I needed the triangle panels

With triangle panels

Step 3: Sew the long side of the triangles (the one with the 90-degree angle to the short side) to the edges of the side panels. Iron seams flat.

Triangles sewn!

Step 4: Pin the side panel to the top/front panel. Again, it should now look like an inside-out cozy.

Step 5: Sew along the longest side of the triangle and all around the pinned edge. You’re almost done! I had one side of my triangle that didn’t quite match up so I just trimmed it so it was flush with the edge of the cozy.

Step 6: Turn up the raw edge and iron. I placed the cozy inside-out on the printer to see if I had enough length to fold the hem up again so there weren’t any raw edges along the hem, but I didn’t, so I just made do. Sew along the hem.

Step 7: Iron all the sides right-side-out so it makes a box shape. Place on top of your printer. Yay, hidden printer!

Please let me know if you have any questions about making this project, as I’ve never tried to explain such a thing.

20-minute Baby Pants!

I was nearly devastated the other day when my 8-year-old hand-me-down pajama pants ripped in the rear. They were my favorite. As you can see, they have little wiener dogs on them.

too much booty in the pants!

So instead of throwing them out, I stashed them for a rainy day. Well, it’s not really raining today, but it’s cold enough that my car won’t start. So I decided to make some tiny pants out of larger pants.

I used a super simple pattern from make-baby-stuff.com and they turned out splendidly. Here’s my childhood bear, Bosh, modeling them.

They sew up in a flash so I used some leftover baby material from a quilt I made a couple of months ago and made another pair. Lickety split! They are even quicker to sew when you use the hem of the big pants as the hem of the small pants. It’s basically six seams if you include the leg hems, inseams, rise and elastic casing. It’s really a great beginner project.

I can’t wait to put them on my real child.

Brown Rice Primavera

I love parmesan cheese, and I mean the real stuff, not the pre-grated kind that comes in a bag. The real stuff is extremely expensive up here in Alaska so it’s pretty much a treat when I decide to shell out at Costco for a big wedge of it.

I saw a recipe the other day for a quinoa primavera dish that sounded really delicious. I decided to make that, but to use brown rice instead of quinoa. Yes, I know quinoa is amaaaaazing and super good for you, but heck, I just love brown rice.

The dish I came up with was cheesy, nutty and full of flavor. Also, it’s chock full of veggies so I don’t feel so bad about myself when I stuff my belly.

This makes enough to feed four plus lunch leftovers.

Ingredients:

For the rice
1.5 cups dry brown rice
2.5 cups chicken stock
1 tbs. butter

Rest of the ingredients:
1/2 brick of cream cheese
1/4 cup chopped fresh basil, or to taste
2 cloves garlic, chopped
1 tbs. olive oil
4 cups frozen mixed veggies (or fresh if you happen to be fancy)
1/2 cup freshly grated parmesan cheese
1 cup shredded leftover chicken (optional)
salt and pepper

I ALWAYS use Alton Brown’s recipe for brown rice in the oven. It comes out perfectly every time. This time I used chicken stock instead of water and did not add any salt to the rice.

To make his oven rice, preheat oven to 375 and bring the water (or stock) to a boil in a saucepan. Place dry rice in a square baking dish and add the butter. Pour the boiling stock over the rice and stir till butter is melted. Cover tightly with foil and bake for exactly 1 hour. It’s foolproof fluffy, tasty rice.

When there’s about 10 minutes left on the rice, start steaming the veggies. Then heat the olive oil in a small pan and add the garlic. When garlic is lightly browned, add the cooked brown rice, the cream cheese, basil, parmesan cheese, steamed veggies and chicken. Toss over low heat till the cheeses are melted. Season with salt and pepper.

Enjoy!

Chunky Braided Winter Headband

Last year I posted a pattern for a braided winter headband. After making one for myself, my mom and my little sister I soon realized it was the most popular knitted item I’ve ever created. The problem is, I’m really lazy and unless I’m determined, I really hate making these headbands. It’s simple, any beginner knitter could do it, but it takes too long and I lose interest.

I decided to try the pattern on larger needles with thicker yarn. Turns out I actually prefer the pattern this way. It goes by much more quickly and the texture stands out more strongly.

I’m still pretty lazy and can’t get myself to produce enough to sell, but I thought I might as well post my pattern so I don’t forget how I made it (hence the whole reason I started this blog in the first place).

If these instructions aren’t clear enough, you can always look at my other pattern for a slightly different explanation.

If you’re wanting to knit this pattern with a different needle size and different weight yarn, I am unable to adjust the pattern for you. This pattern is written for a specific needle size and yarn weight.

Materials:
2 skeins of worsted weight yarn (you’ll be knitting them together) OR one skein of bulky yarn
size 10 double point needles
darning needle
three attractive buttons
needle and thread
straight pins

Directions:
Using two double point needles, cast on 24 stitches. Knit in seed stich (also called moss stitch) till piece measures 12 inches. I always slip the first stitch of each row to keep the edge even.

*Next row: seed stitch the first 8 stitches onto an empty double pointed needle. Work back and forth on this “leg” for 12 inches.
Next row: k2tog, seed st. 3 stitches, k2tog
Next row: K2tog, k2tog
Bind off next row*

Repeat * for each of the two remaining “legs” of the headband.

Finishing:
Weave in the first tail of yarn.

Braid the three “legs” of the headband till there’s about 2 inches left at the ends. Pin the three ends to the beginning of the piece, creating the headband shape. Make sure the ends overlap the beginning of the piece so there’s a good amount of space for the size of your buttons.

Pin the braid in place. With the darning needle, secure each end in place using the tails from the “legs.”
Turn headband inside out. With needle and thread, whipstitch parts of the braid so the “legs” are secure and don’t move or twist apart when stretched.

Sew on your buttons.

Pickled Beets = yum yum yum

I love most things pickled. Never give me sugar again, but I wouldn’t survive without salty snacks. Being pregnant and all, I’m supposed to be eating well, namely cramming veggies down my throat every meal of every day.

Beets are a great source of nutrients such as vitamin C, dietary fiber, iron and calcium. I never had them as a child and wasn’t quite sure how to prepare them as an adult. One of my coworkers introduced me to canned pickled beets and I was hooked.

I decided to try out Alton Brown’s pickled beets recipe, since any time I want to cook something new I just Google the food with Alton Brown’s name next to it.

He has you roast the beets with shallots, olive oil and fresh rosemary. Since shallots cost a lot up here, I just used some red onion instead.

He also instructs you to put the beets in jars. I didn’t have any big jars so I just used a big tupperware container with a tightly fitting lid and that worked just fine.

After several days in the fridge, I tasted them and they were fantastic. There were a little on the crunchy side (I think my beets were larger than the recipe called for so they probably didn’t cook as quickly in the oven) but the beets were infused with rosemary. I felt the flavor would be more balanced with a little more sweetness so I just added a bit more sugar and let the beets pickle another couple of days.

These will last in the fridge for a long time, but I think I’ll eat through them pretty quickly.

Here’s his recipe:

Ingredients

  • Roasted Beets, recipe follows
  • 1 large red onion, frenched
  • 1 cup tarragon wine vinegar
  • 1 1/2 teaspoons Kosher salt
  • 1/2 cup sugar
  • 1 cup water

Directions

Remove the skin from the Roasted Beets and slice thinly. Arrange in 1-quart jars alternating layers with the onion. In a small pot boil the rest of the ingredients and pour over the beets. Tightly lid the jars and place in the refrigerator for 3 to 7 days before serving.

Roasted Beets:

  • 6 medium beets, cleaned with 1-inch stem remaining
  • 2 large shallots, peeled
  • 2 sprigs rosemary
  • 2 teaspoons olive oil
Preheat oven to 400 degrees F.
In a large bowl toss all of the ingredients. Place into a foil pouch and roast in the oven for 40 minutes.

Granny Blanket for Baby

Finally, after more than a year of teaching myself to crochet, I have made something substantial. All it took was being pregnant!

Baby Blanket pictured with Beary, my older sister’s favorite bear

I crocheted a blanket using the classic granny square technique. I used Lion Brand Vanna White yarn. I love the colors and it’s super cheap at JoAnn Fabrics, although I had to go to Michael’s for the blue color. They have better baby yarn selection with the Vanna White yarn.

I think the blanket cost about $35 and it took me just a week to make. My granny squares were about 6 inches so I didn’t need to make too many to make a substantially sized baby blanket. Just 16 squares, four rows of a border and a simple trim and it was done before I knew it. Joy!

I had never stitched together granny squares, although I’ve made quite a few in a failed attempt to make a blanket last year.

I just love Attic24‘s colorful, detailed instructions on all things crochet. Her blog was my inspiration to learn crochet.

Click here for a great tutorial on stitching together squares.

Click here for simple border and trim instructions (she uses UK terminology but translates it for us Americans).

I think the trim will be good for when baby is able to grab things because it feels nice between your fingers.

Overall, this blanket was a success, but I think I stitched the squares together too tightly because they poof out in the middle and doesn’t lie quite flat.

Apple Breakfast Sandwich

My husband and I just spend the holidays in Pittsburgh with his mother and my sisters. I love visiting new cities because there is usually so much good food. Pittsburgh was no exception. Our first morning there, we ate at a greasy spoon called Eggs ‘R’ Us with unsurpassable homefries and perfect over-medium fried eggs.

On our last day in the city we tried to eat at Franktuary, a hot-dog place inside a church, but they were closed. My little sister instead took us to a kitschy place in Garfield called Quiet Storm. Their menu was full of unique vegan and vegetarian diner fare.

This morning I whipped up a breakfast sandwich inspired by their Apple Panini. I added some of my homemade breakfast sausage. The sweetness of the apple and jam blend perfectly with the salty sausage and tangy cheddar. The cream cheese brings it all together.

Ingredients:
1 thin bagel, or thin bread of your choice
1 breakfast sausage patty
2 slices of granny smith apples
cream cheese
strawberry jam
2 slices of sharp cheddar

Directions:
Heat the sausage patty over medium high until browned on both sides. Lightly toast the bagel and spread the jam on one slice and the cream cheese on the other. Place one piece of apple on each bagel slice and top with cheddar cheese. Place under the broiler till cheddar is melted. Add the sausage patty and enjoy!

How to Take a Neat Christmas Tree Photo

I really wanted to take a photo of our little Christmas tree without using anything but the multi-colored lights.

Click to get the full effect
You’ll need a digital camera where you can change the ISO and the shutter speed. Nothing too fancy!
Here’s what to do:
Set the ISO to the highest speed you can. This is the highest number, which is 1600 on my camera. 
Next, set the shutter delay to two seconds. This will ensure you won’t be touching or shaking the camera when the photo is taken.
Now set the shutter speed to really slow, like 1/6th of a second. 
Set your camera on a tripod or a solid surface like a table.  Take the photo. If your photo isn’t glowing enough, tinker with the shutter speed. Make is slower and see if that does the trick. If there’s too much light, make the shutter speed faster.
Christmas magic!

Crab Bisque

While basking on the beach yesterday in Punta el Custodio, Mexico, the boys decided to behave like, well, boys and torture a few of the small blue crabs in the tide pools.

After a half hour of chasing them with long sticks they decided to actually catch some.

I was impressed they caught 33 of the poor creatures. I was even more impressed when they cleaned and boiled them. Bisque was on their minds. My dad gave us his recipe he made up last month when it was crab breeding season in the estuary and he captured 240.

It is a time consuming process, but the bisque turned out rich and bursting with flavor.

Ingredients:
3-5 pounds fresh whole crab
Chicken bouillon
6 cloves garlic
One onion
2 carrots
3 Tbs. butter
8 ripe tomatoes or one large can chopped tomatoes
Pepper
2 tsp. smoked paprika
1.5 cups cream

Directions:
Rinse crabs thoroughly in fresh water, getting out any grit. Use protective work gloves if using live crabs.

Bring a large pot of water to a boil. Put crabs in batches into water and cook about 5 minutes.

Rinse crabs again and cut off and discard females' tails if they contain eggs.

With a cleaver, chop an "x" in the backs of each crab and crush the claws with the blade of the knife.

Bring another large pit of water to a boil and toss in all the crabs. Simmer without the lid for 3-5 hours. You should have a concentrated broth that smells über crabby and kind of gross. Strain broth into a smaller pot and discard all the crab parts. Stir in bouillon based on how much broth you have. I added two teaspoons.

Let the broth cool and then refrigerate if you don't have time to finish bisque on the same day.

Toss the butter into a tall-sided frying pan and turn to medium heat. Chop up the garlic and add to pan. Sauté for a few minutes, but don't let it burn. Roughly chop the onion and grate up the carrots. Add to pan and sauté for about 5 minutes. Add more butter if it gets too dry.

Chop up the tomatoes if using fresh. Add tomatoes to the pan and cook till everything is soft and cooked through — about 10 minutes.

Let cool and place in a food processor. Process till smooth, about two minutes.

Add this mixture to the crab stock and bring to a simmer. Simmer for three hours with the lid off so the bisque reduces a bit. Add paprika, salt and pepper to taste. Turn off the heat and leave the bisque till it's room temperature. Stir in the cream.

Serve room temp or pop a bowl in the microwave for 40 seconds before eating.

Free knitting patterns, DIY crafts, easy recipes and more!