My friend Rosey is organizing a banquet Saturday and she decided to make her own boutonnieres instead of paying for them. The first job I ever had was working in the flower shop at my local grocery store when I was 14. I picked up a lot of techniques that have been useful in my crafting endeavors throughout the years. I was totally stoked about teaching Rosey how to make boutonnieres since I won’t be able to make them for her banquet.
The following is a tutorial on how to make gorgeous boutonnieres. I’ve posted a tutorial in the past, but this one is more thorough since I had a second person to take photos. Please excuse my dirty, unmanicured nails.
Oh, and happy St. Patrick’s Day! My friend Josh came over toward the end of the night and I taught him to make his own boutonniere. You’ll see him at the end enjoying a Guinness.
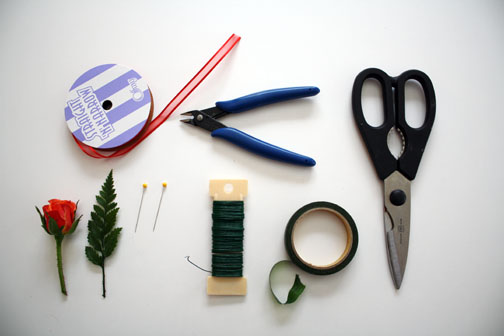
Materials:
1. A sturdy flower such as a rose, carnation, or chrysanthemum. I prefer tiny spray roses.
2. Corsage accessories such as a piece of fern, ivy, a leaf, twig, berry, bead, baby’s breath, small greenery
3. Ribbon (not satin as it’s tricky to work with. Wired ribbon is preferred)
4. Wire cutters or scissors you don’t care about ruining
5. Floral wire
6. Floral tape
7. Scissors
8. Pins for securing corsage
9. A pen, straw or dowel (not pictured)
10. Needle-nosed pliers (not pictured)
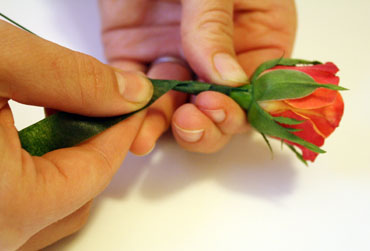
Step 1:
Each element of the corsage is going to be individually wired and wrapped. Trim the flower about an inch below the bloom. The other plant accessories should have about two inches of bare stem. Tear off any branches or small flowers that get in the way of the stem. Create a bow with your ribbon.
Step 2: Cut about 7 inches of wire for each corsage element. Straighten out the wire as best you can, then fold each wire in half.
Step 3: We’ll first start wiring the main flower. Take one end of a piece of wire and stick it through the base of the flower. Roses are very sturdy. Carnations are a little more delicate so be more careful. Run the wire through the flower till you get to the crimp where you folded it.
Step 4: Wrap the edge of the floral tape around the base of the bloom, where you inserted the wire. Tightly wrap the tape around itself a couple of times so it’s secure, then begin twirling the flower so the tape wraps down the stem.
Stretch the tape as you go and firmly run your thumb along the tape as you secure it. This will help it stick better. Wrap the tape all the way to the bottom of the wire. Tear or cut the tape and stick it to itself to hide the end.
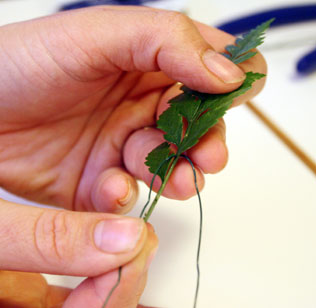
Step 5:
Wire and wrap your plant elements by placing the bent part of the wire in the crux of the lowest branch. Use needle-nosed pliers to crimp the fold of the wire to better secure it to the plant. Then wrap the wire in the same way as in step 4.
Repeat step 5 for all other plant elements.
Step 6: run wire through the back of your bow. Crimp the fold of the wire with pliers and wrap the wire with floral tape. If using wired ribbon, curl the ribbon using a straw or pen.
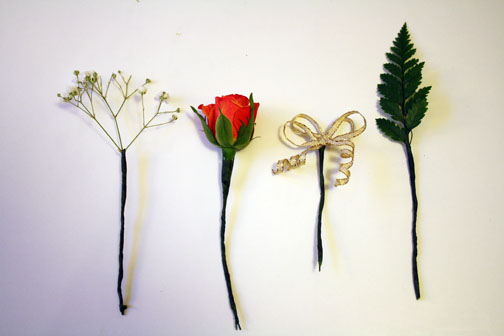
Step 7:
All your elements should be wired and wrapped.
Now you’re going to place the elements together in a way that pleases you. I usually start with the plant elements in the back, followed by the main flower and ending with the bow. Bend the wires till they are situated well, then twist all the wires around each other. They will stick together.
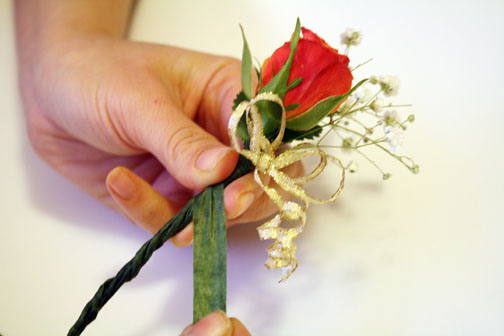
Step 8:
Wrap the whole clump of wires with floral tape starting at the top and working your way to the very bottom of the wires. Cut the tape and wrap it into itself so the end doesn’t show.
Step 9:
Using a pen or straw, wrap the wire around to make a decorative spiral.
Step 10:
Bend the spiraled wire upwards a little and rearrange all the elements so they are just so. Place in a tupperware container and set in the refrigerator till ready to wear. These should keep well for a whole day if not longer in the fridge.
Guinness time!