I’m Back! Swedish Meatballs!

Hi all in Blogland who bother to look at KnitNatAk,
Sorry for the month-long silence. A lot has been going on and also I’ve been really lazy. I thought there’d be no better way to start blogging again than with a recipe for Swedish meatballs!

This is a really quick dinner. I recommend making a double batch and freezing half of the meatballs on a parchment-lined cookie sheet and then placing the frozen meatballs in a ziploc for another time when you have even less time.

Ingredients (makes about 24 meatballs):
1/2 pound ground pork
1/2 pound ground beef
1/2 onion, finely chopped
1 egg
1 slice of fancy white bread, soaked in milk
1 tsp. salt
pepper
1/2 teaspoon allspice
1/4 teaspoon nutmeg
3 Tbs. butter
4 tsp. Wondra flour (or just regular flour)
1 cup chicken stock
1/2 cup sour cream
egg noodles
green beans

Directions:
Preheat oven to 375 degrees. When the bread has soaked up the milk, smash it up with a fork and gently squeeze out most of the milk. Mix together the meat, egg, onion, bread, salt, pepper, allspice and nutmeg. Form into 1-inch meatballs. Place them on a cookie sheet and bake for 20 minutes.
Meanwhile, bring a pot of salted water to boil.

Add the egg noodles when there is about 10 minutes left on the meatballs. Place the green beans in a pot and cover the bottom of pot with water. Cover and turn heat to high.

When meatballs are 7 minutes to being done, melt the butter in a small saucepan over med-low heat. Whisk in the flour and cook while stirring for a couple of minutes. Stir in the chicken stock and bring to a simmer. Let it thicken for a couple of minutes. Add some salt and pepper to taste. Add a dash of allspice and nutmeg too if you want. Add the sour cream and turn to low.

Add the meatballs to the sauce and scrape in any yummy bits that may have ended up on the cookie sheet.

Drain the beans and noodles when they are done. Pour the sauce and meatballs over beans and noodles.

Mama Makes Pizza on the Grill

My dad is the main chef in my family. He’ll roast a chicken, toss a carbonara, and braise a pork chop. My mom has her own prize dishes: killer pot roast, sinful sopaipillas, perfect posole and her famous pizza on the grill.


So I welcome my guest blogger — Rachel!


My mom makes pizza the true Italian way — very little cheese and exotic toppings such as porcini mushrooms, kalamata olives and anchovies.


Here’s her recipe for pizza dough. It’s enough for two 10-inch pizzas.


A good pizza dough doesn’t need a lot of yeast, but it should rise for at least three hours (or four or five).  If you don’t have that much time, double the yeast and find a very warm spot to let it rise (I used to put warm water in a sink and put the bowl with the dough into it).

1 cup water
1 tsp. yeast
1 1/2 tsp. salt
2 T. olive oil
3 cups bread flour (not all-purpose)

Or for more dough:


12 oz. water
1 1/2 tsp. yeast
2 1/2 tsp. salt
2 + T. olive oil
4 cups flour.

I don’t measure the yeast, salt or olive oil exactly, it works with more or less.  I put the water in the bowl of my KitchenAid, dissolve the yeast, and then add everything else and let the machine do the kneading with the dough hook.

Oh, one more thing:  up until last week, I always made one ball of dough and divided it into individual balls after rising, before rolling out.  Last week, I divided it into separate balls to rise.  When it came to rolling out the pizzas, the individually risen balls handled much more easily than in the past.


When the pizza dough is done rising, fire up your grill to hot hot hot. Roll out your dough one at a time. Roll it pretty thin — thinner than normal American pizza dough. Coat one side with semolina flour or yellow corn meal. This will keep the dough from sticking to the pizza paddle or cookie sheet. Place your rolled out dough on the pizza paddle or a cookie sheet that doesn’t have sides. Turn down the heat to your grill just a bit. Transfer the dough semolina-side up to the grill. After about a minute, check to see there are good grill marks and then remove from grill. Cover the grill again and heat it to very hot again. Now your grill will act as a super-hot oven.


Set dough on a pizza board or some kind of tray that you can easily slip the pizza off of (semolina side down). Brush with olive oil. Spread on some marinara or pesto sauce. Add toppings such as:


Fontina, parmesan, fresh mozzerella cheese
Kalamata olives
Mushrooms
Italian sausage, already sliced and cooked
Fresh basil or oregano
Roasted garlic


Try not to go overboard with toppings because this might make the pizza too heavy for the grill to support. Gently slide the pizza back onto the grill and cover the grill for several minutes, until the cheese is all melted and everything looks delicious.


Repeat with the other balls of dough.


Enjoy!!


Thanks mom! It’s one of my favorite home dishes. 


Homegrown Salad with Honey Mustard Vinaigrette

In my household growing up, we ate pretty European. Pasta alla carbonara, lots of lamb and most importantly we eat our salad after the main dish. My mom always makes a simple olive oil and vinegar dressing and in the summer we always use greens from the garden. Radicchio, arugula, romaine and even nasturtium and pansies alongside greek olives and an occasional avocado and tomato on the vine.

I learned her house dressing at a young age and since then have tweaked it to become my own.

I never measure anything exactly, but the main thing to keep in mind is that it’s 2:1 oil to vinegar.

The other night I put together a basic greens salad with a honey mustard vinaigrette.

Ingredients:
Olive oil
Balsamic vinegar
some sort of light vinegar or fresh lemon juice
1 clove of garlic, minced
1 tsp. dijon mustard
1 tsp. honey
salt and pepper
salad greens

Use the spoon of your salad tongs to measure the oil and vinegar and combine everything in the bottom of the salad bowl. I fill the spoon up twice with olive oil and then halfway with balsamic. Then I used my parents dill and garlic flavored vinegar and filled the spoon halfway again. This makes dressing for a huge salad. Use your own judgment depending on the size of your salad. Just remember two parts oil to one part vinegar or lemon juice.

Next mince your garlic and add it to the bowl. Add your dijon, honey, salt and pepper and whisk with the salad spoon. Add your lettuce and wait to toss till right before dinner is served.

Pink Champagne Cake — Again!

Last month I made a cake for a coworker’s wedding. Instead of having centerpieces at the reception the couple had friends make cakes for each table. It was a brilliant idea. And it got a lot of my coworkers craving more of my pink champagne cake.

It seems we have a lot of August birthdays around the office, so I decided to make another champagne cake. Instead of using brut style I opted for spumante. It’s sweeter and it gave the cake a slightly different flavor.

I also opted for a different kind of icing. I had been making a butter cream cheese frosting, but I decided it was a little heavy so I made a whipped cream/cream cheese frosting. It was fantastic and it used less sugar.

Oh, also I crafted my own cake stand out of a thrift store plate and a porcelain cup.  A glue gun did the trick!

Ingredients:

3 cups all-purpose flour
3 teaspoons baking powder
1/2 teaspoon salt
2 sticks of butter, softened
2 cups sugar
1 teaspoon vanilla extract
6 egg whites
four drops red food coloring
2 cups Champagne

For the frosting:
1, 8 oz. block of cream cheese, softened
1/2 cup sugar
one pint of heavy whipping cream
fresh strawberries

Preheat the oven to 350 degrees. Grease and flour two cake pans. Line the bottoms with parchment paper.
For the cake, mix together the flour, baking powder and salt in a medium bowl. Set aside. In a large mixing bowl, beat the butter and sugar for several minutes till fluffy. Mix in the vanilla. Add the egg whites one at a time then mix in the food coloring. Incorporate the flour and champagne in alternating batches of three, starting and ending the flour. This way the champagne won’t curdle. Pour into the cake pans and bake for 35 minutes or till a knife runs clean when stuck in the cake.
Let cake cool completely before removing from pans.

For the frosting, whip together the sugar and cream cheese. When fully combined, add the whipping cream and beat till you get stiff peaks. Slice up fresh strawberries for garnish.

Homemade Russian Pelmeni

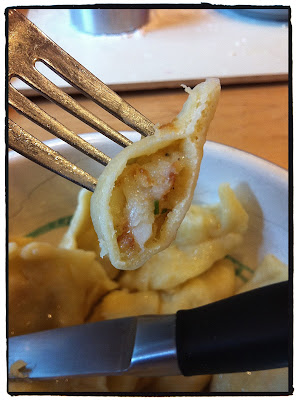
Hello, my name is Natasha and I’m addicted to dumplings. I’ve gone on a bit of a bender since last Friday when I found out we have a new Russian dumpling restaurant downtown. I have eaten some sort of dumpling every day but Monday.

Last night, Kelly and I made our own. I made meat-filled dumplings, and she made potato-filled perogies. What I loved about her perogies is she fried them up in butter after boiling them. Yum yum!

In the spirit of all things dumpling, I thought I’d better post my recipe for the Russian kind. I’m sure Russians don’t use cilantro, but I despise dill and cilantro is what the restaurants here and in Juneau use anyway.

Makes about 30 dumplings

Ingredients for the dough:
1/4 cup warm water
1 egg
flour

Ingredients for the meat filling:
1/4 onion, chopped very finely
olive oil
1 garlic clove, minced
1/2 tsp. curry powder
1/2 lb. ground beef
salt and pepper

For the topping:
Butter
Curry powder
Siracha sauce (I don’t know the actual name, cause we all just call it cock sauce)
Fresh cilantro
Sour cream

Directions:
In a medium bowl, whisk together the egg and water. Incorporate flour till you have a soft, stretchy dough that isn’t sticky to the touch. Knead on a floured surface for a couple of minutes, incorporating flour if it’s still too sticky. Place the dough back in the bowl and cover for 15 minutes.

Meanwhile, coat a small frying pan with olive oil and turn to med-high heat. Add the onions and the curry and saute for a couple of minutes. Add the garlic and cook till onions are fragrant and translucent, about another 3 minutes. Let this cool off the stove while you combine the beef, salt and pepper in a small bowl. Once onions are mostly cooled, add to the beef and combine well.

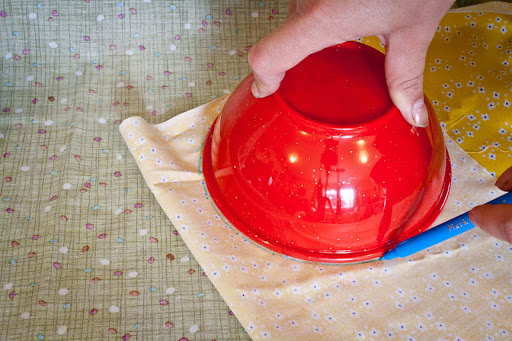
Roll out the dough till it’s thin like pasta dough. Using a biscuit cutter or the edge of a glass, cut circles out of the dough. Reuse the scraps as much as you can.

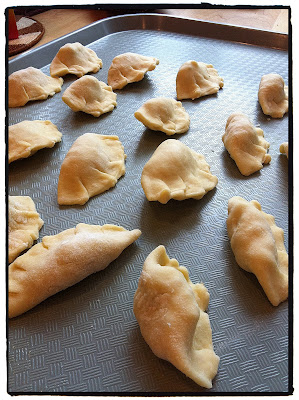
Add about a teaspoon of filling to each circle and fold it in half so it looks like a half moon. Crimp closed. The dough should be sticky enough to stay closed on its own without additional moisture.

Set each finished pelmeni on a parchment-lined baking sheet.

From here you could either boil the dumplings right away or place them in the freezer for later. If you freeze them, make sure to freeze them on the baking sheet before putting them in a ziploc bag or container. Otherwise they will stick together.

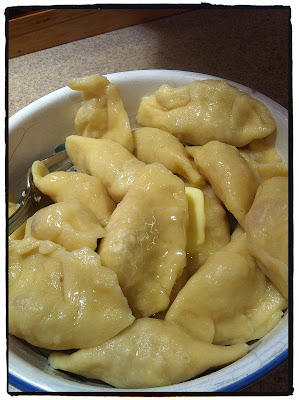
To prepare, bring a big pot of salted water to a boil. Add the dumplings and return to a boil. Cook until dumplings float — about 5 minutes.

Use a slotted spoon to remove dumplings and place them in bowls. Top with butter, curry powder, cock sauce, cilantro and sour cream. Enjoy!

Homemade Perogies

Back in the day when Stephen and I lived in the heart of downtown Anchorage, our favorite late-night restaurant was the Lucky Monkey on the corner of 5th Avenue and C Street. Their menu was limited. They served pelmeni, or Russian dumplings. For about $6 you’d get a bowlful topped with curry powder, sriracha sauce, cilantro and sour cream. They were THE BEST. And then they closed down. It was a sad day for downtown Anchorage.

Fast forward five years. A friend and I are cruising the downtown scene at 2 a.m. and I smell them — the scent of butter and curry and meat. I follow the sound of Euro techno and there it was: Nane’s Pelmeni. I dashed in and five minutes later I was mowing down on pure happiness. They taste just as I remembered. At $8 a bowl, it’s enough to shake that drunken edge and fill you up after a night of rocking the dance floor.

Nane’s serves meat pelmeni and potato filled ones. This morning I was craving them yet again, so I used my near mother-in-law’s dough recipe and made my own potato perogies.  They were splendid.

And here’s how I made them.

Serves two hungry people

For the dough:
1/4 cup warm water
1 egg
flour

For the filling:
1/2 cup mashed potatoes
1/4 cup grated parmesan
pepper
1 tsp. fresh chopped chives (optional)

Directions:
In a bowl whisk together the water and egg. Start adding flour till a kneadable dough forms — I think I used about a cup. Remove dough from bowl and knead for a few minutes until it’s soft but not sticky. Add more flour if needed. Form into a ball and place back in the bowl. Cover and let rest for about 15 minutes.

Meanwhile, mix together the filling ingredients. You can get creative with this. You could use cheddar and bacon bits. I used two frozen hash brown patties because I didn’t have any potatoes. I fried them up and then broke them apart with forks in a bowl. The filling should hold together when you form it into a small ball.

Fill a large pot with salted water and get it boiling while you’re making the perogies. Turn it to low if it boils before you’re done.

When the dough is done resting, roll it on a floured surface with a floured rolling pin till it’s the thickness of a noodle (so, pretty thin). With a large biscuit cutter or the edge of a glass, start cutting out circles from the dough. Fill each circle with about a teaspoon of filling. Fold the dough over so it looks like a half moon and pinch the edges all around. The dough should be sticky enough to stay together when you press the edges hard.

When you run out of circle space, ball up the dough again and roll it out. Make more perogies. Save them on a tray while you’re making them.

Place all the dumplings in the boiling water and stir gently. Turn heat to medium so it doesn’t boil so hard that it tears apart the dumplings. Boil for about 4 minutes. They should all be floating before you take them out of the water.

Use a large slotted spoon to remove the dumplings and place them in a bowls. Top with butter and a little salt.

Hubby Cooks Beeramisu

My husband’s favorite dessert is tiramisu. I would win this quiz hands down in a newlyweds game. Ever since he had it in Italy on a school trip in 2001 he’s been hooked — especially if it’s in gelato form. He decided to get adventurous and make his own tiramisu using a recipe that called for beer — not liquor.

It was fantastic.

The recipe he used can be found here.

Is there anything you can’t make with beer?

Cedar-Plank Salmon — it’s totally worth it!

Last week Stephen and I went to Lowes — not my favorite place to shop, but at least it’s not Best Buy. While I was perusing the shelving aisles, Stephen decided to buy a big cedar board. I thought it was for the shoe rack he was planning on building (hubby craft!), but when we got home he sawed it into planks and told me it was for salmon. Now Stephen despises fish, so this was purely a thoughtful act on his part. He really wanted me to try making cedar-plank salmon. I don’t know where he got the idea, but the only time I’d ever tried this was the summer I spent in Kodiak in college. I had no idea what I was doing and the board caught on fire.

I had a knitting friend who wanted to get together, so I thought tonight was a perfect time to not only clean my completely ransacked house (I live like a bachelor when Stephen is out of town) but to also try out this cedar salmon idea.

I looked up a few recipes online and decided on Real Simple’s version.  The only thing I did differently was I soaked the cedar boards in salted water for two hours. Twenty minutes only brought back memories of grills engulfed in flames.

This salmon was incredible. I’m not too familiar with grilling, let alone grilling salmon, and this recipe made me seem like some sort of salmon chef. Man — I’m gonna have to force feed this down Stephen’s throat when he gets home. He might actually like fish after he tries a bite of this! I served it with Alton Brown’s brown rice and a salad.

Ingredients:
1 sockeye salmon filet
1 cedar plank big enough to fit the filet
1/4 cup brown sugar
1 tbs. cooking oil
2 tsp dried thyme
1/2 tsp. cayenne powder

Directions:
Heat your gas grill to high for 15 minutes. Meanwhile, mix the sugar, oil, thyme and cayenne together to make a paste. Place salmon skin side down on cedar plank. Rub sugar mixture all over the top of the filet. Turn grill to med-low and place planks on the grill. Cover the grill and cook salmon for 40 minutes or until the fat starts congealing in the grains of the meat (see the above photo). Remove planks and let the salmon sit for 5 minutes before serving with brown rice.

30-Minute Craft: Cute Pincushion!

Yesterday my husband and I were antiquing (It was my husband’s idea!) and I came across an old homemade pincushion that looked pretty simple to make. It was basically a round beanbag with yarn wrapped around it — kind of like a stuffed Trivial Pursuit piece.

My rendition turned out cheerful and totally useful. I’m happy I finally got to toss my cheapo Wal Mart pincushion.

And here’s how to make it.

Materials:
a 6- or 7-inch bowl
a small amount of fabric
4 14-inch lengths of yarn
1-inch button
a cup or so of uncooked rice
funnel
pillow stuffing (I used chunky yarn cause I was out of stuffing)
Tapestry needle (make sure it can fit through the holes of the button)

Directions:
Trace your bowl onto the wrong side of your fabric. Double up the fabric and cut out the circles.

Fold one circle in half and crease the center of it. Draw a 2-inch line in the center of the crease and make a cut on this line. This is where you will stuff the pincushion.

Put right sides together and sew all the way around the edges. Cut small slits along the edge so that the fabric won’t ripple when you have it right-side out.

Turn the pincushion right side out through the hole you cut in the center. Stuff the cushion till it’s about halfway full. I didn’t have any stuffing so I just used scrap chunky yarn.

Using a funnel, fill the cushion with rice till it’s stuffed but not too tightly stuffed.

Stitch up the hole. It doesn’t have to be perfect because this seam will be on the bottom and yarn will be covering it.

Take a piece of yarn and double it. Then wrap it around the pincushion and tie it tightly with a square knot on the bottom of the cushion.

Do this with the other three pieces of yarn so it looks like a pie chart. Trim the ends of the yarn.

Thread your darning needle with a piece of yarn and push it up through the bottom of the pincushion so it comes up in the center of the top. Thread the button through and push the needle back down to the bottom. Tie this tightly and secure it with a good square knot. Trim the edges.

Now put pins in your new pincushion and enjoy!

How to Make Salmon Caviar

Last month I posted a short recipe for salmon caviar, or roe. In the past week we’ve had record salmon numbers run through the Kenai River. You couldn’t pass a person in the grocery store without hearing the word “salmon” escape his lips. I had coworkers whose fishing group caught 160 reds in two days. My friend’s family caught 60. Basically, if you had a dipnet and you dipped it in the Kenai River Friday, Saturday or Sunday, you’re probably patting your belly because it is full of grilled salmon right now.

In the spirit of all things salmon, I thought I’d post a more detailed tutorial on how to process and then eat salmon roe. So now when your friends go fishing you can have them save their roe when they are gutting and then you’ll reap all the benefits — all the tasty, tasty benefits. And it’s nutritious too!

Thanks Todd and Josh!

What you’ll need:

  • A piece of 1/4-inch wire mesh grate
  • Lots of salmon eggs
  • A carton of kosher salt
  • Cold water
  • Large mesh strainer
  • One gallon freezer Ziploc bag
  • Rubber spatula
  • Non-aluminum mixing spoon
  • Small mesh strainer
  • Two large bowls
  • One small bowl

Directions:
Place a large bowl in the sink and put the wire mesh over the bowl. Start pushing the eggs through the mesh. This will help separate the membrane from the eggs. You’ll smash some of the eggs, but it’s not a big deal. When you’ve pushed the eggs through as best you can, pick up the membrane and scrape off as many eggs as you’re able. Discard the membrane into a small bowl.

When you’ve pushed all of the eggs through the wire, use a rubber spatula to scrape off the eggs from underneath the mesh. Set the mesh aside for cleaning.

Now fill the other large bowl with very cold water. Add a ton of salt so that there is still salt visible on the spoon when you stir it. This is a basic brine.

Carefully pour the eggs into the brine and stir. Let them sit for 10 minutes, stirring occasionally. Put a spoonful of eggs into a small strainer and rinse them off with cold water. Taste them. If they don’t taste salty enough, let the eggs brine for a few minutes longer until they are salty to your taste. If they are too salty you’ll have to soak the eggs in plain cold water till they become less salty.

When the eggs are to your liking, pour them into a large mesh strainer and run cold water over them for a couple of minutes, while stirring. You want to remove the salt water as best you can without overflowing the roe.

Be sure to wear your amethyst tennis bracelet while preparing this delicacy

Once the roe is rinsed, place the strainer in a large bowl. Make sure the bottom of the strainer doesn’t touch the bottom of the bowl by inverting a small saucer or plate in the bowl. You don’t want the roe to soak in the water. Rather, you want the water to strain out of the roe.

Fill a gallon bag with water and seal it up. Place the bag on top of the roe, which is in the strainer, which is in the bowl. Place in fridge overnight or for 12 hours. This will remove excess liquid and compress the roe, which means tastier roe!

When the roe is ready, place it in small jars with wide mouths.

Wide mouths mean easy roe access

Ta-da! 

From here you can distribute your roe to all of your gourmand friends. It will keep in the fridge for three days, but really, you shouldn’t be storing this stuff. You should be stuffing this stuff into your mouth as fast as possible because it’s so delicious.

In case you have a surplus of prepared salmon caviar (my parents will be processing 40 pounds of it this weekend) the best thing to do is to vacuum pack the jars themselves. Your caviar can keep for a few weeks if vacuum sealed.

Before vacuum packing, poke a couple of holes in the tops of the jars. This will get the air out of the jars while in the vacuum packer.

Store your roe in the back of the fridge where it’s coldest. Eat your caviar with Carr’s crackers and white wine.

Officially YUM. For more caviar answers and insights, I recommend this site. For a more detailed tutorial, click here.

Free knitting patterns, DIY crafts, easy recipes and more!