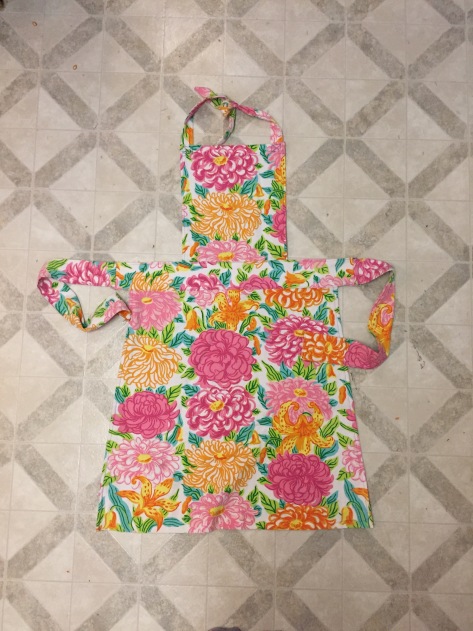
Sewing is by no means my greatest talent. My mom taught me to sew at a young age, but that doesn’t mean I like it. It’s time consuming to cut out a pattern, cut out the fabric and take out the sewing machine. If I’m going to sew something it’s got to be a two-hour-or-less project.
I love the concept of refashioning clothes; i.e., taking an article of clothing and turning into a different article of clothing. Refashionista is pretty much my sewing/thrifting idol and she’s incredibly cute.
Lately I’ve been noticing gigantic church-lady linen dresses at the thrift shops. My mother loves linen dish towels because they are lightweight and absorbent. I thought about purchasing a linen dress and cutting it into dish-towel rectangles, but the concept didn’t really excite me much.
Last week I saw a lovely linen apron at Anthropologie. I had an “I can make that” moment. I figured an apron was a great way to refashion an old dress.
Years ago I made an apron for my sister and managed to write down the pattern measurements. I have included that pattern in this tutorial. Keep in mind my sewing skills are far from elegant so I’m sure some of you could come up with a prettier apron, but I’m satisfied with what I ended up with and it only took two hours from start to finish.
Be sure to check out the bottom of this post for more clothing refashion tutorials I’ve done over the years.

What you’ll need:
- A large linen dress
- Medium weight fusible interfacing – 3″ x 23″
- Seam ripper
- Fabric scissors
- Sewing machine
- Straight pins
- Iron

Directions:
- Rip a back or side seam of the dress so the fabric can lie flat. I ended up with a nice long zipper that I’m sure I’ll reuse for another project. Measure out your apron elements on the dress as best you can. If you don’t have enough material you can make the sash ties out of a different material. Use the hem of the dress as the hem of the apron. This saves you a step!

2. Cut out the pieces from the dress.


3. Iron and turn under twice the edges of the apron bib on three sides. no need to turn under the bottom seam as it will be sewn into the waistband.
4. Sew around the three folded edges of the apron bib.

5. Iron and turn under twice the side edges of the apron body. Pin and sew in place.
6. Iron the fusible interfacing to the wrong side of one piece of the waistband.

7. Iron and turn under once the top and bottom edges of the waistband pieces.

8. Center the apron bib to the center of the waistband. Sandwich the apron bib between the waistband pieces and pin in place.

9. Pin the remaining top edges of the waistband pieces. Sew the entire length of the top of the waistband including the sandwiched apron bib part.
10. Repeat steps 8 and 9 with the apron body.
11. Fold the sash piece in half lengthwise so right sides are touching.
12. Sew along the long edge of sash (thus creating a long tube) and along one short edge. Turn right-side out using a chopstick to poke out the closed edge. Iron flat and sew a top stitch along the seam side if you desire. Repeat with other sash.

13. Create a French seam with the waistband and one of the sash pieces. Sew the edges together so the raw sides are exposed on the front of the garment.

14. Fold the sash on top of the waistband and sew another seam on the new edge, thus encasing the raw edge in a seam. Iron flat and top stitch so the French seam doesn’t stick out. Repeat with other sash.

15. At this point you should have an apron with no neck ties. I held it up to me and realized I had sewn the bib on sideways so it was too tall (whoops!). I folded it down about an inch, ironed it and sewed it.
16. Fold a neck tie piece so right sides are touching and iron flat.
17. Sew along the long edges and one short edge of neck tie and turn right-side out (anyone used to make scrunchies as a kid? This should feel nostalgic). Top stitch along the sewn edge if you like. Repeat with other neck tie.
18. Fold the raw edges of the neck tie inward and iron flat.

19. Sew the neck ties to the apron bib. I sewed a square with an “X” through it to really secure it.


Check out some of my other refashioned clothing tutorials.


