How to Reupholster a Dining Chair

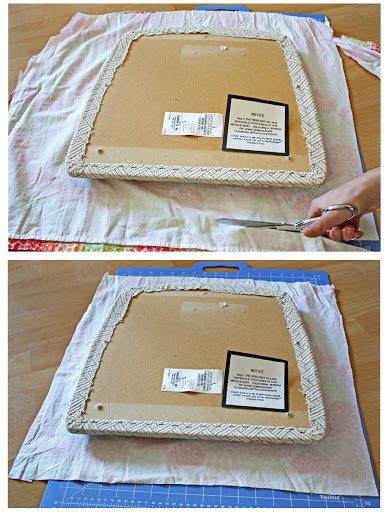
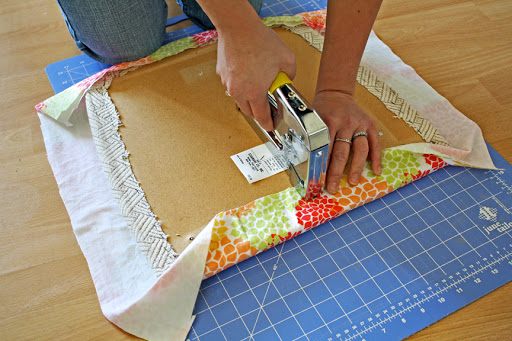
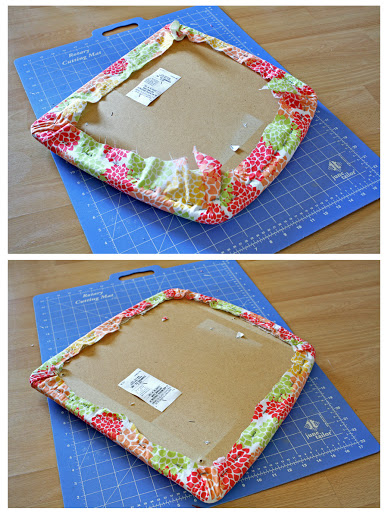
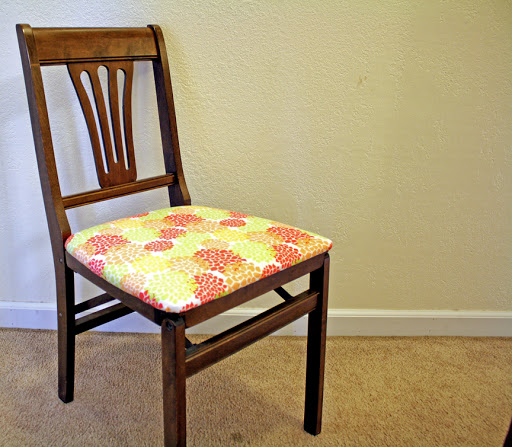
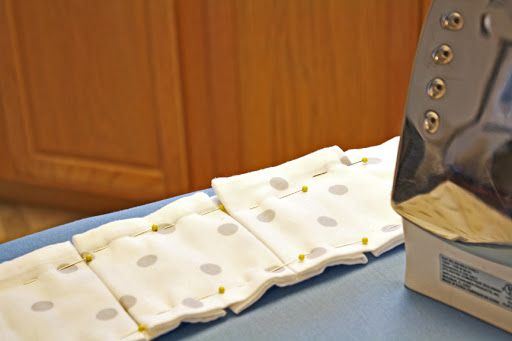
Recovering a dining chair is simple. It’s about a 30 minute project that can brighten up any drab, thrift store chair. I decided to use a dress I bought at the thrift store to recover a chair that looked as though it needed some love. The frame was in great shape but the seat was all torn up and let’s just say….ugly.

Old chair – $5 at thrift store

Sundress – $2 at thrift store
All you need are the following materials:
  • An old chair with a padded seat
  • A piece of fabric 3 inches bigger on all sides than the cushion
  • Screwdriver
  • Staple gun
  • Fabric scissors
Directions:
  • First, unscrew the cushion from the chair frame. Place the screws somewhere where they won’t get lost.
  • Then, iron your fabric and make sure it’s big enough for your cushion. My fabric was thin and see-through and the dress came with a lining so I decided to double up the lining and the fabric.
  • Trim the fabric all around the cushion so there’s about 3 inches on all sides.
  • With the cushion face down on the fabric, stretch one side tightly around and staple in the middle. Do this on each side, turning the cushion over once in a while to make sure there aren’t any wrinkles. 
  • Next, staple the corners of the cushion by gathering up the fabric so it looks nice. Staple all of the corners.
  • Now, staple along the edge of the fabric, stretching it taut as you go. Check the other side of the cushion for wrinkles. If there are any, either pull out the staple by the wrinkle and redo or just tug the fabric and staple it down.
  • When you’ve stapled all around the edge trim the edge so there’s about 1/2 inch of fabric next to the staples. 
  • Finally, screw the cushion back onto the frame.
Voila!
Before and after!

Thrift Finds 2

My husband and I decided to skip our hometown thrift shops yesterday and drive out to the Matanuska Valley and visit the thrift shops in Palmer and Wasilla. We strolled down the quaint downtown Palmer street after checking out their Bishop’s Attic. There I found a couple of cool things.

Boots – $7.50

Sundress – $2

The boots are J.Crew and they are made in Italy. They are suuuuper soft inside. The dress is a girls’ XL and I bought it for the fabric. I wasn’t sure what I would do with it until we made it to Nugen’s Ranch in Wasilla.
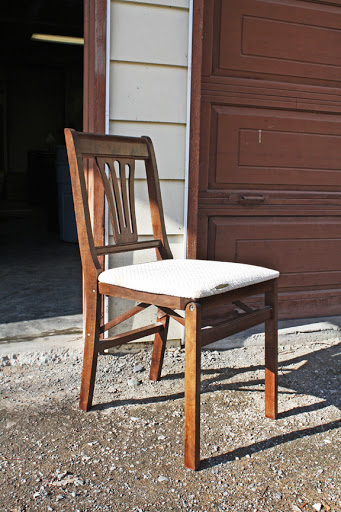
Chair – $5

I found this shabby chair and I knew I had to recover the cushion with the dress fabric. That will be today’s project besides spring cleaning.

Flannel Ruffle Scarf

Yesterday morning I leaped out of bed and started making the flannel ruffle scarf I saw a couple of months ago on http://www.rufflesandstuff.com.

It was about 18 feet of flannel I ended up sewing and pinning. It was pretty fun to make — and simple!

I wore it about all day today. It’s a tad extravagant, or as my dad described “like a clown,” but I love how soft and unique it is.

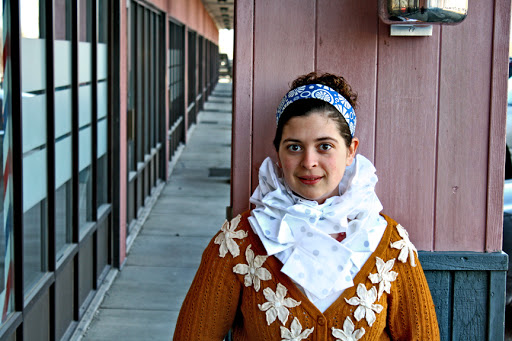
I didn’t add the buttons as she has done in her version. Thanks for the great pattern!

Thrift Finds No.1

In addition to cooking and crafting, my other passion is finding awesome stuff for cheap. I take after my frugal mother. She taught me at a young age that there’s nothing wrong with wearing used clothes. When most children hated wearing their older sibling’s hand-me-downs, I would be eagerly sitting on my sister’s bed as she rifled through her bedroom getting rid of stuff. What can I say? I’m a bit of a scrounger. In my college years I set up a free box in my dorm lounge where people could put things they didn’t want. During move-out week that box would turn into a mountain and I would go digging. I would find shelves, lamps, tapestries, Converse All-Stars, tea kettles, and even once a $200 hiking backpack. I furnished my first apartments on mostly thrift-store items.

These days I have a more refined thrifty shopping style. I usually check out the local thrift shops once every couple of weeks and the consignment clothing shop once every three weeks. In the summer I occasionally stop at garage sales after slowly driving by and assessing the type of items.

I’ve decided to start an ongoing blog column dedicated to my thrifty finds. It isn’t just to show off the awesome stuff I find (that’s about 90% of the reason), but I’d also like to show people that you don’t need a lot of money to look and feel good.

Candy dish – 75 cents
Colorful pot – $3

Here are a few tips to keep in mind when thrift store shopping:

  • Keep an ongoing mental list of things you might need. I’m always on the hunt for queen sized sheets, king-sized pillow cases, cool fabric, belts, useful kitchen gadgets, the perfect pair of jeans, good yarn, neat sewing patterns, flute sheet music, fun stationery and books in French. Having a list will give you more of a focus and will help you hone in on the good stuff. 
  • Be ready to find something awesome or to find absolutely nothing. There are good thrift store days where you might totally score an old Le Creuset frying pan and a Fiestaware pitcher, but often there just isn’t anything good. Thrifting takes a certain level of dedication. You can’t expect to find that cowboy shirt with pearlized buttons on your first go. Be patient.
  • Don’t become a pack rat. Just because you find a good deal on a brand new Target comforter at Salvation Army doesn’t mean to have to buy it. Think about how much you actually want and need an item before purchasing it. The last thing you want is a home full of clutter.
  • Be sure of quality. Most thrift stores have a zero-returns policy, so if you’re in the market for a bigger-ticket item such as a sofa, make sure you inspect what you’re thinking of buying. Make sure there are no funky smells coming from it and take a look at the wear and tear. I’m not against buying an avocado velour wingback chair if the cushion has a stain only on one side. I’d just turn over the cushion and call it good. But if there are visible tears in the upholstery, I’d really consider if it’s the chair I’m looking for. With clothing, make sure there aren’t any holes, stains or missing buttons. Are you really going to replace that missing button on that houndstooth overcoat? 
  • There is always room for improvement. Find a sewing desk that would work perfectly in your computer room but the finish is terrible? Consider sanding and painting it. My godmother has made a hobby of refurbishing abandoned wooden furniture on the side of the road. All of her kitchen chairs were originally throwaways. She recovered the seats (very easy to do if you have a staple gun) and painted them all to match. The same goes for clothing. My husband has found several high-quality dress shirts at the thrift store that pretty much fit him, but for very inexpensively he took them to an alterations shop and had them fitted for him. If you have a top-loading washing machine, it’s easy to professionally dye clothing (as long as it’s made of all-natural materials). I once found a white duvet cover at a garage sale and dyed it purple to make it more interesting.
  • Don’t forget about Craigslist. If you’re looking for something specific, this is always a great place to start. You don’t even have to be dressed to shop there! I have found some incredible stuff on this site including a pot-bellied pig! We found our maple expandable dining table and four chairs on Craigslist for $200, our Natuzzi cream leather couch for $700, and our entire modern bedroom set for $300 (valued at over $1,200 when I did the research).
So keep your eyes peeled for my thrifty finds. I’m going out there today and I’ll post if I find anything good.
Acrylic paint – 15 cents apiece
Little cactus pot – $1
Thanks for reading.
Nat

Chicken Sandwich

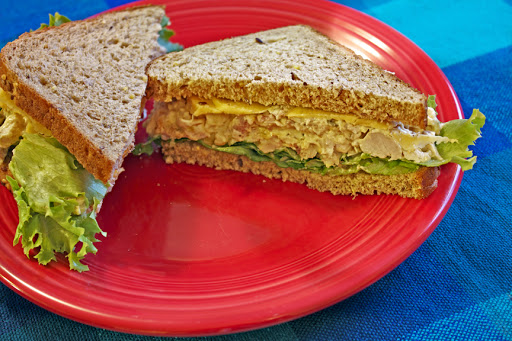
Another dinner thrown together with leftover Costco roast chicken. I never measure, so the amounts are of course approximate.

Ingredients:
3/4 cups cooked chicken, diced
1 tsp. yellow mustard
1 Tbs. sweet relish
4 Tbs. light mayo
1 tsp. apple cider vinegar
a dash of smoked paprika
salt and pepper

Mix all the ingredients together and serve on wheat toast with lettuce and your favorite cheese.

Digital Photography 101 — class 1 notes

My photographer friend was gracious enough to give me a two-hour lesson today on how to take good digital photos and how to edit them in Photoshop. Basically, I wanted to learn how to use my Canon EOS Rebel XS beyond the auto-focus setting and how to use Photoshop beyond the auto-levels setting. Granted, it can’t all be taught in two hours, but the following are the things I picked up on today.

First, it’s crucial to have a tripod. This ensures you get a crisp, in-focus photo.

Next, activate the timer on the camera to two seconds. When you press the shutter button you are probably going to shake the camera slightly, which can produce an out-of-focus shot. Giving your camera a two-second delay ensures that once the shutter button is pressed the camera is nice and still by the time the exposure is taken.

Now, let’s change that dial on your camera from “Auto” to “M.”

The first thing you’ll notice is on the viewing screen there is a light meter. When you push the shutter button down halfway, in addition to automatically focusing the shot it will now tell you if you need more or less light.

This brings us to the basics of photography. There are two main ways to let light into your camera: the shutter speed and the aperture. The shutter speed on my camera can vary from 1/4000th of a second to 30 seconds. Whatever I set it on, that’s how long the shutter will be open and the “film” will be exposed to light.

The aperture is the size of the hole that lets light into the lens. This is measured in F-stops. The larger the F-stop number, the smaller the aperture is and the less light can get into the camera.

So finding the right balance of light means finding a balance of shutter speed and aperture. There are many combinations of the two that can give you the right amount of light for your photo. These different combinations can create different depths of focus.

For instance, you could take a photo with a very large aperture, say, F5.6, and a very quick shutter speed such as 1/800 and you might get a photo such as this:

This photo is strictly what the light meter in my camera judged to be the right amount of light. We’ll address this later. What you can initially notice is that the cookie is in focus but pretty much everything else is out of focus, such as the back corner of the plate and the far background. 
Now, on the opposite end of the spectrum, if you have a very small aperture such as F22 and a slow shutter speed such as 1/25, your photo could look something like this:
You might notice that now the plate is more in focus and so is the background. The small aperture has created a greater depth of focus. Incidentally, I also added a black piece of tagboard in the background to take away the bright white spots. That’s why it looks really different in the background.
You can notice how the second photo looks brighter than the first. That’s because I fiddled with the histogram. When you view your photo on your camera, there’s a way to look either at the whole photo or a tiny version of the photo with a little graph next to it. You want to be able to view the tiny graph. The histogram has divided your photo up into 255 shades of grey from the blackest of black to the whitest of white. The graph shows blacks on the left and whites on the right. The vertical axis displays how many pixels in that photo are in that specific area of dark to light. When my camera automatically set the light meter, it didn’t take the whitest of whites into consideration. I altered the shutter speed so the light meter appeared to be slightly overexposed.
You want to shift everything a little more to the right in the histogram, creating more pure whites in the photo. The reasoning behind this, which isn’t totally clear to me, is that digital photos store most of their data in the white parts so it’s best to contain as much info in the whites cause you can alter it later in photoshop. It’s better to have too much information than not enough.
After I altered the exposure and viewed the histogram, the little photo started blinking in the whitest areas. That’s good. You want there to be some true white spots, just not too many of them. I haven’t quite learned why, but for now this is my best explanation.
I took several shots of this oyster where I altered the F-stop and shutter speeds so the light was balanced slightly to the right on the little light meter. Each time I took a photo I would check the histogram and see if the photo was blinking little hot spots. If it wasn’t I’d either change the aperture or shutter speed so the light meter would be one setting farther to the right.
Then I loaded up my photos onto my computer. My Photoshop is having trouble processing RAW files, so for now, we’ll just use JPEGs. When I loaded up my photos I looked at the differences of depth of focus. This is where you can be the artist. I decided I liked the plate to be in focus, so I chose the photo above to manipulate in Photoshop.
This is where you can make your photo truly shine. It’s important to know the basics of taking a good photo, such as composition and light direction, but in Photoshop you can bring out the best parts of your photo to make it look amazing. 
I really love the photos featured on Foodgawker.com. They look all bright and cheery. I want to achieve this look with my blog photos. I think a lot of it has to do with how you manipulate the photo in Photoshop.
First, open up the image you want to manipulate. Look at the image at 100 per cent size by double-clicking the magnifying glass. It is important that your photo is sharp to begin with. The first photo I opened was not sharp at 100 per cent, but looked sharp at 16 per cent.
Now, create a duplicate layer (command J). Doing all the manipulation on layers is a good idea in case you screw it all up. If you do you can always delete the layers and still have the original image. The first thing you can do is adjust the brightness and contrast. Looking at the photo above, I determined the image was a little flat and grey. I increased the brightness and contrast levels and the photo already looked more cheerful. 
But what if I wanted parts of the photo to be brighter and parts to be darker? One good method is to create a layer mask in the duplicate layer. Then select the paintbrush tool and make the brush size pretty large, like 1100. Make sure the paint color is black and start painting over the bright spots that you want darker, such as the plate. This will keep the cookie nice and bright, but will darken the plate. 
What if you want to darken the plate, but not as much as it’s darkening it now? Just double click the black paint swatch and click the center of the color palate. That will make it grey and will make the plate less dark when you paint over it.
Another technique is to select “filter>sharpen>unsharp mask.” Drag the preview to an important part of a image. I used the eye as a reference point. This way you can see up close what the filter is doing. Select the Amount at 20 per cent and drag the radius all the way to the maximum right, 250 pixels. Doing this gave my cookie punch. It just looked better.
One more touch is to select “Filter>sharpen>smart sharpen” and find the most defined part of your photo, in this case, maybe the granules of sugar on top. Fiddle with the amount and radius and see if you like the result.
And yet another technique is to select “Shadows/Highlights” in the Adjustments menu. Select “Show more options” and fiddle with the highlights. Also, raise the midtone contrast.
Lastly, use the rubber stamp tool to remove any blemishes. My cookie had some dirt on it so my rubber stamp got rid of it.
After all these adjustments, here’s what my image looked like.
Yowza! It’s not a huge difference all in all, but just the subtle changes make the photo better. It takes what’s already good in real life and makes it better than it actually looks, I guess.
Here’s a before and after, just to see the difference better:
before

after

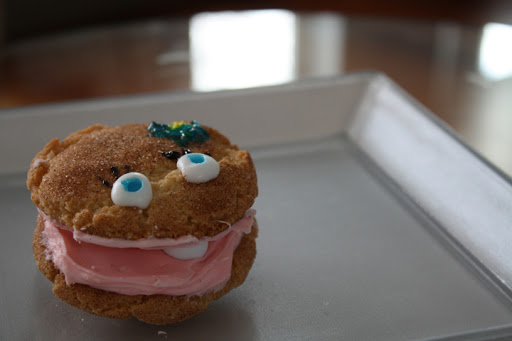
Oh, and thanks to Susie for the adorable oyster cookie. It was delish!

Homemade Whole Wheat Pizza

If you have an extra 90 minutes to spare before dinner time, then it’s totally worth your while to make your own pizza dough for many reasons. One, it’s cheaper than store-bought crust. Two, it’s tastier than store-bought crust. Three, it’s not full of any preservatives or weird ingredients. And four, it’s cheaper. I know I mentioned that already, but I thought I’d reiterate.

I find the best way to make pizza dough is in the bread maker. It kneads it for you so there’s no floury, sticky mess for you to clean up later when it’s all crusted over (I’m pretty lazy).

I found a delicious recipe for whole wheat dough at food.com. I don’t think I need to tell you how to make toppings for pizza, but I used my simple marinara sauce recipe and ended up buying a bag of pre-shredded italian blend cheese. I think it has mozzerella, asiago and a couple of other yummy cheeses in it.

The dough is enough for a pizza the size of a large baking sheet. Lunch for two days, hurray!

Dough Ingredients:
1 cup plus 2 Tbs. lukewarm water
2 Tbs. olive oil
1.5 cups all-purpose flour
1.5 cups whole wheat flour
1 tsp. sugar
1 tsp. salt
2.5 tsp. yeast

Directions:
Put ingredients, in order, into your bread machine and press the “dough” button. Let the machine run its cycle, about 90 minutes on my bread machine. During this time you could prepare your marinara sauce and toppings. When the dough is ready, roll it out on a floured table until its the size of a large baking sheet.

Flour a baking sheet and stretch the dough to fit it, trimming any excess. Brush the top side of the dough with olive oil. Cover with plastic wrap and refrigerate for 30 minutes (I don’t know if refrigeration is necessary. I was waiting for a friend to come over before making the pizza. You’re probably fine not refrigerating). Preheat the oven to 400 degrees.

Start prepping your pizza!

Coat pizza in sauce. Top lightly with cheese. Add toppings of your choice. Top with a little more cheese. Cheese goes a long way so you don’t really need to overdo it. Plus, it’s healthier if you go lighter on cheese anyway.

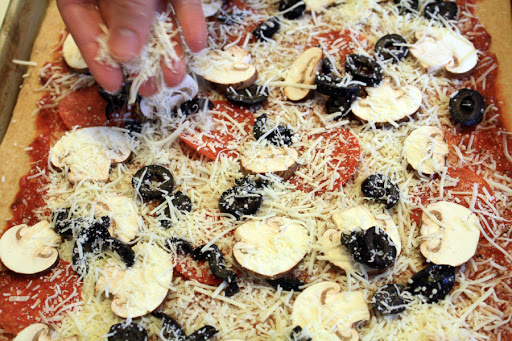
Bake pizza for about 20 minutes or until crust is golden. Remove from oven and cool for 5 minutes before slicing.

Cheesy Broccoli and Quinoa

What’s a girl to do when she’s craving mac & cheese but is out of mac and is already in her PJ’s and doesn’t feel like going to the grocery store? Why, rifle through the cupboards till she finds something resembling mac & cheese, of course!

I feel better though that I made quinoa instead of pasta because it’s healthier overall; but I guess the cheese part cancels that all out. But there’s broccoli in it!

Serves 3, or 1 with lunch for tomorrow and Tuesday

Ingredients:
1 cup uncooked quinoa
2 small broccoli crowns, cut up
1/3 cup shredded sharp cheddar
a couple of tablespoons of grated pecorino romano cheese
a couple of tablespoons of grated pizza cheese
1 tbs butter
1/3 cup milk
1 clove of garlic, minced
1 tbs Wondra flour
salt and pepper to taste

Directions:
Cook quinoa according to package. I make mine in the rice cooker and overfill the water past the “1” line. Meanwhile, steam broccoli in a covered saucepan till bright green and tender, about 8 minutes?
In a serving bowl, combine the butter, milk and garlic. Microwave for 40 seconds or until butter is melted. Whisk in the flour and microwave another 30 seconds. If sauce is too thick, add more milk. If it’s too thin, add a bit more flour and microwave another 15 seconds. Add the cheeses, salt and pepper. Stir in cooked quinoa and broccoli. If sauce is too thick, add a bit more milk. Serve with a big glass of milk. I’m trying to use up my milk before tomorrow, can’t you tell?

Gathered Clutch

I ordered some fabric from Hawthorne Threads and it arrived today. I was really excited. It only took two days to ship. That’s some kind of Alaska record. Since I have a limited supply of this exquisite cotton I want to be sure I know what I’m making with it. Of course I’ll be using it for my headbands, but I wanted to try a purse inspired by the gathered purse at noodle-head.com.

I used some scrap fabric and came up with something a tad funky, but I like it. I didn’t use a pattern whatsoever and the lining is kind of shoddy, but it holds my phone and I could totally use it out on the town.

Headbands — I can’t stop!

After making my own headband the other day I was motivated to make a bunch at once, so I went to JoAnne’s and bought some fat quarters. It’s a great use for fat quarters because they are already 18 inches long, which is the length I use for the headbands, so less cutting! Here’s the pattern.

Free knitting patterns, DIY crafts, easy recipes and more!