Homemade Whole Wheat Pizza

If you have an extra 90 minutes to spare before dinner time, then it’s totally worth your while to make your own pizza dough for many reasons. One, it’s cheaper than store-bought crust. Two, it’s tastier than store-bought crust. Three, it’s not full of any preservatives or weird ingredients. And four, it’s cheaper. I know I mentioned that already, but I thought I’d reiterate.

I find the best way to make pizza dough is in the bread maker. It kneads it for you so there’s no floury, sticky mess for you to clean up later when it’s all crusted over (I’m pretty lazy).

I found a delicious recipe for whole wheat dough at food.com. I don’t think I need to tell you how to make toppings for pizza, but I used my simple marinara sauce recipe and ended up buying a bag of pre-shredded italian blend cheese. I think it has mozzerella, asiago and a couple of other yummy cheeses in it.

The dough is enough for a pizza the size of a large baking sheet. Lunch for two days, hurray!

Dough Ingredients:
1 cup plus 2 Tbs. lukewarm water
2 Tbs. olive oil
1.5 cups all-purpose flour
1.5 cups whole wheat flour
1 tsp. sugar
1 tsp. salt
2.5 tsp. yeast

Directions:
Put ingredients, in order, into your bread machine and press the “dough” button. Let the machine run its cycle, about 90 minutes on my bread machine. During this time you could prepare your marinara sauce and toppings. When the dough is ready, roll it out on a floured table until its the size of a large baking sheet.

Flour a baking sheet and stretch the dough to fit it, trimming any excess. Brush the top side of the dough with olive oil. Cover with plastic wrap and refrigerate for 30 minutes (I don’t know if refrigeration is necessary. I was waiting for a friend to come over before making the pizza. You’re probably fine not refrigerating). Preheat the oven to 400 degrees.

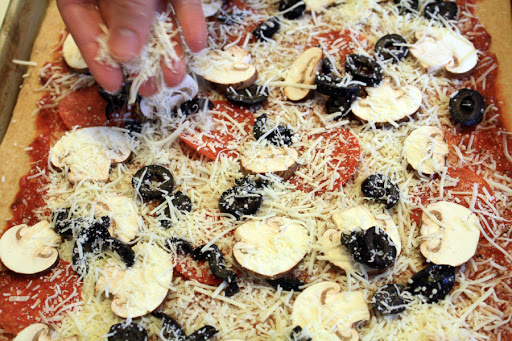
Start prepping your pizza!

Coat pizza in sauce. Top lightly with cheese. Add toppings of your choice. Top with a little more cheese. Cheese goes a long way so you don’t really need to overdo it. Plus, it’s healthier if you go lighter on cheese anyway.

Bake pizza for about 20 minutes or until crust is golden. Remove from oven and cool for 5 minutes before slicing.

Cheesy Broccoli and Quinoa

What’s a girl to do when she’s craving mac & cheese but is out of mac and is already in her PJ’s and doesn’t feel like going to the grocery store? Why, rifle through the cupboards till she finds something resembling mac & cheese, of course!

I feel better though that I made quinoa instead of pasta because it’s healthier overall; but I guess the cheese part cancels that all out. But there’s broccoli in it!

Serves 3, or 1 with lunch for tomorrow and Tuesday

Ingredients:
1 cup uncooked quinoa
2 small broccoli crowns, cut up
1/3 cup shredded sharp cheddar
a couple of tablespoons of grated pecorino romano cheese
a couple of tablespoons of grated pizza cheese
1 tbs butter
1/3 cup milk
1 clove of garlic, minced
1 tbs Wondra flour
salt and pepper to taste

Directions:
Cook quinoa according to package. I make mine in the rice cooker and overfill the water past the “1” line. Meanwhile, steam broccoli in a covered saucepan till bright green and tender, about 8 minutes?
In a serving bowl, combine the butter, milk and garlic. Microwave for 40 seconds or until butter is melted. Whisk in the flour and microwave another 30 seconds. If sauce is too thick, add more milk. If it’s too thin, add a bit more flour and microwave another 15 seconds. Add the cheeses, salt and pepper. Stir in cooked quinoa and broccoli. If sauce is too thick, add a bit more milk. Serve with a big glass of milk. I’m trying to use up my milk before tomorrow, can’t you tell?

Gathered Clutch

I ordered some fabric from Hawthorne Threads and it arrived today. I was really excited. It only took two days to ship. That’s some kind of Alaska record. Since I have a limited supply of this exquisite cotton I want to be sure I know what I’m making with it. Of course I’ll be using it for my headbands, but I wanted to try a purse inspired by the gathered purse at noodle-head.com.

I used some scrap fabric and came up with something a tad funky, but I like it. I didn’t use a pattern whatsoever and the lining is kind of shoddy, but it holds my phone and I could totally use it out on the town.

Headbands — I can’t stop!

After making my own headband the other day I was motivated to make a bunch at once, so I went to JoAnne’s and bought some fat quarters. It’s a great use for fat quarters because they are already 18 inches long, which is the length I use for the headbands, so less cutting! Here’s the pattern.

Oilcloth Headband with Photo Tutorial

Every time we go to Mexico I can’t resist buying oilcloth at the fabric store. All the bright colors, fruits and flowers just make me so dang happy.

Here’s a photo tutorial on how to make a lovely headband. It’s pretty easy and looks pretty profesh. Enjoy!
Sorry, my usual photographer was taking a nap.
Materials:
One piece of oilcloth, 1.75 in. x 18 in.
One package of double fold bias tape
One four-inch piece of 1/2-in. wide elastic
1. Cut two lengths of bias tape to run along the long edges of the oilcloth. Slip the edge of the oilcloth into the bias tape. It should fit snugly in there. Sew the bias tape in place, making sure you’re sewing through the top layer of the tape, the oilcloth and the bottom layer of the tape
2. Using a zig-zag stitch, secure the elastic to the raw edge of the oilcloth.
3. Fold in the corners of the band so it makes a taper. Sew in place with a zig-zag stitch.
4. Place the headband around your head and adjust the elastic so it’s comfortable. Repeat steps 2 and 3 for the other end of the band.
It’s as simple as that. Only took me about 10 minutes total. 

Springtime Headband with Tutorial

The apparel store I work at always gets fun headbands in this time of year. They are simple construction with bright, pretty fabrics, but they always cost way more than I’m willing to pay. Eighteen dollars? I could just make the same thing with materials I already have at home. That’s free!

Here’s step-by-step instructions on how to make your very own springtime headband. Enjoy!

Materials:
A piece of cotton, 18 in. x 4 in.
5-inch piece of 1/2-in. thick elastic

Directions:
1. Cut your fabric to a dimension you prefer. I wanted about a two-inch thick headband, so I cut my fabric to be 4 inches wide (it’s a little narrower than two inches because of the seam allowance). You also might have a different sized head from mine, so you could always measure the circumference of your head and subtract four inches.

2. Sew your fabric together on the long edge, right sides together. I use a very small seam allowance. I line the fabric up with the edge of the foot. You are essentially making an inside-out tube. Turn your tube right-side out and iron flat with the seam going up the middle. This will be the inside part of your headband.

3. Iron the edges in on each side of the strip so that no raw edges show.

4. Place the edge of the elastic inside one of the ends of the fabric strip so about 1/2 inch of the elastic is inside. Sew in place using a zig-zag stitch.

5. Iron in the corners of the same side of the strip so it makes a tapered edge. Zig-zag stitch the folds in place.

6. Now place the headband around your head and figure out how much elastic you will need to make it comfortable. Once you’ve figured that out, repeat steps 4 and 5 on the other edge.

Presto! I think I’m gonna whip out several of these for my friends.

Baby Blanket

I’ve been waiting to post this project because I didn’t want to spoil the surprise for my friend Lizzie. She is having a baby girl any day now. I just sent this out to her last week. It’s just a big, crocheted granny square with added trim and flowers.

Breakfast Skillet

This is supposed to be a weekend breakfast skillet, but it’s so dang tasty and easy I’ve started making it during the week.

Serves 2
Ingredients:
4 eggs
6 Tbs. milk
2 slices of bread, cut into cubes
2 green onions, chopped
2-3 slices of bacon, cut into small pieces
4 baby portobello or crimini mushrooms, sliced
1/3 cup shredded sharp cheddar
1 Tbs. butter
salt and pepper

Directions:
Preheat oven to 475 degrees F. In a small frying pan melt the butter over medium high heat. Add the mushrooms and saute till they are lightly browned on all sides. Set mushrooms aside. In an oven-proof medium skillet, cook the bacon over medium-high heat till crispy. Set aside the bacon and reserve about a tablespoon of bacon grease in the pan. Add bread cubes from only one slice of bread and brown on all sides. Set aside with the untoasted bread cubes. Meanwhile, whisk the eggs and milk in a mixing bowl. Add the salt, pepper, green onions, bacon, mushrooms and cheese. Add the egg mixture to the now empty pan and stir around for about a minute, till eggs are just starting to set. Fold in all the bread cubes and pat everything down with a spatula. Place in oven and cook for 7 minutes.

Beluga Point

One of the best things about living in Anchorage is you are always merely minutes away from beauty and nature. After dinner last night, Stephen suggested we go for a drive. Fifteen minutes later we pulled off the highway at Beluga Point and enjoyed the scenery. Steve is convinced spring is on its way, but I’m skeptical. We’ve been blessed with clear bright skies for two weeks, but the low clouds have started to set in and I think we’re due for more snow. I can’t wait for break up!

Free knitting patterns, DIY crafts, easy recipes and more!