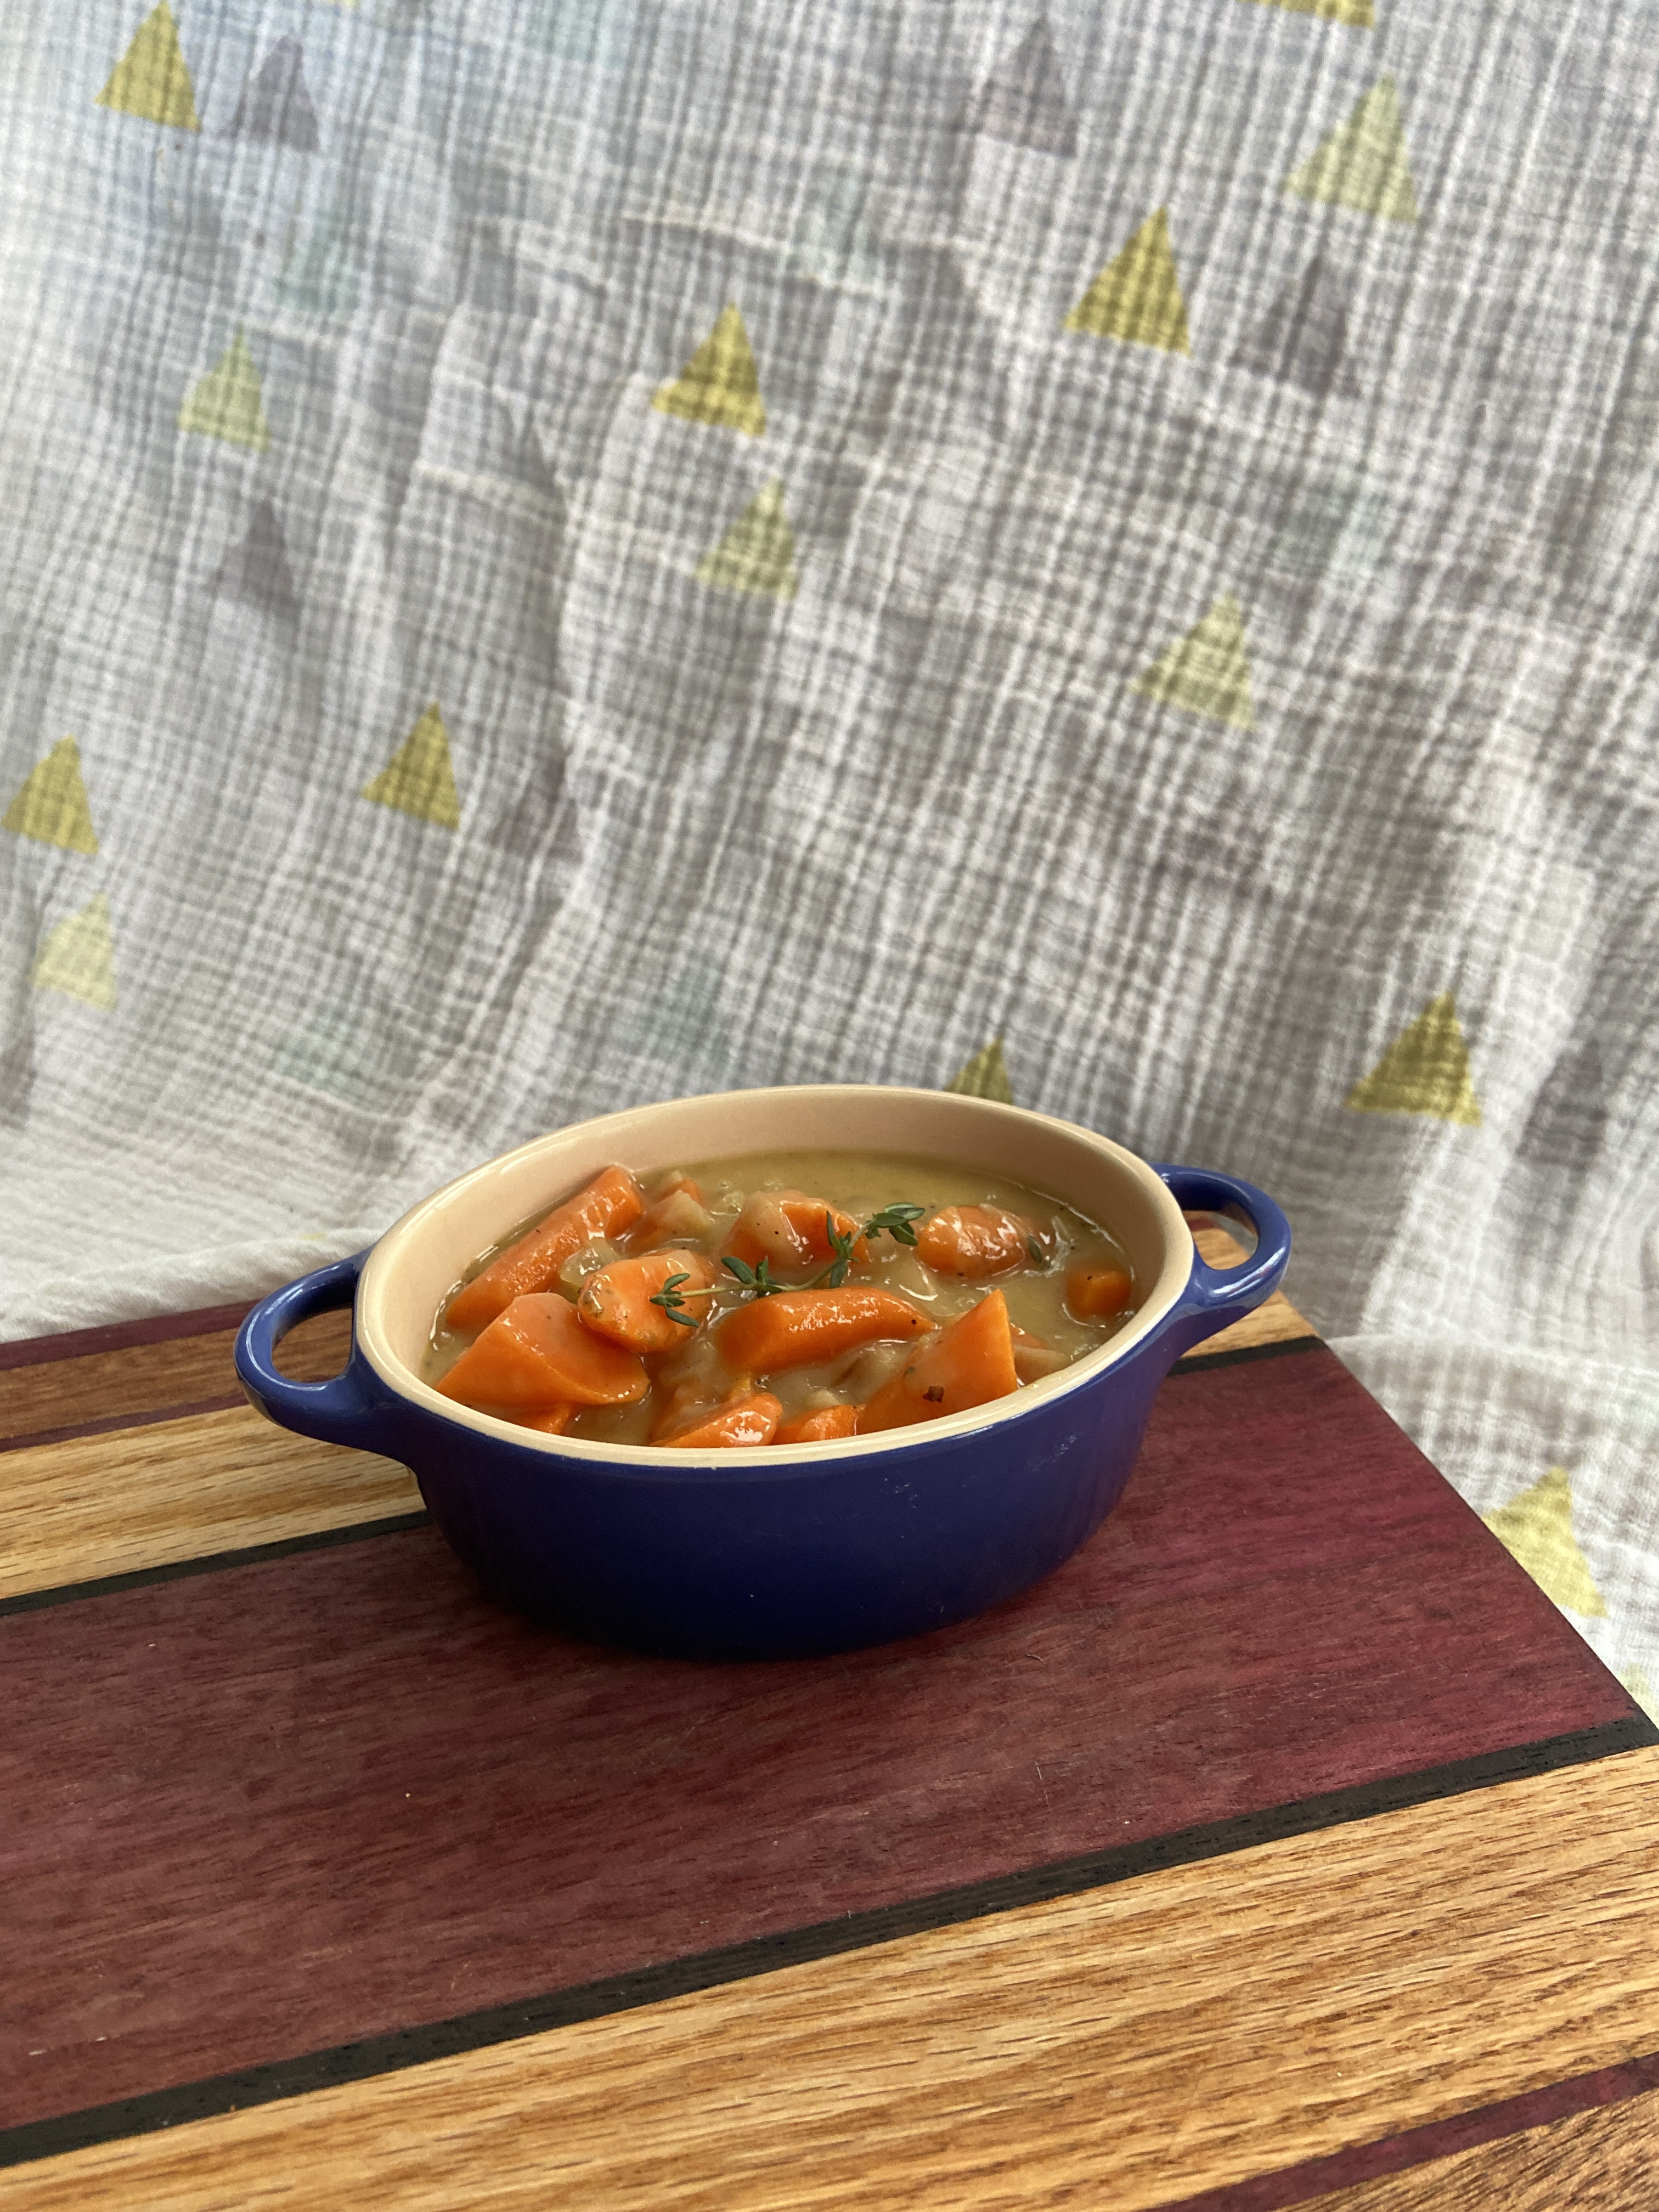
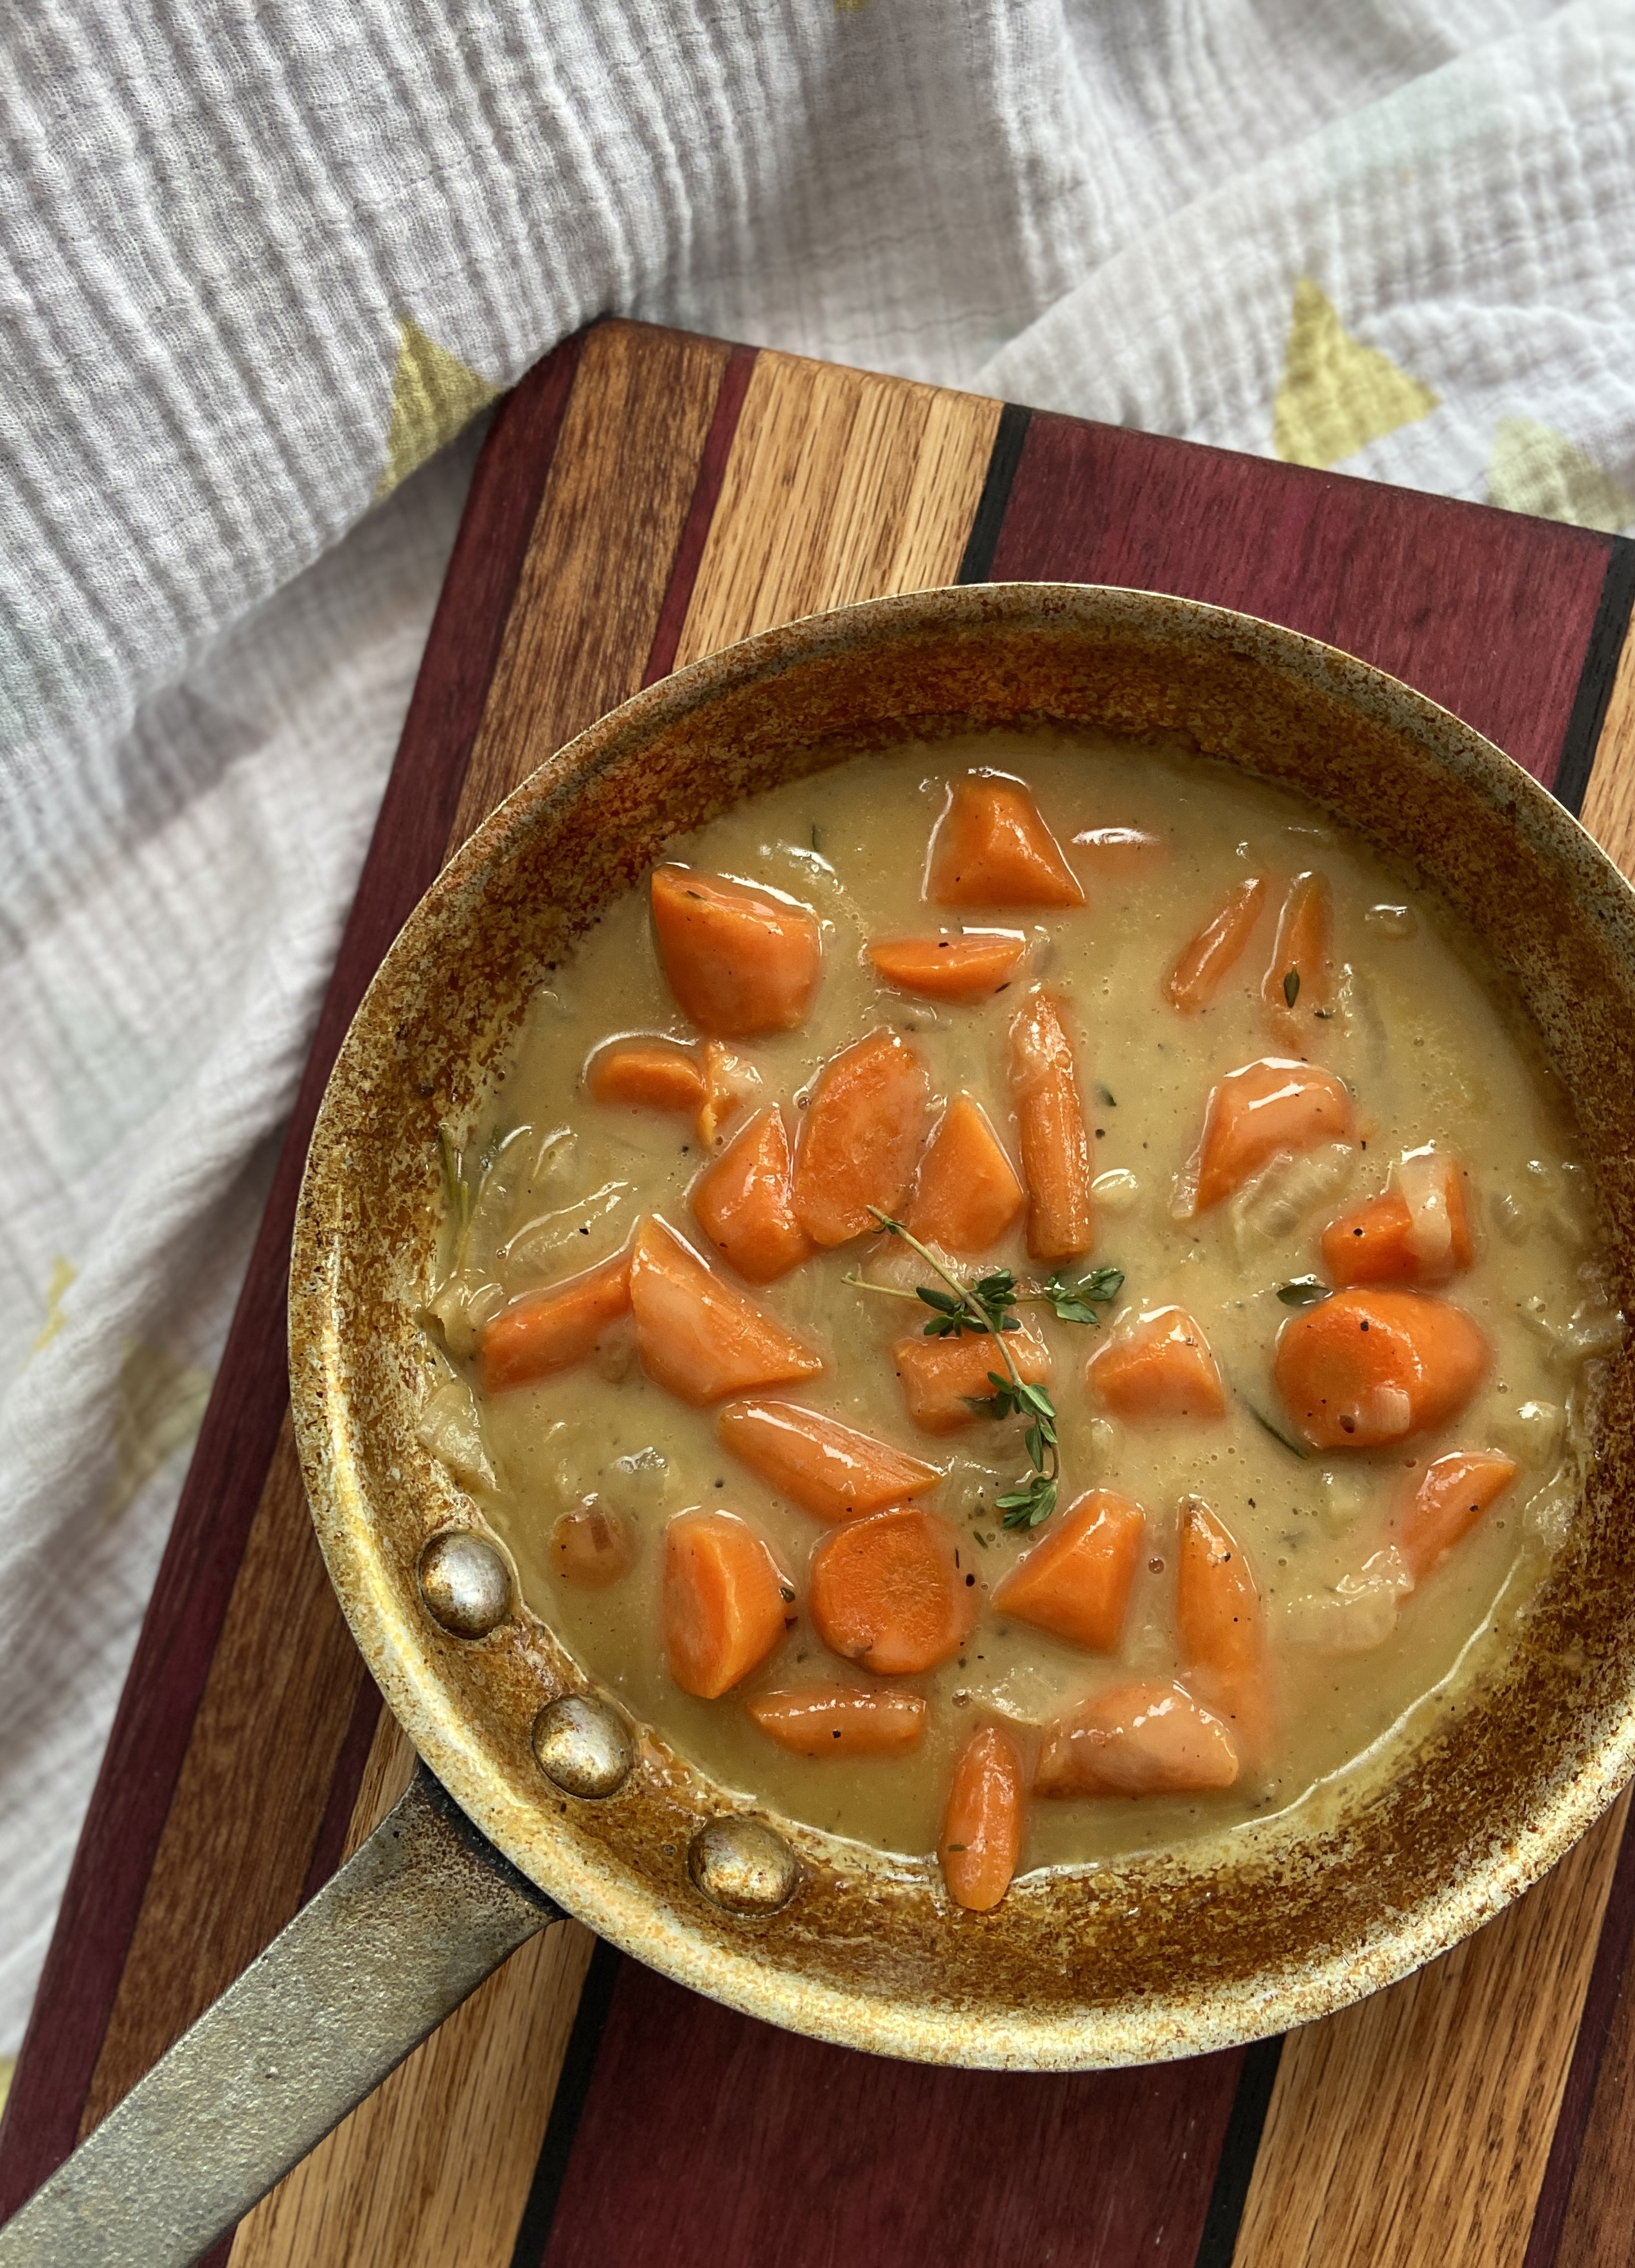
Category Archives: recipes

Homemade Russian Pelmeni – Updated

Back in 2011 I posted a recipe for one of my favorite dumpling recipes – pelmeni. This was back before I had all the recipe-writing knowledge I have today, so I wanted to update this recipe for anyone wanting to make these delicious dumplings at home.

It’s super helpful to have a pelmeni mold, but you can always make them using a small glass as a dough cutter and folding them into half moon shapes.

Russian Pelmeni

Makes about 60 dumplings

Ingredients for the dough:
1/2 cup warm water
2 eggs
About 260-270 grams AP or 00 flour, plus more for dusting

Ingredients for the meat filling:
1/2 medium onion, chopped very finely (I recommend using a small food processor)
1 tablespoon olive oil
2 garlic cloves, minced
1 teaspoon curry powder
1/2 pound ground beef
1/2 pound ground pork
1/2 teaspoon salt
Pepper, to taste

For the topping:
Butter
Rice vinegar
Curry powder
Sriracha
Fresh cilantro
Sour cream

Directions:
In a medium bowl, whisk together the egg and water. Incorporate flour till you have a soft, stretchy dough that isn’t sticky to the touch. Knead on a floured surface for five minutes, incorporating flour if it’s still too sticky. Wrap the dough in plastic wrap and let sit for 30 minutes.

Meanwhile, heat a pan with the oil over medium-high. Add the onions and sauté until onions are soft, about 5 minutes. Turn the heat to medium, add the curry powder and garlic, and cook for 1 more minute. Let this cool off the stove while you combine the beef, pork, salt and pepper in a mixing bowl. Once onions are mostly cooled, add to the meat and combine well. Cook a small sample in your frying pan to sample, if you like, then adjust for salt. Once the meat mixture is seasoned to your liking, place it in a gallon sized zip top bag and cut a small hole in one of the bottom corners.

If you have a pelmeni mold, use 1/4 of the dough and roll out a large, thin, round sheet of dough, incorporating flour if needed so it doesn’t stick. Sprinkle flour over the mold and drape the dough on top. If you don’t have a mold, use a biscuit cutter or the edge of a glass and cut circles out of the dough.

Using your makeshift piping bag, add about a teaspoon of filling to each divot in the pelmeni mold. If the dough seems too dry, you may want to lightly spritz the whole sheet with a water sprayer because you want the other sheet of dough to stick. Roll out another 1/4 of the dough into a large, round sheet and place it on top of the filled mold. Using your rolling pin, gently roll back and forth along the dough side of the mold until the mold starts to pierce through the edges of each pelmeni. Lightly dust a counter with flour and turn the mold upside down to shake/poke the pelmeni out of the mold.

Repeat with the remaining dough to make one more set of pelmeni with the mold.

If not using a mold, add about 1 teaspoon of filling to each cut circle. Crimp closed with your fingers. The dough should be sticky enough to stay closed on its own without additional moisture.

Set each finished pelmeni on a flour-lined baking sheet.

From here you could either boil the dumplings right away or place them in the freezer for later. If you freeze them, make sure to freeze them on the baking sheet before putting them in a zip top bag or container, otherwise they will stick together.

To prepare, bring a big pot of salted water to a boil. Add the dumplings and return to a boil. Cook until dumplings float — about 5 minutes (7 minutes if frozen).

Use a slotted spoon to remove dumplings and place them in bowls. Top with butter, vinegar, curry powder, Sriracha, cilantro and sour cream.

Legit Falafel Mix

I’m usually not one to write more than a few sentences before a recipe, but this one warrants a little explanation.

I am not too familiar with making my own falafel patties. I’ve used a box mix before but that wasn’t worth writing about. The other day my sister told me she had the most delicious falafel at work and asked her coworker for the recipe. My sis came over last week with the recipe and ingredients, but we realized parts of the recipe were unclear so we had to make some guesses.

One thing was clear: you have to make falafel from dried chickpeas and not canned chickpeas. I didn’t know this having not grown up eating falafel. But soaking the chickpeas for 12-18 hours is the base ingredient for crispy, flavorful falafel that hold together perfectly. You don’t cook the chickpeas first. Frying the falafel cooks the chickpeas. If you use canned they will not hold together well and will be mushy.

Note: we soaked enough chickpeas for two batches of falafel. You can freeze the remaining soaked chickpeas for another time – it still comes out great!

Ok, four paragraphs wasn’t so bad! Here’s how we made the falafel. I included a recipe for a tomato cucumber salad as well.

Delicious Falafel Mix

1 batch makes about 25 falafel patties

Ingredients for the chickpeas (enough for 2 batches of falafel):

  • 2 quarts water
  • ½ teaspoon baking soda
  • 1 pound dry chickpeas

Ingredients for the falafel:

  • ¼ of a leek, roughly chopped
  • 1 pound of soaked chickpeas (NOT CANNED OR COOKED), fully drained
  • ¼ cup fresh cilantro, roughly chopped
  • ¼ cup fresh parsley, roughly chopped
  • 1 celery stalk, roughly chopped
  • ¼ cup chopped onion
  • 2 cloves garlic, roughly chopped
  • Squeeze of fresh lemon
  • 1.5-2 teaspoons salt (or to taste)
  • ½ teaspoon ground pepper
  • 2 tablespoons ground coriander
  • 1 tablespoon cumin
  • A pinch of ground allspice
  • 2-3 tablespoons chickpea flour
  • ⅛ teaspoon baking powder
  • ⅛ teaspoon baking soda
  • Cooking oil, for frying

Directions:

The day before you want to make falafel, you’ll need to start soaking the chickpeas. Fill a pot with the water and add the baking soda. Add the chickpeas, cover, and soak them 12-18 hours. Drain and store in the fridge or freezer until ready to make your falafel.

On falafel day:

Soak the leek pieces in water to remove any grit. Put the leeks and chickpeas in a salad spinner and spin to remove as much water as possible.

Place the leeks, chickpeas, cilantro, parsley, celery, onion and garlic in a food processor and pulse it until it is paste-like, scraping down the sides with a rubber spatula often.

Place mixture in a bowl and add the lemon juice, salt, pepper, coriander, cumin, allspice, chickpea flour, baking powder and baking soda. Mix well and form into falafel patties. If mixture is too moist, add a little more chickpea flour. If too dry, add a little more lemon juice. The falafel should be sort of wet but should hold together without bits falling off. 

Heat a half inch of oil in a cast iron skillet till about 350F. Fry 6-8 falafel at a time so as not to bring down the heat of the oil. Fry till crispy and dark brown, about 2-3 minutes on each side. Place on a paper towel-lined sheet pan. Serve with all the falafel fixins.

Tomato and cucumber salad

Ingredients:

  • 2 roma tomatoes or 15 cherry tomatoes, diced
  • Half an English cucumber, diced
  • ¼ cups minced red onion
  • 2 tablespoons chopped parsley
  • 1 tablespoon garlic infused olive oil (or plain olive oil)
  • Juice of half a lemon
  • Salt and pepper to taste

Directions:

Combine all the ingredients and place in fridge until ready to serve.

Marinated Ramen Eggs

I am high-key obsessed with the jammy eggs that come in ramen. So much so, that I started making them on the regular and not even putting them in ramen. I’m just snacking on them. The simple marinade penetrates the white of the egg and infuses the whole egg with umami flavor.

Thanks to Uncle Roger for the tip on how to keep the floating egg parts submerged! You know when your eggs are properly marinated when they are brown all over and when you cut them open you can see the marinade has gotten inside the eggs.

Marinated Jammy Eggs for ramen or for snacking

Makes 4 eggs

Ingredients:

  • 4 eggs
  • 1/4 cup soy sauce
  • 1 tablespoon oyster sauce
  • 1 tablespoon rice vinegar
  • 1 tablespoon sake
  • 1 tablespoon mirin
  • 1 teaspoon Knorr chicken bouillon (optional, but this is the MSG part of the recipe)
  • 1 teaspoon sesame oil
  • 2 teaspoons miso paste

Directions:

Bring a medium pot of water to a boil. Gently lower in the eggs so they don’t crack and turn down the heat slightly so it’s not an aggressive boil. Boil for 6 minutes 45 seconds. This is my magic number to achieve not too runny and not too cooked eggs. If you like yours cooked more, boil them longer.

Drain and place eggs in an ice bath till cool. In the meantime, combine all the marinade ingredients in a mason jar and whisk well so the miso paste breaks up.

Peel the eggs and gently place them in the jar. Take a paper towel and place it on top of the eggs so it becomes saturated with the marinade. This will ensure that any parts of the egg that are floating will get marinated.

Place in the fridge overnight. Enjoy your eggs the next day or the day after. I don’t usually let them sit longer than two days (but they also don’t last that long).

Broccoli and Cheese Bread Pudding

This Thanksgiving we were left with way too many dinner rolls. I wanted to make something savory with them so I put together a bread pudding that was perfect for dinner and even tastier the next morning for breakfast!

Broccoli and Cheese Bread Pudding
A great use of leftover dinner rolls

Serves 4-6

Ingredients:

  • 5-7 leftover dinner rolls, cut into cubes
  • 2 tablespoons butter
  • 1/2 onion, chopped finely
  • 2 garlic cloves, minced
  • 2 tablespoons fresh parsley, chopped
  • 1 small head of broccoli, stems and crown chopped into small bits
  • 1/2 cup cream
  • 2/3 cup whole milk
  • 2 eggs
  • salt and lots of pepper
  • pinch of ground nutmeg
  • 1/2 cup shredded parmesan
  • 1 cup shredded sharp cheddar

Directions:

Preheat oven to 375F. Coat a small casserole dish liberally with butter and place bread cubes in it. There should be enough bread cubes to cover the bottom of the dish. Set aside. Melt 2 tablespoons butter in a pan over medium-high heat. Add onions and sauté until soft, about 5 minutes. Turn down heat, add garlic and cook until fragrant, about 1 minute.

Meanwhile, boil a small pot of salted water and add the broccoli; cook for 3 minutes and drain well. Add the broccoli to the onion mixture and combine well. Spread this mixture evenly on the bread cubes.

In a mixing bowl, whisk together the cream, milk, eggs, salt, pepper and nutmeg. Evenly pour this mixture over the broccoli and bread cubes.

Sprinkle on the cheeses, then lightly press down on the mixture to help the bread absorb some of the liquid.

Cover with foil and bake for 30 minutes. Remove foil and bake another 15 minutes. Remove from oven and serve. Save leftovers overnight and eat for breakfast the next day for an even tastier dish!

White Bean + Tomato Stew

I pretty much want pasta all the time. It’s my Achilles heel, so to speak. But my body probably shouldn’t have pasta all the time. So here’s a recipe I tossed together that gives off perfect pasta vibes but uses canned white beans instead. It’s not a stew, exactly, but I didn’t know what else to call it.

White Bean + Tomato Stew: a quick meal to satisfy that pasta craving

Serves 4
Cook time: 20 minutes or so

Ingredients:

  • 1 tablespoon butter
  • 1/2 onion, chopped
  • 6 ounces crimini mushrooms, roughly chopped
  • 1/2 teaspoon salt
  • 2 cloves garlic, chopped
  • 3 tablespoons white wine or sake
  • 1 teaspoon dried basil
  • 1/2 teaspoon dried oregano
  • pinch of dried red pepper flakes
  • 1 cup marinara sauce
  • 1/4 cup cream
  • 1 can white beans, drained
  • 2 handfuls fresh baby spinach, roughly chopped
  • 1/2 cup parmesan cheese
  • Salt and pepper, to taste
  • 1 tablespoon fresh parsley, chopped
  • 1/4 cup chopped pistachios

Directions:

Melt butter in a medium sauté pan over medium heat. Add the onions and mushrooms. Cook until onions are soft and mushrooms have released their liquid, about 7 minutes. Add the garlic and cook until fragrant, about 1 minute.

Deglaze the pan with the white wine and let it bubble for 1 minute. Add the dried basil, dried oregano and dried red pepper flakes. Pour in the marinara and cream, bring to a simmer and turn heat to low.

Add the beans and baby spinach; cook until spinach is wilted, just a few minutes. If stew is too thick, add in a little more cream. Stir in the parmesan cheese and add salt and pepper to taste. Sprinkle on the parsley and pistachios; serve immediately with a drizzle of good olive oil.

Salad with Pistachios, Craisins and Creamy Honey Vinaigrette

Salad isn’t my favorite. I’ll eat salad and occasionally enjoy salad, but it’s not a dish I love to make for myself. A few weeks ago I found a cookbook in a free box at a garage sale called “The Riversong Lodge Cookbook” by the renowned Alaska chef, Kirsten Dixon. In this beautiful book she has a recipe for a creamy herb vinaigrette in which she includes heavy cream. It never occurred to me to add cream to a salad dressing, but it sounded like a great idea.

So I whipped together a vinaigrette and used rice vinegar instead of my typical lemon juice to tame the acidity a little. I had some pistachios, craisins and chèvre so I tossed those in with some salad greens. It’s now my favorite salad of all time.

Use whatever types and quantities of salad fixings you prefer, but I recommend including something sweet because it pairs nicely with the honey in the dressing.

Salad Creamy Honey Vinaigrette

Makes about 4 side salads

Ingredients for the vinaigrette:

  • 1/4 cup high quality olive oil
  • 2 tablespoons rice vinegar (or white wine vinegar would work too)
  • 1 tablespoon honey
  • 1 teaspoon Dijon mustard
  • 2 teaspoons cream
  • Pinch of dried oregano
  • Salt and pepper, to taste

For the salad:

  • Salad greens of your choice
  • 1/3 cup shelled pistachios, roughly chopped
  • 1/3 cup dried cranberries, chopped
  • Chèvre or freshly grated Parmesan, as much as you prefer

Add all the vinaigrette ingredients to a liquid measuring cup and use an immersion blender to blend until it’s emulsified. Assemble your salad in a large bowl and toss well with the vinaigrette. Serve immediately. Save any extra dressing in the fridge for up to five days or so.

Banana Blueberry Muffins

I’m not really into banana bread. Enough said. So when I had a few overripe bananas on the counter the other day I decided to make up a recipe as I went and ended up with a delicious batch of banana blueberry muffins. They aren’t too sweet, aren’t too dense, aren’t too oily. I guess they are just right!

Banana Blueberry Muffins

Makes 12 muffins

Ingredients:

  • 3 ripe bananas
  • 2 eggs
  • 1/3 cup white sugar
  • 1/3 cup brown sugar
  • 1 teaspoon vanilla
  • 1/3 cup melted coconut oil
  • 1 1/2 cups all-purpose flour
  • 1 teaspoon baking powder
  • 1/2 teaspoon baking soda
  • 1/2 teaspoon salt
  • 1 cup fresh blueberries

Preheat oven to 375F. In a mixing bowl, mash the bananas with a potato masher till they are a pulp. Add the eggs, sugars and vanilla and combine with an electric mixer. Mix in the coconut oil.

In a separate bowl, combine the flour, baking powder, baking soda and salt. Add this all to the banana mixture and mix till just combined. Fold in the blueberries.

Line a muffin tin with cupcake liners. Spoon in equal amounts of batter into each cupcake liner. Bake for 22-25 minutes, rotating the pan halfway, until the tops are golden brown and a toothpick inserted in the middle of a muffin comes out clean. Remove from oven and let cool for a few minutes. Carefully transfer muffins to a cooling rack and let sit till room temperature or until you can’t stand it anymore and have to eat a piping hot one and burn your tongue on a molten blueberry.

Authentic Enchiladas Verdes

When we visit my parents’ place in Mexico the best part of our trip is always the food Moña, their housekeeper, prepares. She used to run a restaurant out of her house and she makes some classic Mexican dishes such as chilaquiles and chilies rellenos. Last time we visited she prepared enchiladas verdes. The tomatillo-based sauce was delicate and the cheese-filled enchiladas were absolutely delicious. I’ve been daydreaming of this dish ever since.

My folks are down there now so I asked my dad if he could get Moña to tell him the recipe. Instead, he made a video of her preparing them.

Moña doesn’t measure anything and we don’t have all the exact same ingredients here. It was a fun challenge to translate/transpose her method. I’ll definitely be making these again.

Green Enchiladas

Serves 4

Sauce:

  • 1/2 of an onion, divided
  • 1/2 of a fresh jalapeño, seeded
  • 3 garlic cloves, divided
  • 1 1/2 pounds tomatillos (about 15-20), husks removed
  • 1 packed cup fresh cilantro
  • 1 cup Mexican-style cream, divided
  • 1 tablespoon olive oil
  • 1/4 cup reserved tomatillo liquid (see recipe instructions)
  • 2-4 teaspoons granulated chicken bouillon

Filling:

  • 1/3 cup finely chopped onion
  • 2 teaspoons olive oil
  • 7 ounces crumbled queso fresco (about 1 1/2 cups), 8 ounces grated Manchego or Monterey jack (about 2 cups, divided)

Enchiladas:

  • 12 corn tortillas
  • Vegetable oil, for frying

Directions:

Preheat oven to 350F.

Place 1/4 of an onion, 1 garlic clove, jalapeño and tomatillos in a saucepan and add enough water to submerge everything. Bring to a boil, turn down heat and simmer for 10 minutes.

Using a slotted spoon, add the onion, garlic, jalapeño and tomatillos to a blender. Strain the tomatillo water through a mesh sieve into a liquid measuring cup. Place any pulp from the sieve into the blender and pulse blender until smooth. Add cilantro and blend. Add 3/4 cup cream and blend.

Finely chop the 2 remaining cloves of garlic and 1/4 of an onion. Wipe dry the saucepan and add 1 tablespoon olive oil. Heat oil and sauté garlic and onion till soft, about 2 minutes. Add the contents of the blender to the saucepan. Place 1/4 cup of tomatillo water in the blender and swish it around to loosen up any leftover sauce; add to the saucepan. Add 2 teaspoons of chicken bouillon and taste for saltiness. If it needs more salt, add more bouillon. Turn heat down and gently simmer for 10 minutes so sauce thickens, stirring occasionally. Turn off the heat and add remaining 1/4 cup of cream; set sauce aside while you prepare the filling.

Sauté the 1/3 cup chopped onion in olive oil until soft, about 2 minutes. Let cool slightly and combine with the queso fresco and 1 cup of the Manchego or Monterey jack. Set aside the filling while you prepare the tortillas.

In a frying pan, add enough vegetable oil to liberally coat the pan, about 1/3 cup. Heat oil over high. Add the edge of a tortilla to see if the oil is ready. The tortilla should bubble a little in the oil. When oil is hot enough, add one tortilla and fry just a few seconds on each side, flipping three or four times. You don’t want the tortillas to become crispy, but the oil makes them more pliable. Lift tortilla out of pan and let the excess oil drip off the tortilla. Transfer tortilla to a platter or tray and repeat with remaining tortillas, adding more oil if needed.

Here’s the technique Moña taught me for how to flip the tortillas in the hot oil.

To assemble the enchiladas, spoon about 1 cup of the sauce into the bottom of a casserole dish. Pat a tortilla with a paper towel to absorb any excess oil, then dip the tortilla into the pot of sauce, letting any excess drip back into the pot. Place tortilla on a prep tray, add a small handful of filling, and roll up the tortilla, placing it seam-side down in the casserole dish. Repeat with remaining tortillas and filling. You could also add shredded cooked chicken in this step, if you like.

When the dish is packed with enchiladas cover them with a layer of sauce, using a spoon to spread the sauce into every nook and cranny. Top with remaining Manchego or Monterey jack. Cover with foil and bake for 15-25 minutes, until cheese on top is fully melted.

My Favorite Meatloaf

My mother makes a pretty mean meatloaf. It’s always a little different but has similar components such as tomato sauce, bread, cheese and of course ground meats. For years I adopted her basic recipe as my go-to, which you can view here. But recently a friend gifted me the hefty cookbook “The Food Lab” by J. Kenji López-Alt and I saw he suggested adding gelatin to meatloaf, which I found fascinating. His recipe is quite different from my mom’s and involves a bit more labor. Around the same time I checked out a new cookbook from my local library called “Come on Over.” Author Jeff Mauro has his favorite meatloaf recipe where he uses other ingredients that differ from my mom’s. I decided to take a little from all three recipes to create my new favorite meatloaf.

Some things I love about this recipe:

  • The classic loaf shape makes for perfect serving sizes
  • The gelatin makes it slice so perfectly
  • The cold leftovers are SO GOOD
  • You can make delicious meatloaf sliders as Jeff Mauro suggests.

My Favorite Meatloaf

Serves 6-ish
Cook time from start to finish: 2 hours, 15 minutes (totally worth it)

Ingredients:

  • 24 saltine crackers, roughly crushed
  • 1/4 cup chicken stock
  • 1/4 cup whole milk
  • 1 packet (1 scant tablespoon) unflavored gelatin powder
  • 2 tablespoons butter
  • 3/4 cup minced onion (about 1/2-3/4 of an onion)*
  • 1/2 cup minced carrot (about 1 medium/large carrot)*
  • 1/2 cup minced celery (about 2 celery stalks)*
  • 2 cloves garlic, minced
  • salt and pepper to taste
  • 1 tablespoon Dijon
  • 1 teaspoon fish sauce
  • 1 teaspoon soy sauce
  • 2 teaspoons Worcestershire sauce
  • 1 pound ground beef
  • 1 pound ground pork
  • 2 eggs
  • 1 cup grated Pecorino Romano cheese
  • 1/4 cup minced parsley
  • 1/3 cup shelled pistachios (optional)

*I blitz the onion, carrot and celery in a food processor. It’s super fast and makes everything an even, small size.

For the glaze:

  • 1/2 cup ketchup
  • 1/4 cup packed brown sugar
  • 1/4 cup barbecue sauce
  • 2 tablespoons apple cider vinegar
  • 2 tablespoons Worcestershire sauce
  • 1 tablespoon soy sauce
  • 1 teaspoon molasses
  • Lots of ground pepper

Directions:

Place saltines in a large mixing bowl and set aside. Place stock and milk in a liquid measuring cup and evenly sprinkle gelatin on top. Set aside.

Melt butter in a large sauté pan and add onion, carrot and celery. Sauté till onions are soft, about 5 minutes. Add garlic and cook until fragrant, about 1 minute.

Pour in stock/milk mixture; add Dijon, fish sauce, soy sauce, Worcestershire sauce and salt and pepper. Bring to a simmer and simmer until liquid has reduced by half, about 10 minutes.

Place this mixture in the bowl with the saltines and mix till well combined. While this mixture cools, preheat the oven to 350F.

Add beef, pork, eggs, cheese, parsley and optional pistachios to the cooled saltine mixture. Gently mix with your hands until just combined. Pack mixture into a glass loaf pan, pushing out any air bubbles. Spray a sheet of foil with cooking spray and cover the pan with the foil. This will hopefully keep the loaf from sticking to the foil later (that’s the only downside to my recipe, I’ve found. I haven’t tried spraying the foil, so if you make this recipe, let me know if it works!) Solution! Use a silpat baking mat and this solves all the sticking problems.

Line a baking sheet with foil. (see above note). Invert the loaf pan (with the foil still on top) onto the baking sheet. Bake for 30 minutes. Carefully remove the baking sheet and using pot holders you don’t care getting gunky, gently jiggle the loaf pan so it comes out. Keep the loaf on the baking sheet and bake another 40 minutes or until internal temperature measures 140 F. Remove and let sit 15 minutes. Turn the oven up to 500 F.

Here is the loaf still in the pan after removing it from the oven.
Here it is after I removed the pan. This will go back in the oven now.

Meanwhile, make the glaze by combining the ingredients in a small saucepan and heating till the sugar is dissolved.

Here is the loaf after the second time in the oven before it was glazed.

Paint loaf with a layer of glaze and bake for 3 minutes. Add another coat of glaze and bake for 3 more minutes. Add a final coat of glaze and bake for 4 minutes. Remove from oven and let sit 10 minutes before slicing and serving. Serve with noodles or mashed potatoes and any extra glaze.

Glazed and ready to be sliced!

Creamy Broccoli Cheddar Soup

I cleaned out my freezer today and found some broccoli florets lurking in the back. I love broccoli, but only when I steam it from fresh. When it’s already frozen it can be sort of mushy. It’s perfect for soup! Or if you have leftover broccoli in the fridge, you can use that with some fresh baby spinach.

Here’s a delicious recipe I came up with today. The bacon gives the soup a smokey flavor that accentuates the broccoli and sharp cheddar perfectly. Add in potatoes and canned white beans and you give the soup a little more bulk. Serve this with a crusty white bread and you’ve got yourself a delicious wintertime supper!

Creamy Broccoli Cheddar Soup with Bacon, Potatoes and White Beans

Creamy Broccoli Cheddar Soup with Bacon, Potatoes and White Beans

Serves 6, probably

Ingredients:

  • 1 pound broccoli (this doesn’t have to be exact)
  • 2 strips of bacon, chopped
  • 1 cup chopped onion
  • 5 garlic cloves, smashed and choppped
  • 3 tablespoons butter
  • 3 tablespoons flour
  • 1/2 cup white wine
  • 3 cups chicken stock
  • Freshly ground pepper, to taste
  • 1/2 teaspoon dried thyme
  • 2 medium russet potatoes, peeled and cut into small cubes
  • 1 can of white beans, drained and rinsed
  • 6 oz. sharp cheddar, grated
  • 1 oz. pecorino Romano cheese, grated
  • 3/4 cup cream

Directions:

If using fresh broccoli, steam it until tender. If using frozen broccoli, thaw it under hot water. Roughly chop and set broccoli aside.

Add bacon to a dutch oven and heat over medium till bacon is cooked through but not crispy. Add onions and cook till translucent, about 3-5 minutes. Add garlic and cook till fragrant, about 30 seconds. Add the butter until melted and mix in the flour till a paste forms. Cook this for about 1-2 minutes. Add the white wine and scrape up any browned bits. This will thicken very quickly. Slowly stir in the chicken stock. Add pepper, thyme and broccoli and bring to a simmer. Turn heat to low, cover and simmer for 15 minutes.

Remove pot from heat and use an immersion blender to blend the soup until it’s a consistency you like. This is up to you. I like a chunky soup so I didn’t blend it very long, but if you prefer a smoother soup, go to town with your immersion blender.

Return pot to low flame and add in the potatoes and beans. Simmer until potatoes are tender, about 15 minutes.

Turn off the heat and stir in the cheeses till melted. Stir in the cream. Add salt if desired. Serve immediately.