Category Archives: Uncategorized

Apple Cranberry Sauce

Cranberry sauce always seems like the dish that gets most forgotten about at the Thanksgiving table. The tart cranberry – who needs that when you’ve got rich gravy, juicy turkey, creamy mashed potatoes, and buttery stuffing?

I agree with Samin Nosrat that cranberry sauce is a necessary part of the Thanksgiving menu as it’s one of the only acidic dishes to make an appearance. It cuts through the buttery, the creamy and the richness. It also is the most beautiful dish to accentuate your holiday table with a ruby-red glow.

You could easily open up a can, slide it out onto a platter and call it a day, but with minimal effort you could have a gorgeous side dish that’s sure to delight your Thanksgiving guests.

I add apple to my recipe because it counterbalances the tartness of the cranberries and it’s my foolproof method to ensure the sauce thickens. The apples become the same color as the cranberries so no one will even realize they are there.

I use foraged lowbush cranberries (also called lingonberries) but you can use the cranberries from the grocery store and it works the same way.

Easy Cranberry Sauce with Apples

Serves 6-8
Prep & Cook Time: 20 minutes

Ingredients:

  • 12-14 ounces cranberries, fresh or frozen
  • 2 cups finely diced apples (peel the apples first)
  • 1 cup sugar
  • 2 tablespoons maple syrup
  • A pinch of salt
  • 1/3 cup apple cider
  • 1 cinnamon stick

Directions:

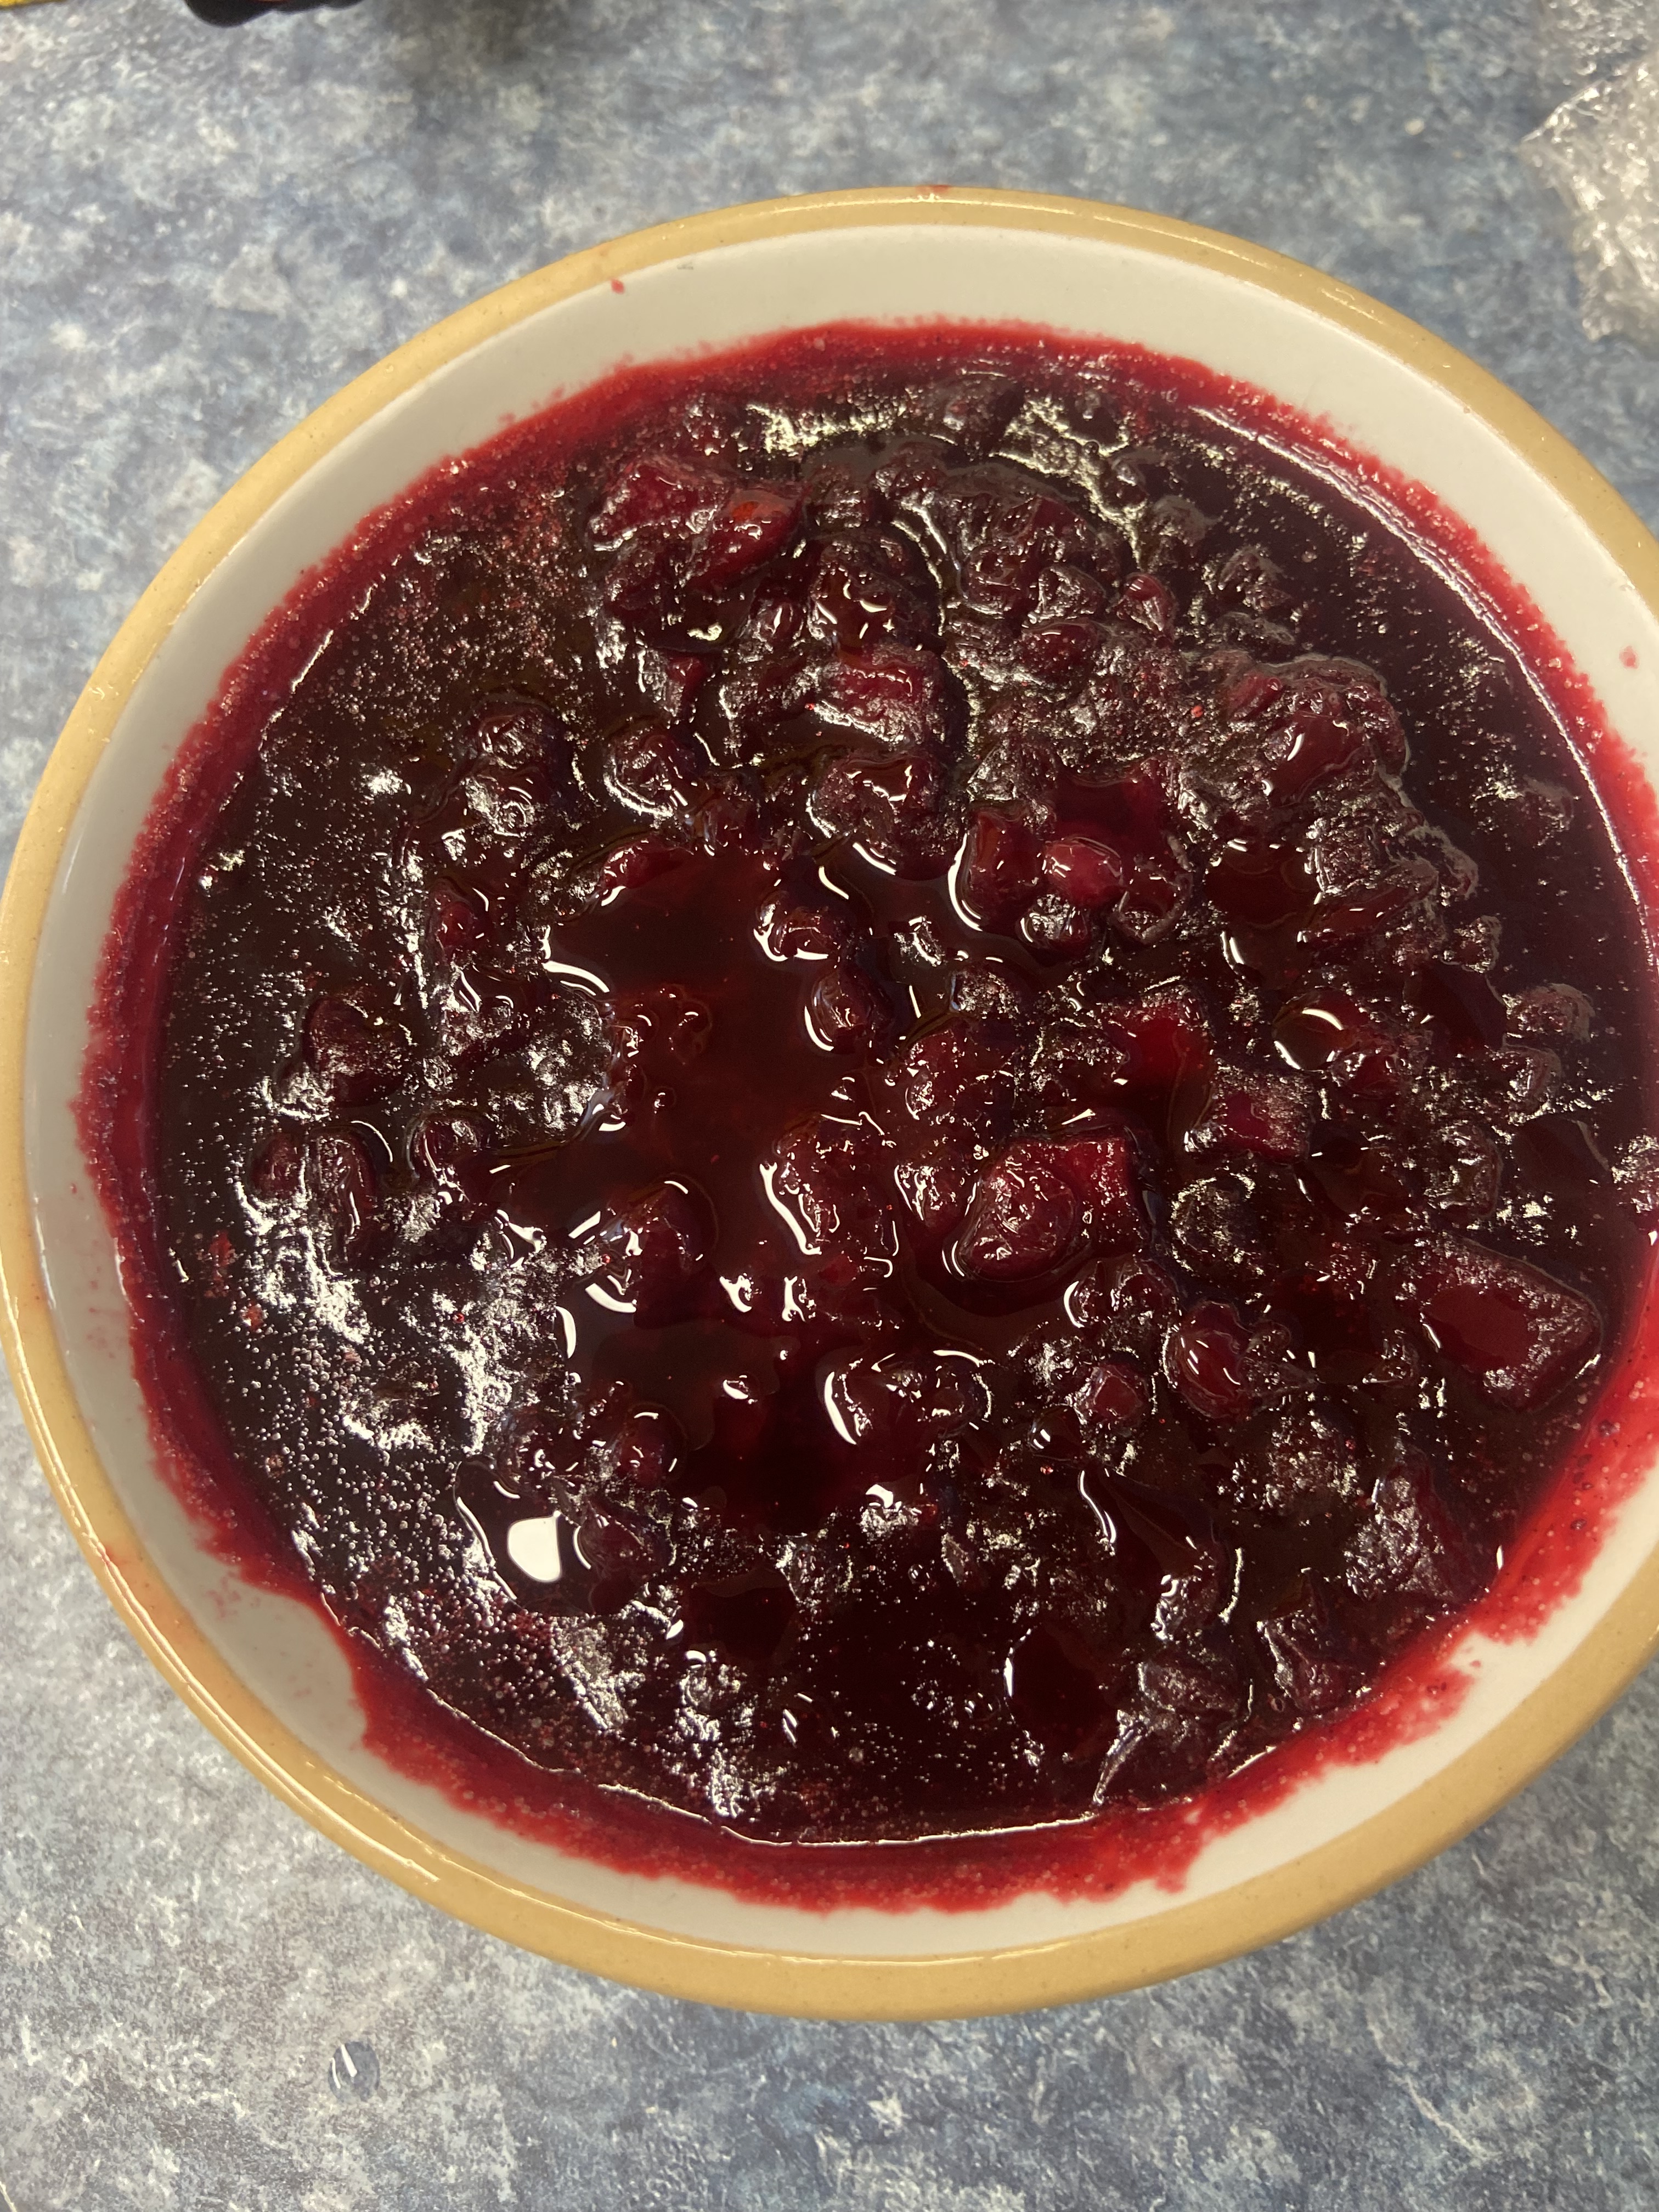
Add all the ingredients to a pot and heat over medium high, stirring all the while. When it comes to a simmer, turn down the heat and cook until the cranberries have popped and the apples are soft, about 15-20 minutes (till it looks like jam). Gently smash the berries with a wooden spoon against the side of the pan as they simmer. At first it’ll seem like it’s never going to look like cranberry sauce and then it transforms and becomes deep red and sort of glossy.

Let cool, remove cinnamon stick, transfer to an airtight container, and store in the fridge till ready to serve.

My Favorite Thanksgiving Stuffing

My dad’s stuffing recipe has been a family tradition for as long as I can remember. Many years ago I took over making the stuffing and now it’s technically considered dressing because we don’t stuff the turkey anymore and I prepare it in a slow cooker. Not only is this less likely to cause a food-borne illness it also makes the turkey cook faster and frees up oven space. The slow cooker makes the stuffing fluffy and moist – you’d never know it wasn’t resting inside the cavity of a bird for several hours!

If you don’t have a slow cooker, I provided oven instructions at the end of the recipe.

Happy Thanksgiving!

-Natasha

Daddy O’s Thanksgiving Stuffing

Serves 8-10
Prep time: 30 minutes
Cook time: 4-5 hours

Ingredients:

  • 1 onion, chopped
  • 3 celery stalks, chopped
  • 6-8 ounces sliced crimini or button mushrooms
  • 1.5 packets of breakfast sausage links
  • 1 cup cup golden raisins
  • 1 can of medium black olives, drained and chopped
  • 14 oz. bag seasoned bread cubes (or two boxes of Mrs. Cubbison’s since there are fewer cubes in the boxes)
  • 1/2 cup finely chopped parsley
  • Salt and pepper, to taste
  • 3/4 stick of butter
  • About 1 cup chicken stock

Directions:

Start making this when you’re ready to eat breakfast. This way you can eat a couple of sausage links with some eggs while the other ones are cooling.

Brown all the sausage links in a big sauté pan. Once they are cooled, chop them into little rounds.

Secret ingredient: meat

Add 2 tablespoons butter in the sauté pan and heat on medium-high. Add the celery, onion and mushrooms and cook till everything is softened, about 7 minutes.

In a very large mixing bowl, add the breakfast sausage, celery, onion, mushrooms, bread cubes, raisins, olives, parsley, salt and pepper. Mix thoroughly with your hands (they are truly the best tool for this).

Cut the remaining butter into little cubes and mix into the stuffing. Periodically pour in the chicken stock between mixing so everything is well incorporated. You don’t want to overdo it with the stock as it can make everything soggy, so splash some in here and there until the cubes are moistened but not saturated.

Spray the inside of your slow cooker with cooking spray and add the stuffing. Dot with a little more butter if you have some.

Cover the slow cooker and turn it to low. Let it cook for 4-5 hours. Don’t remove the lid until you’re good and ready because it takes a long time to reheat a slow cooker.

When dinner is ready, transfer to a pretty serving dish, reserving any extra in the covered slow cooker to keep warm.

Oven method: Follow the same instructions using a large Dutch oven and bake at 275F for 2-3 hours, stirring occasionally. 

Beef Stew with Anchovies & Thyme, Revisited

Years ago when I was a newlywed trying to impress my husband with my cooking skills I found a recipe for a lamb stew in a random cookbook and would make it often using beef instead. He really loved it and I thought I did too. I even blogged about it, but I stopped making it and eventually forgot about it.

A few months ago my husband asked me about that dish and why I never make it anymore. He requested I make it again. I was surprised to find my hastily written blog post about it and when I read through it I realized how much I’ve learned as a cook in the past 15 years. My original recipe doesn’t cook the flour – I just toss it in with the wine and stock. It only calls for braising the stew meat for 30 minutes. No wonder I remember this dish as being tough and difficult to digest. It needs to be slow cooked in the oven like a proper stew so the flavors can meld and the meat can get nice and tender!

So with my seasoned chef’s hat securely on my head, I set to reimagine this recipe and make it more palatable but with the same flavors my husband yearned for. I turned to the stew queen herself, Julia Child, whose boeuf bourguignon recipe is pretty much considered the holiest of stew recipes.

I’ve hybridized her recipe with mine. And I quite like it!

Beef Stew with Anchovies and Thyme

Serves 4
Total prep & cook time: 3.5-4 hours

Ingredients:

  • 6 ounces bacon, cut into 1-inch pieces
  • 1 tablespoon cooking oil
  • 2-3 pounds beef chuck, cut into 2-inch pieces
  • 1 medium carrot, roughly sliced
  • 1 medium onion, roughly chopped
  • 1 teaspoon salt
  • black pepper, to taste
  • 2 tablespoons flour
  • 2 cups red wine
  • 1 1/2 – 2 cups beef or chicken stock
  • 3 garlic cloves, minced
  • 6 anchovy fillets, minced
  • 1 1/2 teaspoon dried thyme
  • 1 cup frozen peas
  • Parsley, for garnish

Directions:

Preheat the oven to 450F.

Bring 1 1/2 quarts of water to a boil and add the chopped bacon. Simmer the bacon for 10 minutes and then remove bacon with a slotted spoon to a paper towel-lined plate. Dab the bacon pieces dry. This removes the smoky flavor from the bacon so it doesn’t overpower your stew.

In a large enameled Dutch oven, heat the oil. Add the bacon pieces and cook until bacon is browned. Remove with a slotted spoon to a plate. Pat dry the beef pieces and add about 1/3 of them to the Dutch oven. You don’t want to add too many or the pot will cool down and the meat won’t get nicely browned. Brown the beef, turning with tongs till there’s a nice crust on them. Place on the plate with the bacon. Repeat with the remaining pieces of beef in batches till it’s all browned.

Add the chopped carrot and onion to the pot and sauté until onion is starting to brown, just a few minutes. Drain the remaining oil from the pot.

Place the bacon and beef pieces back into the pot and add the salt and pepper. Sprinkle the flour all over till the beef is coated in the flour. Place the Dutch oven in the oven for 4 minutes. Remove, stir the beef, and place in the oven for another 4 minutes. Place the pot on the stove and turn the oven down to 325F.

Pour the wine and stock into the pot and add the garlic, anchovies and thyme. The liquid should just cover all the beef pieces, so add more stock if you need to. Bring this to a simmer, then cover and place in the oven for 2 1/2-3 hours or until the meat is falling apart tender.

Remove from the oven and bring to a simmer on the stove over low flame. Skim off any excess fat from the stew. Stir in the frozen peas until they are thawed and heated through. If the stew liquid is too thin, simmer over the stove until some of the liquid evaporates. If the liquid is too thick, add a little more stock.

Garnish with fresh parsley and serve with potatoes or egg noodles.

Roasted Delicata Squash Soup with Chicken and Corn

It’s dinnertime yet again and I’ve got a leftover Costco rotisserie chicken taking up space in the fridge. I also picked up some delicata squash, which I never know what to do with. Soup time!

I love inventing soups. I use some pantry staples, rummage around in the fridge for other ingredients and an hour later I’ve got something wholesome, healthy and delicious on the table.

Roasted Delicata Squash Soup with Chicken & Corn

Serves 6-ish
Cook time: 1 hour

Ingredients:

  • 2 delicata squash
  • 1 tablespoon olive oil
  • 1 ear fresh corn
  • 2 tablespoons butter
  • 1 onion, chopped
  • 2 celery stalks, chopped
  • 2 medium carrots, chopped
  • Salt, to taste
  • 1/4 cup white wine (I used sake)
  • 1 bay leaf
  • 1 sprig of fresh rosemary, stem discarded
  • 3 sprigs fresh thyme, stems discarded (or 1/4 teaspoon dried thyme)
  • 4 cups chicken stock
  • 1 can white beans, drained
  • 2 cups chopped leftover rotisserie chicken meat
  • Cream, for serving

Directions:

Preheat oven to 400F. Chop off the ends of each squash and cut them lengthwise. There is no need to peel them. Scrape out the seeds with a spoon. Place the squash halves on a sheet pan and coat inside and out with the olive oil. Bake for 30 minutes or until squash is fork tender.

Meanwhile, chop the kernels off of the corn and set those aside. Don’t toss the corn cob because it goes into the soup!

Melt the butter in a heavy-bottomed 4-quart pot over medium-high heat. Add the onions, celery and carrots. Sprinkle with a little salt and sauté until onions are soft, about 7 minutes. Add the white wine and let it bubble away for a minute or so.

Add the bay leaf, rosemary, thyme, chicken stock and the corn cob. Bring to a simmer, cover, and let simmer for about 20 minutes, until the carrots are soft.

Remove the squash from the oven. Roughly chop the squash and add it to the pot along with the drained beans. Cover again and cook for 10 minutes. Remove the corn cob and bay leaf from the pot and discard.

Remove pot from heat and blend with an immersion blender until it’s a consistency you like. I like mine a little chunky.

Place pot back on the heat and add the chicken bits and corn. Simmer for another 10 minutes. Add salt to taste. Serve with dollops of cream.

Salmon Smashburgers

Everyone has a salmon burger recipe. But THIS salmon burger recipe is really, really good. My friend Matt adapted a Mark Bittman recipe and served them up to my family a few months ago. I coined them “salmon smashburgers” by the way he haphazardly tossed balls of the salmon mixture into a pan and smashed them with a spatula (I cover a potato masher in parchment paper and secure with a rubber band around the handle. This keeps the salmon from sticking to the masher).

These burgers are so good, no bun is needed (but you can certainly add a bun if you’d like). They are moist, super flavorful, and a total hit.

This is also a great way to use the extra salmon meat when you’re filleting salmon. I filleted about 70 sockeye salmon over the past week and I used a serrated grapefruit spoon to scrape away any meat I might have left on the ribs after I filleted each fish.

Salmon Smashburgers

Makes about 4 burgers
Cook time from start to finish: 20 minutes

Ingredients:

  • 1 1/2 pounds skinless, boneless salmon
  • 2 teaspoons Dijon mustard
  • 3 scallions
  • 1/2 cup panko
  • Juice of half a lime
  • 1 tablespoon capers
  • salt and pepper, to taste
  • 2 tablespoons butter
  • Arugula, for serving
  • Sriracha mayo, for serving (See recipe below)
  • Lemon or lime wedges, for serving

Sriracha mayo:

  • 1/3 cup Kewpie mayo (the non-American kind with MSG is the best)
  • 2 tablespoons Sriracha (or more to taste)
  • Juice of half a lime
  • 1/2 teaspoon sesame oil

Directions:

Cut the salmon into chunks and place a quarter of it in a food processor with the mustard. Turn on the food processor and and let it run, scraping down the sides if necessary, until it’s a paste.

Add the scallions and remaining salmon and pulse the food processor until the fish is chopped and well combined with the salmon puree. The salmon pieces should be about 1/4-inch big.

Scrape the mixture into a bowl and stir in the panko, capers, salt and pepper. Form into four equal balls and set on a plate.

Combine all the ingredients for the Sriracha mayo and set aside.

Heat a griddle or large frying pan over medium high and melt the butter. When the foam subsides, add each salmon ball, smashing it down so each one is nice and thin. Cook till browned, about 3-4 minutes, then flip and cook the other side for 1-2 minutes.

Serve on a bed of arugula and top with Sriracha mayo and a squeeze of lemon or lime.

Salmon smashburgers

Curried Coconut Creamed Spinach

I have very little experience with Indian-inspired dishes, so I’m not sure what to call this meal I made tonight. It was so delicious, though, that I had to jot it down so I could remember it for later.

Indian-Style Coconut Creamed Spinach with Squash and Potatoes

Serves 6
Cook time: 35 minutes
(not counting cooking the squash)

Ingredients:

  • 1.5-2 pounds of delicata squash (butternut squash would work too)
  • 1 tablespoon coconut oil
  • 1 onion, chopped
  • 3 cloves garlic, chopped
  • 1, 4-ounce can yellow curry paste
  • 1, 13.5-ounce can coconut milk (the kind in the Asian section of the grocery store)
  • 1 tablespoon tomato paste
  • 8-10 ounces fresh spinach leaves
  • 3/4 cup chicken stock
  • zest of 1 lime
  • salt, to taste
  • 1 pound fingerling potatoes, cut into bite-sized chunks (any ol’ potatoes would do)
  • dollop of cream, to serve
  • lime juice, to serve
  • Rice, to serve

Directions:

Cook the squash however you prefer. I cubed mine, tossed it in olive oil and agave nectar, and roasted it in a 425F oven for 25 minutes. Set aside.

In a medium dutch oven, heat the coconut oil over medium high heat. Add the onions and cook until translucent, about 5 minutes. Add the garlic and cook until fragrant, about 30 seconds. Add the curry paste, coconut milk, and tomato paste and whisk till well combined. Add the spinach leaves and chicken stock and bring to a simmer. Turn down the heat, cover and simmer for about 7 minutes, until the spinach leaves are cooked through.

Remove pot from heat and carefully blend with an immersion blender or place into a blender and return to the pan once it’s well blended. Add the lime zest and salt to taste. Add the potatoes, cover and simmer for about 20 minutes or until potatoes are fork tender.

Add the squash to the pot and stir until everything is mixed well.

Serve over rice with a dollop of cream and a squeeze of lime juice.

Potato, Broccoli and Cheddar Soup

There was a chill in the air today and it’s definitely wintertime now. I had a sack of potatoes in the pantry, three slices of bacon and some broccoli, so I figured I could make a comforting soup to ward off the wintertime blues. It was simple and delicious – almost like a baked potato soup. And now I have leftovers for tomorrow!

Potato, Broccoli and Cheddar Soup

Prep/cook time: 45 minutes
Serves 8-ish

Ingredients:

  • 3 slices bacon, chopped
  • 1 tablespoon butter
  • 1 medium onion, chopped small
  • 2 carrots, chopped small
  • 2 tablespoons flour
  • 3 cups whole milk
  • 3 1/2 cups chicken stock, divided
  • 1 bay leaf
  • 2 pounds Yukon gold potatoes, peeled and cut into small cubes
  • 1, 15-ounce can white beans, partially drained
  • 12 ounces broccoli, cut into small bits
  • 1-2 cups shredded sharp cheddar
  • Salt and pepper, to taste
  • Chopped scallions and sour cream, to serve

Directions:

In a large dutch oven, cook the bacon over medium heat, until cooked through but not crispy. Add the butter, onions and carrots and cook until onions are soft, about 5 minutes. Sprinkle in the flour and mix into the ingredients in the pot. Let the flour cook for about a minute. Add the milk, 3 cups of chicken stock, the bay leaf and the potatoes. Bring to a simmer.

Turn the heat to low, partially cover and let simmer for 10 minutes or until the potatoes are just tender, stirring occasionally so the bottom of the pot doesn’t burn. Meanwhile, combine the partially drained canned beans with 1/2 cup of chicken stock in a liquid measuring cup and purée with an immersion blender until creamy.

When the potatoes are just starting to get tender, add the beans and the broccoli to the pot. Cover again and bring to a simmer. Simmer on low for another 7 minutes, or until the broccoli is tender, stirring occasionally. (If using cooked leftover broccoli, don’t add it with the puréed beans. Let the beans cook for 5 minutes, then add the leftover broccoli and cook until it’s heated through and continue with the recipe.)

Turn off the heat. Stir in the grated cheese until it’s all melted into the soup. Add salt and pepper to taste. I am not liberal with the salt because the bacon and cheese have already added salt to the soup, which is why I add salt at the end to make sure it isn’t over-salted.

Ladle into bowls and top with dollops of sour cream and chopped scallions (and maybe some more cheese if you like).

Potatoes au Gratin with Bacon + Mushrooms

I always forget about potatoes. They sit in my pantry, slowly shriveling and growing roots, but then I remember that potatoes are delicious!

Here’s a potato casserole dish that’s perfect for breakfast, lunch or dinner. It’s a flexible recipe. If you don’t care for mushrooms, add sautéed Swiss chard or cooked broccoli instead.

Potatoes au Gratin with Bacon and Mushrooms

Serves 8
Prep/Cook time: 1 hour, 15 minutes

Ingredients:

  • 2 pounds thin-skinned potatoes
  • 1/2 teaspoon granulated onion
  • 3 tablespoons butter
  • 3 tablespoons 00 flour (or AP flour)
  • 1 1/2 cups whole milk
  • pinch of nutmeg
  • salt and pepper, to taste
  • 5 slices bacon, chopped
  • 8 ounces crimini mushrooms, sliced (or vegetable of your choice)
  • 3/4 cup grated Parmesan cheese
  • 1/2 cup grated mozzarella cheese
  • chopped chives, for garnish

Directions:

Preheat oven to 375F. Butter a 9×13″ casserole dish and set aside. Clean your potatoes (no need to peel them if you don’t feel like it), and slice them paper thin using a mandoline or a food processor slicer. Set these aside while you make the béchamel.

Measure your milk and microwave it for 90 seconds. In a small saucepan, melt the butter over medium-high heat. Add the flour and whisk till incorporated. Cook this roux for 30 seconds or so to get rid of the raw flour taste, whisking all the while. Turn the heat down to low and start slowly adding the hot milk, whisking the entire time, until you have a thick sauce. Add nutmeg and salt and pepper to taste.

Back to the potatoes: layer half of the sliced potatoes in the casserole dish. The potatoes don’t have to be perfectly fanned out like a fancy French cookbook. Just evenly disperse them in the dish. Sprinkle with a little bit of granulated onion then spread half the béchamel over the layer of potatoes using an offset spatula. Layer in the remaining potatoes, sprinkle with a little granulated onion and add the remaining sauce, spreading it evenly over the potatoes.

Place uncovered in the oven and bake for 45 minutes.

Now it’s bacon time. While the potatoes are in the oven, cook your bacon bits till crispy. Place on a paper towel lined plate for later. Discard most of the bacon grease, but save some in the pan because that’s flavor country, baby! Add the mushrooms (or vegetable of your choice) to the pan and toss with the bacon grease. Cook until mushrooms are browned (or until veggies are tender). Set aside.

After 45 minutes, remove the potatoes from the oven. Sprinkle on the mushrooms, then the bacon, and top with the cheeses. Place back in the oven and bake another 15 minutes or until the cheese is melted and starting to brown. Remove from oven and sprinkle with fresh chives. Serve immediately. I also love this dish the next day when it’s cold!

Knitted Bandana – a Free Pattern

Recently a friend sent me an Instagram reel of a bandana cowl and it was the answer to all my cold neck problems. My hair has gotten so long that it’s becoming a hassle to wear it down with a hat and also manage to tie a scarf around my neck. So much hair everywhere! I decided it was something I could figure out – and I knit it up in about three hours. Then I made six more for holiday gifts. Here’s my sister modeling hers:

I’m calling this a “knitted bandana” to be trendy, but really I’m naming this pattern a dickie scarf. Remember dickies? If you’re over 40 I’m sure you’ve at least heard of them or definitely owned one in the past. It’s all the style of wearing a turtleneck sweater without the bulkiness of having to cram it under another layer of clothing. A dickey scarf is similar – you have the warmth of a cozy turtleneck without having to deal with the bulk of a scarf.

This pattern is so simple and a great stashbuster project.

Knitted Bandana – or as I’m calling it: knitted dickie scarf

Sizes: Adult M (L)

If you’re wanting to knit this pattern with a different needle size and different weight yarn, I am unable to adjust the pattern for you. This pattern is written for a specific needle size and yarn weight.

Ingredients:

Abbreviations:

  • CO = cast on
  • PM = place marker
  • K2, P2 = knit 2, purl 2
  • WS = wrong side
  • RS = right side
  • K2tog = knit 2 stitches together

Directions:

CO 60 (64) stitches; PM. Join the work being careful the stitches aren’t twisted and work in K2, P2 for 30 rounds. When you’ve reached the marker on the final round, turn your work and knit the other direction till you reach the marker again (WS). You’ll now be working back and forth in rows of garter stitch, decreasing by two stitches on each right side row.

Next row (RS): K2tog, knit to the last 2 stitches in row, K2tog.

Next row (WS): K

Repeat these two rows until you have 4 stitches remaining. Bind off and weave in ends. Ta-da – DICKIE SCARF.

Beet Horseradish and Homemade Matzo Crackers

This is more of a “so I don’t forget” kind of recipe. Every year at Passover our family friends have prepared a bright red horseradish sauce as part of the Seder ceremony, going back more than 20 years. They couldn’t attend this year so I took it upon myself to try and make it.

This is clean-out-your-sinuses, see-through-time spicy horseradish. It’s not f-ing around. I was warned it would cause my eyes to tear up while making it, so as a precaution I wore safety glasses and they worked like a charm!

I also acquired a cute matzo stamp so rather than rush to the store last minute for a box of matzo I decided to make it myself. I was surprised how easy it was!

So here’s how I made the horseradish and the matzo so I don’t forget!

Beet Horseradish Sauce

Makes about 2-3 cups

Ingredients:

  • 1 fresh horseradish root, about 6-8 inches, peeled
  • 1/2 small beet, peeled
  • 1/4-1/2 cup apple cider vinegar
  • 1 teaspoon sugar
  • 2 teaspoons salt, more if desired

Trim and discard the root ends from the horseradish and beet. Grate both of them with a box grater and place in a food processor with 1/4 cup of the vinegar, the sugar and the salt. Process until minced, scraping down sides as you go. If it’s not smooth, add more vinegar a little at a time till it’s the consistency you prefer. Tasting it at this point will not be super effective as the flavors have to meld and mellow. Place in a container and refrigerate for a couple of hours. Then taste for salt. This will keep for a few days in the fridge.

Homemade Matzo Crackers

Makes about 8-10 crackers, depending on size

Not necessarily Kosher for Passover unless you use Kosher AP flour

Ingredients:

  • 1 cup all purpose flour
  • 1 teaspoon olive oil
  • 1/2 teaspoon kosher salt
  • 1/3 cup warm water
  • Extra kosher salt

Preheat oven to 500F. Combine all the ingredients in a small mixing bowl and turn onto a floured surface to knead. Knead for just a couple of minutes until it’s a nice flexible ball. Roll out as thinly as possible. Using a fork, prick holes in the dough all over. Either cut the dough into squares with pizza cutter or use cookie cutters. Line upside down cookie sheets with foil (this makes the crackers easier to remove when they’re done) and place the pieces of dough on them. Sprinkle with kosher salt and place in the oven. Bake until lightly browned (this took about 10 minutes in my oven but I suggest you watch carefully as you don’t want them to burn.) Remove from oven, let cool and store in an airtight container for up to two days.