Category Archives: Sewing

Printer Cozy — A Tutorial

I’m trying to streamline our living room and I’m almost there. We’ve got the bookshelves organized, video games stashed away and pretty accoutrements scattering the room. The one big eyesore is the printer. It’s this boxy plastic thing that makes me cringe when I look at how sleek the rest of the room is.

So I actually made a cozy for it. I’ve never been a big fan of cozies — tea, blender and the like — but this printer needed one. I didn’t use a pattern and I just followed my sewing instincts. I have to toot my own horn here. It turned out just great!

Here’s how I constructed it.

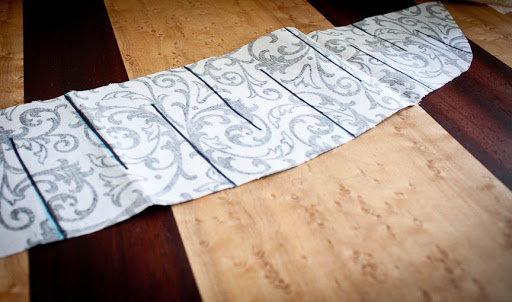
Step 1: Measure all the sides of the printer. The paper tray on ours can’t be removed so I made sure to measure how far it sticks out. I decided to have one panel for the top and front of the printer and one panel to go around the sides and back of printer. Then there were two triangular areas where tray sticks out from the front so I had to figure out the measurements of that.

I added an inch to each measurement for selvedge. The top front panel was 21.5 inches in length by 20 inches in width. The sides and back were 40.5 inches in length and 11 inches in height. The printer tray stuck out 5.5 inches (6.5 with selvedge) and the height was 10 inches (11 with selvedge). I made a triangle where one side was 6.5 inches and the other side was 11. Then I connected those sides to complete the triangle. I think it was around 12.5 inches.  Whew! That’s a lot of measurements! Here’s a visual:

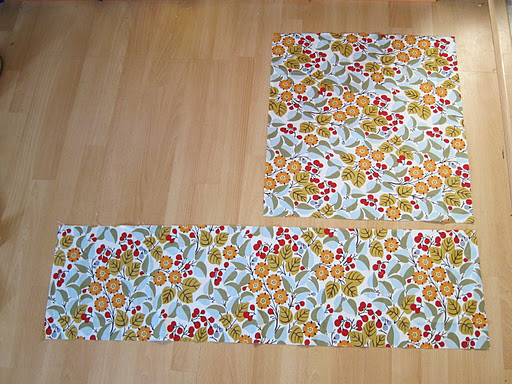
Squarish panel is the top/front, rectangle is the side/back/side

Make two triangles, but be sure one is cut on the right side and the other on the wrong side.

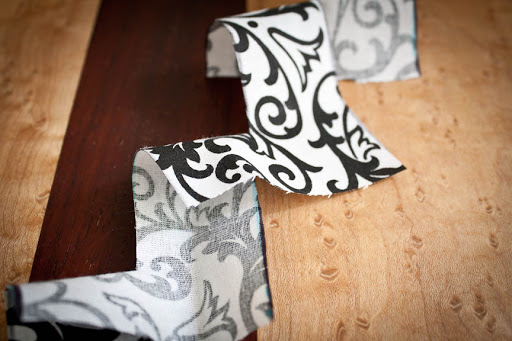
Step 2: I pinned all the pieces together to see that it would fit properly around the printer. When pinned altogether it should look like an inside-out cozy.

This is before I realized I needed the triangle panels

With triangle panels

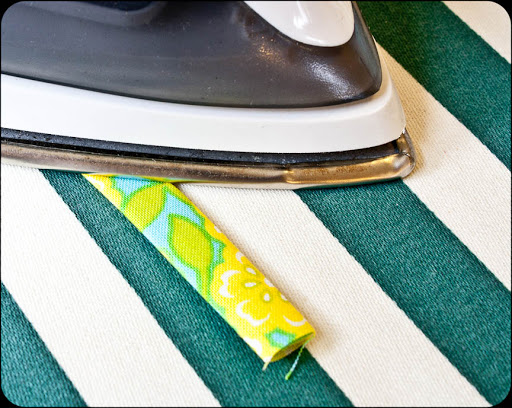
Step 3: Sew the long side of the triangles (the one with the 90-degree angle to the short side) to the edges of the side panels. Iron seams flat.

Triangles sewn!

Step 4: Pin the side panel to the top/front panel. Again, it should now look like an inside-out cozy.

Step 5: Sew along the longest side of the triangle and all around the pinned edge. You’re almost done! I had one side of my triangle that didn’t quite match up so I just trimmed it so it was flush with the edge of the cozy.

Step 6: Turn up the raw edge and iron. I placed the cozy inside-out on the printer to see if I had enough length to fold the hem up again so there weren’t any raw edges along the hem, but I didn’t, so I just made do. Sew along the hem.

Step 7: Iron all the sides right-side-out so it makes a box shape. Place on top of your printer. Yay, hidden printer!

Please let me know if you have any questions about making this project, as I’ve never tried to explain such a thing.

20-minute Baby Pants!

I was nearly devastated the other day when my 8-year-old hand-me-down pajama pants ripped in the rear. They were my favorite. As you can see, they have little wiener dogs on them.

too much booty in the pants!

So instead of throwing them out, I stashed them for a rainy day. Well, it’s not really raining today, but it’s cold enough that my car won’t start. So I decided to make some tiny pants out of larger pants.

I used a super simple pattern from make-baby-stuff.com and they turned out splendidly. Here’s my childhood bear, Bosh, modeling them.

They sew up in a flash so I used some leftover baby material from a quilt I made a couple of months ago and made another pair. Lickety split! They are even quicker to sew when you use the hem of the big pants as the hem of the small pants. It’s basically six seams if you include the leg hems, inseams, rise and elastic casing. It’s really a great beginner project.

I can’t wait to put them on my real child.

Dress Shirt Tote Bag — Tutorial

I just nearly had a heart attack. I went to log in to my blog and it said it had been deleted. Somehow, though it was miraculously restored without any effort, so I’m back on track!

My husband decided to get rid of about 30 dress shirts the other day. I knew crafts were in the making, I just had to decide what craft.
Tote bag!
And here’s how to make it.
Ingredients:
1 large dress shirt
lining fabric, about 1/2 yard
stiff iron-on interfacing
necktie
Directions:
  • Sew the middle of the shirt down so the buttons are in place. There is already a seam to follow, so try to sew on top of that with matching thread. Once you’ve sewed this, you will be unable to unbutton the shirt.
  • Cut your lining fabric into two 15×16-inch rectangles.
  • Do the same for the dress shirt, but you may have to cut them separately since sometimes there are pleats on the top of the back. I made sure the buttons were in the center of the rectangle — so at 7.5 inches. I also had to cut the back rectangle way low on the shirt because there were pleats.
  • Cut the interfacing about 14.25×16.25 inches. It doesn’t have to be exact.
  • Iron the interfacing to the wrong side of the dress shirt material. 
  • Iron down the top edge of the exterior and lining about an inch.
  • Pin the dress shirt material right sides together and sew the sides and bottom. Do the same for the lining.
  • If you’d like your bag to have a flat bottom, then open up the corners of the bottom and iron flat. Then measure about an inch up from the corner and draw a line. Pin the corner down and sew along the line. Then trim the corner off. I turned mine right side out to make sure I sewed them correctly and one of them was actually longer than the other, so I just resewed the short one a little bit higher and it came out just right.
  • Sew the edges and bottom of the lining this way too.
  • Now, turn the exterior right side out and slip the lining inside it, keeping the lining inside out.
  • Pin the top edges in place all around, making sure the lining doesn’t stick out above the exterior.
  • Now you’re going to measure your necktie handles. My husband wanted short handles so I let him figure out the length and had him add 1.5 inches on each end. When he gave me his preferred length I just cut another bit of the tie the same length. One strap will probably be wider than the other because the tie is tapered, but that’s OK by me. I think it’s cool.
  • I measured two inches outward from the buttons and pinned my handles in place. Nestle the edge of the handle between the lining and the exterior fabric so you can’t see any raw edge. Pin it in place near the edge.
  • Stephen also wanted the neck tie to come out of the top and be loose, like the tote back is wearing the tie. I had him measure how long he wanted the tie to fall and then added about 2 inches. Pin it in place so the edge of the tie sticks up. This way, when we sew, the tie can flip down over the seam and hide it.
  • Sew all the way around the top of the bag, leaving about a one-inch seam allowance. Remove all pins and sew another seam around the top, very close to the edge.
  • Stephen wanted to use a tie clip so I used a seam ripper to make a hole where he wanted to put the clip.

Thank You, Anna. I finally made a quilt.

My friend Laura has a new baby boy named Connor and I had just enough time to be inspired and then actually motivated to make him a little quilt to match his monkey-themed crib.

My mom is a whiz quilter, having won countless blue ribbons and judges’ choice awards at the Alaska State Fair. She’s so successful that I’ve never felt quite worthy enough to try and quilt. I lack patience and overall desire for accuracy. But recently my friend Anna made a baby Pooh quilt that was so darling. She said it really wasn’t too tricky.

So one evening I bought some fabric and cut out the squares. At 7 a.m. Saturday I was up and at ’em.  I sewed the top all together. Then I was clueless. Thanks to my mom I was able to pin the top to the fleece back and to create a binding. I didn’t use any batting since the fleece was pretty thick on its own. All in all it was a seven-hour project.

It’s definitely not perfect, but hey, It’s homemade and I’m sure Laura can’t wait to bring Connor home and place him in his monkey crib.

30-Minute Craft: Cute Pincushion!

Yesterday my husband and I were antiquing (It was my husband’s idea!) and I came across an old homemade pincushion that looked pretty simple to make. It was basically a round beanbag with yarn wrapped around it — kind of like a stuffed Trivial Pursuit piece.

My rendition turned out cheerful and totally useful. I’m happy I finally got to toss my cheapo Wal Mart pincushion.

And here’s how to make it.

Materials:
a 6- or 7-inch bowl
a small amount of fabric
4 14-inch lengths of yarn
1-inch button
a cup or so of uncooked rice
funnel
pillow stuffing (I used chunky yarn cause I was out of stuffing)
Tapestry needle (make sure it can fit through the holes of the button)

Directions:
Trace your bowl onto the wrong side of your fabric. Double up the fabric and cut out the circles.

Fold one circle in half and crease the center of it. Draw a 2-inch line in the center of the crease and make a cut on this line. This is where you will stuff the pincushion.

Put right sides together and sew all the way around the edges. Cut small slits along the edge so that the fabric won’t ripple when you have it right-side out.

Turn the pincushion right side out through the hole you cut in the center. Stuff the cushion till it’s about halfway full. I didn’t have any stuffing so I just used scrap chunky yarn.

Using a funnel, fill the cushion with rice till it’s stuffed but not too tightly stuffed.

Stitch up the hole. It doesn’t have to be perfect because this seam will be on the bottom and yarn will be covering it.

Take a piece of yarn and double it. Then wrap it around the pincushion and tie it tightly with a square knot on the bottom of the cushion.

Do this with the other three pieces of yarn so it looks like a pie chart. Trim the ends of the yarn.

Thread your darning needle with a piece of yarn and push it up through the bottom of the pincushion so it comes up in the center of the top. Thread the button through and push the needle back down to the bottom. Tie this tightly and secure it with a good square knot. Trim the edges.

Now put pins in your new pincushion and enjoy!

Fabric Scraps Garland

Whenever I sew I always feel obligated to keep all of my fabric scraps, no matter how useless they seem to be. When it came to setting up my crafts booth last weekend, I knew I wanted some cool decorations and that’s when those fabric scraps came in handy.

I thought of it in the middle of the night last week — some long ago paper crafts project I might have seen in an old library book as a kid. You cut strips of paper like a continuous “S” and then stretch it out.

First thing in the morning, I did a test on a strip of fabric. What I came up with was a delightful way to decorate any event.

And here’s how I made it:

Ingredients:
Several scraps of fabric, about 4 inches wide.
Sewing machine
Fabric scissors

Directions:
Your scraps do not have to be perfect. They could be different widths if you like, but I found 4 inches is a good width. All you do is sew your scraps end to end. It’s OK if right sides aren’t always facing because you’ll be able to see both sides of the fabric from all angles. When you’ve sewn as many scraps as you feel is adequate (a little goes a long way), start cutting the strips like so:

You do not need to draw the lines. I just did that so you could see what I was cutting.  Pull the fabric apart and see what you’ve created!

If it’s not long enough, add more scraps. Then hang up your garland, or store it on a paper towel roll.

Girdwood Forest Fair Preview

I found out a week ago that a friend and I are sharing a booth at the Girdwood Forest Fair, an annual festival dedicated to homegrown food, crafts and music. I’ve been attending the Forest Fair since I was able to bum rides from older friends — so….15 years?

I’ve been busy as the busiest bee and/or beaver in the last few days trying to get my crafts together. Here’s a small preview of some of my wares. Come down to the Forest Fair July 1, 2, and 3 and I’ll give you a special Knit Nat discount on any of my crafts!

Headbands Galore!

Homemade Wallet

In high school I used to sew wallets for my close friends. I modeled them after my brother’s ’80s velcro wallet he’d left behind when he moved out. My wallets were hastily made, often crooked, but they were made with love and I always stitched my friends’ names or initials on the overflap.

Fast forward more than a decade. I’m starting to get back into sewing and I’m about to leave on a trip to New York. I purchased at the thrift store a red, watermelon slice-shaped sling purse and I couldn’t fit my checkbook wallet inside. So I decided to make one.

Making a wallet takes some planning. You have to know when to sew what so you aren’t left with unsewable raw edges. I like to map out what I’m going to do and when I’m going to do it. I use construction paper and cut out all the wallet’s components and make sure I leave enough seam allowance to still fit credit cards in the slots (I failed on the left-side slots as you can see below). I lay out my paper wallet so I can physically see how the wallet is assembled.

My wallets have a long pocket down the middle for bills and two pockets inside which have credit card slots sewn on top of them. They velcro close so I have to sew the velcro on first since I can’t sew it when all the pockets are assembled (you’d be sewing the pockets closed).

First I iron interfacing to all the wallet pieces. For the main body of the wallet I use heavy interfacing and for the pockets and slots I use lighter weight interfacing.

Next step is to turn down and sew the top edges of the credit card slots. Iron, iron, iron! It’s the only time I ever iron is when I am sewing. It makes crisper edges and everything is easier when you iron.

Next you turn under and sew the edges of the inside pockets. I like to baste all the inside components together before the next step, which is to turn down and sew the long inside edge of the pocket.

You can see in the wallet above that I skipped a step and had to hand sew the right-side pocket closed. I failed to sew this down before sewing the outside to the inside. Too late once it was flipped!

Then only other thing I’d do differently when I sew the outside to the inside is instead of leaving an open seam and hand-sewing it shut, as I would a pillow, I should just leave the whole top edge of the wallet open and then turn it under and sew it down once it’s right-side out.

Tea Wallet — A Photo Tutorial

Here’s a step-by-step guide to sewing a tea wallet. It’s a good way to use up scraps. Enjoy!

Materials:
Two different patterns of cotton fabric
light interfacing
one snap
sewing machine
iron
needle and thread

The wallet is made of five parts: The outside material (piece A), the inside material (also piece A), the two inside pockets (pieces B and C) and a little strap to fasten the wallet together (not pictured below).

The body of the wallet is 6.5 inches wide x 4 inches tall.
The first pocket is 6.5″x 3″
The second pocket is 6.5″ x 2.5″
The little strap is made from the outside material and it’s 1.5″ x 3″

The first thing you’ll need to do is iron on some light interfacing to the inside parts of the wallet, namely the inside A pattern and the B and C patterns. It’s up to you what material you use for the pockets, but I like pocket B to be made of the outside material and pocket C to be made of the inside material.

Cut the interfacing for patterns A, B and C and iron the shiny side of the interfacing to the wrong side of the fabric.

Turn down the top edge of pockets B and C and iron flat. Sew a straight stitch across the top edge of each pocket.

Arrange pocket C on top of pocket B, which is on top of inside piece A. Baste along the side edges of the pockets. Fold these basted pieces in half and iron. Make a stitch along the ironed line from the base of the wallet to the top of pocket B, making sure to backstitch. This creates a dividing line between each side of the wallet.

Next, you’ll make the little strap. Iron in the long edges of the strap and then fold the piece in half and iron. Basically, you’re making a small piece of bias tape. Sew along the ironed edge of the tape.

Sew one side of a snap to the outside piece of pattern A, about an inch inward. Place the raw edge of the little strap on the opposite edge of the outside pattern A, facing inward. Pin outside piece A to inside piece A, right sides together and sew all around the edge, leaving a 2-inch space open at the top of the wallet, closer to the snap side.

Trim the edges of the wallet except for the top edge. Turn right side out and iron flat. Sew the opening shut, very close to the edge.

Next, place the tea bags and sugar packets in the wallet and figure out how long the little strap should be in order to reach around to the snap on the body of the wallet. Trim the strap accordingly, fold under the raw edge, then fold it again and sew it down. My machine didn’t feel like sewing this part, so its easier to hand sew for me.

Finally, sew the other side of the snap to the inside of the little strap.

Ta-da!