Category Archives: Crafts

Pink Champagne Cake — Again!

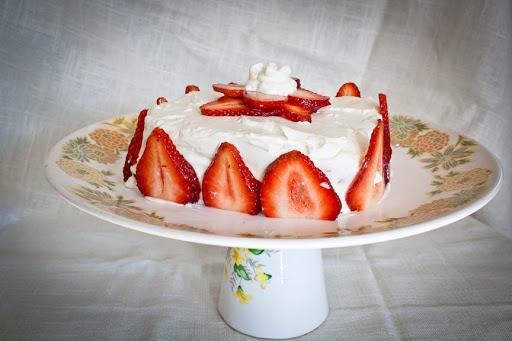
Last month I made a cake for a coworker’s wedding. Instead of having centerpieces at the reception the couple had friends make cakes for each table. It was a brilliant idea. And it got a lot of my coworkers craving more of my pink champagne cake.

It seems we have a lot of August birthdays around the office, so I decided to make another champagne cake. Instead of using brut style I opted for spumante. It’s sweeter and it gave the cake a slightly different flavor.

I also opted for a different kind of icing. I had been making a butter cream cheese frosting, but I decided it was a little heavy so I made a whipped cream/cream cheese frosting. It was fantastic and it used less sugar.

Oh, also I crafted my own cake stand out of a thrift store plate and a porcelain cup.  A glue gun did the trick!

Ingredients:

3 cups all-purpose flour
3 teaspoons baking powder
1/2 teaspoon salt
2 sticks of butter, softened
2 cups sugar
1 teaspoon vanilla extract
6 egg whites
four drops red food coloring
2 cups Champagne

For the frosting:
1, 8 oz. block of cream cheese, softened
1/2 cup sugar
one pint of heavy whipping cream
fresh strawberries

Preheat the oven to 350 degrees. Grease and flour two cake pans. Line the bottoms with parchment paper.
For the cake, mix together the flour, baking powder and salt in a medium bowl. Set aside. In a large mixing bowl, beat the butter and sugar for several minutes till fluffy. Mix in the vanilla. Add the egg whites one at a time then mix in the food coloring. Incorporate the flour and champagne in alternating batches of three, starting and ending the flour. This way the champagne won’t curdle. Pour into the cake pans and bake for 35 minutes or till a knife runs clean when stuck in the cake.
Let cake cool completely before removing from pans.

For the frosting, whip together the sugar and cream cheese. When fully combined, add the whipping cream and beat till you get stiff peaks. Slice up fresh strawberries for garnish.

30-Minute Craft: Cute Pincushion!

Yesterday my husband and I were antiquing (It was my husband’s idea!) and I came across an old homemade pincushion that looked pretty simple to make. It was basically a round beanbag with yarn wrapped around it — kind of like a stuffed Trivial Pursuit piece.

My rendition turned out cheerful and totally useful. I’m happy I finally got to toss my cheapo Wal Mart pincushion.

And here’s how to make it.

Materials:
a 6- or 7-inch bowl
a small amount of fabric
4 14-inch lengths of yarn
1-inch button
a cup or so of uncooked rice
funnel
pillow stuffing (I used chunky yarn cause I was out of stuffing)
Tapestry needle (make sure it can fit through the holes of the button)

Directions:
Trace your bowl onto the wrong side of your fabric. Double up the fabric and cut out the circles.

Fold one circle in half and crease the center of it. Draw a 2-inch line in the center of the crease and make a cut on this line. This is where you will stuff the pincushion.

Put right sides together and sew all the way around the edges. Cut small slits along the edge so that the fabric won’t ripple when you have it right-side out.

Turn the pincushion right side out through the hole you cut in the center. Stuff the cushion till it’s about halfway full. I didn’t have any stuffing so I just used scrap chunky yarn.

Using a funnel, fill the cushion with rice till it’s stuffed but not too tightly stuffed.

Stitch up the hole. It doesn’t have to be perfect because this seam will be on the bottom and yarn will be covering it.

Take a piece of yarn and double it. Then wrap it around the pincushion and tie it tightly with a square knot on the bottom of the cushion.

Do this with the other three pieces of yarn so it looks like a pie chart. Trim the ends of the yarn.

Thread your darning needle with a piece of yarn and push it up through the bottom of the pincushion so it comes up in the center of the top. Thread the button through and push the needle back down to the bottom. Tie this tightly and secure it with a good square knot. Trim the edges.

Now put pins in your new pincushion and enjoy!

Fabric Scraps Garland

Whenever I sew I always feel obligated to keep all of my fabric scraps, no matter how useless they seem to be. When it came to setting up my crafts booth last weekend, I knew I wanted some cool decorations and that’s when those fabric scraps came in handy.

I thought of it in the middle of the night last week — some long ago paper crafts project I might have seen in an old library book as a kid. You cut strips of paper like a continuous “S” and then stretch it out.

First thing in the morning, I did a test on a strip of fabric. What I came up with was a delightful way to decorate any event.

And here’s how I made it:

Ingredients:
Several scraps of fabric, about 4 inches wide.
Sewing machine
Fabric scissors

Directions:
Your scraps do not have to be perfect. They could be different widths if you like, but I found 4 inches is a good width. All you do is sew your scraps end to end. It’s OK if right sides aren’t always facing because you’ll be able to see both sides of the fabric from all angles. When you’ve sewn as many scraps as you feel is adequate (a little goes a long way), start cutting the strips like so:

You do not need to draw the lines. I just did that so you could see what I was cutting.  Pull the fabric apart and see what you’ve created!

If it’s not long enough, add more scraps. Then hang up your garland, or store it on a paper towel roll.

I’m coming out of the booth!

After three days and 25 hours of customer service I’ve decided this booth was a great idea. I had the time of my life. I put in 63 feather hair extensions and sold 17 headbands, 10 purses, 5 hats, 20 magnets, 3 necklaces, 3 pairs of earrings, 4 leather bracelets, 4 jars of jam, and about a dozen matchbooks. My mom hung out with me all three days and helped be my cashier.

Next year I’ll be much more prepared and actually have knitted stuff to sell.

Here are some photos of the booth. What I loved is people were drawn to the booth just because of the decorations. Even if they didn’t buy anything, people enjoyed being in our tent.

Purses were displayed using a tree branch

The tent was adorned with pom poms and scrap garlands

A thrift store sheet covered the main display table. Appetizer dish displayed the matches

Tiny doll furniture from the thrift store really came in handy!

The view of our booth from across the way. Boothmate Alex is setting up her wares

Cranberry marmalade 

Kelly’s monsters chilling in an old suitcase. A few found loving homes

Macrame leather bracelets were a big hit.

Girdwood Forest Fair Preview

I found out a week ago that a friend and I are sharing a booth at the Girdwood Forest Fair, an annual festival dedicated to homegrown food, crafts and music. I’ve been attending the Forest Fair since I was able to bum rides from older friends — so….15 years?

I’ve been busy as the busiest bee and/or beaver in the last few days trying to get my crafts together. Here’s a small preview of some of my wares. Come down to the Forest Fair July 1, 2, and 3 and I’ll give you a special Knit Nat discount on any of my crafts!

Headbands Galore!

Hubby Craft 2

My mother-in-law gave us an antique kitchen scale last week.

My plan was to simply spray paint it a different color. But then I lost motivation. My husband picked up that motivation and went all the way. He got a wire brush that attaches to his power drill and sanded off most of the paint. Then he took acetone to it to get off any remaining paint. Then he spray painted it.

In other words, he did a much better job than I ever would have.

Way to go, Stephen!

Tips on Tulips

It was my mom’s birthday on Wednesday so on my way to work I stopped by the grocery store to buy her flowers. I brought my own vase and instead of paying a lot of moolah for a pre-made bouquet, I was just going to make my own. Daffodils were only $2 a bunch and there were all sorts of different colored tulips. I decided on a simple arrangement of daffodils and purple tulips. When I went to pay for them, the young woman behind the counter told me that daffodils are toxic to other flowers, so if you mix them, the other flowers will die.

I was surprised that a grocery store clerk knew this. I had worked at this very same flower department when I was 14 and I knew very little. I just loved flowers.
So I took her advice and went for yellow and purple tulips.
She then provided me with some other useful tulip information that I felt like sharing:

  • Tulips grow even after you cut them, which is why the purple ones in the photo look taller than the yellow — they must have grown faster
  • Tulips like pennies, so drop one in the vase not just for good luck
  • If a tulip is drooping, poke a pinhole just below the bloom and it should perk up
I gave this last advice to my mom upon floral delivery and she told me she tried it out and it totally worked. I guess a little air bubble gets stuck in the stem after it has been cut, so a little hole lets the air escape and get to the bloom.
Neat!

Thread and Scissor Rack — A Tutorial

While my husband was busy at Lowe’s buying tie rack supplies, I found a piece of pegboard for $5.50. An idea popped in my head — a rack to hold my threads and scissors. So I had the hardware man cut a piece 2-ft.x1.5ft. I’m not woodworker, but with a few inexpensive supplies and a little elbow grease, I came up with this:

And here’s how to make it:

Materials:

  • 1 piece of peg board, cut to a size you prefer
  • 2 long wooden dowels, the thickness to fit snugly inside the holes in the peg board
  • 2 pieces of 1.5x.5-inch wood, the length of your peg board
  • 6 short screws
  • 2 big nails or a way to hang the board like a picture frame
  • spray paint
  • Metal hooks to fit in a pegboard (in the pegs section of Lowe’s)

Tools:

  • Piece of sandpaper, about 120 grit
  • A Saw
  • Drill
  • Wood glue
  • wet rag
  • Newspaper or big plastic bag
  • 2 pieces of scrap wood
  • pencil

Have your pegboard cut to your specifications. Mine is 1.5 ft x 2 ft. Lay out some newspaper in a ventilated area and rest the peg board on two pieces of scrap wood. Spray paint one layer onto the peg board. Let it dry and do one more coat.

Meanwhile, figure out how long you want your pegs to be. I took my longest spool of thread and added the thickness of the board plus a little sticking out the end — about 3 inches? I didn’t measure. I sawed off that length from a dowel and then with a pencil marked that length all the way down the dowel. Saw as many pegs as you see fit. I made 28. It’s OK if they splinter a little bit on the edges.

Lay your sandpaper on a table, grit side up, and sand one end of each dowel so the edges and corners are all smooth. It doesn’t have to look perfect — no one is going to be inspecting them.

When the paint is dry, drill the 1.5x.5 pieces of wood to the top and bottom of your board, on the back. For each board, I drilled three screws from the front to the back through the holes in the peg board. Drill one on either end of the wood and one in the center. Here’s a picture of the back of my peg board, since I’m absolutely terrible at describing this:

My screws were slightly too long, but that’s because I didn’t bother to buy screws for this project. I just found some lying around my garage. I’m not a perfectionist so I was fine with it.

Now place the pegs on the board and figure out how you would like the layout to be. I knew I wanted to hang scissors on one side and I wanted room at the bottom for a possible shelf in the future, so I arranged my pegs off-center.

One at a time, remove a peg, add a little wood glue to the rough end, add a little glue in the hole the peg is going into and insert the peg, feeling in the back for the end. Make sure the rough end is as flush as you can get it with the back of the peg board. Make sure the peg is straight and wipe off any excess glue with a wet rag.

Do this for each peg and let dry a couple of hours. When everything is dry, hang up your board like you would a picture frame, if you have the hardware. I just put two fat nails in the wall and hung it up that way. Arrange the metal hooks how you like them. Enjoy an organized craft space!