Category Archives: baby

Crocheted Baby Booties

In the past I’ve not admired crocheted objects. They looked icky to me. But during the past couple of years crochet has grown on me. It’s easier and more gratifying than knitting when you’re making blankets. And recently I’ve discovered baby booties go by more quickly on a hook than with needles.

 
I have Lion Brand Yarn to thank for this bootie pattern. Reading crochet patterns isn’t easy when you’re a beginner, but I took it one step at a time and after two pairs of funny looking booties I finally made a pair that resembled something. 


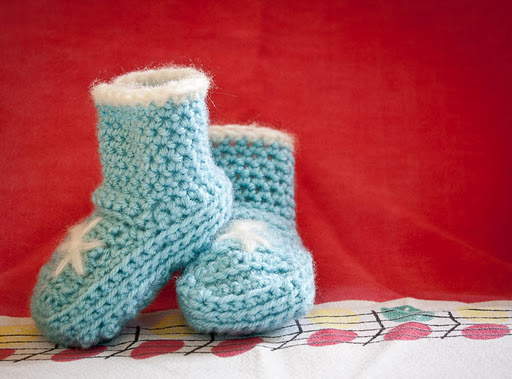
I would not call it a baby bootie in the size I was successful at, but more of a small child’s slipper.
 
Either way, I thought they were cute and a little kitchy. They don’t have the elegance of a knitted bootie, but functionality outweighs elegance when it comes to clothing a baby.
 
This is really a great way to make a bootie. You create the sole first, then crochet around to make the vertical volume, then work across to make the front and you end with the cuff.
 
I’m unable to link the pattern — it just takes you to the main Lion Brand page, so I’ll paste the pattern below. Initially it required a lot of counting and I couldn’t figure out how to get the number of cuff stitches that pattern suggests you should have, but after a couple of tries I worked it out.
 
Also, I still haven’t really figured out hook size so I used a J hook and it turned out just fine.


BOOTIE (make 2)
Sole

Ch 5 (7, 9, 9).
Foundation Row: Sc in 2nd ch from hook and each ch across – 4 (6, 8, 8) sc.
Next 5 (6, 7, 9) Rows: Ch 1, turn, sc in each sc across.
Next Row: Ch 1, turn, 2 sc in first sc, sc in each sc to last sc, 2 sc in last sc – 6 (8, 10, 10) sc.
Next 4 (7, 10, 12) Rows: Ch 1, turn, sc in each sc across.
Place marker in last st worked. Move marker up as work progresses.
Sides
Rnd 1:
 Do not turn, work 10 (14, 18, 22) sc evenly spaced down side of sole; work 4 (6, 8, 8) sc along opposite side of foundation ch (this is the heel); work 10 (14, 18, 22) sc evenly spaced along other side of sole; work 6 (8, 10, 10) sc across to marker – 30 (42, 54, 62) sc.
Next 2 (3, 4, 5) Rnds: Working in front loops only, sc in each sc around.
Top of Foot
Note:
 When working top of foot, do not ch 1 at the beginning of rows.
Row 1: Sc in next 1 (1, 2, 2) sc, sl st in next sc, turn, sk sl st, working in front loops only, sc in next 6 (8, 10, 10) sc; working in both loops, sl st in next 2 sc; leave remaining sts unworked.
Next 4 (8, 12, 14) Rows: Turn, sk first 2 sl sts, working in front loops only, sc in next 6 (8, 10, 10) sc across top of foot; working in both loops, sl st in next 2 sc along side of Bootie.
Next Row: Turn, sk first 2 sl sts, working in front loops only, sc in next 6 (8, 10, 10) sc across top of foot; working in both loops, sl st in next sc along side of Bootie.
Cuff
Rnd 1:
 Turn, sk first sl st, working through both loops, sc in each sc around entire Bootie opening; do not join – 18 (22, 26, 30) sc.
Note: If you would like cuff to be a little tighter, when working Rnd 2, work 3 decreases evenly spaced around as follows: draw up a loop in each of next 2 sts, yarnover and draw through all 3 loops on hook.
Rnd 2: Sc in each sc around.
Rep last rnd until cuff measures 1 1/2 (2, 3, 4) in. (4 (5, 7.5, 10) cm). Fasten off.
FINISHING
Weave in ends.
 

The Tiniest Steelers Fan!

My friend Laura had her son five weeks early. A few days after he was born she asked me if I would make him a Steelers hat (even though I know she’s a Colts fan, but I guess he’s daddy’s boy in the sports department).

I made the little guy the littlest hat. I couldn’t imagine this hat fitting a person, but it looks like it fits him just fine and with lots of room to grow.

I made the hat using the magic loop method because it was so small that I would have had to use double points from the get-go. A normal circular needle would have been too long. Magic loop uses an extra long circular needle and you work half the stitches at a time while the other half rests on the bendy part of the circular. This sounds confusing, but once you get the hang of it it can be much faster than using double points. Just remember, every knitting technique I know I’ve had to learn backwards since I’m left handed, so if I can do it, you can do it!

Preemie Steelers Hat

Materials:

Worsted baby yarn in yellow, black and white
At least a 32-inch long size 8 circular needle or one set of size 8 double points
Tapestry needle

Directions:

Cast on 56 stitches of the white yarn either using the magic loop method or divided onto three double pointed needles.
Join your work, making sure the yarn isn’t twisted. Place a marker if needed.
k1, p1 rib for five rounds.
Knit eight rounds in stockinette stitch. Switch to black. Knit three rounds. Switch to yellow. Knit four rounds. Switch to black and knit three rounds. Switch back to white and knit eight rounds.
Decrease as follows:
At stitch marker, *k2tog, k6* Repeat * till end of round
K one round
*K2tog, k5*, repeat * till end of round
K one round
*K2tog, k4*, repeat * till end of round
K one round
*K2tog, k 3*, repeat * till end of round
K one round
*K2tog, k 2*, repeat * till end of round
K one round
*K2tog, k1*, repeat * till end of round
*K2tog*, repeat * till end of round.
Cut yarn leaving an 8-inch tail. Using a darning needle, weave in all ends.

For pom-pom:
Using something small, like a matchbook, wrap yarn around and around a ton of times. Remove the matchbook and tie a 12-inch piece of yarn around the middle of the yarn loops. Cut the loops. Trim pom pom to preferred size.

Shake Your Booties!

“All the hotties at the party feeling naughty shake your boobies, yeah
Who likes to rock the party? Who likes to rock the party?
All the ladies with their babies make their babies shake their booties, yeah”


Ok, that’s always what I think of when I think about knitting booties. If you don’t know what I’m talking about, Google it. It’s funny.


I’ve never been a big fan of bootie making. I guess it’s cause they are tiny and you have to make two of them and I really dislike knitting things flat and then stitching them up at the end. I am a knit-in-the-round type of gal.


After downloading the Red Heart Yarn app the other day, I did some bootie searching and found a pattern I actually liked. I went so far as to use the exact yarn in the pattern. They turned out just like the pattern picture!


Don’t tell my husband, but I stole spare buttons off one of his dress shirts. It was a really quick knit. I made one during an episode of Law and Order, so it must have taken two hours to make both. The pattern is free and can be accessed Here. Now I need to give them to a baby so I can see them in action. 


Baby Blanket

I’ve been waiting to post this project because I didn’t want to spoil the surprise for my friend Lizzie. She is having a baby girl any day now. I just sent this out to her last week. It’s just a big, crocheted granny square with added trim and flowers.

Old T-shirt becomes baby pants!

I’ve been trying to think of things to make my best friend for her soon-to-be baby. I found a web site called www.make-baby-stuff.com that has a printable pattern for sewing baby pants.

Making pants is actually quite easy. You only need to cut out one piece for the pattern and with the right technique you can literally sew four seams and you have pants.

I decided to try and make some out of an old Patagonia t-shirt of my husband’s. I forgot to take a “before” photo, but here’s the “after”:

By using the hem of the t-shirt for the bottom of the pants, I didn’t have to hem them up. I made sure to use a needle that’s best for stretchy material and be sure to stretch the fabric a bit as you sew, that way the seams won’t bust when you stretch the pants later on. I added a ruffle made from the hem of the sleeves. I’m happy about this first try! I think I’ll go to the thrift store right now and find some good T-shirts to cut up.