
Homemade corn tortillas are the best. Just buy Masa Harina from the grocery store and follow the directions on the packaging.

Homemade corn tortillas are the best. Just buy Masa Harina from the grocery store and follow the directions on the packaging.

Liquid ingredients are approximate
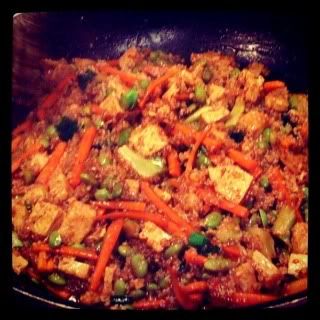
Ingredients:
1 cup raw quinoa, cooked according to package
1 crown fresh broccoli, chopped into bite sized pieces
1 carrot, julienned
1 cup cooked edamame without the pods
1 brick of extra firm tofu
2 scallions, chopped
2 cloves of garlic, minced
1/4 cup soy sauce
1 TBS corn starch
2 TBS cooking oil
1 TBS sesame oil
2 tsp chili garlic paste
2 tsp seasoned rice vinegar
Directions:
Drain the tofu and slice it in half like a hamburger bun. Place in a pie pan lined with paper towels. Place a paper towel on top and weigh a heavy pan on top to press out the liquid. Let rest for 10 minutes. Drain off excess liquid and chop tofu into bite size pieces. Heat the broccoli in the microwave with a small amount of water in a plastic wrap-covered bowl for 1.5 minutes.
Heat cooking oil in a large saute pan over high heat. When oil starts to shimmer, add the tofu and brown on all sides. Drain the oil. Add the carrot, scallion, garlic, broccoli, edamame and sesame oil. Toss to coat. Add the cooked quinoa, soy sauce, corn starch, chili garlic paste and vinegar and toss till thoroughly coated. Add more soy sauce if necessary to create a good glazed sauce.

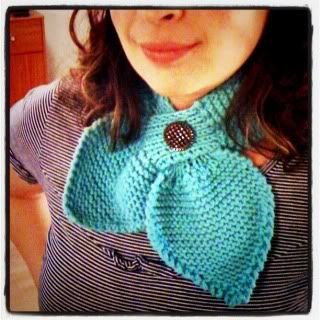
This was knit with Cascade Superwash yarn in a cranberry color that Stephen picked out. The small pearl button was his added touch.

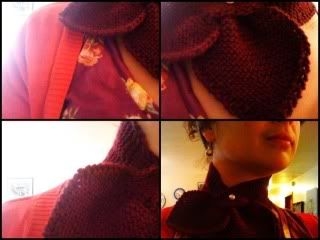


This is for a friend’s baby girl. It was knit on size 8’s, 64 stitches.

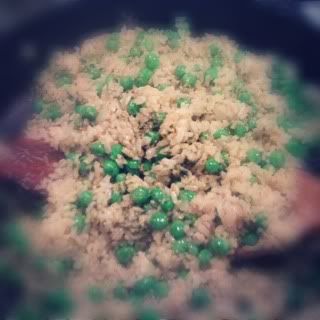
Ingredients:
1.5 cups uncooked brown rice
2.5 cups boiling water
1 TBS butter
1 teaspoon salt
1 TBS olive oil
1.5 cups frozen peas
1/4 cup pesto
1/2 cup grated parmesan
1/4 onion, finely chopped
1 clove garlic, minced
Directions:
Make brown rice according to Alton Brown’s Recipe. Ten minutes before rice is done, steam the peas in a small saucepan. Drain when they are just hot. Saute onions in olive oil over medium heat till soft. Add the garlic and lightly brown. Add the rice, cheese, peas and pesto and toss till rice is coated.

I knit this with baby yarn from Michaels. I can’t remember the brand, but it reminds me of Debbie Bliss, only much much cheaper. This was knit on 7’s but since the yarn is meant for 8’s it came out larger than my others. A girl in my knitting group gave me one of her grandmother’s vintage buttons. I just love how it came out.
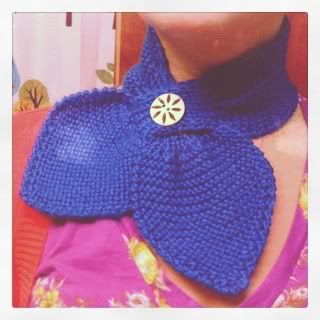
One thing I did differently from the original pattern is I bound off when I got to 4 stitches instead of 3. That way it’s more rounded like the first point.


I’ve been trying to find a way to purl faster so I can churn out more braided headbands. After extensive YouTube research, I found a technique where you don’t put the yarn in front of the work to purl. It’s called the Norwegian Purl. It looks confusing, but for some reason it totally makes sense to me. It may take me a little longer to do this stitch, but I find it much more interesting and rewarding that I actually finished another headband!
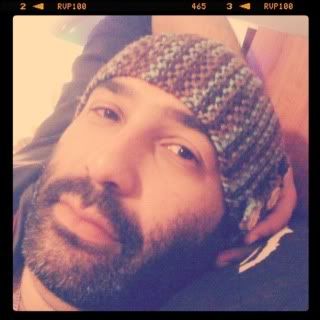
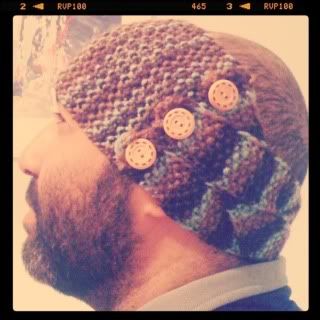
Stephen is a master in disguise of picking good yarn. This is just Red Heart yarn from Wal Mart, but it knit up so well. He also decided to wear the headband backwards and I think it look much more masculine. I was skeptical that this design would look overly feminine, but he can pull it off. Must be all those years of wearing women’s sunglasses…

I’m a lefty. My grandmother taught me to knit when I was very young. Being married to a lefty, she must have empathized for my future self and taught me to knit left-handed. She had the best intentions, but how wrong she was to teach me this way.
I’m an adaptable person. I could have learned to knit the normal way, but for some reason, I knit in reverse. Take everything you know about knitting and make it backwards — that’s me. So when a pattern tells you to take three stitches from the left needle and transfer them to a cable needle, I have to automatically switch it to read, “take three stitches from the right needle…”
Usually this isn’t a big problem. The only obstacle I’ve come across is when I made my Norwegian snowflake mittens and I had to follow an intricate chart. Figuring out where the thumbhole went and whether to ssk or k2tog proved tricky.
Recently, I made a headband using a seed stitch. This stitch takes me forever to make and I expressed this to a local shop owner/knitter who was admiring my work. She balked and said it’s because I’m throwing my yarn, not picking it. I’m knitting English method, not Continental. If I were picking my yarn it would go by so much faster! This irked me a little. I couldn’t shake it.
This was about two weeks ago, and since then I’ve received dozens of comments on this headband. So I decided to look into the two methods and figure out exactly what I’m doing. Turns out I’m some sort of hybrid knitter. I knit Continental method, but I wrap the yarn instead of pick.
What I need to learn is how to actually knit Continental. Then I can churn out these headbands. I have no idea why I learned to knit this way, but it would have been a hell of a lot easier if Grandma just taught me how to knit her way.
Lefties have their rights too!

