Healthy Pumpkin Muffins

I’m not much of a baker, but when I saw a recipe on my BabyCenter.com app for pumpkin muffins, I thought I should try it out. Pumpkin is high in vitamin A and I tweaked the recipe to make it even a little bit healthier.

My muffins turned out moist and flavorful. I decided against the orange cream cheese frosting, but it was mainly that I lacked the ingredients and I was too lazy to go to the store.

Pumpkin muffins

Makes about 14 muffins

Ingredients:
1 TBS butter (I might try cooking oil next time)
1 egg
3/4 cup + 2 TBS canned pumpkin
3/4 cup milk
2/3 cup brown sugar
1 cup whole wheat flour
1 cup white flour
1/2 tsp salt
2 tsp baking power
1/2 tsp baking soda
1/2 tsp cinnamon
1/2 tsp freshly grated nutmeg
1/4 tsp ground ginger
1/2 cup golden raisins (optional)

Directions:
Preheat oven to 400 degrees. In a large bowl, mix together the butter, egg, milk, sugar and pumpkin. In another bowl, mix together the dry ingredients. Slowly mix the dry ingredients in with the wet till everything is combined. Add the raisins if you desire.

Spray a muffin tin with Pam. Pour batter into the pan, almost to the top of each.

Bake about 20 minutes or until a toothpick comes out clean.

Let cool on a rack.

Muffiny goodness!

Thai Coconut Curry Soup

I’ve never really cooked Thai food before. I love to eat it and I respect those who are able to concoct it, but I always thought I was unable to create the spicy, sweet flavors on my own.

I was inspired by a recipe that called for five ingredients for Thai soup. I decided to try it out but to add my own flair to it as well. Turns out I can make something that tastes like Thai! Watch out, it’s spicy!

It’s worth noting that you could probably find these ingredients at a normal grocery store, but usually it’s a lot cheaper and there’s a lot more variety at an Asian market. I found all of my ingredients at the Red Apple Market in Mountain View and it probably cost about $7. I wish I was able to find bean sprouts, but my grocery store didn’t have them. I would add that next time.

Thai Coconut Curry Soup

Serves 4

Ingredients:
2 oz. of yellow curry paste (I chose a 4 oz. can that looked like it had Thai writing on it. It also had a photo of soup on it, so that’s why I went with it).
One 13.5 oz. can of coconut cream (not milk or water)
1/3 package of rice noodles (again, I wasn’t sure what to get so I looked at the photos on the packaging)
1 cup chicken stock
1.5 cups water
1 jalapeño, thinly sliced (optional if you want less spice)
1/2 brick of extra-firm tofu, cubed
1/2 cup or so of cooked shredded chicken
2 tbs. cooking oil
a couple of dashes of fish sauce (the magical Thai ingredient)
a couple of tablespoons of fresh cilantro
several sprigs of fresh basil
squeeze of fresh lime

Directions:
Cook noodles according to packaging. I boiled mine for six minutes and then strained and ran under cold water for one minute and set aside till I was ready to add to soup.

Bring the 1.5 cups water and chicken stock to a boil. Set aside. In a large saucepan, heat the oil and add the curry. Stir and cook for 30 seconds or so. Add the coconut cream, the water and the stock and stir till the coconut cream is melted and soup starts to simmer. Add the noodles, fish sauce, tofu, chicken and jalapeños to the soup and return to a simmer. Turn off heat and serve into bowls. Top each bowl with cilantro and broken up pieces of basil. Squeeze a wedge of lime over it all.

This soup was quite filling. It made more than I expected, and I’m happy to have leftovers for tomorrow!

Make Your Own Fitted Crib Sheet

My husband and I are putting together the baby room. We’ve got shelves, a bassinet, a comfy chair, a cradle and as of last week, the crib that all four of the children in my family used. It’s a gorgeous maple crib made in Sweden in 1971. My father bought it in England when he was going to school there before my brother was born.

I love being able to use family heirlooms. Our family doesn’t go very far back so means even more to me to keep things that have history.

I soon discovered the downside to this priceless piece of furniture when we tried to find a sheet at Babies R Us. Looks as though the crib mattress (which thankfully is in pristine condition) is an irregular size and stores just don’t carry a fitted sheet in its dimensions.

So let’s sew one! It was pretty easy. The hardest part was cutting, honestly.  Here’s how to make a fitted sheet for your crib mattress.

Materials:
Two yards of 100 per cent cotton fabric (length depending on dimensions of mattress)
36 inches of 1/4-inch wide elastic
Iron

Directions:

Prewash your fabric to make sure it’s preshrunk.

Measure your mattress’ width, length and depth. Ours was 23″x48″x4″. I decided I wanted the sheet to wrap around the mattress by three inches, making the depth of the sheet 7 inches. I didn’t take into account seam allowance and hem, but it seemed to work out just fine for me. You may want to consider adding 3.5 or 4 inches to the depth to compensate.

Since the depth on each side of the sheet will be 7 inches, I added that length to each side of the sheet, or rather, added 14 inches to the width and the length, thus making the dimension of my sheet 37″x62″.

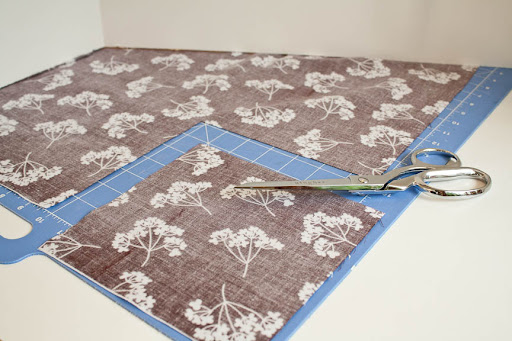
Cut your fabric to the proper dimensions.

Cut 7″x7″ squares out of each corner of the fabric. Discard the cut squares.

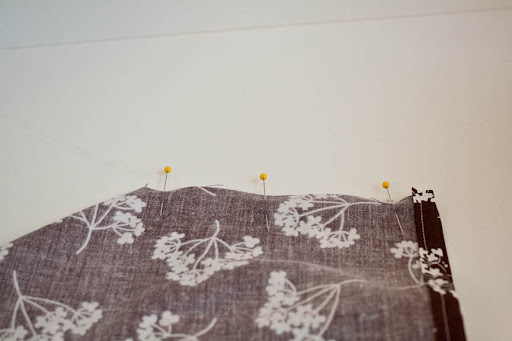
Turn under and iron the edges of the sheet. Turn under and iron again so you have no raw edges. Pin and sew hem on all sides.

In the areas you cut out the squares, pin the fabric right sides together where the raw edges still are. Sew each corner. You should now have a somewhat baggy fitted sheet.

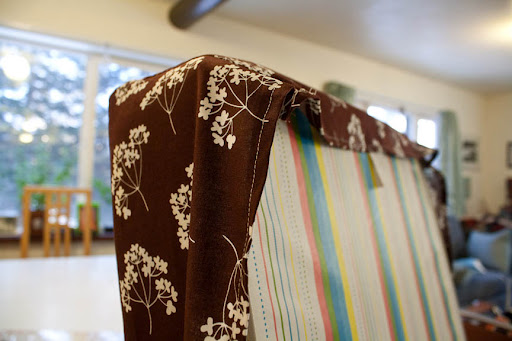
Place on the mattress to make sure it’s a good fit. If it’s too baggy, increase the seam allowance of all four corner seams.

Next, cut your elastic into four 9-inch lengths. Find the center of one piece of elastic and line it up with one of the corner seams. Pin or hold in place. While holding or pinning the middle part of the elastic to the hem, stretch the elastic on the right edge as far as it will go and mark where the end of the elastic hits on the inside of the hem. This is where you’ll start sewing the elastic.

Sew elastic in place and backstitch. Now stretch the elastic along the edge while you’re sewing. The fabric should ripple up behind the sewing machine foot as you sew. Sew the length of the elastic, stretching it all the while. When you get to the end, backstitch in place.

Repeat this for the three other corners.

That’s it! It’s not quite as snug as a store bought sheet, but it does the job and you can pick whatever fabric you want.

Peppers stuffed with Italian Sausage

I’ve never been a big fan of bell peppers, but since I’m pregnant and I’m supposed to eat my veggies I thought I should give them a chance. They’re high in dietary fiber and vitamins A, C, K, and B6.

My husband is on the South Beach Diet in an attempt to lose weight (I think there’s some truth in husbands gaining weight when their wives are pregnant). I want to cook him yummy carb-free food.

The best South Beach Diet Web site I’ve been able to find is www.kalynskitchen.com. It’s full of recipes that would be appropriate for people on the South Beach Diet, but these recipes are also awesome for anyone wanting to eat healthy food.

I found a recipe there for stuffed bell peppers and they looked delicious and right up my alley. What a great way to get me to enjoy bell peppers — mix it with italian sausage and cheese. I tweaked the recipe a bit by adding ground up pistachios and garlic and using pork sausage instead of turkey (which I realize is a less healthy choice, but I freaking love pork sausage). The pistachios acted like bread crumbs and added a little more bulk and depth to the dish. I’m also spoiled because I used homemade Korshin Italian sausage.

I served the peppers with steamed green beans and it was truly a meal worth repeating.

Serves 3

Ingredients:
3 bell peppers, a mixture of red and green
1/2 pound ground beef
4 Italian sausages, removed from casings (or 1/2 lb. loose sausage)
1 tbs. olive oil
1/2 onion, finely chopped
2 cloves garlic, pressed
pepper
dash of dried basil
dash of oregano
1/2 cup marinara sauce
1/4 cup or so freshly grated Parmesan or Romano cheese
1/2 cup shredded mozzarella, divided
1/4 cup shelled pistachios

Directions:
Preheat oven to 375 degrees. Brown the beef and sausage together over medium heat. Break up the meat as much as possible while you cook. Meanwhile, chop a couple of the bumps off the bottom of each pepper so they sit flat. Reserve the chopped bits. Chop the tops off the peppers and clean out each one. Cut around the stem of the cut-off tops and chop finely with the pepper bottoms.

Add the pistachios to a small food processor and grind till it’s the consistency of coarse corn meal. It doesn’t have to be perfect.

When the meat is browned, set aside and add the oil to the pan. Add the peppers and onions and saute for a few minutes. Add the garlic, oregano, basil and pepper and cook till garlic is fragrant, stirring often for about 4 minutes. Return the meat to the pan and add the marinara sauce and pistachios. Cook for another few minutes. Turn the heat off and let cool for 5 or 10 minutes. Add all the cheese, but reserve some mozzarella to sprinkle on top of the peppers.

Make sure all the ingredients are combined and fill the peppers, packing in the filling tightly and letting it mound on top of the peppers. Top with mozzarella cheese and loosely cover with a foil tent so the foil doesn’t touch the cheese. Bake for 20-30 minutes. Remove the foil and bake another 15 minutes or till the cheese is brown on top.

Serve with steamed green beans tossed with butter, pepper, parmesan cheese and lemon juice.

Thrift Find 8

I love Craigslist!

We’ve been putting the nursery together the last few weeks and I’ve decided if I were to pick a theme it would be “Vintage Circus.” I just love vintage colors like rust, aqua and dandelion yellow. I also don’t want an overly cutesy nursery with one or two colors dominating. I want to be able to live in the room and love it too.

I found some vintage Fisher Price toys today on Craiglist. I was surprised they hadn’t been scooped up yet, considering the low price. I got the toys as soon as I got off work. I know our boy won’t find them useful for a long time, but at least they will look perfect in his room till he’s ready to play with them. The woman who sold them to me was really happy they were going to a family that would get more use out of them as her kids did.

I think the toys are from the ’60s. One of them has a copyright of 1961. They are in great shape and are ready to be played with!

Tippy clown. Our child will be terrified of clowns!

Putt Putt Plane. Head bobs when it’s pulled 
Tractor. The wheels wobble when it’s pulled

Musial Chime and Wobble Dog

T-shirt Onesie — A Tutorial

I’ve been in full baby crafting gear lately. Last night I sewed a couple of little pants and I’ve been tinkering with the idea of making a onesie out of an old T-shirt. I have a special one in mind, but I thought I should test it out on a junker first. Success!

It was about a 45-minute project. And here’s how I made it:

Materials:
A small adult T-shirt, or a child’s size shirt
A store-bought onesie (to use as a guide)
Velcro (the kind you have to sew on, not stick on)
Stretchy materials needle (recommended, but not required)

Directions:

First, turn your T-shirt inside out and fold it in half down the middle. Fold your store-bought onesie in half down the middle and lay it on top of the T-shirt so the collars line up and the shoulders/sleeves run along the top. Cut around the onesie leaving about 1 inch of a border on the sleeves and sides but about 2.5 inches at the bottom crotch area. You should end up with one piece of fabric where the front and back are connected at the collar/shoulder/sleeve area.

Trim the sleeve edges how you prefer. The sleeves just happened to end up right where the big shirt sleeve began so there was a sewn edge that made it easy to trim.

Turn under the edges of the legs (there should be four of them) and sew in place. This looks pretty rough since I didn’t have a mini screwdriver to install my stretch needle. When you sew jersey be sure you stretch it out as you’re sewing it so there is give to the seams.

Sew along the sleeves and sides of onesie using a half-inch salvage.

Turn right-side out and turn under the bottom crotch flap of the front twice over. This will add extra thickness to better stabilize the velcro. Pin and sew in place.

Next, turn up the bottom crotch flap of the back, but just once over. You want the back flap to be about two inches longer than the front flap once the edges are turned under. Pin and sew in place.

I chose to use three squares of velcro, but a strip would work also. Sew the softer side of the velcro to the wrong side of the back flap. Sew the rougher strip of velcro to the RIGHT SIDE of the front flap.

And there ya have it — a make-your-own onesie. This would be a fun project if you had a sports team T-shirt or a TUXEDO T-shirt, which is the reason I wanted to try this out. Stay tuned for my tuxedo onesie in the next couple of weeks.

And, as always, please contact me if part of this tutorial isn’t clear.

Heart Garland

My little sister’s best friend had to move away from home for medical reasons so I thought I might send her some cheer for her new temporary home.

I found a great pattern for crocheted hearts here. I only ended up doing the first two rows and they worked for me just fine. They went by so fast that I didn’t even realize how many I had made by the time the TV show I was watching was over.

Hopefully this garland isn’t too granny-ish for her, but I almost wanted to leave them up at my house. I can always make more!

Quick and Healthy Mini Pizzas

I’ve been trying to think of healthy dinners for my pregnant self. Whole grains and protein are essential for a healthy pregnant diet. Also, I really like pizza. While perusing the grocery store this evening, I came across Oroweat Sandwich Thins.

Mini pizza instantly came to mind. Mozzarella has protein and calcium and the thin breads are whole wheat. Hello, healthy pizza!

This recipe is pretty much a no-brainer. It would be a fun idea if you have kids because picky eaters could pick the toppings they prefer.

Ingredients:
Oroweat Sandwich Thins
Marinara sauce
Shredded mozzarella cheese
Pizza toppings of your choice (I used one mushroom, sliced, and five olives, sliced)

Turn on your toaster oven to bake at 450 degrees. You could also heat up your oven to this temp, but the toaster oven is really convenient if you’re only making one serving, plus you can conveniently through the window.

Spread the marinara on the open faces of the Sandwich Thins. Sprinkle lightly with mozzarella. Add your toppings.

Place in oven till cheese is melted and starting to brown on edges, about 7 minutes.

Enjoy!

Baby Bok Choy Stir Fry with Tofu Steaks

My mom dropped off some baby bok choy yesterday. I’ve never cooked with it before, so I thought I’d make something healthy for dinner.

My husband wants to start the South Beach Diet and I’ve been researching recipes to make for him. I found a yummy-sounding recipe for baked tofu steaks and I thought that would go great alongside some sort of Asian-style bok choy.

Here’s the recipe for the tofu, from a really informative cooking site http://www.kalynskitchen.com.

And here’s how I prepared the baby bok choy. All liquid measurements are approximate as I eyeball pretty much everything.

Ingredients:

6-8 baby bok choys, cut in half lengthwise
1 Tbs vegetable oil
1 tsp hot sesame oil
3 cloves garlic, roughly chopped
2 green onions, sliced
1/2 cup chicken stock
2 Tbs. low-sodium soy sauce
1 Tbs. rice wine vinegar
2 packages of top ramen, spice packets discarded
sesame seeds

When there’s about 10 minutes left on the tofu steaks (they take about an hour), bring a medium pot of water to a boil. Meanwhile, heat oils in a large frying pan over medium-high heat. Toss in the garlic and begin to brown it. A couple of minutes later add the green onions. When the garlic is lightly brown, add the chicken stock, soy sauce and vinegar. Then add the bok choy, turn the heat to high, and cover the pan for about 6 minutes.

When the water is boiling, add the two noodle packets and cook for about three minutes, or until al dente. Drain the noodles and add to the bok choy. Add more stock if you want a little more liquid. Toss all of the ingredients together and fry until bok choy is tender, just a couple of more minutes.

Serve with tofu steaks and sprinkle with sesame seeds.

Free knitting patterns, DIY crafts, easy recipes and more!