Category Archives: Sewing

Springtime Headband with Tutorial

The apparel store I work at always gets fun headbands in this time of year. They are simple construction with bright, pretty fabrics, but they always cost way more than I’m willing to pay. Eighteen dollars? I could just make the same thing with materials I already have at home. That’s free!

Here’s step-by-step instructions on how to make your very own springtime headband. Enjoy!

Materials:
A piece of cotton, 18 in. x 4 in.
5-inch piece of 1/2-in. thick elastic

Directions:
1. Cut your fabric to a dimension you prefer. I wanted about a two-inch thick headband, so I cut my fabric to be 4 inches wide (it’s a little narrower than two inches because of the seam allowance). You also might have a different sized head from mine, so you could always measure the circumference of your head and subtract four inches.

2. Sew your fabric together on the long edge, right sides together. I use a very small seam allowance. I line the fabric up with the edge of the foot. You are essentially making an inside-out tube. Turn your tube right-side out and iron flat with the seam going up the middle. This will be the inside part of your headband.

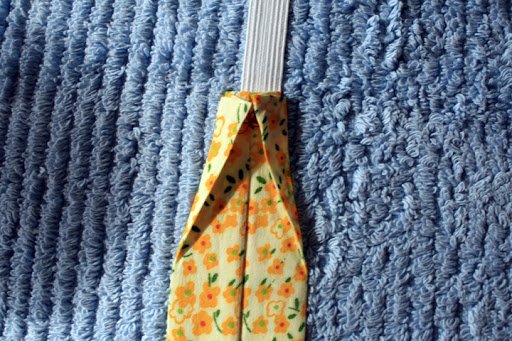
3. Iron the edges in on each side of the strip so that no raw edges show.

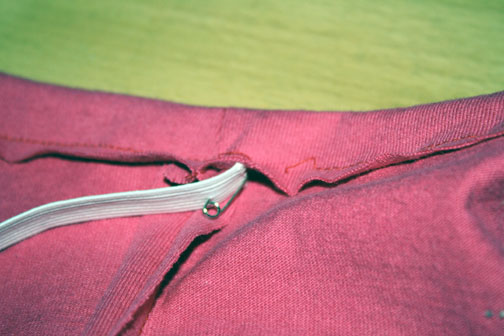
4. Place the edge of the elastic inside one of the ends of the fabric strip so about 1/2 inch of the elastic is inside. Sew in place using a zig-zag stitch.

5. Iron in the corners of the same side of the strip so it makes a tapered edge. Zig-zag stitch the folds in place.

6. Now place the headband around your head and figure out how much elastic you will need to make it comfortable. Once you’ve figured that out, repeat steps 4 and 5 on the other edge.

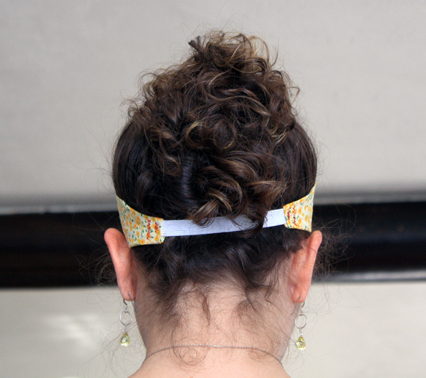
Presto! I think I’m gonna whip out several of these for my friends.

T-shirt Baby Pants Tutorial

I woke up at 7 this morning and couldn’t get T-shirt baby pants off of my mind. So I made some T-shirt baby pants. And here is a step-by-step guide so you can make them too. This pattern includes a reverse applique heart. You can leave it out if you like, but it adds a little flair to these cute little pants.

First, download the pants pattern from Make-baby-stuff.com. I made the 0-3 mos. pattern.

Materials:
One large T-shirt with no seams on the sides
One extra shirt of contrasting color (for reverse applique)
About a foot of 1/2-inch wide elastic
Sewing machine
Stretchy material needle (this will make everything MUCH easier)
Straight pins
One safety pin
Chalk or washable fabric marking pen
Fabric scissors

Directions:
Lay out your T-shirt flat and trace your pattern on either side.

Make sure the pattern’s leg holes are flush with the bottom of the shirt. This will make it so you don’t have to hem the pants. Be sure the bottom hem lines up on both sides before cutting.

Next, cut a shape from a piece of paper. I made a heart about three inches tall. Cut a piece of fabric from the contrasting shirt that’s an inch bigger than the shape on all sides.

Next, trace the shape onto the pant leg using chalk or washable fabric pen. I put mine on the front panel (there is no front and back to each leg, so it doesn’t matter which side.) Pin the contrasting piece behind where you want the shape to be, on the wrong side of the fabric.

Sew along the trace marks and backstitch just slightly so it doesn’t unravel. Carefully pull the two fabrics apart and cut away the main color so the contrasting color shows. Trim to your liking.

As you can see, I could have placed the heart farther down, but oh well. It was my first try!

Now you’re going to sew the inseams of each leg. That’s the straight edge you cut from the pattern. We’ll worry about the curved edge in the next step. Make sure you sew the legs with the right sides together.

Here’s the fun trick of this pattern — Take one leg and turn it right side out. Slip this leg inside the other leg (which is still inside out) and pin the curved edges together.

Pin the curved edge so that the seams you just made match up in the middle on both sides. This is the front and back crotch seams. You’re going to just sew along the curved edge. You may want to sew another stitch to reinforce this seam.  After you sew the crotch, take the inside leg out. Your pants should now be inside out. If one leg is right side out and the other is inside out, you didn’t make sure the right sides of the legs were together when you sewed the crotch.

Next step (no photo since it’s easy), turn down the waistband about an inch and sew all the way around the waist, leaving a 1-inch hole in the back (the opposite side from the heart shape) so you can thread the elastic.

Attach a safety pin to the end of the elastic and feed it through the channel you just made.

Make the elastic as tight as you see fit (I honestly don’t know baby waist sizes. I just judged it by how it looked). And zig-zag stitch the elastic together, trimming the excess elastic.

Sew up the 1-inch hole, making sure to back stitch. Turn your pants right side out and TA-DA!

Pants!

Old T-shirt becomes baby pants!

I’ve been trying to think of things to make my best friend for her soon-to-be baby. I found a web site called www.make-baby-stuff.com that has a printable pattern for sewing baby pants.

Making pants is actually quite easy. You only need to cut out one piece for the pattern and with the right technique you can literally sew four seams and you have pants.

I decided to try and make some out of an old Patagonia t-shirt of my husband’s. I forgot to take a “before” photo, but here’s the “after”:

By using the hem of the t-shirt for the bottom of the pants, I didn’t have to hem them up. I made sure to use a needle that’s best for stretchy material and be sure to stretch the fabric a bit as you sew, that way the seams won’t bust when you stretch the pants later on. I added a ruffle made from the hem of the sleeves. I’m happy about this first try! I think I’ll go to the thrift store right now and find some good T-shirts to cut up.

Semi-Homemade Skirt and Tank Top

Yesterday as I was rifling through the crafts section at a thrift shop, I came across a piece of pretty red fabric for 50 cents. When I got home I realized it was the beginning of a skirt that someone had never finished. Plus, it had pockets. The pockets were what made me want to finish the skirt. It was already hemmed, but hadn’t been gathered at the top. Also, there was no waistband. So I took to the internets to find a suitable online pattern. I came across the Alice Dress. It seemed simple enough and I have an old H&M tank top with a hole in it, so why not put them together?
Here was my basic idea:

The skirt was too long for my liking, so sadly enough I had to trim the beautiful hand-hem job, but luckily it left me with enough fabric to create a waistband. First I hemmed up the skirt just by doing a basic stitch. It’s visible on the outside, but I don’t mind it. Then I basted the top of the skirt and created gathers like so:

When it was gathered to my liking (and I was still able to slip it over my hips), I secured the gather with one more stitch all the way around. After cutting a 3-inch waistband from the hem I sewed it to the top of the skirt, flipped it around, and sewed the band to the inside, creating a 3/4-inch waistband. I left part of the waistband open so I could push elastic through it. When the elastic was tight enough for my waist, I sewed it up and voila! A nearly perfect skirt — with pockets!

I was going to sew the tank top to the skirt, but then I decided not to because I may want to wear the skirt with other tops. I did take inspiration from the Alice Dress and I made ruffles out of the bottom of the tank. It was a long tank so I trimmed off the bottom 3 inches and hemmed the raw edge of the tank. With the 3-inch strip I basted the raw edge, made two ruffles and secured them to the collar of the tank. The other edge of the ruffles were already hemmed since that edge was originally the bottom of the tank. It was really easy. I need to do this more often. I felt like the craftiest person.

Here’s me out on the town with my new outfit:

I am SO ready for mexio — my homemade swimsuit

I’m a knitter, not a sewer. Sewing frustrates me. Bobbins, pins, cutting, cutting, cutting….sigh. I wanted a two-piece bathing suit for Mexico, but I don’t have the right proportions for the cute bikinis at Target and Old Navy. It’s frustrating. So I decided to sew myself a swimsuit. Finding a good pattern wasn’t easy. Jo-Anne’s only had three patterns in all of their books. Two were triangle tops, not supportive enough, so I went with the third — a conservative two-piece with a built-in shelf bra.

I only had one meltdown, thanks to my patient husband.

The pattern is Butterick #B4526. I haven’t sewn from a pattern in years, so I forgot sizing is wonky with patterns. I bought the smaller size, but I didn’t want to drive back to the store so I just went for it. It turned out really well:

Felt Owl Ornaments

My friend Rosey is a lover of all things owl and it has definitely rubbed off on me. We made a bunch of felt owls for a Christmas bazaar last month. Although I don’t have photos of hers, which were undeniably cute, here are some of mine I didn’t sell. Notice there is one cat ornament.

And one unstuffed owl: