Category Archives: Knitting

Ice Cream Sundae Hat — Free Pattern

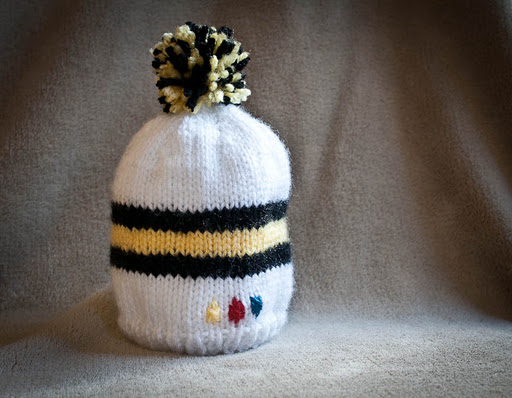
During my bedtime Pinterest bingeing (I like to call it “pingeing”) I came across a lovely knitted hat from muitaihania.blogspot.dk/

I don’t know Finnish, but I’m pretty sure the blogger didn’t post a pattern for it. *Correction: after 30 seconds of browsing the site, I did find the pattern. Oh well!

So here’s my version. It’s called the Ice Cream Sundae Hat and it’s lovely. I made it up as I went along and the pattern is simple enough that I don’t think I need to provide a chart as long as you follow the instructions.
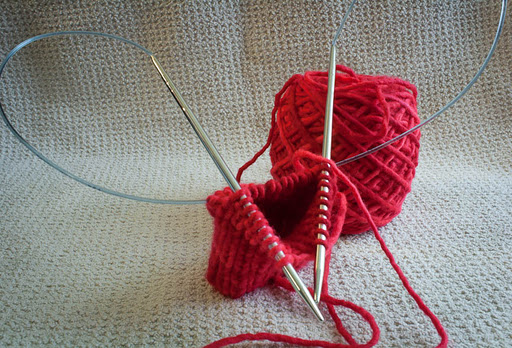
Materials:

3 colors of bulky yarn such as Lamb’s Pride Bulky, (Color A, Color B, and Color C)

Size 9 circular needles

Size 9 double-pointed needles

darning needle

pom-pom maker or giant fork

Abbreviations:

K = knit

P = purl

k2tog = Knit two stitches together

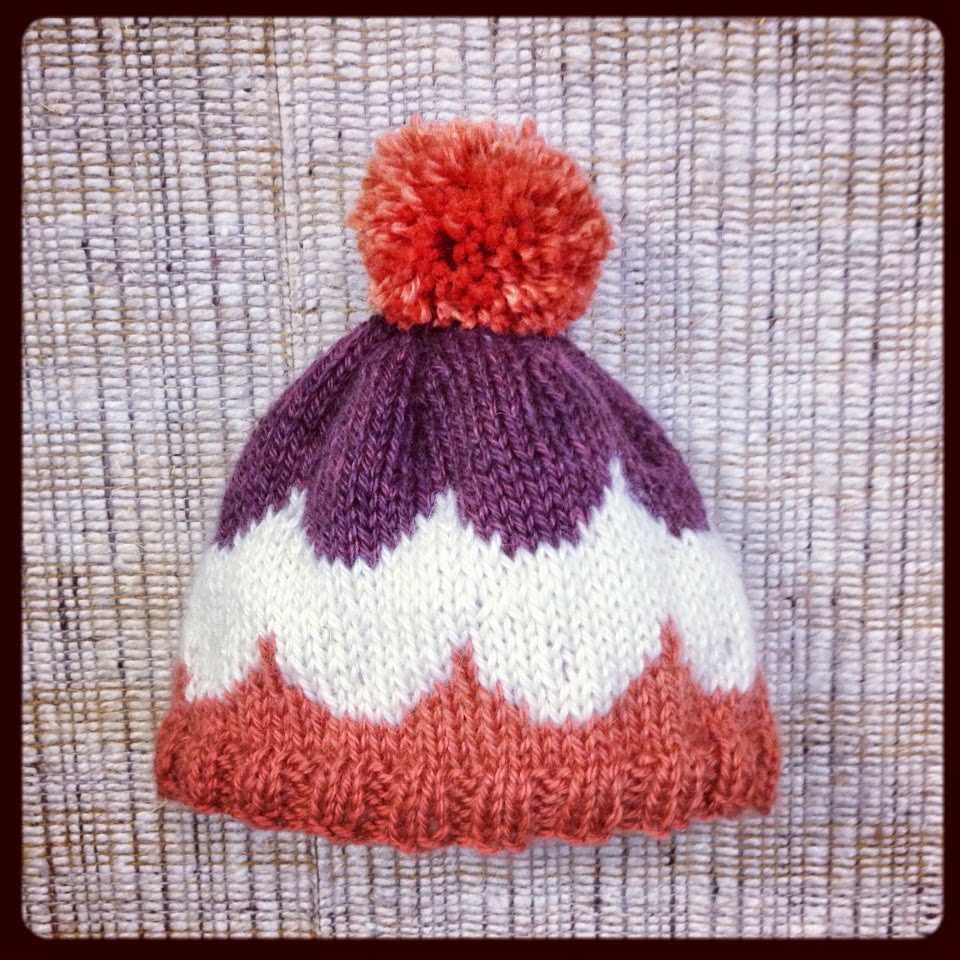
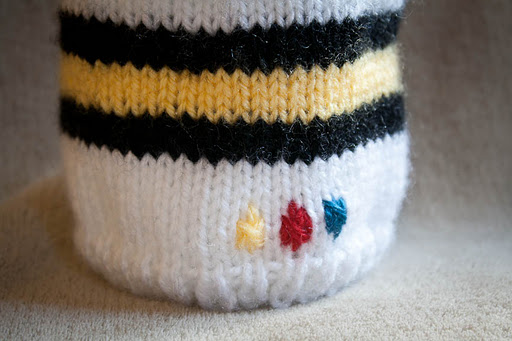
Special notes: You’ll be knitting a basic fair isle pattern, so carry the unworked yarn across the back of the stitches you’re working, being VERY CAREFUL not to pull the unworked yarn too tightly. Your hat will shrink significantly in diameter if you don’t pay attention to the unworked yarn. I intentionally made my pattern bigger than my normal hats to account for my habit of pulling too tightly.

On your circular needle, cast on 80 stitches with Color A. Place marker on needle. Knit into the first stitch, being careful the stitches aren’t twisted. K2, P2 for five rounds. Knit 3 rounds regularly.

Round 9: With Color A, Knit 3 stitches. *With Color B, knit 4 stitches. With Color A, knit 6 stitches.* Repeat ** till end of round (you’ll end by knitting 3 stitches with color A).

Round 10: With Color A, Knit 2 stitches. *With Color B, knit 6 stitches. With Color A, knit 4 stitches.* Repeat ** till end of round, ending with 2 stitches of Color A.

Round 11: With Color A, Knit 1 stitch. *With Color B, knit 8 stitches. With Color A, knit 2 stitches.* Repeat ** till end of round, ending with 1 stitch of Color A.

Rounds 12 & 13: With Color A, knit 1 stitch. *With Color B, knit 9 stitches. With Color A, knit 1 stitch.* Repeat ** till end of round. Cut Color A leaving a six-inch tail.

Knit 5 rounds with Color B.

Repeat rounds 9-13 with Colors B & C.

Knit 6 rounds with Color C.

Decrease as follows:

Round 1: Knit two together, knit 6. Repeat for one round.

Round 2 (and all even rounds): Knit

Round 3: K2tog, K 5 for one round

Round 5: K2tog, K 4 for one round (this is where you should probably switch to the double points).

Round 7: K2tog, K 3

Round 9: K2tog, K 2

Round 11: K2tog, K 1

Round 12: K2tog

Cut yarn leaving a 12-inch tail. Gather remaining stitches with a darning needle and fasten off. Weave in all tails.
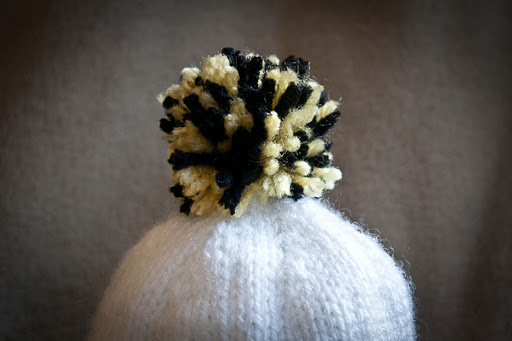
For the pom pom:

I recommend a pom pom maker, which you can buy for about $6 at any big-box crafts store. Another super technique I found on Pinterest, where you use a serving fork. It’s pretty great if you’re feeling lazy.

Secure your pom pom to the hat using yarn and a darning needle. Run the yarn through the pom pom a couple of times and tie on the inside of the hat. I always try and leave a little length in case the pom pom loosens so I can easily refasten it.

Thanks again to Muita Ihania for the pretty design.

Please contact me if there are any errors in the pattern. I’ve already given the hat away so I wasn’t able to look at it as I was writing the pattern.

Simple Knitted Boot Cuffs

Don’t know how much Game of Thrones you’ve been watching, but Winter is Coming.

That means scarves and coats and mittens and boots! Knitting season is officially on so why not start off with a super simple project to give your new fall outfits a little more refinement?

Simple Knitted Boot Cuffs from Alaska Knit Nat

These boot cuffs can be made in just a couple of hours. Nothing fancy, but they are the perfect touch for those cute brown boots you’ve been waiting all summer to wear. You won’t have to worry about bulky wool socks and hot feet when your boot cuffs are peeking out.

Here’s what you need:

Bulky yarn — less than one skein
Size 10, 16-inch circular needle
Darning needle

Simple Knitted Boot Cuffs from Alaska Knit Nat

Cast on 48 stitches on your circular needle. Join the round, making sure not to twist the row.

K2, P2 around.

Repeat for 20 rounds.

Loosely cast off. Weave in ends.

Repeat for other cuff.

Wear as is or decorate with a cute button.

Easy as pie! Cute as cake?

Simple Knitted Boot Cuffs from Alaska Knit Nat

Jazz Baby Hat

My friend Blaze is about two weeks ahead of me in her pregnancy. She had a boy last year she named Lyric and she’s getting ready to have a girl whom she is calling Jazz. Can you guess she’s a singer? 

With a name like Jazz I thought I should knit her a baby hat with some real flair. None of this pale pink stuff — I’ve got to go purple and red!

And I’ve finally learned to crochet a flower. This was the original reason I taught myself to crochet and that was almost two years ago. I now have the skills to make one without referring to a pattern. I will try to write out how I made it.


Materials:
Worsted weight yarn (I used Vanna White yarn)
Size 8 double point needles (or a really long circular if you know the Magic Loop method)
Size H crochet hook (it could be smaller, but I only have two sizes)
Darning needle

Directions for hat:
Cast on 64 stitches. K1, p1 ribbing for 5 rounds
Knit in stockinette stitch for 25 more rounds, or till piece is about 4 inches tall.
Decrease as follows: *K2tog, k6*, repeat till end of round.
K 1 round
*K2tog, k5*, repeat till end of round.
K 1 round
*K2tog, k4*, repeat till end of round.
K 1 round 
*K2tog, k3*, repeat till end of round.
K 1 round
*K2tog, k2*, repeat till end of round.
K 1 round
*K2tog, k1*, repeat till end of round.
*K2tog*, repeat till end of round.

 
Cut yarn leaving a 12-inch tail. Weave ends through remaining eight loops using a darning needle. Weave in end yarn.
 
Crochet flower: 
I apologize for my poor pattern writing skills. I hope you are able to figure it out! Maybe tomorrow when I have daylight again I’ll take step-by-step photos.
 
Abbreviations:
SC = single crochet
HDC = half double crochet
DC = double crochet
Round 1: Make a magic ring and SC 10 stitches into ring. Join with slip stitch to first SC. 
Round 2: Chain 5, skip a stitch, slip into next stitch. Repeat four more times and join to first SC again. You should have five loopy things.
Round 3: SC once into first loopy area, then 2HDC, 1DC, 2HDC and 1 SC into same loopy area. Repeat with four remaining loops. Join to original SC.
Round 4: Skip one stitch from the first round and slip stitch into the stitches between the ones you single chained in round 2. Chain 8, skip stitch, slip into next stitch, chain 8, skip stitch, continue around till you have five new loopy things. Join with first slip stitch you made in this round.
Round 5: 2SC into first loopy, 2HDC, 3DC, 2HDC, 2SC into same loopy thing. Repeat with the remaining four loopy things. Cut yarn leaving a ten-inch tail and draw through the last loop. Weave in ends to back of flower. 
Using a darning needle sew the flower in place.


Chunky Braided Winter Headband

Last year I posted a pattern for a braided winter headband. After making one for myself, my mom and my little sister I soon realized it was the most popular knitted item I’ve ever created. The problem is, I’m really lazy and unless I’m determined, I really hate making these headbands. It’s simple, any beginner knitter could do it, but it takes too long and I lose interest.

I decided to try the pattern on larger needles with thicker yarn. Turns out I actually prefer the pattern this way. It goes by much more quickly and the texture stands out more strongly.

I’m still pretty lazy and can’t get myself to produce enough to sell, but I thought I might as well post my pattern so I don’t forget how I made it (hence the whole reason I started this blog in the first place).

If these instructions aren’t clear enough, you can always look at my other pattern for a slightly different explanation.

If you’re wanting to knit this pattern with a different needle size and different weight yarn, I am unable to adjust the pattern for you. This pattern is written for a specific needle size and yarn weight.

Materials:
2 skeins of worsted weight yarn (you’ll be knitting them together) OR one skein of bulky yarn
size 10 double point needles
darning needle
three attractive buttons
needle and thread
straight pins

Directions:
Using two double point needles, cast on 24 stitches. Knit in seed stich (also called moss stitch) till piece measures 12 inches. I always slip the first stitch of each row to keep the edge even.

*Next row: seed stitch the first 8 stitches onto an empty double pointed needle. Work back and forth on this “leg” for 12 inches.
Next row: k2tog, seed st. 3 stitches, k2tog
Next row: K2tog, k2tog
Bind off next row*

Repeat * for each of the two remaining “legs” of the headband.

Finishing:
Weave in the first tail of yarn.

Braid the three “legs” of the headband till there’s about 2 inches left at the ends. Pin the three ends to the beginning of the piece, creating the headband shape. Make sure the ends overlap the beginning of the piece so there’s a good amount of space for the size of your buttons.

Pin the braid in place. With the darning needle, secure each end in place using the tails from the “legs.”
Turn headband inside out. With needle and thread, whipstitch parts of the braid so the “legs” are secure and don’t move or twist apart when stretched.

Sew on your buttons.

Orange Sherbet Scarf

Last winter I got a tad obsessed with Pickles’ pattern for a Simple Luxury Scarf. I made about three of them and then started on another but didn’t get around to finishing it till this winter.  It was the first one where I used totally different colors in the main yarn and the mohair. I used Cascade Yarn Cherub Aran and Cascade mohair.

Blue Starlight Sideways Scarf

I’ve been admiring a scarf we sell at work, the Zumi scarf by Prana.

I like how it’s make the long way instead of the short way, how most scarves are made.

I figured it would be easy enough to make and it surely was. It was a great winter Sunday project.

Materials:
One ball of soft worsted weight single-ply yarn. I used Universal Yarn Classic Shades in the blue.
One ball of mohair in a similar color. I used some donated yarn that had silver glitter thread in it.
A really long size 13 circular needle
A size J crochet hook

Directions:
Loosely CO 150 stitches. Knit in garter stitch till work is 4-6.5 inches long, whichever you prefer. Loosely bind off.
For the tassels: Using the crochet hook, single chain four pieces of cord 12 inches long. Tie knots at the ends of each cord. Loop two to each end of the scarf.

Cheery Winter Set Patterns

If you’re wanting to knit this pattern with a different needle size and different weight yarn, I am unable to adjust the pattern for you. This pattern is written for a specific needle size and yarn weight.
These items were made with heavy worsted hand-dyed single-ply yarn.
The hat is a simple pattern. Seventy-two stitches on size 9 circular needles. K1, P1 rib for six or so rows and knit in st st for 7 inches. Decrease as follows:
Place marker. *K2tog, K 6*, repeat to end of round
Knit one round
*K2tog, K5*, repeat to end of round
Knit one round
*K2tog, K4*, knit to end of round
Knit one round
*K2tog, K3*, repeat to end of round
Knit one round
*K2tog, K2*, knit to end of round
Knit one round
*K2tog, K1*, knit to end of round
*K2tog*, repeat to end of round
Draw loops together and weave in ends. Add awesome pom-pom.
Click here for the ascot pattern

For the mittens I used the Magic Loop method of knitting. It really made the project go by fast. If you don’t have any really long size 7 circular needles, then just use double points. For the cuff, use size 5, but don’t forget to switch out. I had to undo half a mitten when I realized it was coming out smaller having forgotten to change to size 7.

CO 36 stitches on smaller needles. K1, P1 rib for 28 rows or until preferred length. M1 stitch four times evenly over the next row (40 st).
Change to bigger needles and other color if making bi-colored mitts. Knit 6 rounds even.
Thumb gusset:
Round 1: M1, K1, M1, knit to end of round
Round 2 and all even rounds: Knit
Round 3: M1, K3, M1, knit to end of round
Round 5: M1, K5, M1, knit to end of round
Round 7: M1, K7, M1, knit to end of round
Round 9: M1, K9, M1, knit to end of round
Round 11: M1, K11, M1, knit to end of round
Round 13: M1, K13, M1, knit to end of round
Knit 5 rounds
Thumb hole: Place the first 15 stitches onto a stitch holder or scrap piece of chunky yarn. CO one stitch and knit to end of round (40 st).
Knit in st st till the piece is 1/2 inch shorter than the top of your middle finger.
First decrease round: *K2, K2tog* repeat to end of round
K 2 rounds
Second decrease round: *K2tog, K1* repeat to end of round
K 1 round
Third decrease round: *K2tog*, repeat to end of round
Repeat the last round or you should have about 12 stitches.
Use the Kitchener stitch or just draw up the stitches and weave in ends.
For the thumb:
Place the 15 stitches onto two double points or on your long circular if doing magic loop.
Pick up and knit four stitches, knit to end of round.
On next round, decrease two stitches evenly.
Knit 4 rounds
Next round: K2tog, knit to end of round. You should have 16 stitches, but it’s ok if you don’t.
Knit in st st till it’s as long as your thumb.
Decrease round: *K2tog* till end of round. Draw up yarn and weave in all ends.

Now make one more so you have two mittens to warm both hands!

To make a lining:

Trace the outline of the mitten to a pice of flannel doubled over. Add two inches to the tracing and cut out. Sew double seams all around the flannel mitten. You must make sure you can easily put on the flannel mitten, especially in the wrist area. I had to try a couple of times to get a good fit. Make two and hand sew into the mitten inside-out because that way the raw seams will not be on the inside of the lining.

New Mittens

Last May I went to New York City and finally got to use the gift certificate my little sister got me for Christmas at Purl Soho, the cheeriest yarn shop ever. Since then I’ve been dying to use some of the yarn I bought there, so I finally decided to make some new mittens. These are made out of Manos de Uruguay yarn. I don’t know what brand the red is anymore, but the pink is actually called “cheek.”
I used my basic mitten pattern, but instead of drawing up the top of the mitten like I do a hat, I used the Kitchener stitch to make it seamless.
Then I added a crocheted ruffle trim, which was a first for me. Another first was I lined these mittens with red flannel. I’m glad it was fabric I acquired from a thrift store, because it took me several tries to make a lining that fit properly.
So now I have some delightful mittens to match my hat and ascot, which I will post photos of later.
Happy Thanksgiving and I’ll write from Mexico!
-Nat

Magic Loop

Dear Fellow Knitters,
If ever you find yourself knitting mittens, socks or booties, I highly recommend using the Magic Loop Method.

It eliminates unwieldy double pointed needles, knitting becomes quicker and you don’t have any pesky “ladders” as a result of improper tension between needles.

It takes some finesse to figure it out at first, but once you understand how to Magic Loop knit, it goes by quickly.

Here is a great video tutorial:

Now I’ve got to finish my second mitten. I already finished the first one I started this morning. Can’t wait to show y’all!

-Nat

The Tiniest Steelers Fan!

My friend Laura had her son five weeks early. A few days after he was born she asked me if I would make him a Steelers hat (even though I know she’s a Colts fan, but I guess he’s daddy’s boy in the sports department).

I made the little guy the littlest hat. I couldn’t imagine this hat fitting a person, but it looks like it fits him just fine and with lots of room to grow.

I made the hat using the magic loop method because it was so small that I would have had to use double points from the get-go. A normal circular needle would have been too long. Magic loop uses an extra long circular needle and you work half the stitches at a time while the other half rests on the bendy part of the circular. This sounds confusing, but once you get the hang of it it can be much faster than using double points. Just remember, every knitting technique I know I’ve had to learn backwards since I’m left handed, so if I can do it, you can do it!

Preemie Steelers Hat

Materials:

Worsted baby yarn in yellow, black and white
At least a 32-inch long size 8 circular needle or one set of size 8 double points
Tapestry needle

Directions:

Cast on 56 stitches of the white yarn either using the magic loop method or divided onto three double pointed needles.
Join your work, making sure the yarn isn’t twisted. Place a marker if needed.
k1, p1 rib for five rounds.
Knit eight rounds in stockinette stitch. Switch to black. Knit three rounds. Switch to yellow. Knit four rounds. Switch to black and knit three rounds. Switch back to white and knit eight rounds.
Decrease as follows:
At stitch marker, *k2tog, k6* Repeat * till end of round
K one round
*K2tog, k5*, repeat * till end of round
K one round
*K2tog, k4*, repeat * till end of round
K one round
*K2tog, k 3*, repeat * till end of round
K one round
*K2tog, k 2*, repeat * till end of round
K one round
*K2tog, k1*, repeat * till end of round
*K2tog*, repeat * till end of round.
Cut yarn leaving an 8-inch tail. Using a darning needle, weave in all ends.

For pom-pom:
Using something small, like a matchbook, wrap yarn around and around a ton of times. Remove the matchbook and tie a 12-inch piece of yarn around the middle of the yarn loops. Cut the loops. Trim pom pom to preferred size.