Category Archives: Cooking

How to Make Salmon Caviar

Last month I posted a short recipe for salmon caviar, or roe. In the past week we’ve had record salmon numbers run through the Kenai River. You couldn’t pass a person in the grocery store without hearing the word “salmon” escape his lips. I had coworkers whose fishing group caught 160 reds in two days. My friend’s family caught 60. Basically, if you had a dipnet and you dipped it in the Kenai River Friday, Saturday or Sunday, you’re probably patting your belly because it is full of grilled salmon right now.

In the spirit of all things salmon, I thought I’d post a more detailed tutorial on how to process and then eat salmon roe. So now when your friends go fishing you can have them save their roe when they are gutting and then you’ll reap all the benefits — all the tasty, tasty benefits. And it’s nutritious too!

Thanks Todd and Josh!

What you’ll need:

  • A piece of 1/4-inch wire mesh grate
  • Lots of salmon eggs
  • A carton of kosher salt
  • Cold water
  • Large mesh strainer
  • One gallon freezer Ziploc bag
  • Rubber spatula
  • Non-aluminum mixing spoon
  • Small mesh strainer
  • Two large bowls
  • One small bowl

Directions:
Place a large bowl in the sink and put the wire mesh over the bowl. Start pushing the eggs through the mesh. This will help separate the membrane from the eggs. You’ll smash some of the eggs, but it’s not a big deal. When you’ve pushed the eggs through as best you can, pick up the membrane and scrape off as many eggs as you’re able. Discard the membrane into a small bowl.

When you’ve pushed all of the eggs through the wire, use a rubber spatula to scrape off the eggs from underneath the mesh. Set the mesh aside for cleaning.

Now fill the other large bowl with very cold water. Add a ton of salt so that there is still salt visible on the spoon when you stir it. This is a basic brine.

Carefully pour the eggs into the brine and stir. Let them sit for 10 minutes, stirring occasionally. Put a spoonful of eggs into a small strainer and rinse them off with cold water. Taste them. If they don’t taste salty enough, let the eggs brine for a few minutes longer until they are salty to your taste. If they are too salty you’ll have to soak the eggs in plain cold water till they become less salty.

When the eggs are to your liking, pour them into a large mesh strainer and run cold water over them for a couple of minutes, while stirring. You want to remove the salt water as best you can without overflowing the roe.

Be sure to wear your amethyst tennis bracelet while preparing this delicacy

Once the roe is rinsed, place the strainer in a large bowl. Make sure the bottom of the strainer doesn’t touch the bottom of the bowl by inverting a small saucer or plate in the bowl. You don’t want the roe to soak in the water. Rather, you want the water to strain out of the roe.

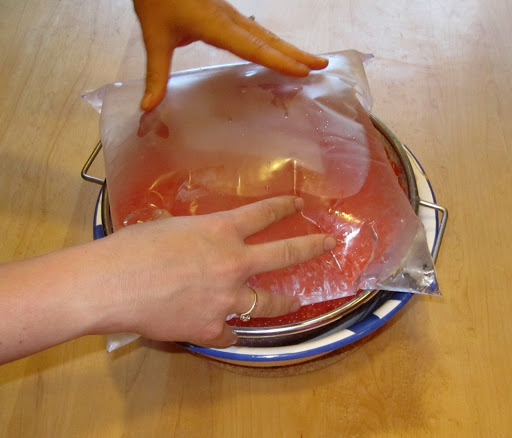
Fill a gallon bag with water and seal it up. Place the bag on top of the roe, which is in the strainer, which is in the bowl. Place in fridge overnight or for 12 hours. This will remove excess liquid and compress the roe, which means tastier roe!

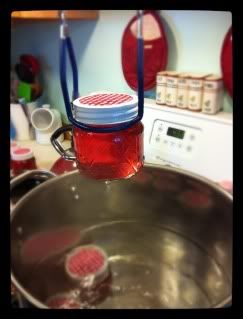
When the roe is ready, place it in small jars with wide mouths.

Wide mouths mean easy roe access

Ta-da! 

From here you can distribute your roe to all of your gourmand friends. It will keep in the fridge for three days, but really, you shouldn’t be storing this stuff. You should be stuffing this stuff into your mouth as fast as possible because it’s so delicious.

In case you have a surplus of prepared salmon caviar (my parents will be processing 40 pounds of it this weekend) the best thing to do is to vacuum pack the jars themselves. Your caviar can keep for a few weeks if vacuum sealed.

Before vacuum packing, poke a couple of holes in the tops of the jars. This will get the air out of the jars while in the vacuum packer.

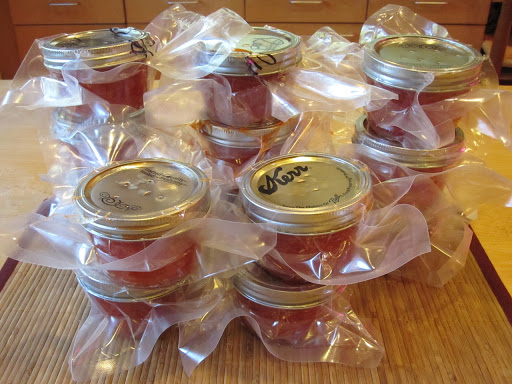
Store your roe in the back of the fridge where it’s coldest. Eat your caviar with Carr’s crackers and white wine.

Officially YUM. For more caviar answers and insights, I recommend this site. For a more detailed tutorial, click here.

Homemade French Fries

Our wedding anniversary is coming up so I forced Stephen to bust out last year’s gift from me to him: our deep fryer. I mean, who actually uses a deep fryer? It is somewhat a waste of space, but we have a lot of cabinets. Even though it was only the third time we’ve used it and the oil reeked of falafel, we ended up with some tasty fries:

I made sure to soak them in super cold water and to dry them off as best I could before dunking them. 

Nom Nom Popcorn

My friend Ashley spent all last week raving about her incredible maple cayenne popcorn. She gave me the recipe she used from December’s Cooking Light Magazine. I’m not one for carmel corn, but holy moly was Ashley right. It’s sweet, salty and just the right amount of spicy. This popcorn deserves some kind of professional Nom Nom Award. First prize!

Ingredients:
1 tablespoon cooking oil
1/4 cup unpopped popcorn
1/4 cup cashews
1/3 cup sugar
1/3 cup maple syrup
1 tablespoon butter
1/2 teaspoon salt
1/4 teaspoon cayenne powder

Heat oil in a large saucepan. Add the popcorn, cover and shake till kernels are popped. Stir in the cashews. Meanwhile, add the sugar, syrup, butter, salt and cayenne to a small saucepan and bring to a boil. Cook for one minute, stirring frequently. Pour syrup over popcorn and cashews and stir. Spread out on a parchment-lined cookie sheet and let cool at least 3 minutes. I stirred the mixture around on the cookie sheet to combine everything better.

Chow down!

Grilled Pepper Steak with Salt Baked Potato and Baby Greens

I am currently lying on my couch completely full and satisfied. I have finally learned how to grill a steak! Tonight I grilled steak and made salt-encrusted baked potatoes (fully loaded with homegrown chives) and I even was able to serve a small salad with greens from our very own garden! Here’s what I made and how I made it:

Ingredients:
2 thick steaks (I got the pre-peppered kind from the store)
2 baking potatoes
Baby salad greens
white of one egg
kosher salt
pepper
olive oil
1/4 lemon
2 strips of bacon
pickled jalapeños
shredded cheddar cheese
chives or green onions
sour cream
butter

Directions:
Preheat oven to 425 degrees. Poke your potatoes all over with a fork. Coat them with egg white and cover them all over with kosher salt. Place in a baking pan and bake for one hour. Meanwhile, chop up your bacon and fry over medium-low heat until crispy. Drain on a paper towel.

When there is 20 minutes left on the potatoes, heat up your grill so it’s around 600 degrees, or super hot. When there is 10 minutes left on the potatoes, put the meat on the grill. Grill four minutes on each side, then remove from grill and cover with foil.

When the potatoes are done cut a slit down the middle and puff them up using potholders. Add the butter, cheese, jalapeños, bacon bits, sour cream and top with chives.

Drizzle your greens with olive oil and then squeeze a wedge of lemon over them. Sprinkle with salt and pepper.

Serve with a glass of Mariette Old Vine Red and then go into a meat coma.

Rose Blossom Jelly

It’s summertime in Alaska and the wild roses are in full bloom. Last week my friend Kelly and I tried to make dandelion jelly and we added some wild roses on a whim. Unfortunately we didn’t follow the pectin directions so we ended up with dandelion syrup.
We weren’t discouraged and we tried again, but this time we just used rose blossoms. What we came up with was a delicate, sweet, fragrant treat that we can’t wait to spread on toast for the rest of the year.
Here’s how we made it.
Ingredients:
1 quart tightly packed wild roses, free of pesticides
4 Tbs. freshly squeezed lemon juice
4 cups water
1/4 cup edible rose water (found at specialty grocery stores)
7 cups sugar
1/2 tsp. butter
2 packets liquid pectin
1-2 drops red food coloring (optional)

Directions:

Pick the entire bud of each rose. Try to pick buds that are free of bugs. Rinse roses and remove any dirt. Reserve 8 whole buds for garnishing. Place roses in a saucepan with the water and rose water. Bring to a rolling boil then remove from heat and let sit for 10 minutes.
Meanwhile, bring a gigantic stockpot of water to a boil. This is for the sealing process.
Strain the rose liquid into a quart-sized measuring cup using a wire mesh strainer. Press the flowers with a wooden spoon to get out as much liquid as possible. Stir in the food coloring. Measure exactly 3.5 cups of the liquid and pour back into saucepan. Stir in the lemon juice, butter and sugar and bring mixture to a rolling boil, stirring frequently.
Once liquid is at a rolling boil that doesn’t stop bubbling if stirred, quickly stir in the pectin packets. Return to a full boil for exactly one minute, stirring constantly.
Remove from heat and quickly ladle liquid into jars, leaving 1/8-inch space from the top. Wipe the rims and threads with a damp cloth to remove excess liquid. Lightly set a rosebud on the jelly before sealing. Make sure the jar tops are totally dry. Seal the jars tightly.
Place the jars in the giant pot of boiling water and boil for five minutes. Remove jars and set them on a kitchen towel. Let cool unrefrigerated for 24 hours. Jars will keep for one year if sealed and three weeks once opened.

Short Cut, Long Cut Chicken Noodle

I call it short cut because we don’t make the broth ourselves and we use leftover Costco roast chicken. I call it long cut because we make our own noodles from scratch.

Ingredients:
6 cups of chicken broth or stock
2 cups water
cooking oil
1/2 onion, coarsely chopped
2 carrots, chopped
2 celery stalks, chopped
1 next-day roast chicken
salt and pepper to taste

For the pasta:
2 cups white flour, plus extra
1 tbs. warm water
3 eggs
pinch of salt

Directions:
Place the flour and salt in a mixing bowl and make a well in the middle. Add the water and eggs and beat with a fork. Slowly incorporate the flour till you have a dough. Mix in as much flour as you can while kneading. Your dough should be elastic but not sticky. Cover the ball of dough and set aside.

Meanwhile, add the onion, celery and carrot to a large saucepan and drizzle in some cooking oil. Cook over med-high heat, stirring occasionally, till onions are translucent — about 10 minutes.
While veggies cook, salvage as much chicken meat from your leftover roast chicken. Don’t forget about the meat on the bottom of the bird.

Add the broth, water and chicken. Salt and pepper to taste. Bring to a simmer and turn heat to med-low.

Now roll out the pasta with your pasta maker. Run a lemon-sized piece of dough through the largest setting. Fold it in half and flour the outsides if it’s sticky. Run through again. Do this about eight times on the biggest setting. Change to the next setting and run dough through once. Do this till you get to the “6” setting. Lay dough on a floured surface.

Do this step again with lemon-sized pieces of dough until it’s all pressed out. Dust noodles with flour and loosely roll up each one. Slice into wide noodles, then determine how long you want the noodles to be and cut to your preferred length.

When all the noodles are cut, add them to the soup. Turn heat to high and return to a boil. Cook for about 5 minutes or until noodles are al dente. They will cook more as the soup cools.

Enjoy!

Italian Cheeseburgers with Homemade Pasta and Cheese

I’m back from New York with a rekindled enthusiasm for home cookin’. Not only did I eat at a lot of delicious New York restaurants, I also cooked several meals for my family, including pork chops with an improvised honey vinaigrette reduction and chicken cacciatore.

Also, my best friend Kelly just moved home and this was our first full day of hanging out in seven months. After we planted flowers and gardened outside, we decided to make a homemade Italian meal. For inspiration, we turned to the famous Marcella Hazan and her Classic Italian Cooking book.

We made her Italian hamburger recipe and paired it with her homemade macaroni instructions. The burgers were so juicy and flavorful, the lack of bun was completely forgotten, although you do need a knife and fork to easily eat it.

Making our own macaroni was truly satisfying and with two people working it went by more quickly than expected. We spent about an hour preparing the meal.

Serves 6

Ingredients for the burgers:
1/4 cup vegetable oil
1.5 pounds ground beef
1 piece of white bread
3 tbs milk
1 tsp. salt
3/4 cups breadcrumbs
one ball fresh mozzarella cheese
one can of whole peeled tomatoes

Ingredients for the pasta and cheese:
2.25 cups white flour
3 eggs
2 tbs water
1 cup finely grated cheddar cheese
2 tbs. milk
1 tbs. butter
salt and pepper

Directions:
Preheat oven to 400 degrees F. To make the pasta dough, put flour in a bowl and make a well in the middle. Whisk the eggs and add them to the well. With a fork incorporate the eggs with the flour. When it’s getting doughy, use your hands to knead it. If it’s too dry, add a bit of water. Use the pasta press on the biggest setting to knead the dough after this. Fold the dough in half before running it through. Do this eight times. Then make the setting thinner and run dough through once. Do this till the dough goes through the “6” setting.

Lay the dough strip on a cutting board and cut it into 1.5-inch squares. A good measure is your index finger at the middle knuckle to the tip of the finger.

Now comes the fun part. Use a clean large comb and place a pasta square on top of it with the top corner facing perpendicular to the teeth of the comb. Place a wooden chopstick on the bottom corner of the square and roll the dough onto the chopstick, while lightly pressing onto the comb. This will make a penne pasta shape with grooves. It’s really satisfying! Place each piece of pasta onto a floured baking sheet.

Bring a large pot of salted water to a boil. Meanwhile, place the 3 tablespoons of milk in a bowl. Cut off the crusts of the bread and add the bread to the milk. Let it soak up all the milk and then mash it up with a fork. Place the ground beef in a bowl and add the milk bread, salt and one egg. Mix thoroughly with your hands and form into 6 thick patties.

Pour the bread crumbs into a pie plate and coat each side of the burger with the crumbs. I used Italian bread crumbs for extra pizzazz.

Heat a large skillet with the vegetable oil over high heat. When the oil is shimmering hot, add the patties and cook four minutes on each side. Turn down the heat if it looks like it’s burning. Place patties in a greased casserole dish.

Open and drain the can of tomatoes. Flatten open each tomato and remove the seeds. Pat dry with a paper towel. Slice the mozzarella into six thick slices. Top each patty with a tomato and a slice of mozzarella.

Bake for 12-15 minutes, depending on how you prefer the doneness of your  burger.

Meanwhile, add the pasta to the boiling water. Stir occasionally and when the pasta water has returned to a boil, just cook it for 30 seconds more. Test for doneness. It should have a bite to it, but not feel too undercooked.

Drain and place pasta in a serving bowl. Add the 2 tablespoons milk and 1 tablespoon butter and stir. Stir in the cheese and salt and pepper to taste.

Baked Mac & Cheese

In case you don’t know this, my all-time favorite food is homemade mac & cheese. As a kid my dad would make “manyghetti,” which was all the leftover pastas in the cupboard mixed together with sharp cheddar, garlic, parsley and pepper. My dad would cube up the cheddar so every once in a while you’d get a nugget of melty cheese in a bite.

My dad never baked his mac & cheese. He never put egg in it. And he never topped it with potato chips.

This is what I was craving tonight.

So I didn’t feel too guilty I used pasta infused with veggies and added some broccoli.

Here’s how to make it.

Ingredients:
1 box of veggie delite pasta (or whatever kind you want to use. This box was 13 oz.)
1/2 bag frozen chopped broccoli
2.5 cups sharp cheddar, shredded
2 green onions, chopped
2 Tbs. butter
1 egg
3/4 cups milk
1 tsp. dijon mustard
salt and pepper
cheddar and sour cream potato chips (or just regular potato chips)

Directions:
Preheat oven to 375 degrees. Grease an 8-inch square casserole dish. Salt a large pot of water and bring it to a boil. Cook the pasta till it’s al dente. Whisk the egg and milk together. Place the frozen broccoli in a colander in the sink. Drain the pasta over the broccoli. Put the pot back on the stove and melt the butter. Add the green onions and sautee for about 1 minute. Add the pasta and broccoli and pour in the egg milk mixture and dijon. Mix well. Season with salt and pepper. Add 2/3 of the shredded cheese and stir. Pour everything into the casserole dish and top with shredded cheese. Crumble potato chips over everything and bake for 20 minutes.

Not-so-bad-for-you Creamy Potato Salad

It’s BBQ season and you know what that means — salads of all types. I’m not wild about macaroni salad or pre-dressed asian salad. I’m not even that crazy for potato salad. Usually it’s heavy with mayonnaise and overcooked eggs. But substitute Fage fat free plain yogurt for most of the mayo and you’ve got something worth adding to your paper plate.

Serves a lot
Ingredients:
3 lbs. thin-skinned purple potatoes, roughly cubed
6 slices of bacon
3 Tbs. capers
3/4 cup Fage fat free plain yogurt (or any plain Greek yogurt)
1/4 cup light mayonnaise
1 Tbs. dijon
1 Tbs. apple cider vinegar
juice of 1/2 lemon (optional)
salt and pepper to taste

Place the cubed potatoes in a large pot and fill with water an inch above the potatoes. Add some salt, cover and bring to a boil. Boil for 8 minutes, or until potatoes are tender but not mushy. Drain and place in a large serving bowl. Cover with a clean kitchen towel for 30 minutes or so.
Meanwhile, chop up the bacon into little bits and fry until brown and crispy. Let drain on a paper towel.
Add all of the ingredients to the potatoes. Salt and pepper to taste.

Cooking with Fireweed

It’s just starting to be spring here in Alaska and that means the fireweed has started to come up. The small reddish shoots are edible, but I’d never actually tried eating them till this week.

My mom and I went on a fireweed hunt and came back with quite a harvest.

We decided to prepare them as I did the fiddlehead ferns. We blanched them in boiling water for 3 minutes, put them in an ice bath and then sauteed them in garlic olive oil and pine nuts. They were pretty good! Not as tasty as the fiddleheads, but definitely worth the effort.

When picking fireweed shoots, try and get as much of the stem as possible, as that’s the tastiest part. I would strip off any big leaves as they tend to be bitter. The bigger the plant the more bitter it tastes, so try and pick ones that haven’t really grown a lot. Here’s a photo.

We rinsed the shoots in cold water and dried them in a salad spinner. We also tossed some into a chicken stir fry. It was a good way to bulk up the stir fry. They looked a little stringy and not too appetizing, but they offered good sustenance.