Category Archives: Italian

Pesto Chicken Lasagna Roll-ups

I’m in love with the lasagna roll-up. It’s simple, it’s customizable and it’s delicious. I also love pesto. So it only makes sense to combine my two loves to create something super amazing tasty.

Pesto Chicken Lasagna Roll-ups
Chicken pesto roll-ups!

They were indeed super amazing tasty, but they were more like stuffed shells than lasagna. They weren’t as gooey and cheesy. I would consider using cottage cheese next time or adding some milk to the filling.

Ingredients (I eyeballed everything):
Lasagna noodles
1 chicken breast, cooked and shredded
1/2 cup pesto sauce (Costco has the best store-bought kind, but nothing beats homemade)
1 egg
1/2 cup shredded parmesan cheese plus 1/4 cup for topping
1/4 cup shredded mozzarella
1/2 cup cream cheese, softened
salt and pepper

Directions:
Preheat oven to 350. Grease a casserole dish. Boil a large pot of salted water and cook noodles according to box directions.
Meanwhile, mix together all the rest of the ingredients. Lay the cooked noodles out on your counter and spread some of the filling on each noodle. Roll up the noodle and place it seam side down in the casserole dish. When all the filling is used up, top the roll-ups with cheese and bake for 30 minutes.

Yum!

White Bean Salad with Basil and Heirloom Tomatoes

On my way into work yesterday morning I stopped by the local fancy grocery store for a microwave burrito. I didn’t have time to make lunch and with our tight budget I really can’t afford to buy scrumptious lunches. At the checkout lane was a special on heirloom tomatoes — you know the ones, mutant and delicious looking that Martha Stewart and Food Network chefs go ga-ga for? I’ve never been able to afford them since they are usually about $6 a pound up here in Alaska, but for some reason they were only $1.99 a pound yesterday. I went ga-ga!

I’m not used to cooking with fresh tomatoes. Good fresh tomatoes are pretty much non existent up here unless you’re willing to pay the big bucks in the summer for home grown. So when I brought home these funny tomatoes I wasn’t sure what to do with them.

I had to sleep on it, and this morning it was clear: bean salad. It’s a great lunch food because it requires no reheating and can sit at room temp for a while and still be good. In fact, it’ll probably be better since it’ll soak in the flavors of the seasonings.

 Ingredients:

1 can canellini beans, drained but not rinsed

1 medium ripe tomato, cubed

1/2 cup fresh basil, chopped

1/4 cup feta cheese, crumbled

1 tsp. dried parsley

1/2 tsp. dried oregano

1/4 tsp. garlic powder

salt and pepper to taste

2 Tbs. olive oil

2 tsp. baslamic vinegar


Directions:

Combine all the ingredients, wait till lunchtime to eat. Easy!

Quick and Healthy Mini Pizzas

I’ve been trying to think of healthy dinners for my pregnant self. Whole grains and protein are essential for a healthy pregnant diet. Also, I really like pizza. While perusing the grocery store this evening, I came across Oroweat Sandwich Thins.

Mini pizza instantly came to mind. Mozzarella has protein and calcium and the thin breads are whole wheat. Hello, healthy pizza!

This recipe is pretty much a no-brainer. It would be a fun idea if you have kids because picky eaters could pick the toppings they prefer.

Ingredients:
Oroweat Sandwich Thins
Marinara sauce
Shredded mozzarella cheese
Pizza toppings of your choice (I used one mushroom, sliced, and five olives, sliced)

Turn on your toaster oven to bake at 450 degrees. You could also heat up your oven to this temp, but the toaster oven is really convenient if you’re only making one serving, plus you can conveniently through the window.

Spread the marinara on the open faces of the Sandwich Thins. Sprinkle lightly with mozzarella. Add your toppings.

Place in oven till cheese is melted and starting to brown on edges, about 7 minutes.

Enjoy!

Homemade Basil Pasta with Cherry Tomatoes and More Basil

My friend Kelly and I wanted to make bruschetta today so we asked my dad if we could raid his homegrown basil. My father doesn’t just have an herb garden by the window. He dedicates two thirds of our dining room table to growing his own basil, oregano, thyme, rosemary and now, hot chile peppers. He uses special hot pink LED grow lights for his little herbal infatuation and what he produces are the bushiest, biggest, almost mutant-like herbs and peppers. His basil is no exception.

When we went up to snag some my dad said “It’s either all or nothing” and forced us to butcher his entire crop. We were left with a conundrum — what the heck do we do with all this basil?

Make green pasta, ff course. And top it with more basil. Double of course!

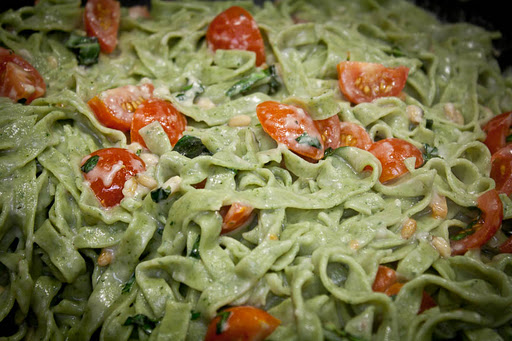
We came up with the brightest green pasta, tossed it with a creamy sauce and then topped it with cherry tomatoes. Amazing!

And here’s how we made it.

Ingredients

For the Pasta:
3 cups flour
3 eggs
3 cups packed basil leaves
1/2 tsp garlic powder
pinch of salt
3 tbs. olive oil
water

For the sauce:
2 Tbs. olive oil
3 Tbs. pine nuts
1 cup cottage cheese
1/2 cup Parmesan
1/2 cup chicken stock
2 Tbs. Wondra flour, or regular flour
salt and pepper
chopped cherry tomatoes
chopped basil

To make the dough:
Add the flour, garlic powder and salt to a food processor and pulse a few times. Add the basil, eggs and oil and start processing. Through the little tube in the top, start slowly pouring in water until a rough ball of dough forms. Turn on to a floured surface and knead for a few minutes, incorporating more flour if it’s too sticky. What you should end up with is a smooth, elastic dough. Place in a bowl and cover with saran wrap for 30 minutes or so.

Set up your pasta roller. If you do not have a roller then this is going to be a long cooking job for you and I recommend putting your dough in the fridge and driving to a store that sells a pasta roller.

Using lemon-sized balls of dough, run it through the largest setting, folding it over itself and adding more flour if necessary. This kneads the dough for you. Make sure the dough isn’t sticky at all during this process. Fold the dough on itself and run it through this setting about seven times. Now start adjusting the rollers thinner and thinner, running the dough through once each time till it’s as thin as you prefer. I like setting 6 on my roller.

Flour each sheet of pasta on both sides and set on a cookie sheet. Repeat with lemon-sized balls of dough till you’ve rolled out all the dough.

Set a large pot of salted water to boil.

In a large saute pan, heat the oil and add the pine nuts, stirring frequently, till they are lightly toasted. Add the chicken stock, cottage cheese, salt and pepper, flour and Parmesan cheese stirring rapidly until it thickens. Turn heat to low.

Meanwhile, run your sheets of pasta through the cutters. I like the fettucini setting because the vermicelli can be stickier sometimes. If your pasta sticks together a little, just separate the noodles when they’ve gone through the cutter and dust with flour. Collect on a tray.

When the water is boiling, add the pasta and stir to make sure noodles don’t stick. Cover the pot till it boils again and then cook the noodles for about 30 seconds. Test a noodle. It should have a bite to it. Before draining the water, reserve about 1/2 cup of the noodle water and add it to the sauce.

Steaming pile of noodle

Drain the noodles and immediately transfer to the saute pan. Turn the heat to med-high and add the tomatoes and chopped basil. Toss till the noodles are well coated and the tomatoes cook a little bit, about 3 minutes.

Enjoy all the hard work you put into making a delicious meal. You deserve it!

Eggplant Parmesan

This recipe is inspired by America’s Test Kitchen, Cooking for Two.
I’ve never been a fan of eggplant, but holy moly, this stuff was GOOD.
Ingredients:
A half batch of Oliver’s Marinara
1 eggplant, about 12 oz.
Four slices of fancy white bread, torn into rough pieces
3/4 cups Parmesan
salt and pepper
3 eggs
1/2 cup flour
1 cup shredded mozzarella
1/2 cup vegetable oil
Directions:
Preheat oven to 425 degrees. Make or heat up the sauce. Slice the eggplant into 1/4-inch slices. Toss the bread into a food processor and pulse till fine crumbs are formed. Toss them into a pie pan and mix with 1/2 cup parmesan, salt and pepper.
Whisk the eggs into a separate pie pan.
Put the flour into a large ziploc and add the eggplant slices. Toss them around in the bag till they are evenly coated with flour. Shake off remaining flour. In batches, coat the slices in the egg and then in the breadcrumbs. Set them on a wire rack on top of a rimmed baking sheet.
Heat the oil in a 12-inch oven-proof pan over med-high heat. Add half of the eggplant slices and brown four minutes on each side, or till golden brown. Set them on the wire rack. After browning the second batch, turn off the heat, discard any excess oil in pan and wipe clean with paper towels. 
Coat the bottom of the pan with one cup of sauce. Place slices in the pan, overlapping one on top of the other from the outside to the inside. Top with another cup of sauce, but do not cover the outer edge of the slices so that these will stay crispy and un-soggy.
Top with remaining parmesan and sprinkle the mozzarella on top.
Place in the oven and bake for about 14 minutes, or until the top is slightly browned. Remove from oven and let sit for five minutes before serving.

Mama Makes Pizza on the Grill

My dad is the main chef in my family. He’ll roast a chicken, toss a carbonara, and braise a pork chop. My mom has her own prize dishes: killer pot roast, sinful sopaipillas, perfect posole and her famous pizza on the grill.


So I welcome my guest blogger — Rachel!


My mom makes pizza the true Italian way — very little cheese and exotic toppings such as porcini mushrooms, kalamata olives and anchovies.


Here’s her recipe for pizza dough. It’s enough for two 10-inch pizzas.


A good pizza dough doesn’t need a lot of yeast, but it should rise for at least three hours (or four or five).  If you don’t have that much time, double the yeast and find a very warm spot to let it rise (I used to put warm water in a sink and put the bowl with the dough into it).

1 cup water
1 tsp. yeast
1 1/2 tsp. salt
2 T. olive oil
3 cups bread flour (not all-purpose)

Or for more dough:


12 oz. water
1 1/2 tsp. yeast
2 1/2 tsp. salt
2 + T. olive oil
4 cups flour.

I don’t measure the yeast, salt or olive oil exactly, it works with more or less.  I put the water in the bowl of my KitchenAid, dissolve the yeast, and then add everything else and let the machine do the kneading with the dough hook.

Oh, one more thing:  up until last week, I always made one ball of dough and divided it into individual balls after rising, before rolling out.  Last week, I divided it into separate balls to rise.  When it came to rolling out the pizzas, the individually risen balls handled much more easily than in the past.


When the pizza dough is done rising, fire up your grill to hot hot hot. Roll out your dough one at a time. Roll it pretty thin — thinner than normal American pizza dough. Coat one side with semolina flour or yellow corn meal. This will keep the dough from sticking to the pizza paddle or cookie sheet. Place your rolled out dough on the pizza paddle or a cookie sheet that doesn’t have sides. Turn down the heat to your grill just a bit. Transfer the dough semolina-side up to the grill. After about a minute, check to see there are good grill marks and then remove from grill. Cover the grill again and heat it to very hot again. Now your grill will act as a super-hot oven.


Set dough on a pizza board or some kind of tray that you can easily slip the pizza off of (semolina side down). Brush with olive oil. Spread on some marinara or pesto sauce. Add toppings such as:


Fontina, parmesan, fresh mozzerella cheese
Kalamata olives
Mushrooms
Italian sausage, already sliced and cooked
Fresh basil or oregano
Roasted garlic


Try not to go overboard with toppings because this might make the pizza too heavy for the grill to support. Gently slide the pizza back onto the grill and cover the grill for several minutes, until the cheese is all melted and everything looks delicious.


Repeat with the other balls of dough.


Enjoy!!


Thanks mom! It’s one of my favorite home dishes. 


Italian Cheeseburgers with Homemade Pasta and Cheese

I’m back from New York with a rekindled enthusiasm for home cookin’. Not only did I eat at a lot of delicious New York restaurants, I also cooked several meals for my family, including pork chops with an improvised honey vinaigrette reduction and chicken cacciatore.

Also, my best friend Kelly just moved home and this was our first full day of hanging out in seven months. After we planted flowers and gardened outside, we decided to make a homemade Italian meal. For inspiration, we turned to the famous Marcella Hazan and her Classic Italian Cooking book.

We made her Italian hamburger recipe and paired it with her homemade macaroni instructions. The burgers were so juicy and flavorful, the lack of bun was completely forgotten, although you do need a knife and fork to easily eat it.

Making our own macaroni was truly satisfying and with two people working it went by more quickly than expected. We spent about an hour preparing the meal.

Serves 6

Ingredients for the burgers:
1/4 cup vegetable oil
1.5 pounds ground beef
1 piece of white bread
3 tbs milk
1 tsp. salt
3/4 cups breadcrumbs
one ball fresh mozzarella cheese
one can of whole peeled tomatoes

Ingredients for the pasta and cheese:
2.25 cups white flour
3 eggs
2 tbs water
1 cup finely grated cheddar cheese
2 tbs. milk
1 tbs. butter
salt and pepper

Directions:
Preheat oven to 400 degrees F. To make the pasta dough, put flour in a bowl and make a well in the middle. Whisk the eggs and add them to the well. With a fork incorporate the eggs with the flour. When it’s getting doughy, use your hands to knead it. If it’s too dry, add a bit of water. Use the pasta press on the biggest setting to knead the dough after this. Fold the dough in half before running it through. Do this eight times. Then make the setting thinner and run dough through once. Do this till the dough goes through the “6” setting.

Lay the dough strip on a cutting board and cut it into 1.5-inch squares. A good measure is your index finger at the middle knuckle to the tip of the finger.

Now comes the fun part. Use a clean large comb and place a pasta square on top of it with the top corner facing perpendicular to the teeth of the comb. Place a wooden chopstick on the bottom corner of the square and roll the dough onto the chopstick, while lightly pressing onto the comb. This will make a penne pasta shape with grooves. It’s really satisfying! Place each piece of pasta onto a floured baking sheet.

Bring a large pot of salted water to a boil. Meanwhile, place the 3 tablespoons of milk in a bowl. Cut off the crusts of the bread and add the bread to the milk. Let it soak up all the milk and then mash it up with a fork. Place the ground beef in a bowl and add the milk bread, salt and one egg. Mix thoroughly with your hands and form into 6 thick patties.

Pour the bread crumbs into a pie plate and coat each side of the burger with the crumbs. I used Italian bread crumbs for extra pizzazz.

Heat a large skillet with the vegetable oil over high heat. When the oil is shimmering hot, add the patties and cook four minutes on each side. Turn down the heat if it looks like it’s burning. Place patties in a greased casserole dish.

Open and drain the can of tomatoes. Flatten open each tomato and remove the seeds. Pat dry with a paper towel. Slice the mozzarella into six thick slices. Top each patty with a tomato and a slice of mozzarella.

Bake for 12-15 minutes, depending on how you prefer the doneness of your  burger.

Meanwhile, add the pasta to the boiling water. Stir occasionally and when the pasta water has returned to a boil, just cook it for 30 seconds more. Test for doneness. It should have a bite to it, but not feel too undercooked.

Drain and place pasta in a serving bowl. Add the 2 tablespoons milk and 1 tablespoon butter and stir. Stir in the cheese and salt and pepper to taste.

Homemade Whole Wheat Pizza

If you have an extra 90 minutes to spare before dinner time, then it’s totally worth your while to make your own pizza dough for many reasons. One, it’s cheaper than store-bought crust. Two, it’s tastier than store-bought crust. Three, it’s not full of any preservatives or weird ingredients. And four, it’s cheaper. I know I mentioned that already, but I thought I’d reiterate.

I find the best way to make pizza dough is in the bread maker. It kneads it for you so there’s no floury, sticky mess for you to clean up later when it’s all crusted over (I’m pretty lazy).

I found a delicious recipe for whole wheat dough at food.com. I don’t think I need to tell you how to make toppings for pizza, but I used my simple marinara sauce recipe and ended up buying a bag of pre-shredded italian blend cheese. I think it has mozzerella, asiago and a couple of other yummy cheeses in it.

The dough is enough for a pizza the size of a large baking sheet. Lunch for two days, hurray!

Dough Ingredients:
1 cup plus 2 Tbs. lukewarm water
2 Tbs. olive oil
1.5 cups all-purpose flour
1.5 cups whole wheat flour
1 tsp. sugar
1 tsp. salt
2.5 tsp. yeast

Directions:
Put ingredients, in order, into your bread machine and press the “dough” button. Let the machine run its cycle, about 90 minutes on my bread machine. During this time you could prepare your marinara sauce and toppings. When the dough is ready, roll it out on a floured table until its the size of a large baking sheet.

Flour a baking sheet and stretch the dough to fit it, trimming any excess. Brush the top side of the dough with olive oil. Cover with plastic wrap and refrigerate for 30 minutes (I don’t know if refrigeration is necessary. I was waiting for a friend to come over before making the pizza. You’re probably fine not refrigerating). Preheat the oven to 400 degrees.

Start prepping your pizza!

Coat pizza in sauce. Top lightly with cheese. Add toppings of your choice. Top with a little more cheese. Cheese goes a long way so you don’t really need to overdo it. Plus, it’s healthier if you go lighter on cheese anyway.

Bake pizza for about 20 minutes or until crust is golden. Remove from oven and cool for 5 minutes before slicing.

Oliver’s Marinara

This simple marinara sauce is the backbone to many of my father’s recipes. He would make a far larger quantity than the recipe I’m providing so he could freeze it and use it anytime. I have fond memories of my dad standing over the stove and instructing me to stir in the corners of the pot so none of the sauce would burn. My sister and I would bring small cups to him, which he’d fill with piping hot sauce, and we’d sip on it like soup.

To this recipe you could add several ingredients. I sometimes saute some chopped onion and mushroom in butter and toss that in. My dad adds reconstituted porcini mushrooms that we pick in summertime. I have porcini powder right now, so I sprinkled about 1/2 teaspoon into the sauce. For a putanesca sauce you could add fried up bits of pancetta and kalamata olives. Add a splash of red wine to give it some depth. Add fresh chopped herbs at the end of cooking such as oregano, basil or thyme.

Ingredients (most are eyeballed):
2 large cans of crushed tomatoes
2 tbs. olive oil
4 cloves of garlic, smashed
1 dried chili pepper, or 1 tsp. dried pepper flakes
2 tsp. dried oregano
2 tbs. dried basil
salt and pepper
1/2 tsp. sugar

Directions:
In a saucepan, heat up olive oil over medium flame. Add the garlic, and cook till golden brown on all sides. Be sure not to burn the garlic. If you do, just start over. Garlic is cheap. Add all of the other ingredients. When sauce is bubbling, turn heat to med-low, cover and cook for at least 30 minutes. Stir frequently so the sauce doesn’t burn. Freeze leftover sauce in jars.

Spicy Ground Pork

Add spicy ground pork to any italian dish or marinara sauce to give it zing!

Ingredients:
1 pound ground pork
1 tsp. garlic salt
1/2 tsp. chili powder
1-2 tsp. cayenne powder (depending on how spicy you want it)
1 tsp. dried pepper flakes
ground pepper to taste

Directions:
Mix together all of the ingredients. Fry up a small sample to taste how spicy it is. Add more cayenne if you want it spicier.